Showing posts with label Hexagon. Show all posts

Wednesday, December 13, 2023

Another Hexagon Ornament

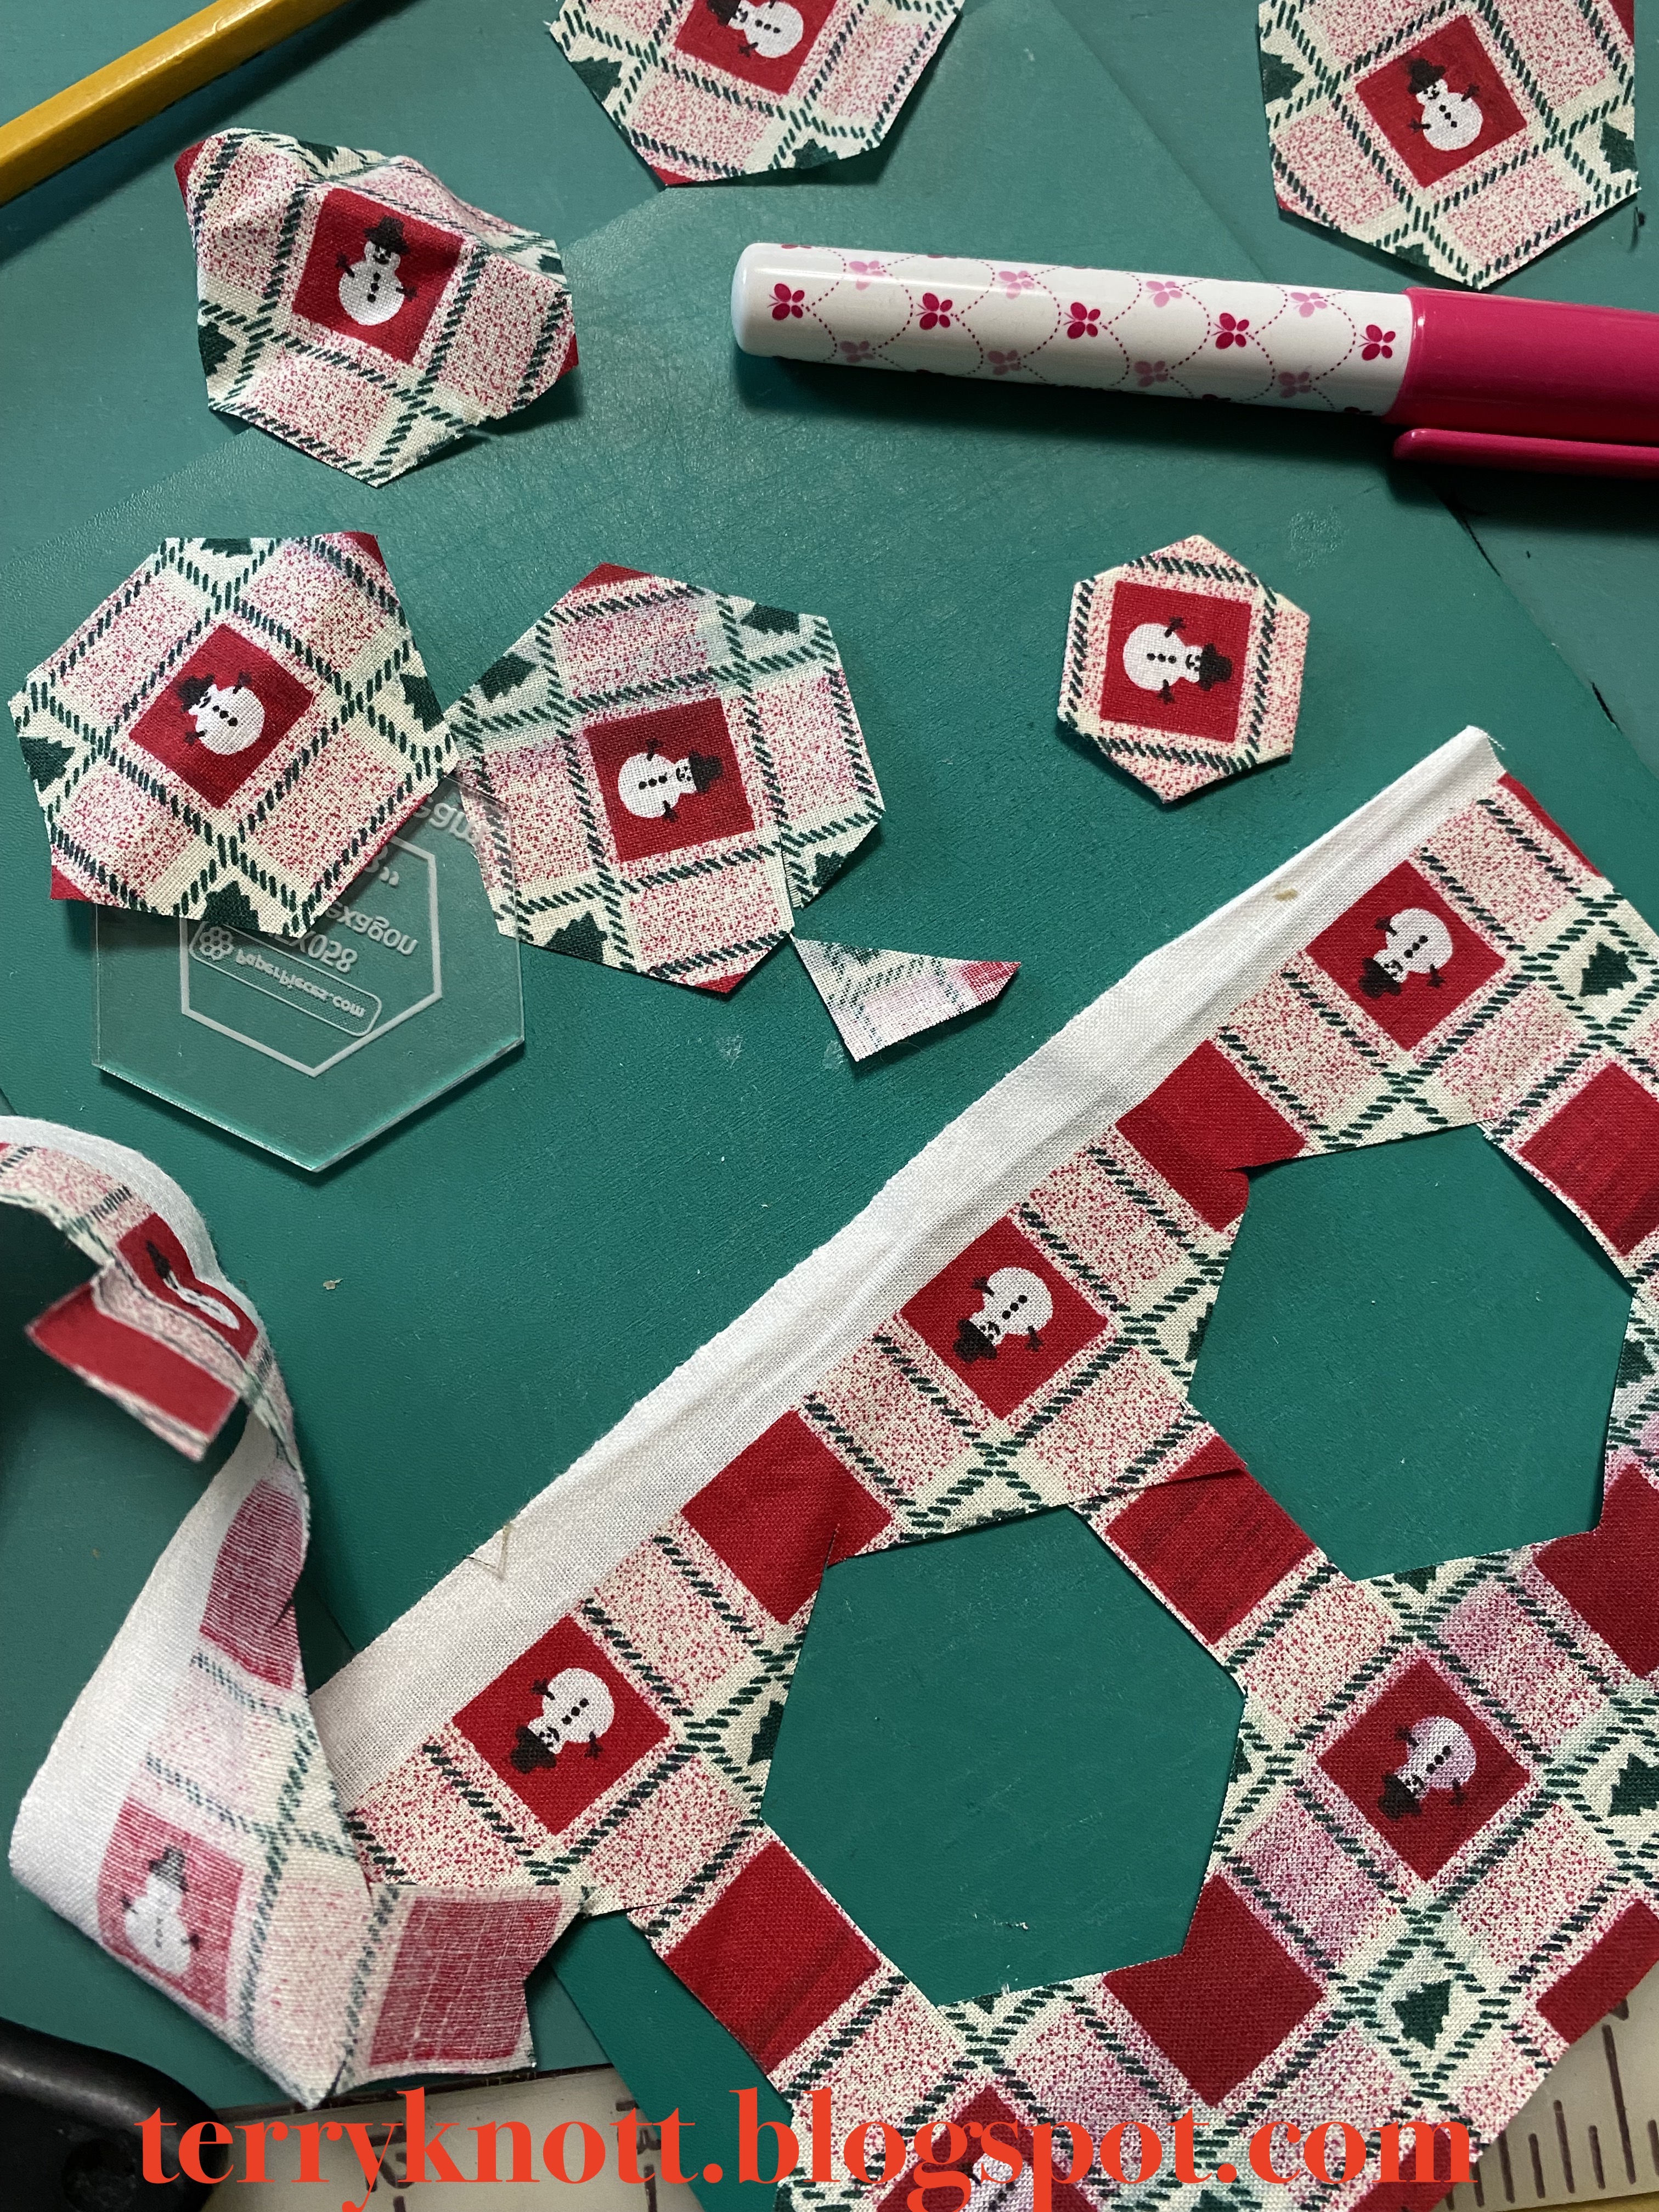
Getting supplies ready for another ornament

Goal number three on my December list was to stitch another hexagon ornament. It takes me a little more than three hours to cut out, baste and stitch one of these ornaments. I now have three of them. When we mailed our cards on Monday, I forgot to add them to the card!

Three total ornaments made

I may wait until next year to deliver them. . .I do plan to make more. . .although, I will wait until after the holiday!

Sunday, March 12, 2023

Hexagon Round Pincushion--post 3

Fabrics and templates ready to glue baste


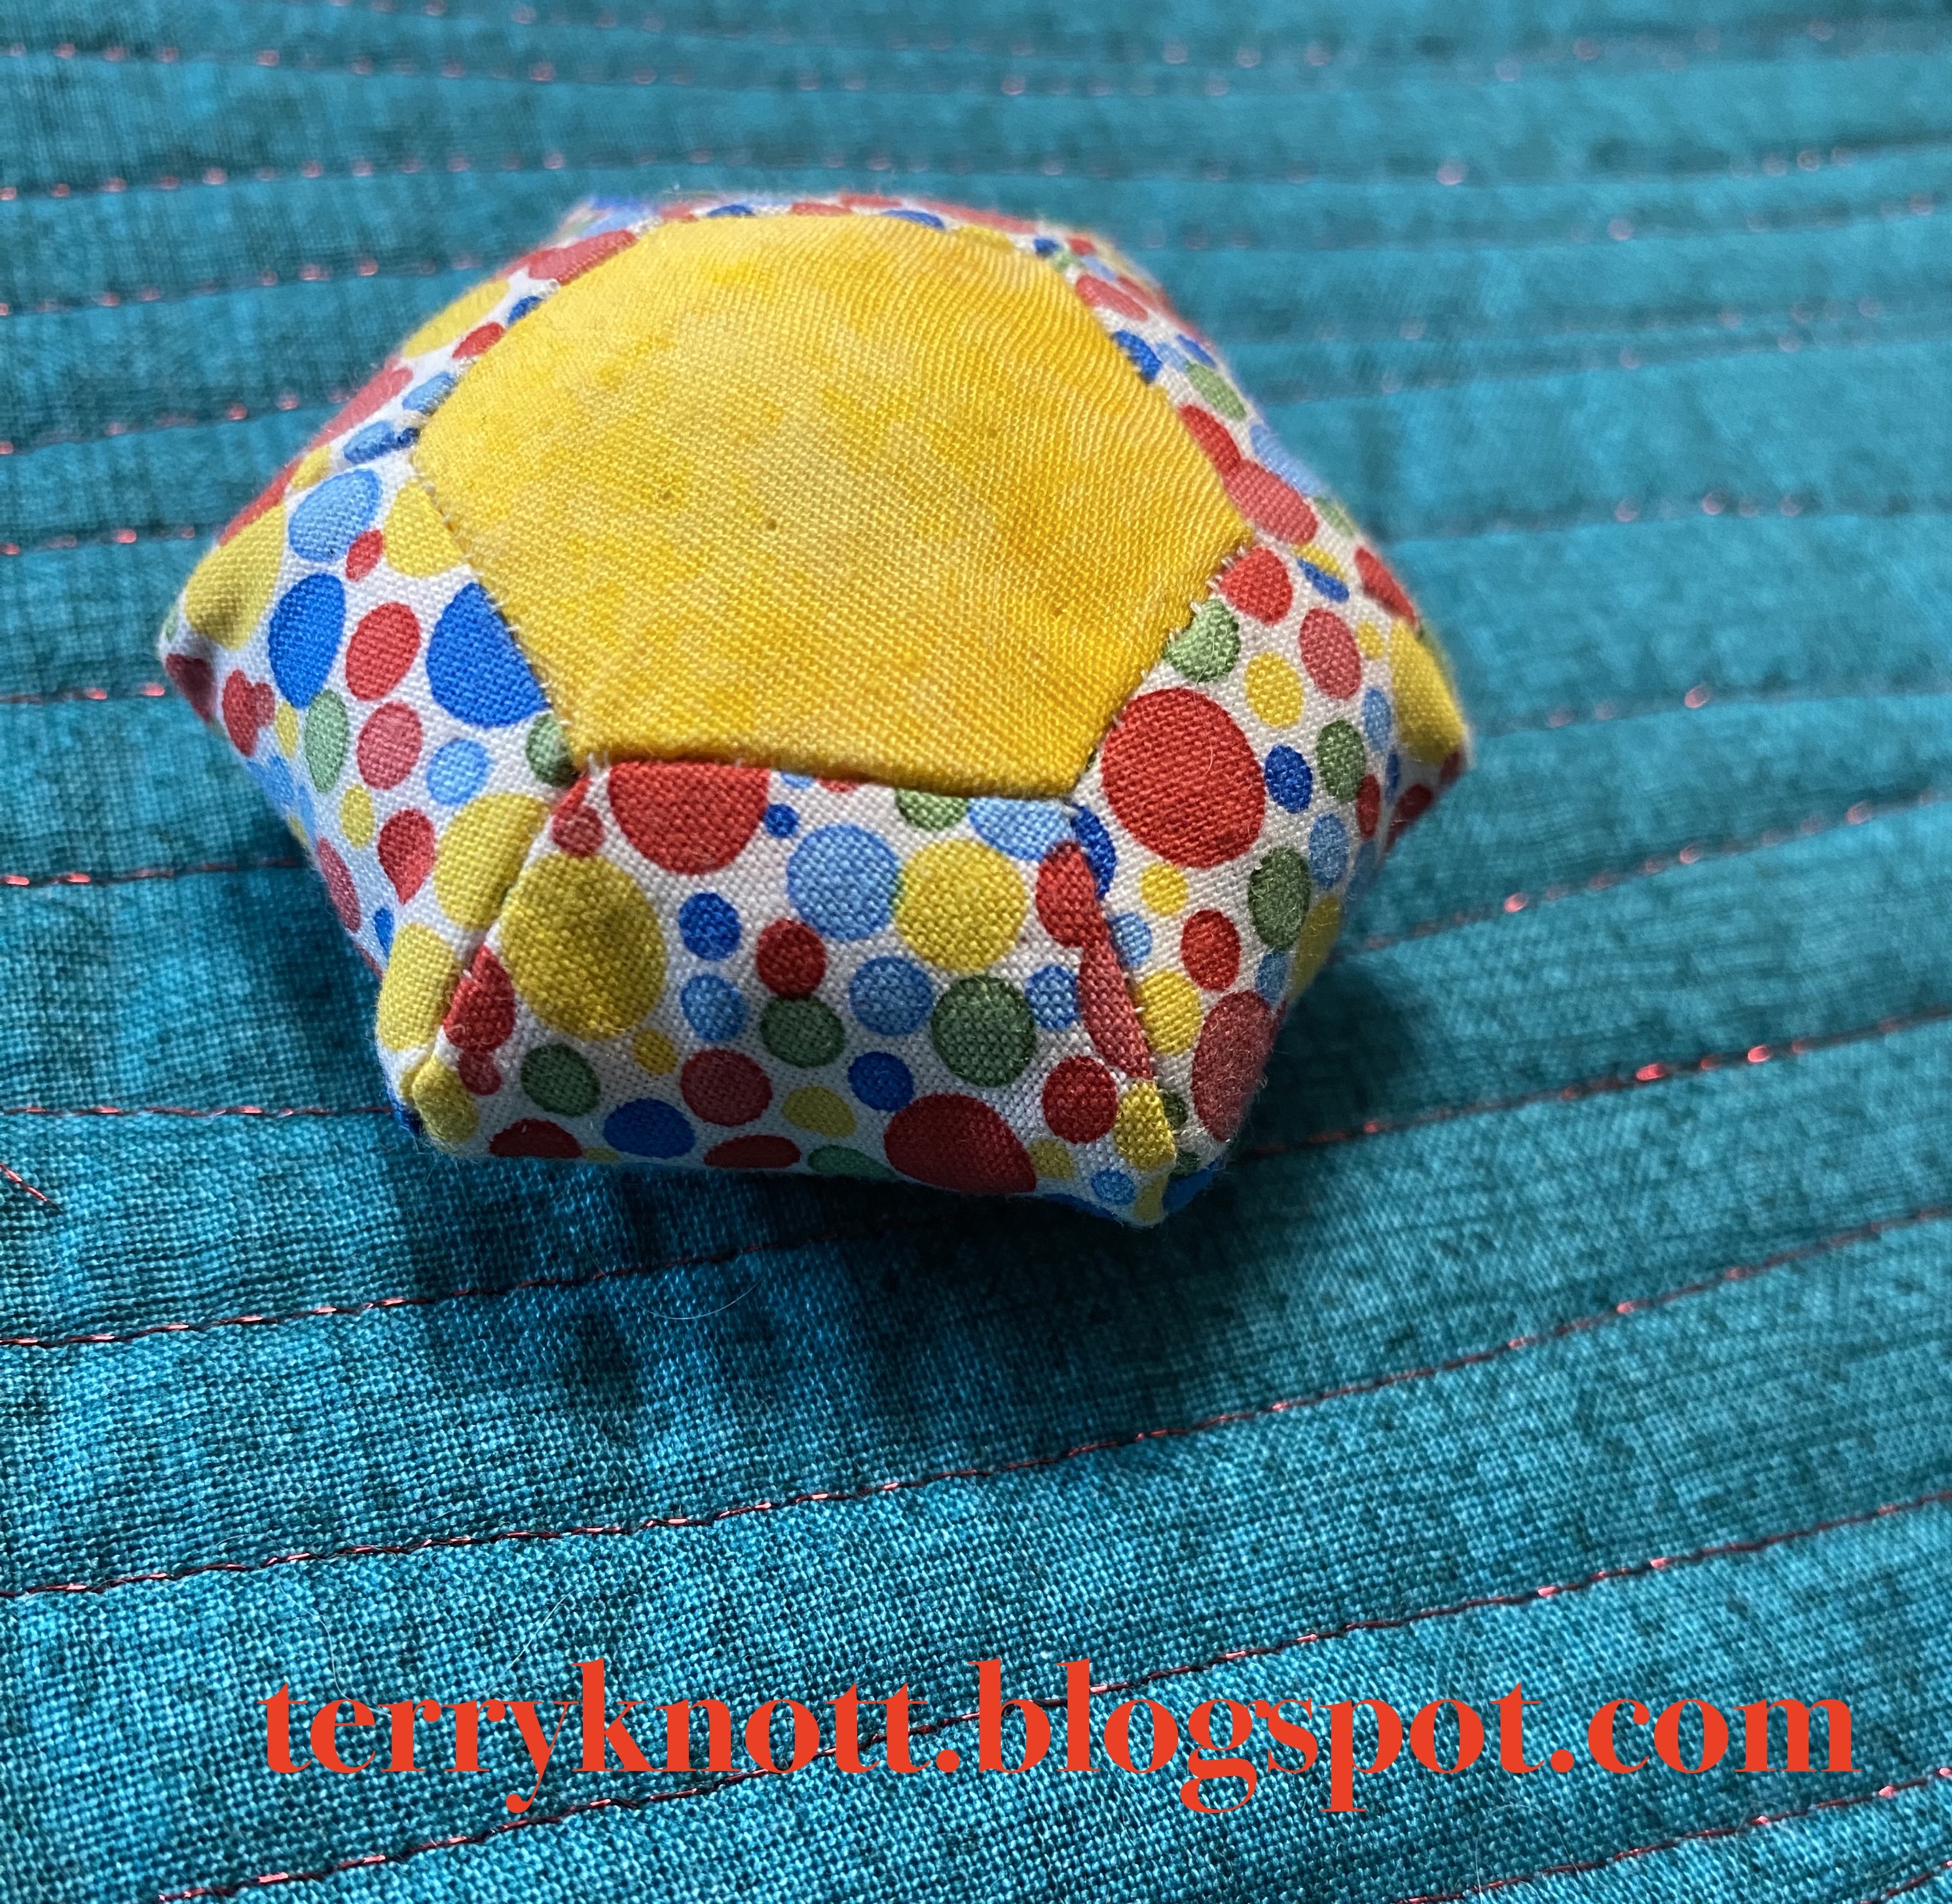
After making the hexagon pincushion, I happened upon a hexagon ball photo on Pinterest. When I clicked the link to investigate further, I found a tutorial AND a link to a template pattern! I had to try it! 

View of the half stitched ball
This time, I printed the shapes on cardstock and  cut out the shapes. I made an effort to cut carefully on the lines. As with hand work, there was less accuracy than with using the laser cut papers I purchased from Paper Pieces

Ready to stuff
I had considered choosing a fabric that I could fussy cut. Since I couldn't see through the paper templates, I decided to use two fabrics. I cut 2 1/4 inch squares for the hexagons and 2 1/8 inch squares for the pentagons.  Cutting squares was faster than drawing around the templates. When I was ready to begin the basting process, I centered the cardstock on the fabric and trimmed about 3/8 inch away from the edge of the shape. 
Sewing the last hexagon in place

As I glue basted the shapes to the cardstock, I was mindful to glue a bit away from the outer edge of the paper. Gluing away from the edge of the paper made sliding the needle under the fabric easier. The fabric stayed in place during the whole sewing process. It wasn't too challenging to remove the card stock.

For stitching, I used a lingerie thread made by Coats and Clark in a neutral shade. It buried well into the fabrics. 

Finished ball
The whip stitch that I used to stitch the pieces together is hardly visible on some of the shapes. I was able to angle the whip stitches and ease a longer edge next to a shorter edge as I do when I use the ladder stitch to stitch pieces together. I didn't like how that seam looked so I turned the ball inside out and stitched the remaining shapes to the ball with right sides together.

The last four sides of the shape is stitched after the papers are removed and after the ball is stuffed. I chose to stuff the
ball partially. I used leftover bits of batting for stuffing. I had leftover wool and 80/20 batting. I removed the papers at the last moment to try to avoid stretching the edges.

The stitches are going to show so I chose to join all the pieces in this project with the whip stitch. I wanted to make it challenging to determine which were the last three shapes I stitched together!

I thought stitching the shapes would be more challenging than it was. I found stuffing the ball firmly allowed me to press into the center as I stitched the edges of the last shape to close the ball. It was a firm surface and it wasn't long until I had a finish!

Aside from the prep work, the fiddly business of stuffing it, trying not to stretch the ball and stitching the last four sides to finish the ball, it wasn't a difficult project. It did take time! It is about four inches in diameter. Perhaps, I will use it as a pincushion.

This was goal number three on my March list.  Since I stitched with small scraps, I'm linking to Oh Scrap/Quilting Is More Fun Than Housework.

On the health front, I had a re-evaluation on my head, neck, back, shoulder last week. I'm making progress. I have more range of motion, fewer tremors in my hand, less numbness and a little more tolerance of PT exercises for my neck. I'm making progress although it is slow!

A few weeks ago while walking across a parking lot, I felt a twinge in my knee. Oh the sharp pain I felt at that moment! Unfortunately, I still have pain and walking has become difficult. Tomorrow, I have an appointment for an MRI. 

I have had meniscus tears in the past. It feels like I have done it again and while doing the same activity. . .walking!

Sunday, February 19, 2023

Hexagon Christmas Ornament--post 2

Ornament fabrics 
Goal number three on my February goal list was to make another hexagon sample for my class coming in May. For me, completing each hexagon is like eating a potato chip. . .I can't stop at one! As I stitch the hexagons, I think about other projects that would be fun to stitch. 

Because I remind myself that I have many unfinished projects, I haven't started a big scale hexagon project. Likely, there are many quilters who also have many unfinished projects. 

My class participants may be quilters with unfinished projects. They wouldn't want another project to make. I decided that I would teach how to piece the hexagon. What they do with their pieced hexagons is up to each participant. 

Fussy cutting
If someone was new to hexagons, they might decide to piece more rosettes if they saw examples of finished projects. Because what appeals to me might not have the same appeal to another quilter. I knew I needed to have a variety of projects. Projects that could be gifted would be good choices.

Auditioning the block
My inspiration for the wreath ornament came from Createwhimsy.com. Ornaments make good gifts and a hexagon ornament would be unique! 

In my stash, I had a little bit of a snowman print and even less of a red/white stripe on a green background fabric. These two fabrics paired well. The fabrics spoke Christmas to me.

Auditioning the stripes
I fussy cute the snowman fabric because hexagons made with fussy cut fabric grab your attention. Hexagons made with striped fabric also provide visual interest.

Clipped and beginning to stitch
The snowman print wasn't printed evenly in each of the squares. I centered the print the best that I could to cut out the pieces. I might be able to cut two more ornaments out of the remaining fabric.

I also fussy cut the stripe fabric so that the stripe was centered in the middle of each hexagon. Once I had the pieces cut, I glue basted them to the paper foundations. I was mindful to check the position of the snowman as I glued the edge of the fabric around each template. Once the pieces were basted, I laid the pieces out as I would stitch the pieces. 

Almost invisible whip stitches
I used the ladder stitch to stitch the pieces together. I used a thread that matched the fabric. It didn't take long. I repeated the process with the striped fabric. I cut a piece of ribbon to act as a hanger. 

Then I used dots of Elmers glue along the edges of the rosette to join the two blocks together. I also inserted the ribbon. I used clips to hold the edges together until the glue dried. I used glue because I didn't want the edges misaligning. Gluing the edges helped.

I left the papers in the hexagons so that the ornament would have a firm shape. I used the whip stitch and a neutral thread to stitch the two hexagons together. I loved how the neutral thread blended into the fabric making the whip stitches nearly invisible. I have friend who will whip stitch with a polyester invisible thread to ensure that her stitches are not visible. 

I liked the result. I plan to cut more pieces for additional ornaments. I will make some step outs for class with those pieces.  It was super challenging to stop at one ornament!!! I definitely was feeling potato chip syndrome!

Finished back
The amount of scraps that I used in this project was small. Of the striped fabric, I used a two inch wide strip about 16 inches long.  I used a 5/8 inch hexagon template and the finished wreath measured about three and one quarter inches square.

Finished front
I've been playing with small scraps the last couple of weeks. This is my second project  using small scraps. (If you missed my Wednesday post about the Valentine postcards, click here.)  

I'm linking to Cynthia at Oh Scrap/Quilting Is More Fun Than Housework. Tune in Wednesday for my next post, I'm planning to play with some flannel scraps!


Sunday, February 5, 2023

Hexagon Placemat and Hexagon Pin Cushion--post 1

A possible EPP project
Last October, I was asked to teach an English Paper Piecing (EPP) class for an event that the Columbia River Gorge Quilters quilt guild is sponsoring in May. Click the link to see the classes. Registration is open to the public.

Mini pincushion
At first, while I was honored to be asked, I didn't feel like I was an expert in EPP. I sent an e-mail to JoJo who taught me EPP to ask her what she thought. She said to go for it. I told my youngest daughter about the request and my conflict. She replied that I wouldn't have been asked if I didn't have the qualifications.

My daughter raised a good point which I hadn't considered. I said yes! While I've given workshops for one of my guilds as a volunteer, this is the first time to be paid for teaching. 

I thought that I would have until January to determine what direction to take my class. Actually, I had about five working days to make a plan. I decided to teach a technique class. Sometimes, people want to play with a technique to determine if they want to add it to their toolbox. Project based classes can result in unfinished projects.

I titled the class, "Beyond the Flower Garden." My reasoning for the class title was to encourage participants to look at different ways to incorporate a rosette into a project.

Removing papers
When people think of Grandmother's Flower Garden, they likely envision thousands of hexagons. While I haven't made a Grandmother's Flower Garden quilt, I have stitched quite a few hexagon shapes together. Sometimes, I interspersed those shapes with triangles or diamonds to create a design.

Because participants will be in class for six hours, I decided to share examples of small projects that incorporated hexagons. Perhaps, participants might decide to turn the rosette they created into something useable. In six hours, participants will be able to stitch a few rosettes!

I looked through my projects to determine the Grandmother's Flower Garden rosette samples I had on hand. People like to view projects.  Not all of the projects will feature EPP.

Threads used in the project
In 2011 I made Grandmother's Flowers. In 2016, I finished a hexagon block of the month project. In 2018, I made a wall hanging and a potholder. When I upgraded to a 790 Bernina machine, I also made a mug rug. Samples sometimes can spark a participant's creativity.

I can also share my temperature quilt. While the project isn't a hexagon, it is an example of EPP.

Free motion quilting detail of rosette
The first new sample that I finished was a hexagon pincushion. I used my 3/4 inch template. It was "fiddly" to turn such a small project. The effort was worth it. I saw the pattern on Pinterest. Benita Skinner posted the tutorial on her blog. I used scraps and wanted to include it because it used eight hexagons. 

The second new sample that I stitched was a placemat. It measures 11 inches by 17 inches. If I were to make another placemat, I'd make the size 11 by 15 or11 by16 inches. My oldest granddaughter chose the main fabric for the placemat. I also used it as the backing. I sure liked her choice. The blue and white print fabric in the first photo was too busy for this project. 

I chose to quilt it with my walking foot using gentle curved lines. Perhaps, class participants seeing this sample will feel quilting is doable on their domestic machine and be encouraged to try it!

Finished placemat
I bound the placemat. Then I hand appliqued the two hexagons to the placemat. I did use a little Elmer's glue to hold the hexagons in place. I placed tiny dots along the edge on the wrong side of the rosettes. I used a warm iron to "fuse" the glue into place. Not having pins to interfere with the applique process was great! Once I completed the applique, I add a little free motion quilting to ensure the rosettes remained in place.

I spent an evening making the placemat. It is a good example of incorporating two rosettes into a project. I am more proficient with the machine binding process.

I used about half a yard of fabric in this project. Last month, I purchased
eight yards of fabric so I'm -7.5 yards towards my goal of reducing my stash! I need to have some more finishes to move that number to positive yards! 

This was goal number three for January. I did finish it in January; but, I didn't get it posted during the month. I'm linking to Cynthia and Oh Scrap/Quilting Is More Fun Than Housework.


Wednesday, November 14, 2018

Pot Holder--Third Finish 4th Quarter Finish-A-Long 2018

Model for drawing a moccasin 
Our Thread Tales fourth quarter book was "The Snow Child" by Eowyn Ivy. It was about a husband and wife who moved to Alaska some years after losing their infant during childbirth. I enjoyed the author's description of the landscape. The author's development of the characters and the story lines sometimes lost me; but, all in all, I enjoyed the read.

I sketched a figure. I thought about the night sky, snow, snow flakes, red mittens, a fox, a dog. I sketched more on the figure and thought more about the story. I couldn't figure out how to draw a shoe from the front view. I took a photo of a slipper and tried drawing it. Miss J was so helpful about how to make my drawing more realistic. I worked more with my shape.
Drawing of a figure for a possible quilt

I thought about the previous book club project I had started. I had drawn some figures on a piece of fabric. (A post about that project is ahead!) I had a frank discussion with myself about starting another art type quilt when I haven't finished the other art type quilts because I got stuck somewhere along the way. I also haven't had a finished quilt at a reveal in so long that I can't remember when it was that I did! I decided to go small and to stitch a hot pad with the Aurora Borealis on it.
Selection of green bits

Selection of bits in monochromatic photo
JoJo over at Through My Hands, posted a pot holder project that she named, "Aurora Borealis." This project has been on my Finish-A-Long list since January 2017. I started with the fabrics that I had bundled for this project.


Shaded and basted hexagons ready for stitching


Background was too small


As I reviewed my fabric choices, I decided that I wanted to make the Aurora Borealis as green as possible so I removed all but the background, backing and binding fabrics. As I looked through my scraps for greens, I decided to use a different green in each hexagon.

I also wanted to practice shading the Aurora Borealis from light to dark. I pulled some pieces and then tried to shade with my eye. Then I took a photo in monochromatic on my phone. After viewing the photo, I pulled some pieces and chose others. I cut out the hexagons using the template that I had purchased last month. These hexagons finish to 5/8 inch so they are small!

It has been a while since I English Paper Pieced. It took me a few hexagons before I figured out how I had basted them in the past. I figured it out and was happy that I had purchased a bag of foundation papers that were just the right size as it make the task easier. I also remembered how much I enjoyed this method.
Audition of prairie points

I also had to do some searching on You Tube for information on how to do a Knicker Knot as my first attempts weren't as I had remembered! It didn't take all that long to sit and stitch the hexagons together. Using the pattern provided, I cut out a background hexagon. Right away, I noticed that I had a challenge. My background was too small for the hexagons! Probably what happened with my pattern was my printer was set to "fit" so that was why the pattern printed too small.

I could have taken some hexagons off; but, I decided that I would recut the background and this time, I would work with a squarish piece of fabric and that I would cut the lines of the hexagon after I had quilted the piece.

I like the background. It looks like the Aurora Borealis is going on behind the hexagons. The background fabric is a scrap from a quilt that I made my freezing daughter many years ago. Nancy Crow designed it. I like that the darkest hexagons fade into the background. I  used a little bit of glue to baste the hexagons in place. Glue basting made it easier to applique them.
Label

At the April Clark County Quilters quilt show two years ago, I purchased a spool of bright blue thread heavier weight Aurifil thread to hand stitch in the background of this project. I put a layer of insulbright and two layers of cotton batting behind the top and stitched some hand stitches around the hexagons. Then I layered it and added the tiny prairie points. I liked them; but decided to add them when I add the binding so that I don't cover too much of them up.

Quilting wise, I wanted it to be simple. I chose to stitch a few gentle curves to represent water and a few peaks and valleys to represent mountains in Alaska. I stitched next to the hexagons and about a 1/4 inch away from the hand quilting. The definition the stitching gave was enough for this small project and probably took me about half an hour.
Finished back

I made the prairie points using Susan Cleveland's tool. These are small. I used a 1.5 inch strip of fabric! I did stitch a decorative thread on the strip to add a little interest to the prairie point. I basted the prairie points to the potholder before I quilted it. Then I decided it would be easier to tuck the prairie points under the binding so I removed the basting stitches and worked on the binding.

Stitching the binding was a challenge. I used my number 72 foot and after I had stitched it, I realized that I had neglected to move my needle over to the left. It made sense now why the seam allowance seemed so small!!! In my defense, I often set up the next step of a project before I leave the studio for the day. Then, when I have 10-15 minutes, it is easy step into the project and make some headway. This was the first time that I was able to consistent square corners with the binding.
Finished front

In the past when I have had a corner different that 45 degree angle, the end result was different for each corner. It really helped that in JoJo's instructions, she shared using the marks on her sewing table to use as a guide for when she turned the corner with the binding. I still need practice; but, I am pleased with how much better these corners look! I am working on bettering my technique of applying the binding totally by machine. I'm making progress but, need more practice!

I used about a quarter of a yard of fabric for this project. Truly, my only costs were the papers, template, thread and needle as the fabrics were all small bits of leftovers. I did put insulbright and two layers of cotton batting in the project so it could be a working potholder. I've had the insulbright on the shelf for years! I'm glad to have used a chunk of it too!

I have now used 38 1/4 yards of fabric from my stash. I am edging closer to my goal of using 50 yards from my stash this year. I have 11 3/4 yards more to use before December 31. If I can finish quilting that mystery BOM quilt, I will surpass my goal. As for my initial drawing, it may become a later project! I'm pleased that goal number five and goal number 23 on my 4th Quarter Finish A-Long list are finished. I'm excited that I've also completed one of my November that was in my previous post!


Sunday, January 21, 2018

Rue--post 4 of 4--First Finish of 1st Quarter Finish-A-Long 2018

Chalking the edge before trimming


At the beginning of January, I caught a strain of flu that was making the rounds. It was a particularly nasty bug which kept me sidelined for weeks. Three weeks later, I'm finally feeling like maybe I can do a little more than cough and sip tea! Sitting in my chair to hand stitch the facing for this wall hanging was a good "healing" project!

I had considered adding beads to the lower edge of the wall hanging. The project is about 20 inches x 45 inches. I decided that because of the length, the beads would get lost so I proceeded with the facing. This is the first time that I have used wool batting on a small project. The project is light and I had some concern that the edges--especially the lower edge could use some "weight" to ensure that it hung well.

Label information
First step is to ready the edge. I could trim the edge; but, I like to chalk the line that is going to be the edge. I look to see if I want to cut on that line. Sometimes, I change the chalked line so this check step works for me. After all, I can't put fabric back that I've cut off!

I often add a piece of narrow ribbon or a piece of twill tape around the quilt perimeter. I do this because I tend to stretch the quilt edge as I'm applying the finish and then I have a slight wave to the edge of the quilt which negates the quilt to lie flat! I often use an 1/8 inch to a 3/8 inch piece of ribbon/twill tape that I couch to the quilt. It is going to be in the seam and enclosed with either the binding or in this case the facing. Therefore, it doesn't matter what color it is or what thread I use to anchor it to the quilt! I have a stash of my great grandmother's threads and I often use one of these spools just to have a little of her in the project!

Back of quilt
Next I apply the facing. I prepare my sleeve and label and hand stitch these to the back of the quilt as well. It feels terrific when I put that last stitch into the quilt! I then steam it and let it rest on the flat surface overnight. Last, I photograph it and share my progress here!

This label has hung out in my stash for years. I've had the blocks waiting for a setting plan since 2014. The important information is listed in the label. Yes, it takes a little extra time to make the label; but, I believe it is well worth the effort! Some day, this might be important information to know!

I like how much interest the orange ribbon and orange strips added to the project. I also like the depth the hand stitched hexagons added to the piece. Using different weights of thread to do the hand stitching was a plus. Adding quilting to the hexagons also provides interest.

Perhaps, the next time, it wouldn't take me as long to figure out what to stitch in the hexagon spaces! I would trapunto again as I like how these pieced hexagons pop from the background of the quilt. All in all, I'm pleased with this finish!

While I like how light this project is with the wool batting; I wondered how the project would hang. Rue has been hanging a few days and it still looks great. I would use wool batting again for a wall hanging.
Close up of the pebbles from the back of the quilt
This is quilt number two in my hexagon series. You can look at quilt number one in the series here. I do have another hexagon project started and another mulling about in my head. I like working with the hexagons. I like to EPP (English Paper Piece) as well as machine stitch these. There are so many different layouts that can be made with the hexagon unit! I could easily become side tracked with hexagons!  Since my goal this year is to finish five older UFOs, I'm going to try to stay away from becoming side tracked. Now I have four older projects left to finish this year!

Finished front
I used four yards of fabric from my stash. My goal is to use 50 yards from my stash this year. (I've 46 yards left to use.) I also haven't purchased any fabric so this is a gain of space in my studio!

You can read the previous posts about this project by clicking the links below:
Rue--post 1
Rue--post 2
Rue--post 3

This was goal number four on my 1st Quarter FAL (Finish-A-Long) list which you can read here.

Wednesday, January 17, 2018

Quilting Rue--post 3 of 4

Fill stitch I didn't like nor did Rue!


In my mind, I envisioned quilting different fill stitches in the hand stitched hexagons. I stitched one and thought. . .yuk! Rue started talking to me. So I asked myself what if I quilted pebbles in the center hexagon? I tried quilting pebbles. I liked that better as did Rue!


Quilted centers


As I pebbled the centers; I decided that I would pebble the background too. I wasn't sure if the larger hexagons would need some more stitching.


Hand stitched hexagons with fill stitches

After I had quilted a number of the centers, I stopped, stepped back and reviewed. I liked what I saw so I continued stitching. When I finished, I decided that the extra large and large hand stitched hexagons needed quilting.

Coming up with a variety of fills and then executing each fill stitch was a challenge. I stitched and then I unstitched and then I repeated that process numerous times!

I liked the openness of leaving the small and extra small hand stitched hexagons plain so I didn't embellish those with thread. I liked using the Westalee templates to create the fills. The practice was good for me.

Stitching the background pebbles
I wasn't excited about stitching more pebbles as I'm still "pebbled out" after finishing the chickens. Repetition is good in a quilting design so I decided that pebbles were a good choice. I talked myself into the stitching. I spent some afternoons, some early mornings and some late nights stitching pebbles.

I used the same 40wt polyester thread in both the top and bottom. Yes, this is an unusual step for me. I had planned to use silk; but, I wasn't that happy with the tension of the silk on the batik fabric on either the front or the back of the project.

Because a batik has a tighter weave, thread has a tendency to float on top of the fabric. The lighter the thread, the more it tends to float.

I wanted to be able to see some definition with the stitches and the 40wt polyester gave me what I wanted so that was why I used it.

Blocked and drying


Once the pebbling was complete it was on to the blocking stage. I needed to wet the quilt because I had used water soluble thread to anchor the polyester batting in place for the trapunto of the fabric hexagons. The thread dissolved easily. In the photo above you can see that I pieced the batting. Once I've finished the project; the pieced batting isn't noticeable. Piecing the batting is a good way to use up smaller pieces of batting.

In the next post, I'll share the finish steps. . .although, when the piecing is blocked and drying, I'm feeling terrific to have another project approaching the sleeve and label stage!


Thursday, January 11, 2018

Quilting Rue--post 2 of 4

Rue as an almost finished top
The embroidered hexagons that I added to the background only took me about 20 hours to complete. I like the whimsy the stitches add to the piece. It took strength to pull the thread through the fabric and my fingers became sore. I'm glad that I didn't try this technique with three layers!

In the end, it was worth the effort! Plus, I'm thinking that I will add pebbles between the hexagons so at least I have another quilting plan beyond stitching around all the appliqués!

I decided to use a wool batting. I was curious as to how much loft an extra layer of wool batting would add underneath the appliqué shapes. I decided that it wouldn't give me the loft that I wanted so I used some polyester batting that I was gifted a number of years ago. This batting is thick and it was used to tie quilts.  I used a water soluable thread to stitch the batting and then I trimmed next to the stitching.
Smallest hexagon quilting design
Largest hexagon--love the unquilted center

Then it was on to layering and basting. I thought the back I had prepared was large enough. It wasn't so I sorted through the bits and found a fat quarter that I liked the color with the existing fabrics.

Middle sized hexagon quilting design
I started stitching in the ditch and around all the shapes. After I had stitched around the large hexagons and the ribbon in the lower part of the design, I checked my work. I had tucks on the back!! So I spent hours unstitching. I unpinned the layers and pin basted again. This time, I used more pins. More pins equaled no tucks which was GREAT!

Medium large hexagon quilting design
I stitched around all the hexagons with a silk thread on the top and a cotton thread on the bottom. I did this to anchor the hexagon. I had fun quilting the trapunto hexagons. I used two Westalee Rulers--the straight edge and a curved arc for the designs. There is a design or an area on each hexagon that I like the best. Some of the designs went together quickly, some way not so much!!!

I wish you could see the depth the trapunto added. Of course, I quilted each a little differently although at a glance, one might think some are quilted the same!

Medium sized hexagon quilting design
I'm thinking about stitching pebbles in the open spaces and then filling the hexagons with  a variety of fill stitches. I had planned to stitch the pebbles in the same color as the background; but, it is difficult to see where you have been and where you are going. I may see what I have on hand and stitch with a different shade of brown.

Maybe, I will leave some of the hand stitched hexagons open. The small ones look great as is. Time will tell. I'm still listening to what this quilt has to say!

Time spent on the project thus far is about 44 hours.

Sunday, April 9, 2017

Quilt Show and Guild Goals Update


My quilt guild, Clark County Quilters, held their annual quilt show April 6-8. There were about 320 quilts to view! For the show, I had four entries and I had planned for two! The entries were:
42 Minis; Totally Hexed, Winter Ice and Whale of a Tail/Tale


Imagine my happy surprise when I saw a red ribbon on 42 Minis for the category mixed techniques large quilt.
2nd place for mixed techniques large quilt


A few rows over, I saw a blue ribbon on Totally Hexed for the category large appliqué.

1st place for large applique quilt


Then, the biggest shock of all!!! I had two ribbons on Winter Ice! The blue one was first place for large pieced and the green ribbon was best of show for machine quilting! I didn't realize how much the border quilting really does show. Seeing this quilt hang, gave me new appreciation for the quilting!
1st place large pieced quilt and Best of Show machine quilting


View of the quilting on the border

Close up of the quilting in the blocks


I also participated in the challenge so I can cross off #4 on my Ten for 2017 plan! The top three places of the challenge will be revealed at the general guild meeting on April 13.

I am humbled for my work to be honored. I encountered many quilting issues with each of these projects. In the past, I would have focused on the errors and pointed them out to all. Now, my goal is to focus on what I learned from those experiences and to improve on the next project.  I seriously considered not entering any quilts in the guild show. If I did  decide to enter, I seriously considered not having any of the entries judged. This experience is an example of no matter what I personally think of my work, it is important for me to share it AND have it judged!

I did plan to share the judges comments in this post. Unfortunately, the comments weren't included with my quilts when I picked them up last night. If sharing the comments would be of interest to you, please leave me a comment. If I receive 15 comments and I receive the comment sheets, I'll write a separate post.