Sunday, October 29, 2017

HH Hall Building--4th Finish 4th Quarter Finish A Long (FAL) 2017

The Pruitt family with the HH Hall Building quilt
The guild's featured artist show was last week at the HH Hall Building in Vancouver WA. The guild has held the featured artist show there for a number of years. Each year, we are welcomed to this building that houses the offices to many companies to set up our show. The guild pays the cleaning fee for the days of the show which is a bargain.

This year, Karan was the featured artist and her quilts were amazing!!! She was one of the artists that made a panel of the building and she gave up space in her show to display this quilt.

The eight of us presented the quilt to the Pruitts who are the owners of the building at 3pm on the opening day of the show. They were amazed at how realistic and detailed the piece was. There was discussion that the piece would hang in their office rather than on one of the walls in the building because in their office was a better place to honor the art! Wasn't that a nice comment?

I posted about my part of the project:
HH Hall Building--The Beginning
Slow Going--HH Hall Building Project
HH Hall Building--Fused
Quilting the HH Hall Building Project

Val, Bev, Terry, Karan, Rosemary, Lynn, Virginia, Sharry who created the quilt.
We're lined up in the order of the panel that we created.
The reason we created this project was because Sandie, who was one of the featured artists last year, suggested it! Sandie said it would be a great way to thank the Pruitts for their support of our show over the years.

This was the first time some of the group had participated in such a collaboration.  In August, the pieces were due. Bev trimmed the pieces and applied the binding. I love her choice of the striped fabric! Karan applied all the hanging sleeves and Val added all the labels.

In September, we shared our creation with the guild. It was the first time that I had seen all the pieces. The conditions weren't great for a photo then though! I wish you could view this quilt close up so that you could see all the different techniques used as well as all of the details. Each of the panels is just amazing!
The entire quilt. . .which is a wow
This was goal number 5 on my 4th quarter Finish A Long (FAL) 2017 list. I used about a yard and a half of fabric from my stash so that brings my total to 33 1/2 yards used of the 50 yards planned so far this year. It is pretty cool that I didn't buy anything for this project; but I did shop JoJo's stash for the two yellow fabrics that I used!
SaveSave
SaveSave
SaveSave

Wednesday, October 25, 2017

Black Swimsuit--3rd Finish 4th Quarter Finish A Long (FAL) 2017

I had posted a photo of swimsuits that I had cut out several years ago as my 4th Quarter Finish A Long 2017 goals 16-19. Well, I went to stitch one of the black suits and found that I hadn't cut a butt for either! I only remembered that I needed to cut a lining.

On closer investigation, I realized that needed a lining for the red suit. I have black lining fabric on hand. Now, I remember that I thought a better lining fabric choice would be beige. I'll keep my eye out for beige lining material.

Three swimsuits to make. . .
I did locate my black swimsuit fabric that I had on hand so I cut myself out a black suit; BUT, this fabric was different weight than the previously cut suits so it wouldn't work for butts of the other two suits.

Last week, I dropped by Joann Fabrics and bought a piece of swimwear fabric that should work for butts and I will be able to get these stitched up at a later date. I spent $14 and should be able to cut the butts and at least another suit out of the fabric.

Next summer the entire family--grands, daughters, son-in-law, boyfriend will all be going to Maui, Hawaii so a gal needs some swim suits. I've been making my swimsuits all my married life which is 37 and half years. In that time, I have only purchased one suit--I remember it was a steal at $2!!!

I did stitch the black suit and it "swims" well. This is the third finish and number 16 on my goals for this quarter. The reason I needed this suit is because this month, I began teaching "swimming" lessons to three to five year olds. I have two thirty minute classes. In the past six years, I have subbed for lessons; but, it has been years since I've taught a whole session of classes. I'm having fun teaching. Watching the confidence and water skills grow in each participant is rewarding.  Oregon has many water related activities. There are pools, lakes, rivers and even an ocean available for these activities. I like that as an instructor, water safety is as much a part of the lessons as is learning how to blow bubbles or swim more efficiently. If the information that the kids learn in class prevent a drowning or near drowning experience . . . well, what a win!

One of my favorite parts of the lesson is when the participants "ask" to do a particular game or skill. Another favorite part of the lesson is when it is time to go and the participants are moaning and asking if they could have one more turn!

Completed black swimsuit
The "uniform" for the swim instructor is a black suit. I'd much rather wear a bright colored suit than a plain black one; but, I can understand the rule. I've been around the pool teaching lessons, water exercise classes, instructor courses and swimming laps for 37 and a half years.

I've gone through a lot of swimsuits over the years. I call them throw away suits as the fabrics fade and lose their stretch from the pool chemicals after the first introduction to the pool. I haven't found that it mattered whether I used a special detergent to launder the suits or if I just rinsed them well after a pool session. I always have a couple of "Sunday" suits in the drawer. Sunday suits are new suits ready for the day when the old suit is ready for retirement. (I also didn't find the "treated" fabric to resist the chlorine damage was worth the price either!)

A couple additional reasons why I make my own suits--I have a longer torso and one hip is larger than the other. I have altered my pattern so my suits don't expose any more skin than is comfortable for me. I like top and bottom coverage!!! Also, my suits are fully lined. Most purchased suits are lined only in the front.

Second, over the years I've been "gifted" swim fabric or purchased it at such a bargain that I might have five to ten dollars of materials in each suit. Yes, it takes me some time to stitch a suit; but, I feel like I am money ahead! Besides, trying on clothes and shopping for clothes is an activity that I dread. . .I'd rather clean toilets than shop!

I used 1 3/4 yards of fabric to make this suit. This finish brings the amount of fabric used from my stash to 32 yards. I'm inching closer to using 50 yards of fabric from my stash this year!


Sunday, October 22, 2017

Good-bye Paris--Post 9 of 9

Graffiti on a building
We arrived in Paris about 1:30PM. Because N lived about 300 days one year in a hotel, we were able to check in early to our room because she still has "status!"

Once we deposited our luggage, we walked to a store where I could buy fish soup and a brand of tea that I enjoy! Along the way, I spotted some interesting graffiti. I just enjoyed the scenery.

That soup was heavy and B carried it for about eight miles! (Thank you B!!) I also bought a couple t-shirts, espresso cups and a tray for the grands.
The cups for a future tea party

(The tray and cups are for when we have tea parties!)

Next, we walked to a shop of local artists and I enjoyed seeing the work or a clothing designer. I liked the bright colors and African influence in the clothing line. (Sorry, no photos were allowed!) Then we met up with a friend of N's, enjoyed a cocktail and then walked across the street to eat a French crepe. I enjoyed getting to know a little about N's friend.

Clothing for the grands
We took the bus back to the hotel and the route included a trip across my favorite bridge in the city! To beat the traffic, we left for the airport at 7AM. We arrived at 7:30AM. Had we waited until 8AM it could have taken us two hours to arrive. We decided it would be better to just be early.

I stitched a bit on my embroidery project while I waited. We ate the last Tavaux baguette. . .sigh. . . it was a little sad to finish it off!

Even though our flight was about half an hour late in taking off, we arrived almost on time in Chicago. We each managed to sleep a bit on that leg of the journey. I slept at least three hours!

Closed Club. . .so sad
Unfortunately, the United Club lounge that was closest to our gate was closed and the next closest was too far away so we didn't get to relax much while we waited for our flight to Portland. Getting through customs was easy. A contraband dog and handler were on hand to check all of us. Our flight from Chicago to Portland was just as it should be. . uneventful and on time. I thank JoJo for picking us up and bringing us home!

At home, we opened our bags and began unpacking. We stayed up until about 10PM to try to get ahead of the jet lag. Imagine my surprise to find my bag packed differently.

More of our purchases
Inserted about half way down in the main section of my bag was a piece a paper that stated the TSA had inspected my bag. Hm m m. . .I speculate that those three cans of fish soup were probably the reason my bag was searched.  Or, perhaps, it was the jars or mustard. . . I lost a sock; but everything else was there.

We didn't have too much trouble adjusting to our home time although it was about ten days before I really felt like my body clock was in the zone again!

N had purchased us seats that had extended leg room and that made a huge difference in our comfort. The best parts of the trip were sharing the experiences with my husband, B and daughter, N. Thanks N for spending so much time with us. Meeting J's family and getting to spend time with his mom, M was truly terrific.

J was a great host. N, you and J truly made this trip so extra special and amazing! I'm calling the experience PRICELESS!

So. . .N, are you going to be ready for me to visit you in London in March?

Wednesday, October 18, 2017

Embroidered Towel--2nd Finish for Finish A Long (FAL) 4th Quarter 2017

Stitching the motif
Goal number 23 on my FAL list for this 4th quarter was to embroider a towel for Miss J. You can review my list here.

Her older sister has had her own embroidered towel for some time. I've been waiting to embroider one for J because J doesn't have a favorite color.  She says she likes all the rainbow colors.

When I'm working on a project that involves a Grand, I try to do as much prep work as I can ahead. In this case, I used my embroidery software to create the design. I printed the pdf of the design so that J would know what we were stitching and then I saved the design to a USB stick.  I hooped a layer of water soluable stabilizer, floated the towel and had a second layer of water soluable stabilizer on the towel face.  It was stitch ready.

We can multitask
When J arrived, she plugged in the USB stick--yes she knows what a USB stick is and where it plugs in to the machine. She won't be four until late next month! Then she liked watching for her design and yes, she can "click" on the design to activate it too!

It was now time for her to choose her thread. If I were choosing the thread, I'd line up the colors I was thinking about and then look at the effect lighter or darker shades had together before making my final selection.

When I asked J what two colors she wanted to choose, she immediately responded that she wanted purple and green. I opened the thread container. She looked in the box and just as quickly as she had responded to the color options, she chose a purple and a green thread. She didn't spend a minute with her selection!
Finished towel design

I picked out a shade lighter and darker of each of her selections and asked if she wanted a different purple or green. Oh, the "look" she responded with was priceless. She was telling me, she already made this decision and was ready for the next step. She reminded me of a saying my dad would utter as we were headed out the door. . ."Get it in gear, we're wasting daylight!" Usually, he would have said this before the sun had risen so I wondered how we could be wasting daylight if there was no daylight! At any rate, her actions and her comments sure reminded me of her auntie. Those two could be clones!

Next, J pushed the green start button on the machine and we were stitching the project. She LOVED watching the letters of her name stitch and kept saying that is my name. She didn't miss a stitch. When the machine moved to the green motif stitches, J started losing interest. We also had a number of thread breakages which made the process longer. To keep her entertained, I invited her to pick out a book to read. She brought me a chapter book which I thought would have been better entertainment for a school age child; but, she seemed to like the story!

Modeling the finished towel
When the stitching finished, her day with us was ending. So I rinsed the towel to remove the stabilizer and dried it for her return. When J saw her towel hanging in the bathroom, she was excited. I asked her if she wanted to try it out which meant would she like to take a bath? Her reply was to strip off her clothes on the spot! (I took that action to be a resounding YES!)

Once out of the bath, I wrapped the towel around her and she wanted her picture taken. When I showed her the photo, she gleefully said, "Gran, it FITS!"  Her response and then not wanting to take the towel OFF just warmed my heart through and through!

The rest of the day, she "needed" to wash her hands often and ALWAYS used "her" towel to dry her hands. I'd surmise that she likes/loves her towel!

I still need some help to better position the towel so that the design is more square. This was a terrific project to help me get reacquainted to the embroidery portion of my machine since it has been a long time since I've embroidered!

Sunday, October 15, 2017

Taking the Train from Dijon--Post 8 of 9

"Tree" sculpture made of metal
We had our last French breakfast with M this morning. She gave us some French coffee beans to take home. We packed sandwiches to eat on the train. Tavaux baguettes are so wonderful as is the Comté cheese! We so appreciated all that M did for us while we were there. She made our visit extra special in all ways!

J drove us to the city of Dijon which is the capital of the combined region of Bourgone-Franche-Compté. In 2014, these two regions were combined. On this trip, J actually drove on a toll road. He said in this case it was the best way to arrive at the capital city. It was about a 45 minute drive. Taking the "scenic" route would have added another 30 to 45 minutes.

While we were walking around Dijon, I saw a sculpture that when I first noticed it, I thought it was a topiary plant; but, it turned out to be made of metal!

Saint Michel Church
The history of the city is unique and I enjoyed that J pointed out a number of historical buildings as well as explained the importance of each one.

If the word Dijon sounds familiar. . .think mustard. . . as in Dijon mustard. This mustard originated here although most of the mustard seeds are now imported from Canada! Still, there were lots of varieties of mustard. . .blue cheese, pistachio, green herbs and black olive were a few of the varieties that I sampled. I did purchase a sampler of mustards--there were nine varieties.

Then we stopped in to a cafe to enjoy a hot chocolate or a coffee. On the way to the train station, we saw the city hall and the opera house. Then it was time for us to get on the train and say good-bye to J.

He was a terrific tour guide and he too made our trip memorable in all the right ways! I look forward to the next time our paths cross.


Wednesday, October 11, 2017

Done Chickens---The FINAL Installment (First Finish for 4th Quarter Finish A Long 2017)

Quilting complete and at the blocking stage
Done Chickens. . . .no. . .there is no recipe to share. I couldn't resist the play on words! Finished would be a better term!

Wow! What a journey--10 years 10 months--this project has been! Another serendipity moment was that I actually completed it on the 10th day of the 10th month. That is a lot of tens!!

It's been on my finish list for years. I've posted about my progress lots. I began this project when a friend asked me to take this Block of the Month (BOM) with her. The orientation to each pattern was held at a local quilt shop, Canby Quilts which sadly is no longer in business. Participants could choose either Maggie Walker's Country Journal pattern or her Garden Party pattern. I decided on the Country Journal and my friend decided on the Garden Party pattern.  I began this project in in January of 2007!

Completed border
If you want to check out or revisit the journey since January, here are the links:
When A Good Idea Sort of Works
Chickens--on the Home Stretch
Pebbles--complete!
Little Helpers and Pebbles
Quilting Lines Among the Pebbles
Endless Pebbles
A Little More Quilting on the Chicken
A Little More--A Chicken Update
Quilting the Center Panel on the Chicken
Chicken Update--Still Anchoring
Basted Chicken
The Chicken is a Top!
March Madness and Chicken Appliqué
Chicken--2nd Section
An Update on the Chicken 

Since, my  Chickens--on the Home Stretch post about this project, I finished quilting the border. I blocked the piece. Some of the shadow stitching is tiny. Please look at the photo with the skinny border next to the outer border to view what I'm trying to describe.

Yes, it took a long time to quilt this project. Because I wanted the quilting to be more of a texture rather than a feature, I stitched the top with silk thread from Superior and YLI. The back is a cotton thread--two ply Masterpiece until I used it up and then a spool of 60 weight Aurifil. Most of the time, you need to be up close to the quilt to see the quilting.
Close up of the shadow stitching

While it was drying, I inked a label. I picked up some labels off of the guild's free table last spring and I thought that this one would work great for the label. This project was a pattern called Country Journal written by Maggie Walker.
Chicken label

Of course, I didn't finish it in September as I had thought I could do. . .but, what is another day or two considering the life journey of this project???

After I finished the label, I took a look at the drying quilt. YIKES, I had not noticed that some of the fabrics bled. . .a red in particular. So I shared with you in my last post what I tried to make the bleeding less evident.


In 2009, I was in a car accident that left me unable to do much handwork. There was a time that I didn't think physically that I would be able to appliqué. In a class, Nancy Chong helped me learn how to sit and hold my work so that I could needle turn appliqué. I still have mobility issues from the accident; but, am pleased that I didn't have to give up on needle turn appliqué! I am appreciative of Nancy's help to encourage me to keep trying.

Back of project
For this project, I spent about $333 for materials. I estimate that I have about 500 hours of work in these "Chickens" and yes, I quilted it on Joyie (my 790 Bernina). It took me about 60 hours to quilt all those pebbles. I have about four and a half yards of fabric from my stash in this project. This brings my total of fabric used for the year to 34 and three quarters yards of fabric used from my stash. My goal is to use 50 yards from my stash. I'm edging closer to that goal!

When it was time to square up the piece and stitch the facing, I kept pinching myself that I really was so close to the finish!  Of course, when I added the hanging sleeve, I was smiling from ear to ear because I FINISHED!!!!!! Note the feather fabric that makes up a part of the hanging sleeve and part of the facing. I originally purchased this fabric for this project; but, decided it was too whimsical. I still liked it so I used it to dress up the back!

My quilting has improved over the last decade. Ten years ago, I wouldn't have quilted it as heavily nor would I have used silk thread.

Finished "Chickens"
This was one of the last projects that I shared with my dad. As I have worked through the family issues of following his final wishes, there were many times that I just didn't feel creative nor did I feel like even stitching! The repetition of quilting in the ditch and quilting hours of pebbles was therapeutic. I'll be raising a glass of scotch to him letting him know that I've finished. As for his estate, there are a couple more steps that are in process before I have completed what he asked me to do. Perhaps, this was God's plan all along. God knew that I would need this project during this time in my life.  Perhaps, taking all this time to finish was THE plan the entire time!

As a final chuckle, the spot where I had planned to display this wall hanging is about two inches too short to adequately display it. Gee whiz, even in its finished state, it is giving me yet another challenge!

This is my first finish for the 4th quarter of FAL 2017. I listed it as goal number one of my list. You can read my list here.


Sunday, October 8, 2017

When A Good Idea Sort Of Works--Yet Another Chicken Post

Evidence that a batik bled
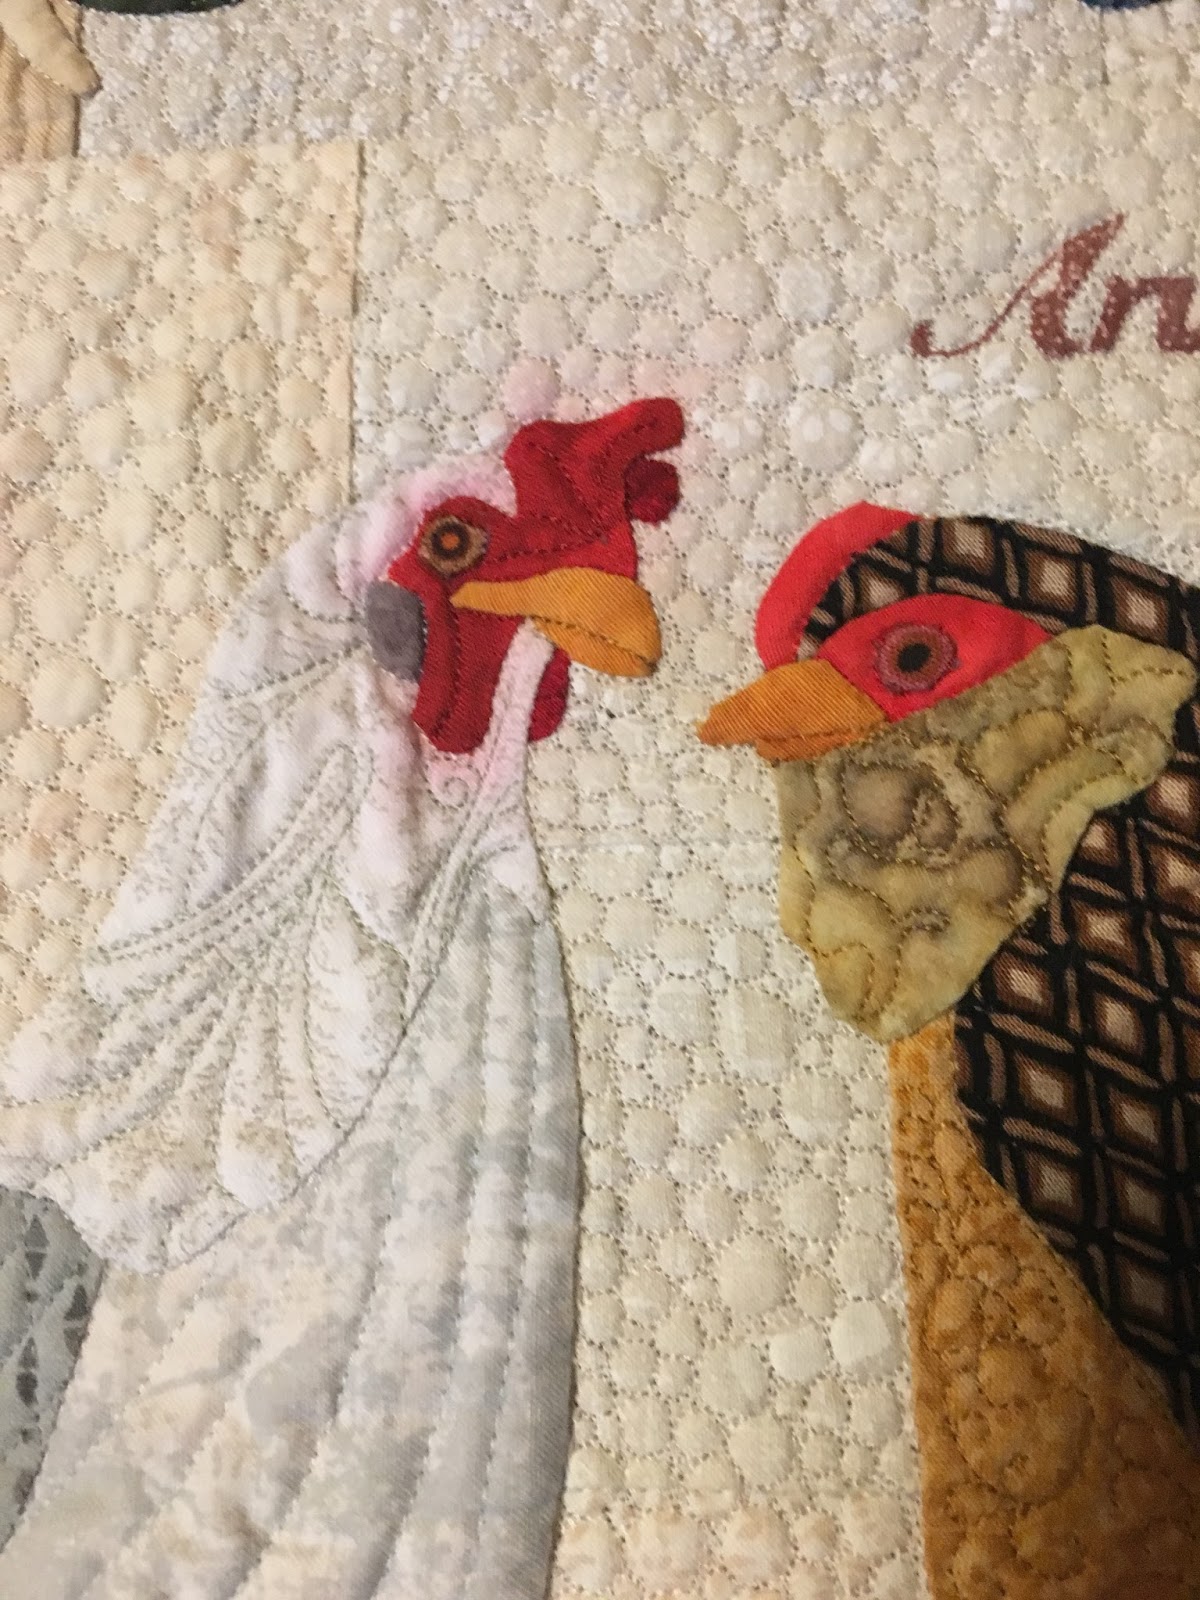
When a fabric bleeds, it generally isn't good. Honestly, the best way to handle fabric bleeds is to prewash or test every fabric before you use it. This chicken project was a kit and some of the fabrics--the red that bled in particular--were so small that to have washed them and they shrank, I might not have had enough to cut the piece for the appliqué.

This was the first time that I purchased a kit. I liked the variety in the fabrics and the $20 each month I spent was less than I would have spent had I bought the individual fabrics on my own. Had I purchased yardage, I would have tested it. A fabric that bled would have been treated and retested. If it bled after a second treatment, I would have tossed it. In retrospect, I should have tested and treated each fabric. I should have substituted a fabric that I had rather than trying to stay true to the fabrics I was given in the kit.

The bleed after Tsukeno ink applications
Knowing what I do now, I will prewash or test all fabrics in the future! Yes, it made me sad that a black ran onto the cream background, a purple ran on the cream background, a green ran on a wood background and a red ran onto a cream background.

Even though I had rinsed the blocks after I had appliquéd them, I still had a few spots where the dye ran. Ugly!!! I tried a synthropol treatment; but it didn't help and I tried Dawn. . .it helped a little.

I've been asked why I didn't use Retayne instead of Synthropol. You can get a little information here.

I felt that the Synthropol would remove the dye particles that were affixing themselves to areas that I didn't want. The Retayne would affix the dye to the quilt which was a process that I didn't want!
The bleed after the acrylic paint applications

I've been trying to figure out why the colors ran this time when they didn't run before. I think, that over time, our water has changed. I know that there is more chlorine in it now than there was a decade ago. I forgot all about that change. I should have used filtered water. Maybe I can remember that for the next time I wash or get a quilt wet!

After the Dawn detergent trial, my next idea was to paint over the areas. Hey, paint covers lots of issues. I used Tsukneko white all purpose ink to cover that fabric bleed. Three coats helped; but, the fabric bleed was too evident for me.

Sample of where a black fabric bled
Next, I tried white acrylic paint. I have about three layers of paint here too! The acrylic paint changed the hand of the fabric a bit; but, not enough for it to bother me more than the fabric that bled! It took some time because I had to wait after each paint application for the fabric to dry which generally meant waiting overnight!

In the other areas where the fabrics bled, I tried the same applications. Unfortunately, I didn't have as much success. On line, I purchased several rubber stamps of chicken or bird tracks and considered inking images on the front of the quilt to "cover" the problems. My thought that a few chicken tracks could camouflage that ink bleed.
Chicken tracks stamped on practice
sample

I used an archival ink pad. My first test was on my practice/test sample. I was surprised that the ink bled into the cotton fabric as much as it did. The edges just weren't clear on the stamped image. Next, I wondered what it would look like if I stamped a bunch of images in an area. I decided it looked liked a mess.
Chicken sample--to much bleeding
I even stamped the ink on the project.  No, I didn't stamp on the front of the project because I may be crazy; but, I didn't want to be committed if I didn't like what was happening!
Stamping a bunch of images in an area
sample


Unfortunately, the stamping test on the back of the quilt netted the same results as it did stamping on my practice sample.


I stepped a foot back from the quilt and looked. Yes, I can see that the fabric bled because I know it is there; but, I also think that there is enough quilting, pattern and fabrics to take your eye other places in the quilt. I decided. . . .the chicken wall hanging was good enough as is. So I didn't add any chicken tracks, although it was a great idea!

The bleed is just above the feather with the
bottom black square
 My "stamping experiment" will be covered with the hanging sleeve. I have about half of the sleeve left to hand stitch.  Perhaps, the finished wall hanging will be the subject of my next post. . . .keep your fingers crossed!

Sunday, October 1, 2017

4th Quarter Finish-A-Long Goals 2017

First the good news. . .I completed these goals from last quarter:

2. Mend one shirt and shorten the hem in
two pairs of pants


1. I did shorten the hem on two pairs of jeans and I did shorten the sleeves on a white t-shirt. I even hemmed another pair of jeans and I have enjoyed wearing the clothing. I shouldn't have waited so long to do it! You can read about it here. (This was goal #9.)


2. Crib quilt

2. The grands and I had a retreat.  We stitched this crib quilt. At our June guild meeting, this project was on the free table. JoJo nabbed it for me thinking that it would be a good project for the grands. We donated it to the guild's comfort group at the September guild meeting. You can read about it here. (This was goal #11.)


4. Make two pillow cases


3. Stitched two pillow cases that coordinate with the chicken wall hanging. (This was goal #10.) You can read about it here.


My plan for the fourth quarter is ambitious. I do want to clear these projects off my table so I can delve into other Works In Progress (WIPs) that have been taking up space in my studio! Yes, dear daughter, N. . .I hear you. . .you are cold and no, your fabric didn't make it on the list for this quarter either! Je suis désolé!

1. Finished these chickens!!!

1. Finish the chickens! I KNOW!!!! This has been an ongoing project for the last 10 years and ten months. I sure thought that I was going to finish it last quarter; but, I had some fabric bleeding when I wet the quilt to block it. As I post this, I have the sleeve to attach. I'll share what I did to make the fabric bleeding less obvious. Surely, I can finish this project this quarter! :)


2. Mt. Hood project fabrics
2.-4. Are three projects in JoJo's passport--Oregon, Canada and England. Visit her at Through My Hands to learn more. I did finish the Hawaii project in the first quarter!

2. This is the Oregon project. I see Mt. Hood out my window on a clear day and love the view. Using her pattern, my project will include a lake in the view which is fine! There will be several firsts achieved when I finish this project. I've been working on this project and have had fun. It is almost at the layering stage. I will finish it this quarter! 

Nope, I haven't posted about it. . .well, I've shared some photos; but, haven't shared the whole project yet! For now, I'll just tell you the reveal is coming!


3. Canada hot pad fabrics


3. Canada hot pad project. I'll get to play with hexagons on this project and it is small. It contains some tiny details!


4. Tea room fabrics


4. London tea room project. There is a lot of appliqué in this project and the opportunity to embroider those words with my machine instead of appliquéing them! I may not finish this one; but, I do plan to make progress!
Turn a section of this photo into a quilt
Fabrics for the HH Hall project


5. Photograph  the group quilt HH Hall project.  I have completed my part. At our September guild meeting, I saw all the pieces together; but, I won't actually take the finished photograph until it is hung at the guild's Featured Artist show at the end of October. Working on this project really did push me outside of my comfort zone which was goal number 2 on my list for the year! Oh, and the finished product is absolutely stunning!!!!!!!


6. Figure out what to do with these parts!


6. Figure out what to do with those hexagons made using different techniques and get them into a finished wallhanging! I think I want to use some skinny ribbons and maybe some orange skinny strips of fabric somehow. Ideas have been swimming around in my head!
7. Finish this top--perhaps a little
"Jean Wells" technique for added interest?


7. Finish that project that I appliquéd some leftover pieces to a sparkly background. I think I want to go a little "Jean Wells" to create an interesting background on part of that sparkly black! The reds I've thought about are too orange or too blue. . .hmm . . .more thought is needed!
8. Finish this BOM Mystery from last year


8. Finish this BOM mystery quilt I worked on last month with an online group. I have the last clue to piece. Realistically, I may finish the last step of the top, get it basted and begin the ditch quilting; but, I'm leaving it on the list!
9.  Embroidered butterfly


9. Create a butterfly for someone who needs to know people are thinking of her. I'm thinking that I'll embroider one as I haven't used that part of my machine in months. Although, I haven't thought through the whole project yet so it might end up being one created in fabric instead! I'm not even sure if I'll keep these colors or if I'll go brighter.


10. Scraps to stitch into Christmas
placemats for the Grands

10. Stitch these Christmas fabric strips into a couple placemats. I think the grands might have fun with their own placemat. Perhaps, Miss J would have fun quilting her own placemat! Maybe it would be wise if the placemats were different.


11. T-shirt fabric for Miss J


11. Stitch a t-shirt for Miss J out of this knit fabric. She liked the gold sparkles!
12. Stitch a skirt for Miss J
13. Stitch a dress or skirt for Miss K

12. Stitch a skirt,  out of this denim fabric for Miss J. There is barely enough!!!! She likes butterflies! Her mom brought the fabric to me over a year ago and it needs to be stitched!

13. These gingham fabrics were on the guild free table in September. Chicken scratch is making a comeback; but, I think grand K would like a tiered skirt or jumper out of these fabrics.
14. Add the binding, sleeve and label to
this QAYG project

14. Add the binding, sleeve and label to the Quilt As You Go project.
15. Tote bag from selvagea
15. Make a bag to replace the one that has been hanging in there for the last year. I've had this in my list before. . .maybe I can at least get it started this quarter! I'll be using selvages and know that I'll need to add some yardage for some of the panels or for some of the pockets. These are two patterns that I have. Maybe, I'll eventually make two bags!!!
16.--19. Stitch a swim suit--I've three cut out

16.-19. Make three swim suits. If I locate my black fabric, I'll substitute one of those for one of these.
20. Recover the ironing station

20. Recover my ironing station. I'll use this muslin fabric and yes, it is long over due to get this job done!!
21. Make a bag using this embroidery

21. Make a bag that uses this embroidery that I made.

22. Bath towel to embroider for Miss J
22. Embroider a towel for Miss J. I embroidered one for Miss K years ago. It is definitely time for J to have one too! I plan to place the letter J and some soft of motif on the towel. Maybe, she will even assist with the project!

23. Make this gift bag
23. Make some gift bags. I picked up this little kit at our guild quilt show last spring. I think that there is enough fabric for two gift bags. I'll make these first and then decide if I want to make more or make something else!

24-25 Embroider motifs on these aprons
26. Quilt this piece--I may add borders
24.--25. Embroider some motifs on these aprons for Miss J and Miss K. They sure could use their own aprons when they cook at Papa's and Gran's house! I've had the aprons at this point for a couple years. The base is a repurposed tea towel and the ruffles are left over 2 1/2 inch strips from a strip exchange. It is time to finish!

26. Add a border--maybe--then, quilt and bind this little art piece created in an Esterita Austin Painted Illusions class.

So, there you have it. . .last quarter, I listed 12 projects and finished three. This quarter, I'm listing 26 projects. I plan to have more success in the finishing department than last quarter. I'm thinking that there are a lot of quick projects that I hope won't lead me into using more time that what I think! I so look forward to clearing more space from my tables and design wall!

Don't get me wrong, I'm still allowing myself to start new projects too! For now, I'm planning lots of play time in my studio!