Friday, June 29, 2018

Project Bag for Miss J--Ninth Finish for 2nd Quarter Finish-A-Long 2018

Last weekend, I went to a quilt show that featured projects all stitched by students of one of my favorite local teachers. I really enjoyed the projects at the show. I LOVED catching up with the participants and the teacher!

There were a few vendors and there were also some awesome deals! The red fabrics and dyed chenille might make it into a quilt project soon. I warped some of my circle templates so being able to have a few more at such an affordable price is great! My liquid stitch needed replacing and the velcro was too good to pass up! The cost for all this bounty was eleven dollars!
Purchases from the quilt show

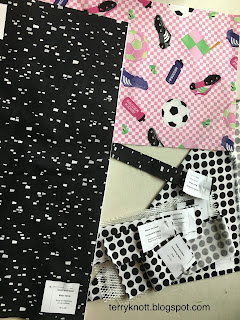
Butterfly fabric was too short too use
After finishing the busy bag for Miss K; I was ready to apply what I learned to the same project by stitching a busy bag for Miss J. I removed the fabrics from the storage box. Right away, I had a problem. The design was printed lengthwise and the bag is cut widthwise.

 I was short about three inches of having it work. I thought about piecing a border to the end of the fabric or in the middle of the fabric; but, in the end, I decided to select different fabric. After I made a selection, I instant messaged my daughter to tell Miss J about the fabric she chose and to ask if she liked my fabric combination. She liked the brighter colors. I was relieved that she was okay with switching fabrics as generally, she is not!  Of course, the fabric change meant that I needed to buy more zipper tape!
New fabric combination

This flower fat quarter was gifted to me at dinner at a retreat many years ago. I've petted it often. I actually had two fat quarters of this print. I made a small bag with the first one about four years ago. I bought the orange fabric to use in a hexagon project and decided that ribbon would fit the bill better. The purple was what I used in my QAYG project.

Playing with the quilting 
The black  zipper tape/pulls weren't right for this project. The beauty of this day and age is that you can order most anything online! I ordered plum zipper tape/pulls. I also reminded myself that moving these fat quarters out of my stash is not an inexpensive process!

Finished front
While I waited for the zipper tape and pulls to arrive, I quilted the body of the bag. I chose to use a variety of polyester threads that blended with the motif or blended with the background. Most of the time, I followed the outline of the motif. Stitching the flowers though, I had to play just a little! I could have quilted an all over design in one thread color and been finished in 20 minutes or less; but, because I LIKE the quilting process, I had fun quilting! I spent about four hours quilting this little piece!
Finished inside

Next up was making the strap, binding the mesh pockets and binding the vinyl pocket. These steps went much quicker the second time around! I did try topstitching the strap differently which I liked. I tried attaching the binding differently to the vinyl pocket and that didn't work well.

I did like the color zipper that I ordered. It is hard to tell what the real color is when you are shopping online! I liked stitching the zipper pulls as one unit and then cutting them apart. Next time, I would make the unit just a bit longer as it was a challenge to tie knots in the end of each string! I still managed to get one zipper zipping in a different direction. I don't know how I manage to do that!

I think the binding went on a little better this time. I'm still not super happy with that part; but, I do plan to try again. These little bags would make terrific gifts although, it still took me more than seven hours to stitch. I must be super slow!

For the bag, I used one yard of fabric. I bought a yard of fabric so my goal of using a net of 50 yards from stash still stands at having sewn 14 1/2 yards from my stash. I have 35 1/2 yards to go to achieve my goal of a net loss of 50 yards from my stash this year. This is finish number nine for the quarter and it was goal number seven on my 2nd Quarter Finish-A-Long list for 2018.
Finished bag ready for action

Wednesday, June 27, 2018

Project bag--a little pink for Miss K--Eighth Finish for 2nd Quarter Finish-A-Long 2018

Fabrics selected for two bags
Last winter, I decided a good use of my many fat quarters would be to make a variety of bags. Making the bags would also be a good way to play with a variety of feet for my machine in addition to learning some new techniques. Lastly, I would have some ready made gifts on hand for Christmas.

Here it is the end of June and I've made just two bags! (If you missed those posts, click the links so you can read about the daffodil bag and the selvage bag.) It was past time to make some progress!!

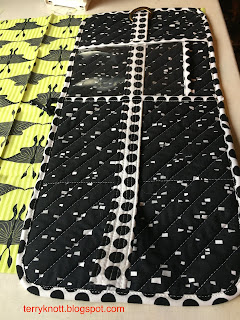
I used two fat quarters for the lining and the outer part of the bag. The black and white dot fabric is for the edge finish and embellishments. It was supposed to be half a yard; but, this piece of black dots leftover was just shy of that so I crossed my fingers and hoped there would be enough! There was! WHEW!!!!
Fabrics cut and labeled

When I purchased the heavy duty zippers and bonsal stabilizer recommended for the project, I laughed at myself. These fat quarter projects were costing much more than the fat quarter fabric that I was moving out of my stash! The pattern is Stash and Dash by Annie Unrein. I labeled the pieces as I cut them out. Her pattern contains a sheet of tags for the pieces that you can copy and then cut to place on your cut pieces. I often label pieces in the project because once the pieces are cut, I want to stitch it. I don't want to try to figure out what piece is what!!!
Zippers on mesh


I reviewed the instructions. I started stitching. I reviewed the instructions and got stuck. First, I got stuck because the zipper tape and zipper pulls that I purchased? Well, I was unable to slide the zipper pulls on the tape. I googled Annie and zipper pulls. Fortunately, for me, Annie had a video tutorial. Turns out, I was trying to slide the pull the wrong way. All I had to do was turn it around! It really was easy to slide the pulls on to the tape!!
Quilting, closure and vinyl pocket close up

Slowly the piece began to emerge. I used a white 40 wt. polyester thread made by Floriani and the walking foot to quilt straight lines on the bag body. Originally, the pink fabric was going to be the outer part of the bag; but, I decided that since this bag could "grow" with the grand, she might enjoy the pink surprise more on the inside so that is how the pink fabric became the lining. Also, if she turns this into a make up bag, it would be easier to find items on a pink rather than a black background.

Finished inside of tote
I stitched the strap, added the zippers to the mesh. I thought that sewing on the mesh would be more of a challenge. Annie provides a tip to sew with the mesh on top of the binding which made the stitching a breeze!

I followed the directions for adding the strap and vinyl pocket to the main body. So far, I'm liking my fabric choices. Then, it came time to add the mesh pockets to the lining. I reread the directions. I looked at the diagram provided. I couldn't see how the pieces that I cut would fit and not interfere with the vinyl pocket!

Perhaps, other people traveled the same path as me because Annie provide a link in the directions to a post in her blog where she provided a tutorial for this very project! Seeing the detailed photos helped a lot!

Finished bag ready for action
It wasn't long before I was ready to round the corners and apply the binding. When I make the next bag, I plan to try to glue the binding to the outer pocket so that when I stitch the zipper pockets, I'll have fewer "opportunities" to match the stitching lines. All in all, I'm pleased with how quickly this bag went together in spite of my confusion with some of the directions!

It did take me most of one day to sew the bag. I'm planning to fill it with pencils, paper, card games, snacks so it will start its life as a busy bag for a six year old grand. There are many uses for this bag. Annie posted here about some of the uses.

I used one yard of fabric from my stash. I now have sewn 14 1/2 yards from my stash and I have 35 1/2 yards to go to achieve my goal of a net loss of 50 yards from my stash this year.

This was goal number six on my 2nd Quarter Finish A Long list. It is my eighth finish for the quarter!

Sunday, June 24, 2018

Miss J's Jean Skirt--Seventh Finish for the 2nd Quarter Finish-A-Long

The project with the fabric and pattern
For the last six weeks, I've been working a lot. Because I've needed to prepare for the courses that I was teaching and prepare feedback after many of the lessons, I knew I wouldn't have much time for working on the truck quilting project. Besides, my brain was not in quilt mode. I didn't want to make a mistake stitching the truck!

After not being able to stitch for about five days in a row, I was surprised at how much I missed spending time in the studio. I decided that I'd better look over my project list for the quarter and find a project that was easy to work on when I had a few minutes to spare.

I decided the jeans fabric needed to be stitched. It was goal number eight on my 2nd Quarter Finish-A-Long list. It is also my seventh finish for the quarter!

Miss J is growing so fast and this 1/2 yard of fabric isn't. If I didn't stitch the skirt soon, I would be making a back pack out of the fabric since there wouldn't be enough fabric to cover the girl!
Skirt and interfacing pieces cut

My daughter bought this piece of fabric shopping one day several years ago because she thought it would make a great item for one of the girls. At least that was the story she related when she gave me the fabric! This project has been on my Finish-A-Long list since October of 2017.

The pattern I have had on hand for many years as I stitched jean skirts for my girls when they were about the ages of my granddaughters!

At first, I decided I wanted to make another pattern; but, after carefully laying out the pattern pieces, I found I was short by at least half a yard! So it was back to my original plan.

A fitting session of sorts

During one sewing session, I cut out the pieces and the interfacing. Then, over a two week period, I would stitch. Some sessions, I clean finished an edge or stitched a side seam. When I stitched on the waist band, I did it in two sessions! Although it took a long time to finish this skirt, this was a great pattern to sew when I had a few minutes to putter.  Having a short stitching session to look forward to or to remember, helped me feel connected to my creative side!

Button from my grandmother's button box
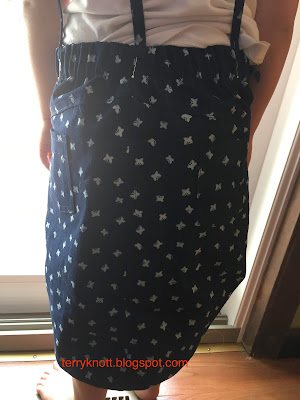
Once the steps remaining were stitching the belt loops, front waist closure and tacking the facing, I asked Miss J to try it on for a fitting. She was game until she saw a butterfly land on the geraniums outside the window. Then she was a "body in motion," moving to watch the butterfly as it flew from flower to flower.  I wasn't able to get the skirt oriented so that the pockets were in the back. Still, I knew it was going to be long enough and that it would fit her around the waist. I'm surprised the photo is mostly in focus!

It didn't take long to stitch the belt loops to the skirt waistband, tack the side seams to the waistband facing and to determine a workable closure. I selected a denim like button that was in my grandmother's button box. It was a perfect and certainly affordable choice!

This skirt is so cute and ready for lots of play. I used half a yard of fabric. I did buy half a yard of fabric though so I still have used 13 1/2 yards from my stash and I have 36 1/2 yards to go to achieve my goal of a net loss of 50 yards from my stash this year. (More on that fabric purchase in a future post as I'm not planning on petting it for any length of time!)

Miss J with her smoothie
First, a photo of the girl who will be wearing this skirt. She made this smoothie and decided she liked the foam on my coffee to decorate her smoothie. She helped herself!

She is my favorite four year old grandchild. We have so much fun playing together!


Finished skirt

Wednesday, June 20, 2018

London Museum and British Museum--Day 16 through 18 of the London Adventure 2018

Roman wall remains viewed from the London Museum
For Day 16 of my London Adventure, I had a leisurely start to the day. I took some time to answer e-mails and to repack my bag. I did a quick weigh of it and found I needed to remove a couple items. I don't plan to remove items at the airport like I did on the way to London!

Kale smoothie and peanut butter/jam blondie
Then I walked to the Museum of London. It took me about 45 minutes. The walk was great and I was never "off course!" On the way back, I took a slightly different route and walked along the Thames. Again, I wasn't "off course!" I like to walk to the various spots that I want to visit because if I happen by a site that looks interesting, I'll stop and look.

At the museum, I liked that staff greeted me at the door and gave me a personal "lay of the land" talk. I also appreciated that the person who helped me was able to tell me where the Roman Wall was located so I didn't miss seeing it!

There were a lot of families visiting the museum. I loved that there were a lot of hands on stations throughout the exhibits and that staff manned activity stations throughout the exhibit. I was looking closely at a chain mail shirt exhibit. I didn't notice the staff member holding the head piece and when I did, she asked if I wanted to hold it. Of course I wanted to hold it, so I did! It was heavier than I had anticipated! I appreciated the opportunity to feel a replica!

I also enjoyed seeing a shoe and pottery exhibit. The displays were in the floor! I could put my foot right next to a shoe and see the difference! After I left the museum, I walked back to my daughter's flat. On the way, I stopped for a smoothie and a treat at The Watch House.
Bridge on my walk to the British Museum


The kale/banana/mango and apple juice smoothie was delicious! The peanut butter and raspberry jam blondie was darn tasty too! For dinner, Nicole cooked a piece of salmon while I turned Jérôme's quinoa side dish into a salad. I added lemon juice, oil, some onions and it was the perfect accompaniment to the salmon. I walked 4.7 miles.

For Day 17 of my London Adventure, I had another leisurely start to the day. I needed to check in for my flight so I didn't leave internet range until I had done that! It is hard to believe that this is my last full day here! The time has flown!
A partial view of the interior of the museum

On this day, I visited the British Museum. My plan was to walk a few minutes and then take a bus to the museum. Well, I went the wrong direction from my daughter's and missed the bus stop. I ended up walking to the museum. Although I wasn't on my planned route, I never was "lost." I just walked in the general direction and arrived in a little more than one hour!

Egyptian exhibit artifacts
I was surprised to see so many people at the museum. There are at least a 100 galleries of exhibits so this is a place that you could spend the whole day! My favorite places were the Egyptian and the African galleries. I wasn't planning to go to the Egyptian gallery but the gallery I was in was so crowded that I just stepped next door. I liked seeing all the artifacts and I liked reading about the mummification process.

What I liked most about the African exhibit was how well rounded it was. I loved the hat exhibit. There was also a tree of life sculpture made out of guns that had been turned in during an exchange program. People exchanged a gun for a tool like a plow or a shovel. One village turned in their guns together and took home a tractor! Another group took the guns and turned them into art!

I did manage to locate a bus stop so I didn't walk back to Nicole's flat. She encouraged me to stop at another coffee shop called Fuckoffee. It isn't far from her house. She wanted me to order a smoothie with bananas and peanut butter. The drink has an offensive name. I tried; but, I couldn't do it. The staff person said, "Oh, you want the MotherF****!" (See, I can't even write it!) The smoothie was delicious and the duck wrap I picked up to eat with it was good too. I didn't find the prices any more expensive than other places and I thought that the quality of the food was great.

Click the link above to find out the story behind the name or rather how the business fought to keep its name.

While I was enjoying the rest and the food, I had a new best friend. Dogs are allowed in eating
Coffee shop clientele
establishments and this dog was so mannerly! I know he could smell that duck and he hoped I would share a nibble. (I didn't.) His owner had treats for him and when another seat opened, the dog hung out on the bench next to his owner.  You can tell that the dog is so stressed out about hanging out in the coffee shop! (NOT!!!) I walked 7.5 miles.

Day 18, I headed for home so this is my last post about my trip. It was a great adventure and already I'm planning my next visit to London. Nicole booked an Uber for my route to the airport. This driver was great! He shared a lot about the city and the country. When I expressed my surprise at so many kids at the museums, he said they were on holiday the week after Easter!

A little breakfast while waiting to board
I had a Nero coffee and a hummus falafel while I was waiting to board. The trip home was uneventful. I flew from London to San Francisco and then on to Portland. I slept a few hours on the long leg of the flight and chatted a bit with a Londoner who was joining his wife in Hawaii for several weeks.

Good bye England
It took my knees about three weeks to return to a somewhat normal state.

I did have an appointment with my primary care physician. I had an X-Ray and and an appointment with an orthopedic surgeon. The surgeon I visited said I wasn't a candidate for a knee replacement because my knee joint wasn't bone on bone yet. His advice to me was to get a a cortisone shot before my next trip, to loose weight (I'd already lost nine pounds) and to join a water aerobics class. (Twice a week, I swim.) He didn't have any suggestions about how to be able to go on my daily walks or what to do for all the swelling every time I walk.

I made an appointment with a naturopathic doctor and after about a month of mostly following a diet and treatment plan, I'm feeling better. My knees are no longer warm enough to act as personal heating devices. Although they still swell and they are still painful with use, the swelling and the pain is much less. I have hope that I'll be able to get back to neighborhood walks sooner rather than later.

Sunday, June 17, 2018

Paris to London day 15 of the London Adventure 2018


Jérôme's favorite church
It was early when we left Tavaux to board the train in Dole to Dijjon. I was surprised that there weren't more people on the train; but, then I remembered the Monday after Easter was a holiday for everyone. We had a half hour wait in Dijjon and then we were on our way to Paris. Jérôme had packed us some of Moniqué's bell cake from the previous day, a MacGonthier, our cheese and a bottle of water. His MacGonthier (baguette with lettuce and cheese) was good! I'm sure it was healthier than McDonald's breakfast sandwich!

When we arrived in Paris, it was about 9:30AM. We met Joy for coffee. Nicole asked me if I needed any more canned fish soup or any other French products; but, my suitcase was getting as heavy as it was when I arrived so I passed on purchasing more! Plus we were carrying our luggage as we perused the streets so I was more mindful of my acquisitions! Truth be told, Nicole did most of the carrying of the heavy bag! (Thank you Nicole!!!!)

The toy sailboats sailing in Luxembourg garden
We walked to see Jérôme's favorite church and then we walked through our favorite garden, Luxembourg garden. My favorite parts of the garden to visit are:
--a smaller replica Statue of Liberty stands in the park that acknowledges the sculpture who designed it as well as a remembrance of the tragedy of September 11th in the New York City.
--The Medici Fountain fountain. It was constructed at the request of Marie de' Medici around 1630 and Napoleon had it updated almost 200 years later!
--Walking around the outer path of the garden. You get to view the expanse of the plantings and colors of the garden.
--Sitting near the center of the garden, watching the kids sail boats that they rented.

Across the street from the garden is Dalloyau which is a pastry/deli shop. We had coffee and a pastry.  I couldn't resist. . .I also had a pistachio macaroon! Then, we made our way back to the train station. Nicole navigates Paris and the transportation system like she is a native!

Desserts at Dalloyau
The train from Paris to London was packed. I finished one of the books I had brought with me and we had lunch on the train. Nicole booked us in first class and we had salmon, quinoa, bread, wine, a chocolate cake and coffee!

Once in London, we took the tube which stopped about a 20 minute walk back to her place. On our walk, we stepped into to a grocery store for a few items for dinner, since were were both a little hungry. Once at her place, we made a green salad with boiled eggs which hit the spot. I slept well that night!

Wednesday, June 13, 2018

Kitchen Towels--Sixth Finish 2nd Quarter Finish-A-Long 2018

Zig zagging the rick rack to the strip
After my last finish, I decided I wanted to tackle an easier project. I decided to stitch the four kitchen towels that were goal number 14 on my 2nd Quarter Finish-A-Long list.

Last fall, I saw a sample towel on display at Craft Warehouse. I was smitten enough to buy supplies to make tea towels for gift giving. My plan was to stitch the kitchen towels for Christmas gifts. Since I'm posting about the towels now, it's clear I didn't finish them last Christmas! I decided, however, not to have the supplies hanging about for another year!

Ready for hand stitching
I preshrunk the linen towels, the cotton fabric and large rick rack that I used to trim the towels. The directions stated I needed two fat quarters to make the project. I bought half a yard of two prints and half a yard each of black and red rick rack.  The linen towels shrunk over an inch so I was glad to have washed them before adding the trims.

I cut a 3 1/2 inch strip of one fabric and stitched a piece of rick rack to the bottom of the strip. I also stitched a folded 1 1/4 inch coordinating strip of fabric to the top on the strip. I added this to half of the towel. (I cut the towel in half.) I cut a "handle" from the coordinating strip and following the directions, I also cut a piece of batting. After I had placed the layers right sides together, I machine stitched around the outer edge, turned and pressed the "handle." I hand stitched this handle to the top of the towel.

The four finished towels ready for kitchen duty!
I added some top stitching around the handle edge, stitched a buttonhole, cut it and added a button. The buttons came from my grandmother's button box. I have no idea how old they are; but, she would be tickled that I found a use for them.

Supplies for another two towels
Most of the buttons in my grandmother's button box were "saved" buttons. She would cut the buttons off of used clothing and sometimes she would string the buttons from that garment on a cord/thread so the buttons were together and ready for future project! The used clothing would be cut into rags or strips to tie the tomato plants to keep them from falling over.

For the four towels, I used about 1/2 yard of fabric. I have used 12 1/2 yards from my stash and I have 37 1/2 yards to go to achieve my goal of using 50 yards from my stash this year. This is my sixth finish for the quarter. I now have four great gifts for Christmas 2018!

Because I stitched these when I had five to fifteen minutes to sew, I didn't track how much time it actually took me to make all four! I've been working many days and also some full days so my studio time has been limited.

As I stitched this project, I discovered that I have one more yellow linen towel so I can make two more kitchen towels. (I lost track of how many towels I actually purchased!)

I don't have enough of the chicken wire fabric to make two "handles." I may have a great fabric hanging out in my stash. My fingers are crossed. In the meantime, I have the leftover bits, towel, pattern and directions gathered in a zip lock bag.

I have some other linen towels too. These will wait for another time though as I've lots of other projects on my list!

Sunday, June 10, 2018

Tavaux-days 12 through 14--The London Adventure 2018

Setting up an e-mail account for Moniqué
It was wet in Tavaux on day12. We did walk a few minutes and visited Jérôme's grandmother.  The rain picked up after we returned and we decided to forego driving into Diijon to shop and sight see.

Moniqué cooked cod in a white sauce with purple potatoes for lunch which was delicious! After lunch, Nicole helped Moniqué establish a gmail account. I snapped a photo of them working through the process.


The everything pizza at La Florentine
In the afternoon, we went shoe shopping as Nicole wanted an updated look for her feet for the birthday party. She was successful!

Dinner that night was pizza at the best pizza place (La Florentine) in France. It was located in Dole. The restaurant seated about 24 people (it was full) and the take out orders were just as many! I agree with the locals that it is the best pizza in France!

I had the everything pizza. It came with olives, peppers, onions, capers, anchovies, chorizo and an egg among the cheese and sauce. It was baked on a thin crust. . .just like what would be served in Italy.

I had to chuckle watching a Frenchman bake an Italian pizza. His technique was poetry in motion. His pizza creation was delicious. We had a nice walk around the shopping area and Jérôme walked us to where he attended high school. I walked three miles. My knees are protesting with each and every step. The knees are swelling too. Each day they have become a bit larger.
Sign outside the abbey

Day 13, we took a little drive to the Abbaye Notre-Same de Cîteaux and picked up some cheese. First, we took a walking tour around the grounds. There are ornate stones that provide the history of the grounds which was interesting to read. In the early days, the cheese was available for purchase after mass. People loved the cheese and the lines were long for and and sometimes, the monks ran out of cheese before all the people were served. People started leaving mass early so they would be ensured they would get their cheese. So the monks opened a cheese shop so people could come other days of the week! The little shop sold regional products, many of which originated in other abbeys. It was a fun stop.

The cheese in this region is delicious.  The variety of cheeses is many. I understand that one could eat a different cheese every day and almost sample all the cheese that is available in the country!
Variety of cheeses in the case for purchase at the abbey

I took a photo of the cheese case just because what is available for sale here is nothing like what is available for sale in France! The Cîteaux cheese is in the red basket with the blue design on top of the wrapper. It is a strong smelling soft cheese that is so creamy when you bite into it and has a light milky but earthy taste. This is one of the cheeses that isn't pasteurized so it is best eaten in France.

The "Channel" costuming for the "spoof"performance
This was also the day of the big party for Jérôme's cousin, Anne who turned 40. Forty is a beginning and what a better way to celebrate than to have a party with your cousins, aunts and uncles, sisters, brother, parents. . . .well, your whole family!

Joel and Sylvie, her parents, had painted the dark wood on their living room ceiling white and they had installed new flooring. Joel joked that he had just finished the job earlier that morning. The renovation was beautiful.

The hors d'oeuvres and starters were almost too beautiful to eat. (I managed though!) Of course, there were toasts of champagne and a spoof to get the party started. Anne's uncle and aunt provided a "story" about the birthday girl.

With 26 people at a sit down dinner, it is no small feat to get that many French people to be seated all at the same time! Sylvie prepared veal in a gravy sauce, a grated potato side and a vegetable brochette for the main. Veal isn't my favorite; but, Sylvie's dish was delicious! Of course there was bread and a Burgundy wine to go with the main dish.

Jérôme and his sweet grandmother
Next came the cheese course, more bread and more wine. My two favorites were a goat cheese and I couldn't tell you what the other cheese was that I enjoyed. It had a sort of green rind and was a more firm cheese. There was more spoofing. The cousins banded together and put together a song for the birthday girl which were followed by a couple dance numbers.

Anne and Jérôme the newest members of the "40" club
Her grandmother gathered all the grandkids and gave them each a little something in an envelope. She decided that she didn't need all the farm allowance this year so she divided it among her grandchildren. She loves kids and she especially loves the small ones who can bring the biggest smiles to her face. She is a special lady and so kind to put up with me trying to speak French with her!

Anne's husband, carried in the cake, with all the candles lit. There was more singing of happy birthday in French. Anne blew out her candles. Then, the candles were relit and her daughter got to blow out the candles. With the cake, we toasted the birthday girl with champagne. Anne's husband is Norwegian so he and his brother sang her happy birthday in Norwegian.
Moniqué's Easter tree with beautiful eggs

Anne opened her gifts. Then, the tables were cleared, chairs stacked and the dancing began.

It was after two in the morning when we left. The dancing was still going on; but, this American was ready for sleep! It felt so odd to be going to bed about the time I would be getting up!

Spending Easter in Tavaux on day 14 was special. Moniqué baked a special sweet bread in a bell mold. It was delicious. The family called it her bell cake. Everything Moniqué cooks or bakes is delicious. For dinner, Moniqué made Coq Au Vin as the main with a variety of salads as the starter. We picked up the cake and the baguettes from the local Boulangier. The cake was delicious. It had a raspberry filling and the raspberries tasted like they were fresh!
Easter Cake

There is something about Tavaux. . .I don't know if it is the air, the bed, the bedding; but, it is sure easy to sleep here!

Tomorrow, Nicole and I leave early to catch the train back to Paris. We take the speedy train in the afternoon back to London. As always, the time goes by way too fast!

Wednesday, June 6, 2018

Circling the Sun post 3 of 3--Fifth Finish 2nd Quarter Finish-A-Long 2018

The look I wanted to achieve


It was time to turn that quilted border to the back of the quilt and turn it into a facing.  First, I squared up the quilt. This was the easiest process that I have had. Second, I pressed that border, which now became a facing. I was impressed with how easy it was to press to the back of the quilt.

This method didn't work

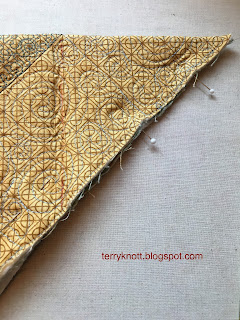
Third, I experimented with how to miter the corners. In the beginning, I thought that pressing the edges then marking the fold line was the way to proceed. It wasn't the best approach. The thickness of the fabric caused the chalk marks to not be accurate enough for the miters. It was however cool to see that the corner could come together!

Pressed and ready to stitch
Next, I pressed the angle and made sure the edges were aligned. I used a friction pen to mark the sewing line which gave me the best results. I checked the corner and only once did I need to restitch. I trimmed away some of the bulk and pressed the corner. It was nice and flat. The corners are, in judges' terms, square or slightly rounded.

Ready for the edge finish
Finally, I needed to figure out how to finish the raw edge of the facing. Honestly, I thought it would be way more difficult to achieve this miter!

If I had thought more about this finish step, I should have stitched the finish fabric to the raw edge before I had stitched the corners.

If I do this technique again, I will enclose the raw edge first. It was a challenge to stitch this strip without stretching the facing. This strip came from the backing that I trimmed away from the quilt. I started with a 1 1/2 inch strip, I used a 1/4 inch seam and stitched close to the corner.

Then I pressed the seam with the bulk towards the strip. Next I turned the raw edge toward the facing and pinned it in place for hand stitching.

 I like how the piecing added to the interest. I was sad that the little piece of blue in the top of the finished strip would be covered with the sleeve. The corners were also a challenge.

Label
Before I hand stitched the edge to the quilt, I inserted the label. This label was one I picked up off the guild free table. I added some gold fabric to the edges and put a piece of fusible interfacing on the back of it. Then, I used a micron pen to write in the information. This time I tried a finer pen. It was a .05. Next time, I'll use a less fine pen because the line was too fine. I like how it appears like I inked this label; but, I didn't!

I like how the piece looks. I love the back and I love the interest the facing adds to the back. It could be a conversation piece of how does the quilting show there; but, not on the front? Although, most likely the only people who will know about it are you and me!

Oh and the pieces left to trim in useable bits using Bonnie Hunter's scrap saving system? Not many remained at all!
Finished back

Leftover bits ready to cut into squares and rectangle


I used about 2 1/2 yards of fabric in this project. I used four fat quarters from my stash for the front and the back came from my "chunk" drawers that had way too many gold and too many green fabrics to close. Each drawer closes now! I have used 11 1/2 yards from my stash and I have 38 1/2 yards to go to achieve my goal of using 50 yards from my stash this year.

This was goal number four on my second quarter Finish-A-Long list. If you missed the previous posts, you can click the links below to read them.
Circling the Sun post 1
Circling the Sun post 2

My next project will be stitching up four kitchen dish towels. I probably have supplies to make more than four; but, I'll reassess after I stitch the four!

Finished front