Wednesday, May 30, 2018

Circling the Sun--post 1 of 3

In my Finish A Long list for this quarter was this little wall hanging. My friend, Pat, walked me through the steps of insetting a circle into a piece of fabric. I inset a couple circles and I also sliced and added some smaller strips. It was a fun three hours of play that I did more than a year ago!
Piece in my Finish A Long for the quarter

I thought that this could be my quilt for the book our group had read about Beryl Markham who was a horse trainer, pilot and writer from Africa.  She wrote "West With the Night." Our group read "Circling the Sun," written by Paula McClain. "Circling the Sun," is a novel based from Paula's research about Beryl. I enjoyed reading both books.
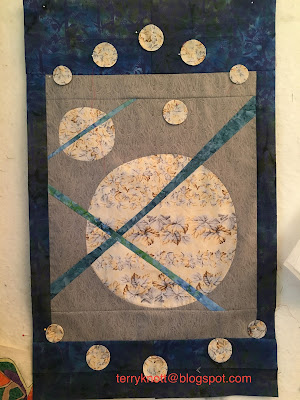
Adding appliqué circles and borders to the design

When I put the project on the Finish A-Long (FAL) list, I thought it was ready for a back and quilting. Then, the piece started talking to me. It wanted to be bigger. (It measured 18 inches wide x 22 inches high.) In a Joen Wolfrom workshop last fall, she talked about shapes that were pleasing to the eye. I decided that I would make this project as close as possible to a Fibonacci number--20 inches wide  x 32 1/2 inches high.
Adding the facing before quilting

I scrounged through my fat quarter stash and located a second fat quarter of the background. I also picked out a coordinating fat quarter that would work as a border. I stitched more background to the piece and added a border.

It wanted more circles. A little circle fabric remained so I traced some circles, stitched a gathering thread around the outer edge, pulled it up, used some starch and pressed it into a circle around a template. After it cooled, I auditioned it on the top. I used Karen Kay Buckley's perfect circle product and her technique.

Although I warped a few of the templates, the technique worked well for me. I liked what I saw. I made more. I played a little more with the arrangement and next, I hand appliquéd the shapes to the background.
Chunks to be used in the pieced back.

After I had completed the appliqué, I looked again at available fabric chunks from my stash for the back. I selected a piece that I stitched as a second border for the top. If you think this is a crazy addition and wonder what was I thinking, let me explain.

I plan to turn this section into a facing after I have finished quilting. This is an idea that I have been thinking about for sometime. Since I haven't actually done it, I have no idea if it will work or not. I may end up cutting off that border; but, for now, it is staying! In my head, I think a quilted facing will be unique and interesting looking finish.
Pieced back

This was the pile of fabrics that I had selected for the back. These were just chunks from other projects or leftovers from the front. The chunk drawer that these were living in was over flowing. Using the pieces makes more room!

I laid out the pieces and then begin to stitch the small ones together, making a larger section. I kept going until I had several units that I could stitch together. I also place the smaller pieced sections in the middle of the back so that during the trimming phase I don't loose some of the piecing. It took me about four hours to piece the back and to stitch that second border on the top.

Leftover bits
I did save enough of the background fabric for the sleeve. I like the interest a pieced back adds to a project. I love using up the bits. When I finished, few scraps remained. Some of these might make their way into the label. Yes, there will be some chunks/strips left after quilting. Still it feels great to use the bits into a useable back!

The next step is to sandwich the top to the back with a piece of batting in between and to quilt the project. My plan is to quilt with cotton thread; to use the same color on top and in the bobbin and to not quilt as densely as I often quilt. I will stitch in the ditch first so that the piece is anchored enough for play time er stitching time!

Now an announcement er update regarding Miss J's artist smock. It won a blue ribbon at the country fair AND she won the prize for being the youngest exhibitor. Her prize winnings were $15. Hm m m. . . .I wonder how she will spend her winnings? If you missed that post, you can read it here.

Since this is the end of the month, I'm entering in my teaching statistics for May.
I trained 36 students in Basic Life Support CPR (YTD 131) and 10 students in Red Cross Babysitter's Training. YTD, I've taught a total of 228 people!


Sunday, May 27, 2018

Hello Paris--day 10 and 11 of the London Adventure 2018

Iconic Eiffel Tower
We were on the train from London to Paris at 7 AM. The train ride lasts about two and half hours. When we arrived, we took the metro to a stop near our hotel. From the stop, we walked a few minutes to the hotel. It was too early to check in; but since Nicole has stayed more than 1,000 nights with that organization, she has "status." So after dropping off our bags, we went to the executive lounge and had a cup of coffee to refresh ourselves. This trip, we stayed in the Opera district. From a window in the hotel, we could see the Eiffel Tower.

Nicole could be a tour guide in Paris. She knows not only the location of the landmarks most people want to see; but, also, she knows the locations of the stores with more affordable pricing! I wanted to add to the grands tea set and I wanted to buy a particular type of tea. Plus, I wanted to walk across the Alexander Bridge, see Sacré-Coeur, walk through the Jardin des Tulleries and Jardin du Luxembourg.

Nicole with the Alexander Bridge in the background
We are finding that we have similar tastes. The positive to having similar likes is that we have less ground to cover. The negative to having similar likes is that we miss out on other experiences that we would enjoy! At any rate, by noon, we were taking in the ambiance of Paris. It did rain and the wind gusted hard enough to turn people's umbrellas inside out. We did get wet; but, for the most part, we were shopping when it was pouring so the weather did little to dampen our spirits! I did not find the pattern for the tea set additions. We did find some clothing for the grands though!

Tile floor pattern inside the Petite Palaís
We stopped at Eric Kayser for lunch. There are lots of locations throughout the city. It is a bakery/deli and popular for people wanting a quick breakfast, lunch or wanting to pick something up to add to their dinner. We each had a lunch special which was a hearty salad, bread, a drink and a dessert. You walk by the case, pick what you want and you pay for it. You can eat in or take it with you. We each had a hearty salad. It was delicious and the cost was about $12 euros.

 While crossing the street to Eric Kayser, I saw an advertisement on a city bus about Van Gogh paintings at the Petite Palaís. We decided to see the Dutch painters of Paris exhibition. We walked by the Louvre and through the Jardin des Tulleries on the way.  An added bonus was that we also viewed the inside of the Petite Palaís. I enjoyed that  view as much as I enjoyed the exhibit! The tile floor pattern sure could become a quilt. We were surprised that so many people were viewing the paintings too! Mondrian and Van Gogh were my favorite artists. (Van Gogh is Nicole's favorite artist.)
Scroll work on the stairway at Petite Palaís

On our return, we walked across the Alexander Bridge. In the early evening, we stopped at Starbucks for a coffee and a well earned rest.

Then we met friends of Nicole's for dinner at Baltard au Louvre. The servings were small. We ordered a variety of items and shared. This was a great way to try different dishes.  Getting a couple bites of each dish was just the right amount of sample! I enjoyed catching up with Joy and meeting Zoe. They both were kind about including me in the conversation. Then we had about a 20 minute walk back to the hotel.

What an amazing day! We returned to the hotel at 11:30PM and we had walked 11 miles! We both slept in the next morning!
2018 pose of Sacré-Coeur

The next day and after the hotel breakfast, we dropped our bags for safe keeping with the hotel staff while we saw a bit more of the city. We set out for Sacré-Coeur.

The first time I saw Sacré-Coeur, Nicole was my guide. She took me a back route and as we rounded a corner, I saw the church. It was a "WOW" moment. This time, we took a more direct route and shopped for the tea set pieces along the way.  I found the pattern of the tea set pieces so I bought a couple bowls and a couple mugs.

We walked around Montmarte square in which a number of artists sell their wares. The first time I was here, there were a lot of stalls featuring flower and bicycle paintings. This time there were definitely more portrait artists than I remember. I missed seeing the bicycle and floral paintings. On one corner of the square was a Starbucks, so we purchased a coffee, walked back to the church and sat. We enjoyed the panoramic view as well as people watching while we drank our coffee. I am learning that a well-timed coffee break, helps the knees rest, allows me to enjoy the sights as well as regroup my energies to move to the next destination. By the way, Sacré-Coeur is still a WOW!!!!
Pattern on a building

Next we traveled to the Galleries of Lafayette so I could purchase a particular kind of tea. Then we walked to another Eric Kayser for lunch. This one was not as crowded as the was where we ate the previous day. After eating, we walked to the hotel to pick up our luggage and then we walked to the metro so we could board the train for Dole.

Unfortunately, the train from Paris to Diijon was late. When the train pulled into Diijon, we had to hustle to make the connection to Dole. Fortunately, the personnel held the train and we made it; but, these knees refused to hurry much! The ride to Dole is about 20 minutes. Jérôme met us at the platform. Moniqué, his mom, had a delicious tomato and tuna quiche ready for us when we arrived at 8 PM. We walked more than seven miles by the end of the day.

I'm looking forward to letting the knees rest a bit as some days the swelling has been so great that it's been a challenge to get my pants on over them!


Wednesday, May 23, 2018

Miss J's Stitching--An Artist Smock Fourth Finish for 2nd Quarter Finish-Along 2018

Panel that we started with
This panel of a child's artist smock was on the guild free table last fall. I thought that it would be a good stitching project for Miss J. We cut out the shape and the two pockets. I showed her how to draw a line on some of the fabric waste and then gave her a pair of scissors so we both were cutting. She liked drawing her own line. Of course, she LOVED cutting!

I'm finding that if we use the same supplies and work on the same techniques, then Miss J has more fun when we stitch. She loves to cut with scissors. Cutting tiny pieces excites her. As she cuts, she watches how the tool reacts rather than cutting to achieve the shape! She also wants to cut with a variety of scissors. She has "her" fabric which she can cut whenever and however she wants.

We have had instances where she has cut other fabric. . .but, no one died.  In those instances, I learned a better way of setting parameters, explaining the parameters and reviewing the parameters!  We both have progressed!
Bias tape and lower pocket

We looked over my vintage collection of bias tape and found enough double fold bias tape. We needed two packages. The prices on the packaging ranged from 15 cents to 54 cents! The yardage in the cheaper packages was five yards! The 54 cent package contained four yards. These were in my grandmother's stash. When possible, I try to use some of her treasures. She would have loved this project because it was for a kid and she loved kids!

Miss J chose the red packages. She had a choice. She could have chosen blue; but, since I'm partial to red, I was happy with her choice! Additionally, now that her project is finished, I like the contrast with the red! The first day, we cut out the pieces, chose the bias tape and stitched the upper pocket.
View of the ties and the smock back

When we sew, Miss J sits on my lap. I provide the power and she "steers." She guides the fabric under the presser foot. Yes, I also help with the guiding process. She lowers and raises the presser foot. She backstitches when we need that function. She is working on identifying the throat plate and foot and selecting those in the machine I have. She thinks the needle position button is cool but, not as interesting as the stitch length and width dials! Again, she likes to see what all the buttons do which sometimes leaves me with an interesting stitch!

The second day, we stitched the lower pocket and cut all the bias tape pieces. The third day, we sewed the ties on the smock. Miss J liked stitching the long edge of the bias tape closed. She can almost thread the top of the machine and most of the time, she can thread the bobbin. We also stitched the bias tape around the outer edges of the smock. Then she tried it on! She loved it!!! She is ready to create art.

Tomorrow, I'll enter this item in the country fair for her which happens over the weekend. Maybe we will be able to go to the fair and see her entry together. It sure was fun to stitch with her.

For the photo, I was surprised that she didn't have her hands in the pockets. She thinks that creating the pockets is magical. She hasn't put together yet that it is the stitching that makes the divisions to give the sections. This was goal number 19 on my 2nd Quarter Finish Along list. I used a yard of fabric. This brings the total of fabric used from my stash to 9 yards. I only have 41 more yards to go to meet my goal of using 50 yards from stash this year!

Finished smock ready for creating art

Sunday, May 20, 2018

Miss J's Apron--3rd finish 2nd Quarter FAL (2018)

The embroidered "J"

After completing Miss K's apron, it was time to tackle Miss J's apron. If the base fabric looks similar. It is. I took one tea towel and cut it half. I used similar fabrics for the ruffles. About five years ago, our guild had a monthly strip exchange. Often, there were at least two strips of the same fabric.

These strips came from several different strip exchanges. As I was putting the strips together, I thought it would be funny if these actually came from the same person's stash! I'll never know!

Miss J loves animals. Lately, she has been drawn to butterflies so I decided she needed a butterfly on her apron along with her initial.

I selected a "J" from my embroidery software. I used the software to stitch a fill design inside the J. I am getting better at understanding how to hoop my design although, I'm still not quite there yet!

Embroidered butterflies
My original thought was to embroider the design on organza and then applique the butterfly to the apron. I wanted it to be three dimensional; but, I couldn't figure out how to achieve my idea. In the end, I decided to embroider directly to the tea towel. I did it twice. This decision to embroider directly to the towel was not good. . .twice!

This design was too dense for the tea towel. Even though I used four layers of water soluble stabilizer, the background of the tea towel puckered. This was a great learning experience. I'm now thinking that most of the "designs" in my software are too dense to stitch on anything but a thick item like a bag.
Finished apron

I considered hand stitching a swirl to mimic each butterfly's flight path. I decided, however, that I had learned enough with this project and I stopped.

The good news is that Miss J LOVES her apron. We had a scavenger hunt to find it. Then we had to bake some blueberry muffins to see how well the apron performed. It performed well! (The muffins were delicious!!!)

This apron and the one for her sister have been waiting for a finish for a long time. . .I'm thinking at least three years. This embroidery stuff sure manages to easily stymie me. In a bit, I'll try improving my embroidery skills again. I'm planning to work on a quilt project next.

This was goal number three on my 2nd Quarter Finish-A-Long list and my third finish for the quarter.  (I used half a yard of fabric from my stash. So I now have used a net of 8 yards of fabric from my stash and have 42 yards more to go to meet my goal of using 50 yards from my stash in 2018!)
Miss J says, "Is it time to cook?"


Wednesday, May 16, 2018

Miss K's Apron--2nd Finish of the 2nd Quarter Finish-A-Long (FAL) 2018

Embroidered K
 After completing the selvage tote, it was time to get the embroidery on the grands' aprons. I decided to start with Miss K's first.

I saw Jenny Doane, from Missouri Star Quilt Company, demonstrating the apron technique that I used to make this one on a Fons and Porter program. Instead of a pocket, she used 2 1/2" strips to make a cute ruffle accent. I used 2 1/2" strips for the tie too. I had the strips from a strip exchange. Click here for a link to a tutorial of Jenny making an apron from a tea towel.

K with bling
This project has been waiting for the embroidery for a couple years. I am not confident with my embroidery skills. . .especially, when I'm stitching directly on the item. I have such a time positioning the design on the garment so that when the embroidery is stitched, it looks centered.  This was a good project to practice center the design.

The initial K is 2 1/2" wide by 3 1/2" high. It would be a great design for applique which I might save for another project.  I incorporated some tips from a friend about centering the design and after much trepidation, I began. Stitching the K went smoother than I had imagined.  Miss K loves bling. I have some crystals so embellishing the initial was my next step.
Hearts weren't it

I have a variety of crystal sizes. When I purchased them more than five years ago, I thought that I would use the largest crystals most often. Actually, I've found the smaller crystals worked best for my previous projects.

For this special project, I pulled out the largest crystals and started. I had envisioned using a variety of crystal sizes to fill the space. It was easier to place the larger crystals and then fill in with the smaller crystals so that was what I did. The crystals look yellow; but, they are clear. I love how the light pink embroidery sets off the sparkle.
Ribbon samples for auditioning

After I finished adding the bling, thought about adding more crystals in a heart design. I cut a couple paper hearts; but decided the hearts weren't it. I also decided that although the crystal K was terrific, it needed a little more something.

Auditioning flowers at the top of the ruffle


I was at a sewing and craft fair and saw ribbon that was pulled into a flower and thought that might add just enough pizazz to the apron for Miss K.

I bought some ribbon in colors and widths that I thought might work. I came home and played. How the ribbon works is that there is a heavy cord on one edge of the ribbon. You pull both ends of the cord and you get a flower. I used an 18 inch piece of ribbon for the fuller flower centers and a 12 inch piece of ribbon for the less full flower outer petals.

As I was purchasing, I thought that the purple centered ribbon would work best. I decided that the purple didn't work well with the rest of the apron. The light flower with the silver edge was too light; but, I thought the two ribbon combination flowers worked best.

I just knew I was going to put three flowers at the top of the ruffle. It looked blah. So I tried spacing the flowers in the body of the apron.

The results were also blah. So I tried two down the center and decided that this option would make Miss K the happiest. Yes, the flowers are impractical on an apron; but, totally important for someone who likes ruffles, bling and as many accents as possible!
Finished apron

This is my 2nd finish for the quarter and goal number number 2 on my second quarter Finish-A-Long list. (I used half a yard of fabric from my stash. So I now have used a net of 7 1/2  yards of fabric from my stash and 42 1/2 yards more to go to meet my goal of using 50 yards from my stash in 2018!)

I'm saving it for Miss K's 6th birthday in a couple weeks. (I can't believe that she is almost 6! Where does the time go?) I hope that she is going to love it!

Sunday, May 13, 2018

Goodbye Cotswolds--Day nine of the London Adventure 2018

Ellenborough Park
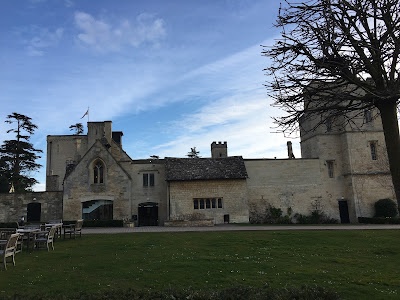
We left Chetleham and the Ellenborough Park spa/lodge a little after nine AM. I was sad to leave behind the Cotswolds as I so enjoyed seeing the small villages tucked along small roadways as we motored towards London.

Our first stop was Oxford. I didn't realize that Oxford University is really made up of 28 smaller colleges. We saw the bookstore that was the inspiration to the Harry Potter books. The shop had Harry's broom in the window! The shop did look like I thought it would from reading the description about it!

We checked out the Modern Art Gallery, the covered market and saw the castle. Then it was time to head to the outlet mall at Bicester Village.

The soap assortment at The Close Inn was wonderful. It was a brand that Nicole recognized and she suggested checking the outlet mall on the way back to pick up some of that product. We arrived about 2PM. I was shocked at how large the mall was.

Oxford Castle
I was more shocked to learn that there are 1,750 parking spacings in one area and another 1000 in another! I was gobsmacked to see the parking lot almost full to capacity.  When we walked to the shops, I was surprised to find that the shopping was high end! Think Prada, Burberry, Michael Kors, Coach. . .well, you get my drift! I couldn't believe how many people were shopping there mid-week!

Unfortunately, the exact product I wanted wasn't available. Turns out the product I liked was the number one seller and rarely comes to the outlet mall! I made do with a substitute. Maybe later in the trip I'll happen by a store. If so, I might purchase the products I used at The Close Inn.

Lunch at the outlet mall
We had lunch at the mall and then we headed back to London. The lunch place we chose served coffee in cups that were really the size of a bowl. Perhaps, this is done to make it easier to dip your pastry or in my case, toast, in the coffee! The salad I ordered was delicious!
After lunch, we continued toward London. Nicole is great at driving on the left hand side of the road. My navigation skills aren't that great even with GPS.  There were times when I would think it was the correct part of the round about to take only to find out that it wasn't and we got to either turn around or we got to find a different route. We did return to the car rental place with about an hour to spare before closing time so that was great.


Dinner made after a rummage through the freezer and refrigerator
Unfortunately, we
arrived during the evening rush hour. Riding the tube at that time of the day was an experience. People were jumping over our suitcases as we were pulling them! I am fortunate that I don't have the need in my life to have to hurry like those people were hurrying!

Once back at Nicole's flat, she started a load of wash and showed me what ingredients were available to make dinner. Nicole said that if it were up to her, we would have peanut butter on some toasted bread! This would have been fine with me; but, I had the sense that she really wanted something else.

She had pasta in the cupboard and shrimp in the freezer. She had a little coconut milk, a lemon, an onion, garlic and 2 sun dried tomatoes in oil in her refrigerator.  I made a pasta dish with shrimp in a lemon coconut sauce that tasted darn good! While I liked the color the tomato added, the flavor fought a bit with the other ingredients. Another time, I would save the tomato for another dish.

I walked 5 miles today. Some days on the trip, my knees have swollen so much that it is challenging to stretch my pants over them! This day was one of those days. I hope tomorrow will be better!

Wednesday, May 9, 2018

Day two of the Cotswolds--Day eight of the London Adventure 2018

Topiary car at Burton on the Water
We again had a terrific breakfast at The Close Inn. It was a fun place to stay and I would recommend it to anyone looking for a place to stay.  I enjoyed it so much that I was a little sad to leave! We left about 9am so we could tour the countryside.

We stopped and walked around Burton on the Water. It is a quaint town that houses the motor museum which wasn't open yet for the day. We snapped photos of this car made up of vegetation and we enjoyed seeing the bridges that cross the canal at various places in the town. The bridges and water reminded me of Venice, Italy.

Old Mill in Lower Slaughter
We drove through Lower Slaughter and Nicole snapped a photo of an old mill. Then we continued on through Upper Slaughter, Kingham, Stow on the Wold and Sudenly Castle. We didn't stop at the castle because it was time for us to arrive at Chetleham and our hotel, Ellenborough Park.

Nicole and I had decided that we would treat ourselves to a massage and a facial. She had booked us appointments. Included in the spa package was lunch so we didn't want to be late!

Spa towels, slipper and robe. . .heaven!
We ate lunch and said goodbye to Jérôme as he was headed back to London and then on to his home town in France where we planned to join him in a few more days. After dropping our bags in our room, we were off to the spa. We swam in the outdoor heated pool. When we arrived, the resident duck was none too pleased. He hung around for about 15 minutes in the adjoining garden bed giving us the evil eye. I imagine he liked swimming in warm water too!

Then we sampled the steam room, sauna and hot tub. It was a great way to unwind a bit before our massage and facial. The massage felt good; although, I am spoiled from the massages that I get at home from Jena.  I've had a couple facials in my lifetime, so I did enjoy this part of the experience much more. After our treatments, we unwound a bit in the "stress reducing" room before changing into our street clothes and taking a walk about the grounds.

Ellenbourgh Park--it was a wonderful hotel
For dinner, we had duck confit, radish and pear salads with a side of seasonal vegetables. We split a rhubarb compote for dessert and that was just right! The salad was delicious.

Walked just two miles today. It was nice to have the pool to exercise those troublesome knees in a different way.

Sunday, May 6, 2018

Exploring the Cotswolds--day seven of the London Adventure 2018

Breakfast at The Close Inn

We had a terrific breakfast at The Close Inn. I found the poached eggs on avocado toast with salmon to be extra delicious. The fruit and pastry assortment buffet was artfully arranged. After breakfast, we were off to see the countryside.

The abbey in Malmsbury
Our first stop was at the abbey in Malmsbury. I am awed that a structure built in the 12th century as a place of prayer is not only still standing but still operating as it was intended!

St John the Baptist church in Cirencester
Our next stop was Cirencester which was the largest city in the Cotswolds. Again, we enjoyed walking about the town and walked in the park too. We did a little shopping and of course we checked out the church! I saw so many dogs enjoying the countryside with their owners. The literature for the area states the Cotswolds is a dog friendly area. At our hotel, we saw several dogs traveling with their owners. I was also impressed with how quickly owners pick up after their pets. There is signage posted that states there are 1000 pound fines for owners allowing their pets to "foul" the area.

Walk way at the Chedworth church


We drove to Chedworth to see the church as well as the Roman Villa. The sign on the church said to bundle up for services as the heating unit was not working; but, that a new unit was ordered. It was chilly in the church. On the piano, there was a scrapbook that contained the documentation of the ladies who replaced the cover on the piano. I enjoyed seeing their handiwork and reading about their process. The walkways around the church were unique.
Pheasant on the go


On the way to the Roman Villa, a huge Chinese rooster pheasant was standing in the middle of the one lane road. We stopped. He continued to stand still. He looked around and then slowly made his way to the side of the road. Once he was in the tall grass, he moved quickly out of sight. We saw a few more roosters and some females (hens) too in the field next to the Roman Villa entrance.


The village of Bibury
We decided the nature was more interesting than an up close view of the remains of the Roman wall so we set our course for Bibury instead. It was a quaint little town along the water. It was picturesque. All the small towns that we drove through were clean and neat. Lawns are trimmed; flower beds are worked, planted and blooming and homes are well maintained.

The mains at the Priory Inn with the roasted vegetables
I walked five miles. My knees have appreciated the rest during the driving time; but, they are still complaining loudly!

For dinner, we walked three minutes from the hotel. We ate an English dinner at the Priory Inn. The roasted seasonal vegetables were delicious.

Wednesday, May 2, 2018

CCQ Challenge post 4 of 4--First Finish 2nd Quarter Finish-A-Long (FAL) 2018

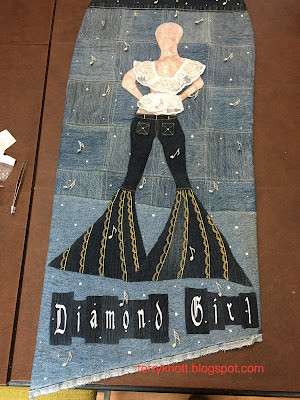
Musical notes added
When we left off from the last post, I was down to the embellishing, sleeve and label for the project. Remember those notes that I embroidered in post number 3? I got those out and played around a bit placing them.

In my original layout, I used 14 notes. When I embroidered them, I decided to double the amount plus a few extra. I embroidered 32 and guess what??? I used every one!

Notice that there are lots of notes at the top the piece. I wanted the notes to represent a piece of sheet music and that the notes were falling off the page and on to the figure.

The notes are  three dimensional. I hand stitched each stem of the note to the background. I used a polyester thread that blended with the metallic thread that I initially used to stitch the notes. It took me three one-hour sessions to accomplish this task. Stitching through all that denim by hand was tough. My fingers ached and I needed to take a lot of breaks.

Adding the bling
The next step was more fun. . .adding bling. After all, the inspiration for this piece was the song "Diamond Girl." With a title like that, some bling had to be involved! I used three different sizes of crystals. I even put a small crystal on each pocket. The crystals sure reflect the light which you can't see in the photo. You get to take my word for it!

Next, it was time to stitch the label and the sleeve to the back. I had prepared both some time ago. For the sleeve, I needed to clean finish or hem one edge once I had determined the actual width. I have found that once I am ready for the sleeve, I tend to loose momentum if I need to construct a sleeve at that point of the project.  Constructing the sleeve, when I've made the back allows me to coordinate it with the project.

Late last year, I began adding the hours as well as the cost of the project to the label. Once I finish the entire project, I add the hours spent on the project to the label.  Sometime, someone (maybe me!) might want to know how long something took!
Label

Finished back of project
I include the size of the project because if I want to enter it in a show, the size is needed and who wants to get the tape measure out to capture that information? (Not me!!!)

Although, I stopped putting the date on the label, I do include that information in a code. I once heard a speaker say that putting the actual date on a project, could make the artist appear "dated" if all their work was years in the past. Since then, I've put my completed dates in a code.

This label has been hanging around in my stash for more years than I can remember so using it for this project  was terrific!

I sure pushed myself to get to the next part which was to add her hair. Part of me was excited to see how much her hair added to the theme of the wall hanging and part of me had trepidation about how I was actually going to attach it. I wondered how it would hold up to being rolled or folded for storage.

Attaching her hair wasn't awful. The hair is on a wire and I tacked the wire to her head at various points to fill in the space on her head. I LOVE how much the "big" hair added to the overall theme of the piece. She does look like a gal from the 70s! I also like how she has some "attitude" and that I was able to make it appear that she is looking over her shoulder. I would like to add something that hangs from her pockets so that people will realize that the pockets are for real!
Finished wall hanging
This was goal number one on my 2nd Quarter Finish-A-Long list. It is the first project that I have finished this quarter! I used a yard of fabric from my stash which brings my total to a net loss of 7 yards. (I did buy two yards of fabric at the stash bazaar guild sale last week.  So I now have used a net of 7 yards of fabric from my stash and 43 yards more to go to meet my goal of using 50 yards from my stash in 2018!) I spent $32 and 86 hours to complete her.

If you missed the previous posts, I've placed the links below.
Post 1
Post 2
Post 3

I also need to update my training for the month of April since I forgot to do it in the last post. I taught 22 students in Basic Life Support CPR (YTD 95.) YTD, I've taught a total of 185 people!