Wednesday, June 29, 2022

The Personal Librarian--Post 3

Piece after stitching all the facial details

In my second post about this project, I wrote that I wasn't happy with how puffy the face was after I had added all of the details. (If you want to read the first post, click the link.) 

I only brought the black Aurifil thread with me for this project. I really needed some neutral thread. I've walked through many parts of Central London. I've seen several tailor shops and dry cleaning shops. I've not seen a fabric store although my on line search showed me some that were a 40 minute bus ride from where I was staying. 

Face after adding a few quilted lines
What to do? I decided to ask my daughter's friend, Fritha, if she had any neutral thread I could have. She brought me a bag of "embroidery silks." There was a little bit of white sewing thread on a spool. She said that she didn't sew and that she hadn't done any cross stitch since before the pandemic. She said she would be happy if I used a bunch of the thread.

Label
I used a couple strands of Fritha's embroidery floss to solve the issue of the puffy face. I added a little definition to the eye area. In the book, the author reveals the character being close to tears that she would be discovered. If discovered, she would lose everything. I added some straight lines to represent the internal tears she allowed herself. I added some lines around the mouth to
represent the times she refrained from making a comment for fear of standing out rather than blending in.

Back
The quilting lines helped disperse the puffiness that was in the face. I pulled the backing to the front to finish the edge. I used tiny stitches to stitch the binding in place. I had envisioned adding some black embroidery stitches to edge; but decided I would leave the area plain so that the emphasis remained on the face and the facial features. I liked how life like her eyes are. I also liked the open space between the background text and the edge finish. The overall design reminds me of a page in a magazine or a book.

I did try to block the piece a bit with steam from my daughter's iron. My daughter said this was the second time an iron had been used in her flat and the first experience for this iron. She said she ironed some napkins for a Thanksgiving dinner that she hosted pre-pandemic. I didn't have a measuring tape nor an ironing board. I used a folded towel to press the project. I used a piece of computer paper to give me a rough estimate of square.

Front
For the sleeve, I used a piece of the leftover fabric from the project. I hand stitched the seam and hand stitched the hem at each end. I attached the label with my usual hand stitching. I mulled over what to call this project. I had a suggestion from my Mavens group. Unfortunately, I wrote the title in a book that I didn't bring with me. One of Nicole's friends, Victoria, who saw the piece used the term "Held" to describe what she saw in the figure's face. I decided that would be a great title for this project.

I learned that it is possible to create a project without a sewing machine and a few materials as long as there is a little help from friends. Thanks Fritha and Victoria, I could not have finished without you!

This was my one monthly goal for June. I'm linking to Patty at Elm Street Quilts. Please click on the link and see all the other great projects this month. Elm Street Quilts One Monthly Goal - June Finish Link-up


Sunday, June 26, 2022

Jump Off Creek---

Rectangle in the center block
Our book club read the book, "Jump Off Creek" by Molly Glass.  It is the story of how a single woman, Lydia, manages to homestead some land in southeastern Oregon in the late 1890s. I was inspired by several passages in the book. The first inspiration for me came when she arrived at her property to find that some men were living in her structure. She kicked them out. 

I was impressed she was able to get them to move on without causing her harm. Note that I didn't call the structure a home. It was little more than a roof and four walls. Her first night, she awoke to the sound of rain on the roof. She felt water dripping on her face and heard the vermin scurrying about open areas. She wondered if she had made the right choice of selling and moving away from the family farm after her dad died.

Quilting design
At the time, our quilt guild had a block of the month (BOM) program. The coordinator of the BOM incorporated a range of blocks to build skills. My color choice skills needed improvement so I would make a block or two. 

Mouse block with French knot
If you brought your blocks to the meeting, you would be entered into a drawing. You might win an assortment of blocks. For this project, I used blocks from two different months. Surprisingly both times, I was a block winner. 

I found out later that people would make blocks; but, didn't want to win blocks. Perhaps, they didn't like the block or the colors. Perhaps, they didn't want another UFO. Perhaps, they didn't want to deal with wonky blocks! Instead of writing their name, they would write another person's name who had turned in blocks.

The first block that I worked with was the inset rectangle blocks because the hole in the center represented the water dripping from the ceiling. The coordinator gave the block a better name; but, I don't remember it. I don't even
remember how I sewed it! I do remember that the technique was not difficult.

The colors were supposed to be red on top, grey on the bottom for the outer section of the block. The rectangle was supposed to be white on the top and black on the bottom. I think the slope of the block was supposed to be left side lower and right side higher.

Mouse block with beaded eye
When more than one person sews a block variations occur in color, style, size and color placement! Making the blocks play together can be the tricky part! I made more blocks and I made some blocks with a different slope and off color arrangement so those different blocks blended better. I spent some time arranging the blocks. I decided to go with a modern layout with the blocks in vertical rows. Because the blocks were a variety of sizes, I chose to sash the rows with a strip of black. I liked the center.

The second set of blocks I won were the mouse blocks. The mouse was supposed to be in red and the background was supposed to be cream. These were cool blocks in that the tail was made with embroidery floss
and the ears were three dimensional. A French knot defined the eye although some blocks contain beads for the eye. It was 
Label
tricky turning the ear.  In the story, mice were running all over her supplies so this was a great block too! The coordinator designated tail color; but, just like the block colors. . .some makers made a different choice.  I made a few more blocks and used them as a border. On purpose, I left spaces between
some groupings of mice.

When it came to quilting, I quilted the piece from the back. I was inspired with a fabric that had tree trunks on it. With a chalk marker, I drew trunk shapes and then stitched on these shapes. It felt so odd to quilt with the back of quilt under the presser foot! In the story, Lydia thinks her land has timber; but, when she arrives, she finds the previous owner had fallen the trees and left behind the stumps.

Finished front
By the end of the story, she is making progress removing stumps, growing a garden and figuring out how to survive. She even plants some flowers next to her cabin. I had a fat quarter of the black flower print. The borders became the size they were because that was how much fabric I had.

I named the quilt Red, Black, White and Mice All Over! I made it in 2006. It is one of my favorites. I'm still surprised that cream backgrounds and white backgrounds work together. . . after all neutral is neutral!

I'm linking with Cynthia at Oh Scrap/Quilting Is More Fun Than Housework because this is one scrappy project!


Wednesday, June 22, 2022

Three Cups of Tea---

Crumb block pinwheel centers
Our book club read "Three Cups of Tea" by Greg Mortenson and Oliver David Relin. It is the story of how Mortenson developed a passion to build a school for girls in Pakistan. 

Mortenson got lost wandering the mountainous region of Pakistan after a failed attempt to climb K2. He ends up in a small village where the people help him recover. 

Pinwheel blocks
During his recovery, he notices children using sticks to write letters in the dirt to complete their studies. He decides to build a school for the girls to repay the village people for their kindness to him. 

It takes him years to complete the task. He develops skills with each step along the way.  To symbolize the debris along the trail that he encountered during his climb, I pieced crumb centers from bits of other projects. I remember thinking how the sherpa guides would come through the tossed clothing articles to find items that would work for them.

To symbolize the meaning behind the three cups of tea, I used three colors to make the pinwheel blades. To symbolize the poverty and the cold of the region, I used a black and white print as the background.

Straight line quilting viewed for the back of the quilt
I remember the descriptions behind the three cups of tea. The first time you had tea with the chief, you were a stranger. The second time, you were an honored guest. The third time, you became family.

I spent a lot of time organizing the blocks into a layout that pleased my eye. I spent even longer determining what to do for a border.

In the end, I decided to finish piecing the black pinwheels. Those grey pinwheels symbolized all the air miles he traveled in his quest to build the first school.
Close up of label
Although I can't remember for sure, I think that I was inspired to make the pinwheels because of Sharyn Craig. She was an instructor who introduced me to the concept that all colors can go together when you use fabrics that become neutrals. This was my attempt to prove her correct!

I quilted it using straight lines in the pinwheels and bound it with the red fabric  For the label, I used leftover parts from the triangles.

I named the quilt, "Fire and Ice." Ice for all the initial environment Mortenson encountered and then for the "ice" Mortenson thawed to drum up contributions for his charity. Fire for the fire that Mortenson fueled for years to keep moving toward his goal of building a school. 

Entire label
I finished this quilt in 2011. I gifted it to my nephew when he moved into his first home. I hope that it is still keeping him warm.

I remember being surprised at how the bag of crumbs, while greatly reduced,  I still had leftovers! 

In 2014, there were accusations against Mortenson of not being truthful about the number of schools that were built as well as not being able to produce a clear record of where the charitable funds were spent.  

In the end, Mortenson resigned from his leadership position on the non profit organization he created and in the years since his departure, the organization has regained support and appears to again be operating in good standing.


Finished front


Sunday, June 19, 2022

The Personal Librarian book project--post 2

Completed pattern
At the end of my first post, I wrote that I combined the lines of text with the face drawing. I didn't redraw the face, I traced it in this manner: 

I taped the original drawing on the sliding glass door.          I taped the text lines on top of the drawing and I traced the face with a pencil line. Then I darkened areas and reshaped other areas until I felt that I had captured the expression of the face.

From there, I transferred the design to my fabric using a pencil with a number two lead. In my neck of the woods, this is an ordinary school pencil. I drew lightly. Again, I used the window as my light box to transfer the design to my fabric.

Basted project
The fabric that I used for this project was on the guild free table years ago. I made a small wall hanging from a lot of it. I speculate that the fabric was once a tablecloth. I had enough to keep the front and the back the same.

Stitching the background
Next I layered and basted the backing, wool batting and top. I pinned the layers together and then I basted the layers together with thread. The reason I basted with thread is that I didn't want my thread to catch on the pins. I stitched a grid with red basting thread.

Eye detail
From that point, I selected my black 12 weight Aurifil thread and began filling the background with embroidery stitches. I made an effort to make my stitches even most of the time. 

Although, on purpose, I made the stitches a bit uneven to represent that the character in the book was wary of being found out that she was a black woman working in a white world. Every day she walked a precarious path of fear!

When I left for London, my plan was to fill the fabric with a variety of hand embroider stitches in a design to reflect text. I decided not to stitch anything but a running stitch to represent text. 

It was helpful to have basted the lines for the columns. I attempted to make my stitches similar looking on the back. I traveled my thread from one row to the next. I buried my knots. It was relaxing to complete this part of the project. Working on the background first, allowed me time to consider different stitches to use to develop the facial features.
Colonial knots and bang detail


I did a stem stitch for the eye brows. I used a back stitch to outline the eyes and a satin stitch for the pupils. I used an outline stitch to mark the areas of the hat and hair. I stitched  Colonial knots in the hat buckle. I stitched coral stitches to give texture to the hair. 

I found it interesting how several stitches made the thread look like it was a richer black I did add a few stitches combining the black thread with a metallic thread in the bang area of the hair. In my work, I like to add a little
something different for the eye to find.

At this point, I was stuck. I was finished embroidering the piece. I could have left it at that point and moved on to the edge finish. . . but, I wasn't happy with how puffy the unstitched areas of the face had become. In my next post regarding this project, I'll share my solution. 

Yesterday, I received notification that my audio hold for this book was now available. Perhaps, I will be able to listen to the book before the reveal of projects in two weeks after all!

I've listened to two hours of the book. I smiled when I heard that she was attempting to smooth her curly hair in one passage. Choosing the coral stitch to represent hair was a great choice!


Wednesday, June 15, 2022

The Secret Life of Bees---

Leftover block became the label
Our Thread Tales book club read, "The Secret Life of Bees" by Sue Monk Kidd. What inspired me about this book was the wall that May built from stones. She called it a wailing wall which was a place to put notes of pain to release her from carrying the pain. 

Of course, bees figured heavily in the story. I had a piece of fabric that I purchased for another project that reminded me of honey. I used this fabric for the sashing. My grandfather was a beekeeper. My mom has a photo of him working his bees. I don't remember him and bees though!

Close up of one section of the label
In my grandmother's stash were some pinwheel blocks as well as some background and some blue fabric. My niece was getting married and I thought that since there were a lot of these pinwheel blocks, I could make it into a quilt. My grandmother spent a lot of time with my niece when my niece was toddling about!

My grandmother knitted, crocheted and sewed. She wasn't a quilter, although in her stash were a number of quilt blocks that she had started. I do remember her and my mother making some blocks using jeans in the late sixties/early seventies. She somehow finished her project; but, my mom didn't. I have those blocks; but that is a story for another post!!

View of the quilting
My grandmother taught me to sew. She had the patience of at least three saints. I remember one time when I sewed a seam so many times that I thought the fabric was ruined. The fabric wasn't because she carefully ripped the stitches and reset the pins until I was happy with my sewing results. 

I shared this anecdote because while she encouraged me to be on the "picky" side, she was not. Let me tell you, those blocks were a variety of sizes! I remember some of the fabrics in the blocks as scraps from her house dress fabrics. As a small child,  I thought it was funny that she called the outfit she wore in her home a house dress! 

Recipient with the quilt
For the border, I used a piece of the blue fabric and a stone fabric.  I quilted it with a pantograph fan design on my friend's Gammill long arm. It was the first quilt that I quilted on a long arm.

I finished this quilt in 2010. I'm posting about it so that I can document my Thread Tales book club projects.

With all the scraps used, I'm linking to Cynthia and Oh Scrap Quilting Is More Fun Than Housework. Cynthia has had a recent vintage finish too. 


Sunday, June 12, 2022

The Personal Librarian book project--Post 1

First version
I knew before I left in March, that our next Thread Tales book club was "The Personal Librarian" by Marie Benedict and Victoria Christopher Murray. I had "reserved" an audio copy through my library at the end of February. Because the queue was so long. . . more than 24 weeks, I realized that I likely wouldn't have the opportunity to read the book much before the reveal.

Fortunately, to participate in our group, one doesn't have to read the book! I did go on line and review summaries of the book and I read book reviews. This lead me to look for information about the woman, Belle da Costa Greene. Reviewing the information, gave me some ideas.

Thumbnails
Had I been home, I likely would have made something inspired by Illuminated manuscripts since Greene had a love of those. Knowing that I would be without access to a machine and my stash, I decided to keep my design and palette simple. I want to work more in a modern design to play with that concept. 

I also decided that my palette would be black and white and that the project would be about the size of a sheet of paper. I thought about what her life might have looked like had it been a schematic line drawing. I put my pen to paper and made a drawing of straight lines and curves. I added a little shading.

Inspiration art work
When I want to make quick sketches, I use ink. When I can't erase, I find that watching the ink flow puts me into a rhythm. Sometimes nothing comes from the exercise and sometimes I like what happens. From what I learned on line about the character I could imagine that these line could represent her life path which needed to alter at times. 

While I liked the drawing and while I figured that I could use black bias tape on a neutral background to complete the project, it didn't move me. Gertie, my inner squirrel, couldn't believe that I did more research. She was even more shocked when I selected the fabrics and thread to take with me before I had settled on a design. I knew that I had created a challenge for myself when I limited the scope of the materials!
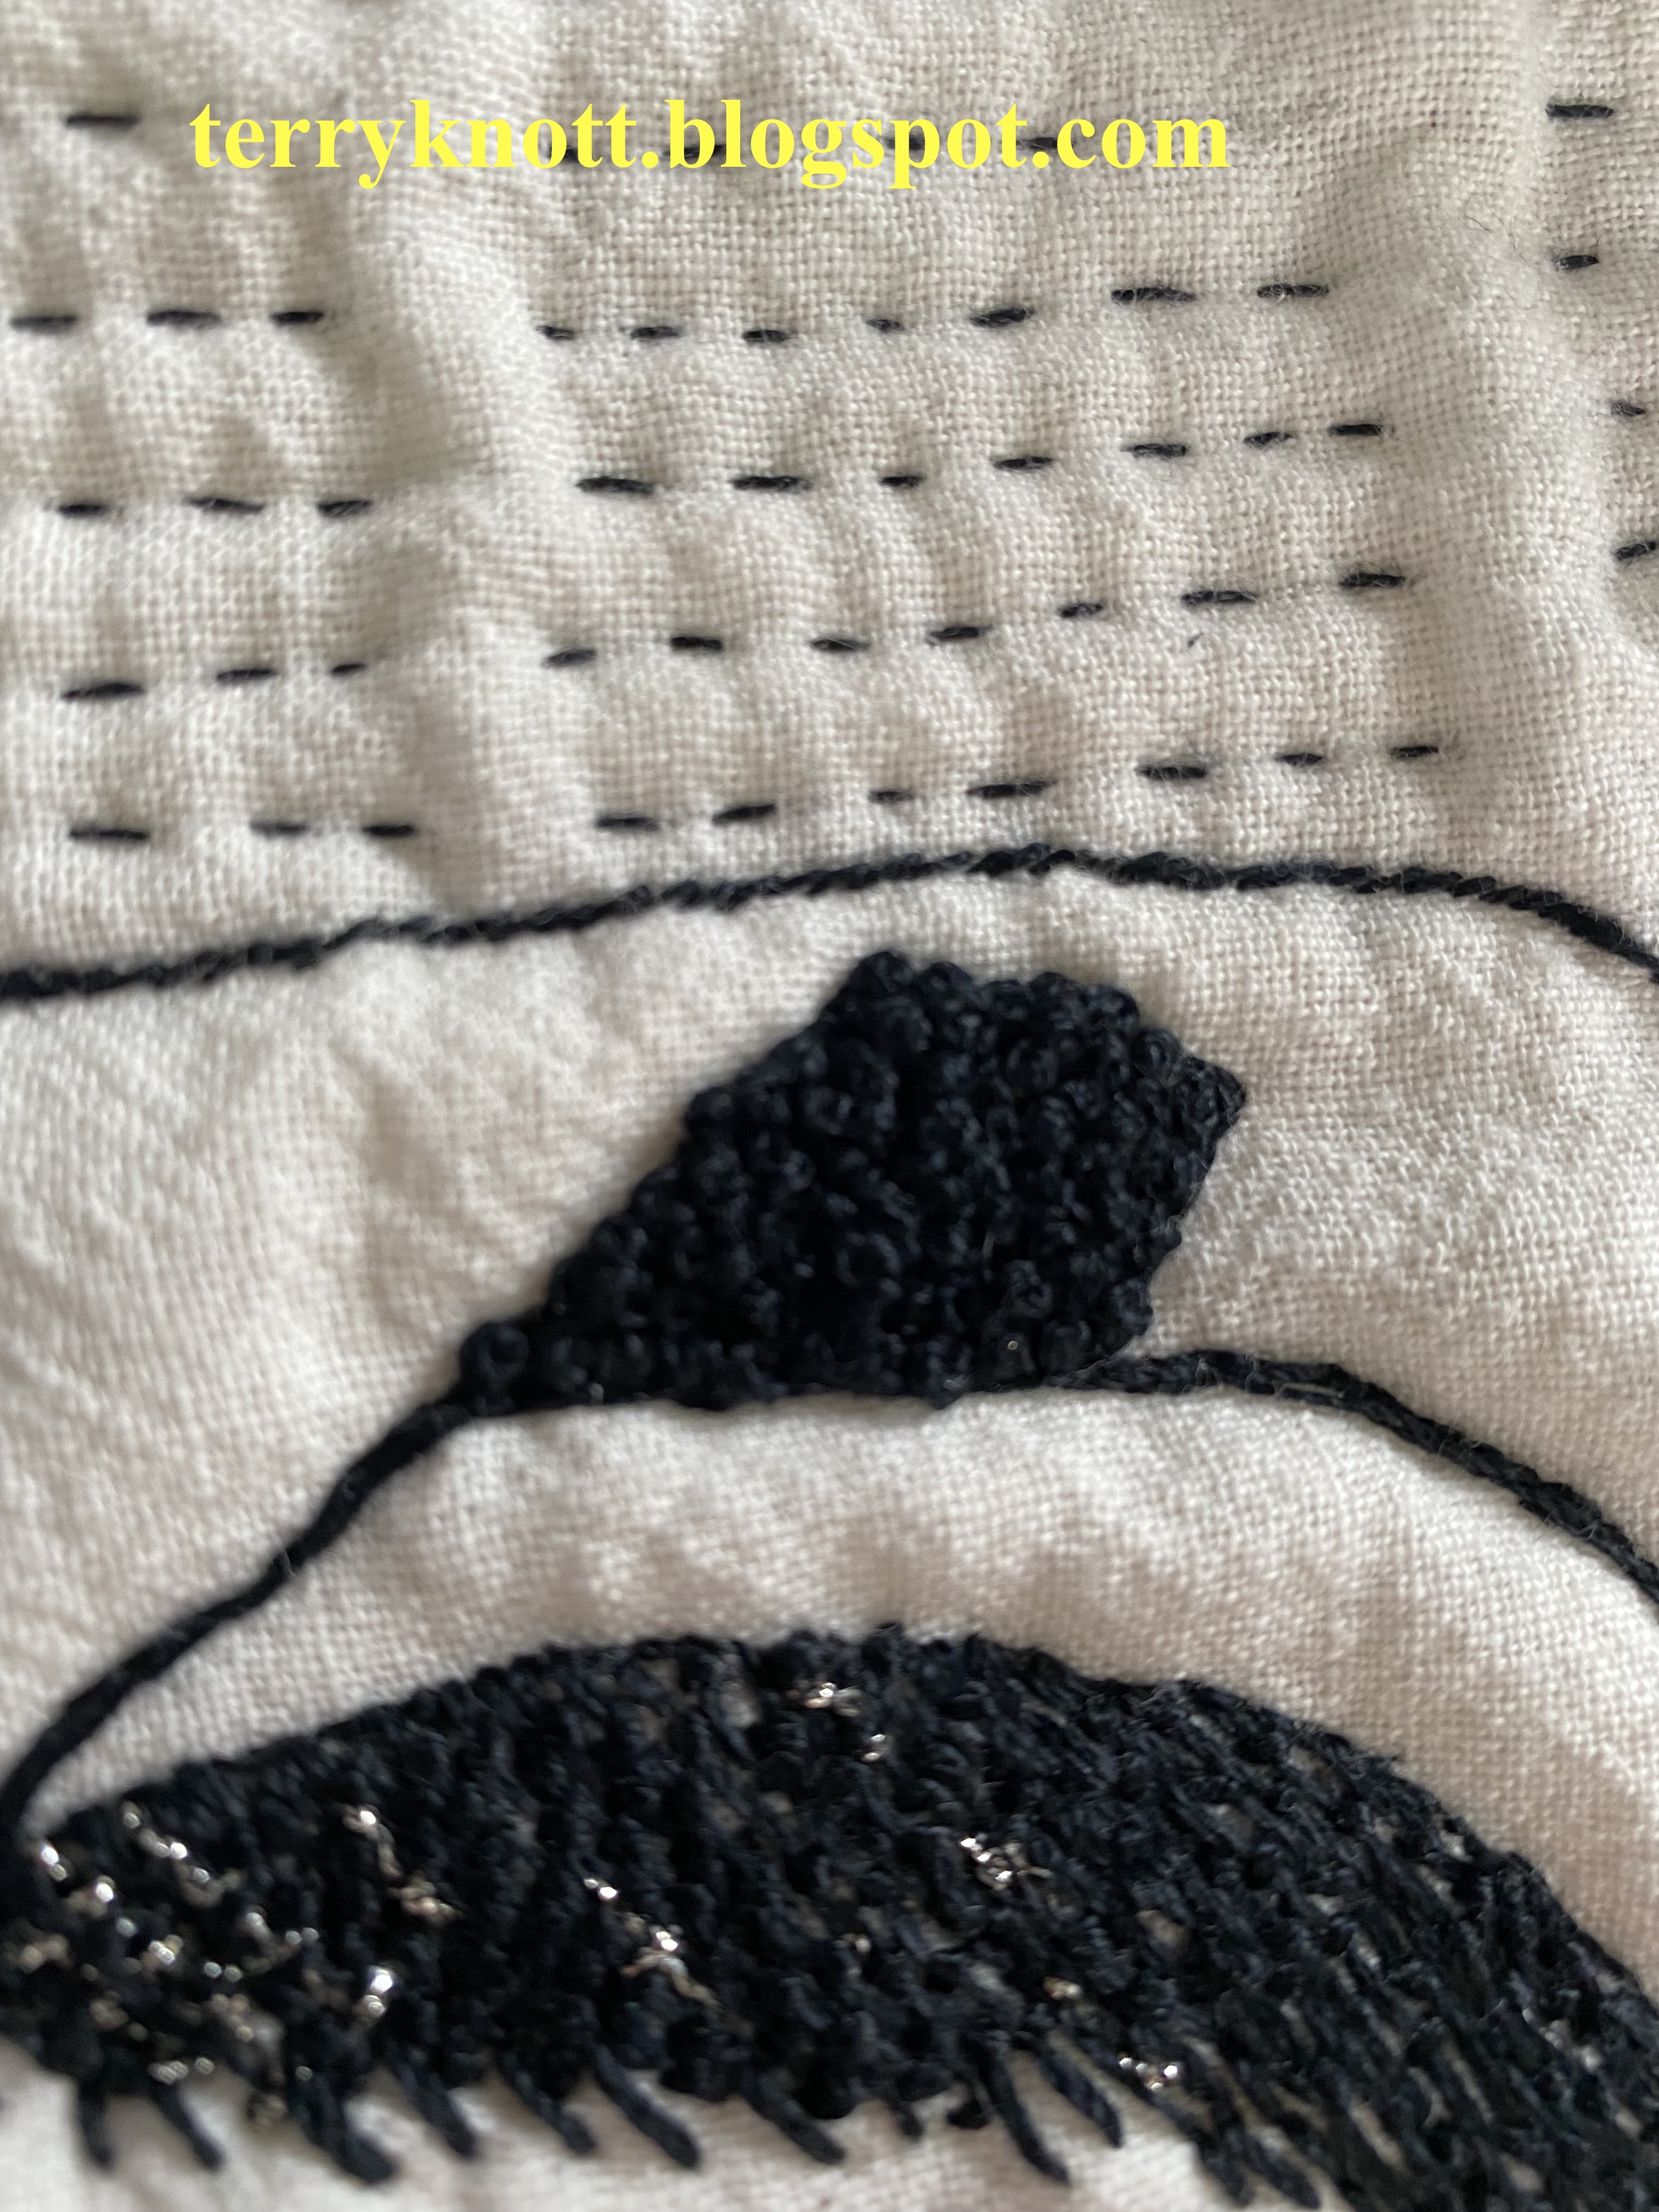
Lines of text
As I contemplated that first drawing, I thought about stitching lines. Then I considered using different stitches for a line or a series of lines. I got out my sketchbook and drew a series of thumbnails. As I drew, I considered lines of type. I thought that the "type" could be stitched in different hand embroidery stitches.These are about two inches square and done in about ten minutes. 

Full figure drawing attempt
While it was a fun exercise, none was "the one." A variety of embroidery stitches no longer felt like the pattern that I wanted to create. 

By this time, I was in London and planning places to visit. One of the places on my list was the Fashion and Textile Museum. We waited until the exhibit "150 Years of the Royal School of Needlework Design" was open to visit. It was a good exhibit of a variety of needlework types through time. 

One of the exhibits was from a group that made banners using blue thread on a neutral background. Unfortunately, there was no signage about the maker of this work. This work inspired me to draw some more. It prompted me to view online photos of Greene. 

Drawing of Greene's face inspired  
by a Wikipedia photo
Greene had a secret that she kept for decades. I wondered how keeping a secret for so long would affect someone's personal appearance. I looked a photos of her younger self and photos of her older self. I first thought that I'd draw a woman in a full length dress. I could silhouette that drawing against the background of columns of type.  I wasn't excited about that drawing.

Because I wanted the opportunity to change angles, I did the drawing in pencil. I happened upon an older photo of Greene. I was surprised at how thin her lips had become and the pinched look that they had. Her eyes seemed to be looking into the shadows for threats to expose her secret.

I decided to replicate the photo in a drawing. It probably took me about half an hour to complete the drawing. I'm not an artist. I haven't taken a formal drawing class. I was pleased with my effort. My daughter was surprised that I was able to capture Greene's resemblance. Honestly, I was likely more surprised than she was with my results!

From this point, I combined this drawing with the lines of text. I felt like I had a good "pattern" for my project. In my next post on this topic, I'll share my next steps.


Wednesday, June 8, 2022

The Book Thief--

Label
Our Thread Tales book club read "The Book Thief" by Markus Kusak. I was inspired by the author's use of color in the opening segment of the book. 

I was inspired by the number of people who banded together to help one of the characters survive the war and the "rules" they lived through. 

Example of quilting
I was inspired by a passage in the book where a farmer has apple trees and some city kids climb over the fence and strip the trees of their fruit before he can. They strip the trees because they are starving.

I had participated in a half square triangle batik (HST) exchange through the
online community of "The Quilt Show" that Edyta Sitar had inspired. I also participated in a HST batik triangle exchange with one of my small groups. These HSTs became the basis for my project.

Finished quilt
To ensure the HSTs were the correct size, we paper pieced them. I used "Thangles" as the foundation paper for my HSTs. I didn't have enough so I used some of my scraps to make the remaining HSTs to finish the tree block.

Inspired by the apple trees and inspired by the sense of community, I chose Sitar's tree pattern as the basis of my project. I've some interesting colors of trees. . .like blue and purple; but, in my world it works. The trunks are a batik fabric I had purchased years ago. I happened upon the green setting square triangle fabric while shopping for another project. I used the tree design in the print to free motion quilt the piece. I stitched continuous curves in the tree leaves.

I had the leaf border fabric in my stash too. It was great to use it in this project. I quilted around the leaf prints. Although, the judges' comments, the two times that I exhibited it in shows, were that the border fabric didn't play well with the top.

I still like the border and all the ways that I incorporated the feeling of many more trees into the piece. I completed this project in 2011. I used wool batting. Because this is a scrappy project, I'm linking to Cynthia and Oh Scrap/Quilting Is More Fun Than Housework.


Sunday, June 5, 2022

Labels--A 2022 Saturday Workshop

Early style of quilt label
Sandie provided information on the importance of adding a label to your quilt. She commented that your name and the date was enough information for a simple label. She said later it could be helpful to determine when you finished a project. 

I made my early labels using the embroidery fonts available on my 1630 Bernina. The information I included was the quilt name, the date it was made, and where I lived. Interestingly, I've lived in the same house for the last 32 years; but, my physical address has changed a few times!

Example of a label for a gifted quilt
I don't remember when I started hand writing my labels; but I do remember why. It took me some time to create the label for my machine to stitch. Now, I have embroidery software and it would be a simpler and quicker process to make and embroidered label. 

The bigger reason I hand wrote my labels was that I wanted to leave a bit of me behind. I write my labels in a calligraphy style which doesn't resemble my actual handwriting. Still, it is my handwriting and so I continue to write my labels. As I've "matured" my handwriting has changed a bit.  

Sandie said if a quilt was given as a gift, it was nice to record that information. Over the years, I've written labels for gifted

Second example of a label for a gifted quilt

quilts. Often, there were many hands creating the quilt.

Sometimes, I used more graphics than other times to decorate the label. Sometimes, I used a piece of the block or fabrics used in the tops to create the label. Sometimes, I've used a leftover block or I've used an orphan block for the label.

Sometimes, I use a printed label. Of the printed labels in my stash, I purchased a grouping of two different prints. The remaining labels in my stash came from the guild free table or were gifted to me by friends. I enjoy finding a label that coordinates with front of the quilt.

Block elements used in the label
Sometimes I add a border and sometimes I don't. Most of the time, I use a micro pigma pen to ink the label information. Pigma pens come in a variety of colors. I heat set the ink when I have finished. Over time and washings, the ink fades. I do hope the recipients of my quilts will use the quilts so much that they are in tatters and having a label won't matter!

Leftover block label example
Information on my label has increased over the years. While I still may write a simple label, more likely the label contains: why I made it, the batting type, the types of thread used, the pattern reference, the estimated hours it took me to make it, the cost of the materials and the size. The date is still there; but, I write it in a different format. 

Years later, someone would ask me what batting I used or the kind of thread. I'd be filling out an entry form and I'd need to know the size or the pattern reference. I had a couple quilts appraised. I had to estimate the time I spent making the project and the cost of the materials. 

Years ago, I attended a lecture at my guild and the speaker talked about different ways of dating quilts. Sometimes, she only put the year. She shared that some quilters used their machine's embroidery font to embroider the specific information they wanted on the binding. I've often considered doing this; but, haven't!

She shared that some quilters numbered their projects. She said that if quilts were part of an exhibit and people read the labels, they might think that the quilter hadn't completed any recent work. The "code" was a way for the quilter to document the age of the quilt without it being obvious to the viewer.

Printed label example
I thought that was a good plan. Over the years, I've tweaked my system a bit. If you were to read #620224 on a label, that doesn't mean it is the 600,000 quilt that I've made! It  would mean that I finished the quilt in June 2022 and it was my fourth finish that year.

Making the label is enjoyable. I've used scraps to make them. So I'm linking to Cynthia and Oh Scrap/Quilting Is More Fun Than Housework. (Each Sunday, I look forward to reading what other people are making with their scraps when I view the link!)

Second example of a printed label
I enjoyed the class. I appreciated Sandie's perspective on labels. I was surprised that so many people in the class didn't label their quilts. All along, I've labeled my projects. Quilts that I've given to charity organizations, I stitched a guild label. 

It is important to place a label on a quilt. There are so many quilts in the "wild" created by an unknown maker. We enjoy looking at them; but, wonder what their stories are. 

Example of leftovers used in label
A good method to view more example of labels I've used is to click on the pages at the top of this blog. "Tips/Techniques/Tutorials" and the "Books" pages don't contain links to finished projects; but the other pages do. The link associated with each finish will take you to the post about that project. I photograph the label for each quilt and have included the label in each finish. 

I'd appreciate hearing how you document/label your projects. Please leave me a comment to let me know your methods or methods! Thanks! 

This was goal number four on my June list.


Wednesday, June 1, 2022

May Recap and June Goals


Finished cross stitch ornament
My goals for May were: 

✔1. Continue piecing blocks for the 2022 Temperature quilt. I am as caught up as I can be. I've a little system in place, I piece one block a day and I'm keeping up! On day last month, we had six inches of snow fall at home. I didn't pack any snow fabric because I can't remember the last time there was measurable snow fall in April! When I return home, I'll add that piece of the cube and I'll finish April.
✔2. Write four more posts that feature book club quilts from the past. The books will be: Snow Flower and the Secret Fan by Lisa See; The Glassblower of Murano by Marina Fiorato; Tales of the Yukon by Robert Fortune and The Help by Katheryn Stockett.
✔3. Work on my book club quilt for the June reveal. Last month I created my plan and drew it on a piece of fabric which I then layered and basted. I plan to complete the majority of the piece with hand stitches.
✔4. Write a post about the third virtual Saturday Workshop that I took earlier this year. That workshop was about an appliqué technique.
✔5. Work on a cross stitch or beading project.
First thought of a design for June reveal
✔6. Write a post about the Ottolenghi recipes we've been making.

I listened to the following audio books: 
1.Britt Marie Was Here by Fredrik Backman 4.5; 2. Crocodile in the Sandbank/Elizabeth Peters; The Curse of the Pharaohs/Elizabeth Peters 3.5; 3. Prayers for Sale/Sandra Dallas 4.0; 4. Becoming Mrs. Lewis/Patti Callahan 4.5; 5.

My goals for June are:
1. Continue piecing blocks for the 2022 Temperature quilt. This month, I'll begin adding a previous rows to the pieced strip. Also this month, I will use all of the purple background fabric I had on hand.
2. Write three or four more posts that features book club quilts from the past. The books will likely be: The Secret Life of Bees by Sue Monk Kidd; Jump Off Creek by Molly Glass; Three Cups of Tea by Greg Mortenson and David Oliver Relin and The Book Thief by Markus Zusak.
3. Continue work on my book club quilt for the June reveal. Last month, I made great progress. Although, I'm currently stuck! This will be my one monthly goal.
Second cross stitch in process
4. Write a post about a virtual Saturday Workshop that I took earlier this year.
5. Work on a cross stitch project.
6. Write a post about additional Ottolenghi recipes that we've made.

I have kept up with piecing blocks and stitching the blocks together for the months. I will use up the purple that I'm using for the majority of the background. I'll order more so that it is at home waiting for me. Likely, I will be a couple weeks behind by the time I meet up with more fabric.

Regarding the cross stitch projects, I have finished stitching two kits. The cross stitch Christmas ornament I will need to finish at home because I need some supplies that I didn't bring with me. I have finished stitching the "Love One Another" refrigerator magnet. I may be able to fully finish it over the next few days. The kit was short some thread; but, I used what was available. I won't share what the difference was. 

May Temperature blocks
Unfortunately, the beaded Christmas ornament kit lacked the thread to attach the beads. I'll take that kit home and will work on it there. I do have one more cross stitch kit and some Halloween blocks to embroider so I won't run out of handwork to do this month!

I've made great progress on my book club project. I'll write a couple Sunday posts about this progress. I'll admit, I'm stuck about what to do next. I only brought with me black thread for the book club project. I also brought blue, red and purple thread for the temperature quilt project. I really need a neutral or cream thread. Gertie, my inner squirrel, has been running ideas by me. Much to her disappointment, I haven't been stirred by any one particular idea. . yet. She is persistent. She continues to have more "thoughts" on this subject which she shares. 

Because I'm stuck, I will make getting unstuck my one monthly goal. Elm Street Quilts One Monthly Goal June Link-up go Please check out Patty's link to see what other fun projects people plan to work on this month.