Wednesday, May 29, 2019

"Into The Depths" Is London Bound

Strip center possibility
Daughter, N, spent a little time with us over the Memorial Day holiday. For those of you who have followed this blog, you will note how "cold" she has been living in London. In other words, I haven't made her a quilt recently. I've fabric and I've a pattern; but, I've allowed other projects to get ahead of her project. During her visit, she perused my completed projects and selected a throw size quilt that she can curl up with on her couch on a cool day.

This was a project that originated from a 2 1/2 inch batik strip exchange. Some strips came from my small group; the majority of the strips came from participants from "The Quilt Show." I did add some strips just to be able to get the shading to work. It is an Elsie Campbell pattern from her book String Quilts published in 2009.

It was truly a great project to practice how value works. I spent hours creating strip sets and then cutting wedges which I then stitched together. It took a long time!!!

London bound
I named this quilt, "Into the Depths." It is a book club quilt inspired by "Shadow of the Wind," which
Carlos Ruiz wrote. It is made entirely of batiks.

Of all the throw sized projects I have finished, had I been the one to choose one for her, this was one of two I would have picked! Funny that we have the same likes!!!

It will brighten her space and bring a little of Oregon across the pond. All is good!!!!


Sunday, May 26, 2019

Continuing the Sketching Process

Small sketch examples in my new journal--sharing space with Miss J
Since the sketchbook revival online workshop ended earlier this month, I've continued making an effort to draw every day. For my birthday, I received a paper journal made out of an old book. My son-in-law saw it when he was out for breakfast. I am honored he thought of me and truly, it is a perfect choice. First, the cover is red which is my favorite color. Second, it was "The Encyclopedia of Modern Sewing." It contains a few pages and photos of "modern sewing" circa 1946! Third, it is spiral bound so it is easy to use all of the pages! Miss J likes drawing in it too! So far, I've completed small pencil drawings.
The drawing spilled over into my bullet journal

I've also incorporated small drawings in my bullet journal. I sometimes use color pencil to add a little detail. Sometimes, I draw in ink; but, most of the time, I use pencil. For the longest time, I didn't know what I should add or where I should add it. . .now, I just take a space from one of the pages and add a little drawing. I also have added little drawings to my daily tasks page. I'm finding it fun to add these bits. It doesn't take long. I can tell practice makes a difference as I am improving. I like how the drawings and color brighten the page.

Color pencil doodles among my daily entries 
Play results with some friends
By the way, I am liking the bullet journal process. I like using the pages to plan tasks to accomplish and to set goals for the month. I can't say that I've improved meeting my monthly goals.  Writing down my goals and reviewing them helps me make progress.

I also find that I do work in the journal at least once a day and I have found myself referring to it to keep myself on task! This is an improvement over using planners in the past! When I finish the pages in this journal, I have another journal waiting to be the next bullet journal. The next one has paper that I will be able to add watercolor paints which will give me another area to practice!

Lastly, a couple of friends came over and I shared the "Sketching Our Intuition" exercise that Angela Fehr led.  We had fun dabbling the watercolors across the page and seeing what designs we made.

Wednesday, May 22, 2019

Miss J's Girl--Post 4; Second Finish 2nd Quarter FAL 2019

Ribbons awaiting beads
From the beginning of this project, Miss J wanted to hang beads somewhere on the project and she wanted a "sparkle" at the neck of her girl. Later the sparkle became a "diamond." When she needed breaks from hand stitching the binding, we talked about incorporating the beads.

Honestly, I wouldn't have considered adding beads to her piece. Since she is the artist/designer, my job was to figure out how she could execute her idea.

Pony beads and knot detail
I had a bag of ribbon bits that were in a variety of colors and that were in various widths. I showed her the bag. Miss J immediately selected blue, orange, green, purple, pink and red ribbons. I cut the ribbons according to her finger in the air drawing of what the edge should look like. . .uneven!!!

She decided that she didn't want her yellow binding covered up so she placed the ribbons on the back of the piece. I pinned the ribbons in place with her approval.

View of lower finished edge
Together, we machine stitched the ribbons to the binding. Then we hand stitched the binding to the cover the ribbon ends. The ribbons should be more secure this way.

Once we had the binding stitched over the ribbon, she chose her beads. I thought she would be able to thread the bead on the ribbon and tie a knot in the ribbon to hold the bead/beads in place.

Close-up of ribbon attachment
Miss J gave each process a try. The ribbon was too difficult for her to manage and the knot process frustrated her. To solve the issues,  she picked a bead, showed me where it went and told me where to put the knot. Sometimes, Miss J wanted double knots! She is a good supervisor. Sometimes, she placed like colors together. Sometimes, she wanted two beads on a ribbon. Sometimes, she wanted three beads. I didn't see a pattern; but I am impressed with how easily and confidently she made her selections. I loved her end result! I believe I witnessed random at its best!
Label

We finished hand stitching the binding. We moved on to applying the sleeve and the label.  At five, she lacks the dexterity to place the needle in the fabric for the hand stitching. We worked in tandem on this task. I inserted the needle, she pulled it through the fabric. It took us 15 minutes to stitch the first four
inches of the sleeve. When we reached the half way point, it took us six minutes to stitch four inches! We made a great team!

While we worked on the hand stitching, we talked about the name for her quilt. For the longest time, no name met Miss J's approval. We talked about, "The Girl, Girl, My Girl, Josie's Girl, Girl with the Hair Ribbons, Hair Ribbons and My First Quilt." Although these options merited her consideration, none met her approval. She stewed about the name.

She kept asking me what her quilt story would be. I told it was what ever she wanted it to be. She didn't like that answer! I told her that perhaps, her quilt's story would be a memory of all the time we spent together creating her quilt. She thought her memory would make a good story.
Girl complete with diamond

 Her papa suggested, "Josie's Jewel." Miss J was happy.  "Josie's Jewel" is a great name for her quilt. She informed both of us that the beads are like jewels so she liked his suggestion.

Miss J offered her thoughts about the other information that she felt was important to include on the label. She wanted her name, that she was five years old, when she started and when she finished. I was honored that she wanted to document my support! She picked a label from the label bag. I wrote the information and we added it to the sleeve.  Lastly, Miss J selected a crystal that we applied to the neck of her girl.

If you missed the previous posts, you can read
post 1, post 2 and post 3. Just click the links!
Miss J and her finished quilt

Miss J's plan is to enter her project in the county fair. Entries are due tomorrow.  Confronted with a goal, she knuckled down, stayed motivated and she met the deadline! She sure was proud to have finished her first quilt.  She is prouder yet that the youngest sister has a first in her family! (She is the first kid to complete a quilt in her family.)

This project was goal number 22 on my 2nd quarter FAL list. It is my second finish for the quarter. It is also a finish that is near and dear to my heart. I have such fond memories of this project!  We used half a hard of fabric so I have stitched 39 1/2 yards of the 57 1/2 yards that I want to stitch before the end of the year. I have 18 yards left to meet my goal!


Sunday, May 19, 2019

Exercise in Artistry--post 5 of 5

Random word drawings and a collage story
Day 11 with Sketchbook Revival had us working with words and stories. In the first session, Rich Armstrong shared his lecture, "Start with Random Words." He developed an app, The Random Word which provides one with random words and a timer. You choose one of the words and doodle what comes to mind. He suggested using the back of a business card of a post it note to ensure keeping the drawing small. He also suggested drawing in ink and to work in any flaws. I completed eight mini drawings in about 20 minutes. It was a fun exercise. Doing it reminded me of my college days when I completed thumbnail sketches for page layouts. (I'm from the era that electric typewriters were the newer technology!)

During the second session, Laly Mille led us through "Serendipity Stories." This was a collage exercise. I happened to have a flyer from a department store on the counter that was made of yardstick and that had an Easter theme. When I was kid, I would get a new dress, shoes, hat and even gloves to wear to church on Easter Sunday. After church, we would have an egg hunt.
Cosmic smashing example

Dinner with my cousins and grandparents
followed the end of the egg hunt. I loved decorating eggs and later I loved hiding the eggs for my younger brothers. I decided to cut the flyer into some interesting shapes and glue the pieces into my sketchbook. I used color pencils to write a few words and to "tell" a bit more of the story. It also was a fun exercise!

Day 12 was all about intuition and healing. Catt Cellar shared "Cosmic Smashing: Power Triggers=Super Power" I've been stalled with organizing my studio so I chose my cluttered space as my trigger and determined that my super power is baggage mover. . .which goes much deeper than I'm willing to share here!
Drawing intuitively

We started writing on the page about the trigger..then we colored over the words paying attention to the colors we picked. Next we scribbled over the page followed by writing a healing prayer, "Heal me, tell me, inform me, instruct me. . . ." Finally, we collaged elements on the page. I thought it was interesting that the flyer I had picked up had the
handbags on it as well as some words like savings, book, best appeared. I loved Catt's tip: "Make friends with the perfectionist/critic. Let her talk; but, don't let her make decisions!

Montine Blank shared "Intuition Painting: Learn How to Let Go and Let it Flow." She took us through the process of painting with your intuition. She gave us 45 seconds to draw something we were familiar with. I drew a house and practiced some tips that I had picked up from other presenter's sessions. We took three cleansing breaths and she gave us another 45 seconds to draw whatever happened. I put my pencil on the paper and started moving my arm. I didn't make a connection until I wrote this description. I've wanted to quilt loops in a border; but, haven't been able to create the effect that I wanted. The lines on the bottom right are more like where I want to go. Now, I know what they feel like so perhaps, when the opportunity presents itself, I'll accomplish them! I appreciated her tip of honoring time for the muse.
My results from the last day of the workshop

Day 13. . .the final day of the workshop sessions. . .it was another great two sessions! Leonie Norton led us through "Travel Sketching in Pen and Watercolor Wash." If you would have asked me before this session to sketch a scene from where I had been. . .I would have declined. After the session, I have the confidence to give it a go!

Leonie gave tips with ink scribbles, color mixing and brush strokes that were terrific. Her cloud technique produces great results and is simple!! I didn't know about the watercolor pen to use for travel. I may need to invest in one or two as they looked easy to use. Leonie's tips about simplifying the scene as well as taking artistic license were invaluable.

Then Karen Abend took us through "Stay Inspired With A Sketchbook Adventure." She encouraged us to be inspired with where we live. I drew the pots on the patio that I'm waiting for the flowers to bloom and the seeds to grow. As I was drawing, I thought how serendipitous it was because I am growing into an artist!

Although I was sad that it was the last day, I learned that I:
--like drawing with pencils
--like coloring with color pencils
--enjoy painting with watercolors and want to play more with that medium
--can be mindful and intuitive when creating
--can draw a dog and doodle on demand
--can draw a face

I had FUN in each of the sessions. I learned tips and techniques in each session. I had success in each session!!! I plan to continue my sketchbook practice over the next year. I know fun explorations are ahead of me!!!!


Wednesday, May 15, 2019

Exercises in Artistry--part 4 of 5


Spicing up shapes with doodles
Continuing with my documentation of the Sketchbook Revival experience on Day 7, Rachel Taylor shared "Magic Motif Creation" using doodles to spice up shapes. We drew some shapes and then used a variety of black markers to draw the lines and to embellish each piece. I found this exercise comfortable and familiar because it reminded me of free motion quilting. The different thicknesses of lines reminded me of different weights of thread.

It was freeing to play as we embellished the shapes. I could have used markers or color pencils to add color to the shapes. I might do that another time. It was fun to create a shape and then decorate it!!

My grand, Miss J, liked this page best of all the pages I had completed. This page motivated her to spend some time drawing!
Creating a mixed media background
During the second session on Day 7, Karen Stamper showed us how to make a background for "Mixed Media Marking. I didn't have gesso or the sepia or India inks that she used. I used watercolors and bits of papers that were in the recycling container.
She talked about a Constantine journal which has accordion folded pages. She shared how to add a page to our journal. I would have like my results better had I used watercolor paper; but, I still enjoyed the process.

Karen collected tickets, papers, photos from travels and used those bits for her collages. She would add the inks on top of the college. Once it dried, she would draw in details of her trip. I thought it was a great way to capture a memory of a place without having to be artistic.
My blueprint to achieve a goal

On Day 8, Adam Sicinski gave us "A Visual Blueprint for Achieving Your Creative Tools." He asked us to come up with a problem. . .easy for me. . .I need to clean/organize my studio. This has been a goal for about four years now. . .I start. . .I stall. . .I start. . .I've yet to get to FINISH!!!

He lead us through an exercise where we identified our resources, looked at our current reality and were honest about the obstacles that face us. We also looked at a future view of why we would want to complete our goal and we came up with some steps to get us going. We even. . .gasp. . .listed a date when we wanted to be at our goal!

I'm ready to try again. I particularly appreciated the tip of working just five minutes on the task and calling it a day. I'm thinking once I get on a roll, I'll be able to accomplish the task. I've roadblocked myself because I've told myself I can't possibly do it and I've been right! Now, I need to tell myself I can do it and I'll be right!
Happy Journal practice

The second lesson on Day 8 was with Jennie Moratis who shared "How to Start a Happy Journal." She said her happy journal started as a way to document a trip as she was staying up all night in an airport back in her early youth. I liked the idea of keeping the drawings small, simple and happy. One of the activities I enjoy doing with Miss J is taking a walk so I drew a few small items that remind me of the walk.

I'll admit as I was drawing, I was smiling. I remembered the conversations that we have had. I remembered how fast and how long Miss J ran the last time we walked. Perhaps, I will add some "happiness" in future posts in my bullet journal.
Botanical and mixed media examples

On Day 9 Anne Butera shared "Botanical Color Celebration" using a tulip and watercolors. She recommended making a color swatch of all the colors in the paint palette. Next time I play with watercolors, I will make a swatch as per her suggestion.

I liked her method of blending colors and how she studied the parts of the flower. She made a reference swatch of the colors that she saw. Then she inked a petal; she painted a petal. She inked a tulip, she painted a tulip. She drew the tulip from all angles. It was such a fun session. Brushing paint onto the paper without having a line felt so different; but I did it and I liked my results!

Iris Fritschi-Cussens led the second session on Day 9. Her topic was media play. I used watercolors left from the previous session, color pencils, gel pens, markers to paint, color, mark write on a sample. The tip I took with me was to go with what you feel. It was such a fun day. I am developing a fondness for watercolor techniques.
Seahorse drawing exercise

On Day 10,  Christine Elder shared "Sketching a Seahorse Drawing to Learn while Learning to
Draw." Christine is a biologist and she shared the nuances of seahorses which helped while I was studying the photo copy reference sheet she provided for the exercise. She recommended using the pencil for placement. She blocked in the line for the photo and then she marked the lines where the photo stopped and started. She starts with a light touch with a mechanical pencil to sketch in the the shapes of the object. The seahorse has a circle for the head, a rectangular shape for the nose, an oval shape for the belly and another circle for the tail.

We used our finger of our non dominant hand to trace the shapes that we were drawing with our dominant hand. I'm becoming more confident with the exercises and I look forward to drawing another object after the online session ends.

Painting an arrangement
During the second session, Anne Bartlett shared "Acrylics are Great Sketchbooks Too." She shared a reference photo and then we painted the light shape of the vase and the outline shape of the flowers.  She shared her technique of brushing color into her brush and then to the paper as she created the background. I liked the technique because you don't really know what you are going to get as you are brushing.  I also liked that some of my paper showed through the design.

Then we brushed color on the paper for the intent of flowers. This was a new to me technique. I learned that with acrylics, you put the darkest colors on first and the lightest colors on last. While darker colors were drying, we would work on another section of the work. I liked that we could keep playing without having to wait for the work to dry.

Practice would help me with the brush strokes to become more petal and leaf like; however, I had enough success that I would call the whole exercise a win!

Sunday, May 12, 2019

Walleye Fishing

Down river view
First, Happy Mother's Day to all the Moms who are reading this post. . .I wish your two legged and your four legged friends and family make your day extra special!

Bob and I haven't been fishing in a long time. Last fall the trip that we had planned was rained out.  Scott, who Bob roomed with in college, called and set up a walleye fishing trip. The guide, Touché, calls his business Fly by Nyte Fishing.

His wife, Kathee, manages the booking part of the business. Touché and Kathee have been married 52 years. When they talk about each other, they do so with love and respect. They are each other's best friend. It is cool to see relationships like theirs exist in this day and age!

Across the river view
We were up early last Sunday morning. (I got up at 3AM.) We drove about one hour and 45 minutes to be in Rufus Oregon by six in the morning. Well, Bob drove and I slept! I find that the time passes quickly when I'm reviewing the inside of my eyelids! Bob has teased me for years about how long trips take me! 😴

Rufus is a tiny town on the Columbia River near The Dallas in Oregon. It is part of the region called the Columbia River gorge. It is almost always windy in this area and sometimes, the gusts are
View from the dock
so strong that fishing trips are canceled. On our day, the weather was beautiful.  Right away, I snapped a few photos because the river was like glass. Usually, the water would be choppy and there would also be lots of other boats on the water.

The most boats we saw at any given time during our 7am-3pm fishing excursion was five. I was really surprised.

Girlie resting as we traveled to another fishing hole
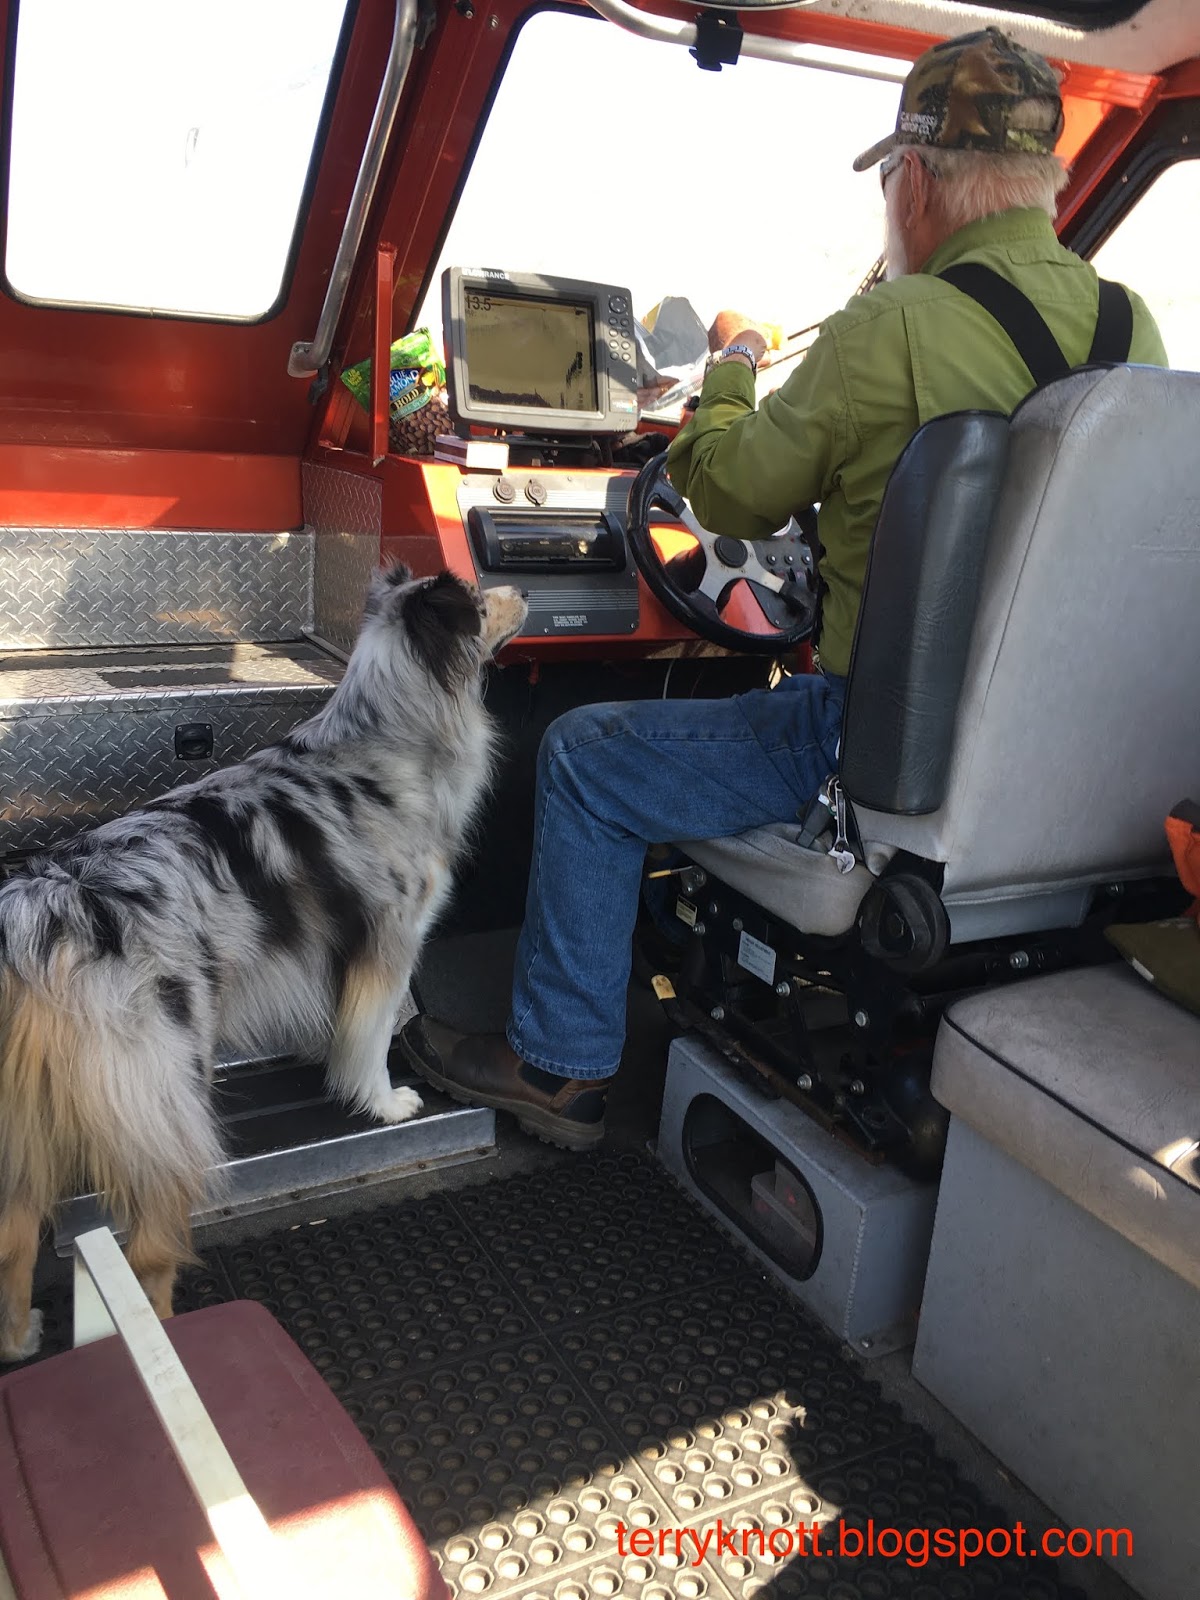
This time of year, the hills are covered with spring green new grass which makes the hills appear to be the texture of velvet. I enjoyed the views from the river almost as much as I did catching fish and getting acquainted with "Girlie," the guide's dog and sidekick.

Girlie is a three year old Australian shepherd or in that part of the country she is called a cow dog. She was so well behaved and such an expressive dog that she was fun to be around.

She and Touché are joined at the hip. The inside of the boat is like her living room. She knows all the stops and routines of the day. While we traveled to the various fishing holes, she rested.

Girlie's "Is it lunch time yet" look
When we were getting close to lunch time, she looked right at Touché as if to say, are we there yet? It was obvious when we were arriving at her swimming hole and squirrel chasing area because she was primed to exit the boat as efficiently as possible!

Touché was a great guide. He has been fishing and hunting his whole life and has been a fishing guide for at least the last 20 years. He told us he was 80 years old. . .If I would have been asked his age, I would have thought in his late 60s! His boat was comfortable to ride in. On a windy day, the cover would have been extra nice!

He shared lots of fishing tales in-between netting our catch. He told us often not to worry about snagging the bottom with his fishing gear because that  was where the fish were.
Girlie's "Are we there yet" look

This was my first time to walleye fish. Bob has been a couple of times. It is a delicious white meated fish. I thought fresh caught Alaskan halibut was the best until I ate walleye!

I managed to catch two walleye. When they bite, their bite is so light that you might miss it; but, you need to reel the line in, otherwise, they take your bait and live another day!

We hadn't had our lines in the water long before I had caught the first fish.  Touché estimated it to be about five pounds which he claimed was a nice one. To me, any keeper is a nice one!

He said the spawning season had ended so the female fish were a little fatter. In general, the fish this time of the year are smaller than those caught in February or March; but, these fish are better eating.

Patty, Scott's wife, caught the next fish. She had been on five guided trips and this was the first fish she had caught. It was cool to see her catch a fish. Feeling the fish take the bait and then run with it is such a thrill. Some fishing trips no one catches anything. My dad always said that was why it was called fishing rather than catching!
River view of Mt. Hood

We each caught another walleye and then Scott caught one. Next he caught a bass. I lost a couple bass and he lost a walleye. Just because you manage to hook a fish, doesn't necessarily mean that you will successfully land it!

After lunch, we all had a few more bites; but, Bob was the only one to land a fish in the afternoon. Even as our day was ending, the river was still calm. I never tired of seeing Mt. Hood from the river. I have a different view of Mt. Hood from our property. Touche' turned the boat so I could get a shot of Mt. Hood, the river and the hills. Notice how few boats are on the water.

At the end of the trip, Touché loaded his boat and we drove the couple miles back to his shop where he cleaned, filleted and vacuumed packed our catch.Bob and I both agreed that we would like to take another trip with him. We  had a great time catching up with Scott and Patty who live a few miles away in The Dalles. I hope another fishing trip is in our plans!
Catch at the end of the day


Wednesday, May 8, 2019

Miss J's Girl--Post 3

Pin basting the layers together
Miss J decided that she wanted to sign her work and then layer it for quilting. She chose a wool batting because it was light. She liked ironing the backing fabric that she choose. Perhaps, she liked spraying the fabric with water even more than ironing it though!

She talked about threads and she looked through the color choices that I have.

Free motion quilting with J driving
To start quilting, we used a silk thread and outlined the girl. She had chosen a metallic silver thread to stitch a "breezy" background. Unfortunately, I was unable to adjust the tension to make it work for this project. So we chose a pinkish silk thread instead. Parts of the surface are heavily painted so the holes are larger in that area. At the end of our first quilting session, she had quilted around the outline of her girl, ditch quilted the join of the background to the pieced orange strip and stitched gentle curved lines in the background of her girl.

In our next day together, she decided there wasn't enough "wind" stitched in the background. So we quilted a ring of circles and then some magic happened.

Quilting patterns and the binding
She said let's quilt this. . .and she drew a shape in the air. I gave her a scrap piece of paper and a pencil. She drew her shape. It is interesting to see what "wind" looks like to her. We stitched her shapes and then she was finished quilting for the day.

I asked her if it was finished and she said no. She said she would work on it the next Papa and Gran day. We spent a number of Papa and Gran days following the format of her drawing shapes on a piece of paper and then quilting it. She is beginning to get the hang of driving/moving the fabric under the needle. She delighted in sharing her progress with her mom and her dad!

When she finished quilting the background, I asked how she wanted to finish the edge. I envisioned a facing finish and showed her an example. Miss J said, "no." She led me to a wall hanging that is finished with a binding. She wanted fabric on the side and she wanted the fabric to be yellow! I pulled the drawer of yellow choices and Miss J made her choice in about a minute. We adjusted the width until it was the size she said was right. We machined stitched the binding to the quilt top after we trimmed the edges. The binding is double fold. It started as a one and one quarter inch wide strip. It is a skinny binding. It compliments her design beautifully.

As we hand stitched the binding, we talked about the label and how to add the finishing embellishments. There is more to her quilt's journey. In the meantime, I'm sharing one of our Monday breakfasts. She gets to choose what we cook for breakfast. To ensure that we have the ingredients, she needs to think ahead and make her choice on Wednesday for the following Monday.

Waffles, butter, jam, ice cream and strawberries
During one ordering session, she said I wouldn't like what she wanted. I was thinking she was going to ask for Oreo cookies because she knows I don't like them. Had she chosen Oreo cookies, I would have said yes because one can have all sorts of foods for a meal. Why limit your choices because of the time of day?

Miss J said she wanted pancakes, strawberries and then what I wouldn't like-- ice cream. I replied that I loved that kind of breakfast; but, that I liked waffles better because it held the ice cream better. Miss J replied, "Oh, I meant waffles!"

When Monday arrived, she stirred the ingredients together for the waffles. Dairy upsets her stomach so we made the waffles from scratch and we substituted a nut milk for the dairy milk. We used dairy free butter and ice cream for the toppings too! Dairy doesn't agree with me either. Although, I can tolerate a little dairy. I can also eat butter with no problem. Unfortunately, Miss J's stomach/intestinal tract can't process butter either.

When the waffle was ready, we spent about five minutes placing the condiments in just the right places. How her plate looks is important to her. Notice, that she chose a red plate as the base for her creation. She ate two waffles; but, on the second one, she omitted the ice cream. I'm going to miss our Monday breakfasts when she goes to kindergarten next fall!

Sunday, May 5, 2019

Exercises in Artistry--part 3 of 5

Sketching Our Intuition results and my supplies
Sketchbook Revival sessions have continued to be an integral part of "stretching my skills" each day. The sessions ended yesterday; but, will be available until May 18.

On Day 4, we were "Sketching Our Intuition" with Angela Fehr. We used three colors from  the watercolor paint set. We used a wide brush. I got enough water on the paper to practice letting the color run a bit. I also practiced moving the color around on the paper with the brush.

I learned that the dryer the paper, the harder the edges that can be created. For this exercise, we did no drawing. We put paint on the paper and let the paint guide us as to where to go next.
Vintage girl drawing

The second session on Day 4 was "Mixed Media Vintage Girl" with Toni Burt. I hadn't prepared my watercolor paper with a mat gel nor did I have the watercolor pencil she recommended. Instead, I used the side of a pencil to draw the face. Toni drew the eyes, nose, mouth first. She added the pupil, line under the mouth, nose and eyebrows. Next, she added the head and neck outlines. Last, she added the hair.  I LOVED her drawing technique. I've spent hours drawing a face and this approach worked so much better for me.

I liked what her collage looked like. I could see creating a crazy quilt background around a similar figure. I could couch ribbons, lace and threads to embellish it.

Quick observation exercise
Day 5, Susan Yeats lead us through "Object Observation: Quick Drawing Exercises." Using a variety of pencils, using a variety of markers and drawing the object from different view points was actually fun. I can't believe how quickly the time passed. A few times, she allowed us one or two minutes to draw. . .otherwise, it was 30 seconds. We also drew the object with a light hand, a heavy hand, in silhouette, tiny and big. . .We drew our object in every way possible!!! I had trouble drawing my
Drawing a bird in five easy steps
object to start with; but, by the time I got to the last drawing, I had improved! I was surprised at how many drawings I could fit on my page. Practicing does make a difference!

The second exercise on Day 5 was "How to Draw a Bird in 5 Easy Steps" with Julia Basenhardt. I looked at the bird she provided and thought to myself. . .sure, I can do that. . .well, honestly. . .I didn't think I could get close! I was SHOCKED that not only did I draw it; I also watercolored it!!!

The take aways from the bird exercise was to draw the head as an oval and then lightly sketch the body shape. We added the legs and added a bit of a "claw" for the foot. I liked that Julia encouraged us to draw a bit and let the viewer's eye fill in the rest.

To achieve the darker colors, I learned to paint in layers. . .I was surprised at the results!
Listening to my intuition

Up first on Day 6, Amber Kuileimailani Bonnici lead us through "Listen to your Intuition through Creative Practice." Her message to use was that your creation have messages. Write them down! She started us with some meditation cleansing breaths and as I was clearing my mind, I picked up on love as a message. Amber did too because she asked us to use LOVE as inspiration. I immediately thought of a book quilt I wanted to create using a heart so I started with a large sketch and then made a couple smaller ones.

Maybe I will make half squares triangles. Maybe I will use an ombre fabric. Maybe I want to figure out a way to merge two hearts into one. Maybe I will sketch some more and think some more. The point is, I hadn't thought about this project for several months!

The result of a mindful art experiment 
The second session on Day 6 was with Cynthia Hauk who lead us through "5 minute Mindful Art Experiments." She also started us with a few cleansing breaths. Her thoughts were to draw a circle and then fill it with whatever sort of doodle felt "right." From there we drew a larger circle and filled that one paying attention to any messages that we might have received. We could add color if we wanted. She had us draw a quadrant and use the following labels: Physical, Emotional, Senses and Mental. Next she had us write a few words that pertained to the label in the quadrant. Then we picked one word in each section and in the fourth section, we wrote a statement using the selected words.

In the mental/overall section I wrote, "I am learning to have fun as I practice becoming more free in my art." I can do it.


Wednesday, May 1, 2019

April Embroidery Lesson

Pin tuck heart
The software embroidery lesson for April was heirloom embroidery techniques. Years ago, I did a little heirloom sewing and so I was excited about working through this lesson. The first part of the lesson was to create a heart with pin tucks. I used a double needle with my embroidery unit. I wouldn't have thought that was possible!

I stitched the heart on a piece of pink cotton that looks like taffeta. I used a light interfacing under the pin tucks and then inserted a tear away stabilizer when I was ready to stitch the decorative edge. This heart would be a cute embellishment on a pocket.

I may have had less fullness at the top of the heart had I used a 5.5mm stitch plate. I don't have one and decided that I wouldn't use one enough to warrant purchasing one. The directions also stated to use a number nine darning foot or the number 15 embroidery foot. Usually, I use the number 26 embroidery foot; however its opening is too small for the double needle.

Circular design made with a wing needle

Part two of the lesson was to create a piece of embroidery on linen using a wing needle.  I don't have linen fabric in my stash; but, someone left a strip of toweling like fabric on the free table so I picked it up for this project!

I used a wing needle to create the design. I didn't do all that well getting the design centered; but, in my defense, the toweling isn't square. For the sample on the left, I used the wing needle to create the outer edge treatment. For the sample on the right, I used a regular size 90 top stitch needle. I used a water soluble stabilizer and perhaps, I should have also used a tear away stabilizer.

It was fun watching the design stitch; but, I don't know how I would use this technique in my stitching projects.

Part three of the lesson was to create a piece of shadow embroidery. I was supposed to use cream batiste for the bottom layer. I didn't have a cream batiste so I used a light weight muslin fabric. I used a water soluble stabilizer as well as a piece of tear away.
Shadow trapunto

The first time I stitched it, the red flowers weren't round and so the candlewick stitches stitched at the end of the process didn't match the design. I tried different fabrics; I tried different stabilizers. After three hours, I stopped trying to make the red flowers round.

The leaves didn't distort. Perhaps, I should have tried a different underlay pattern for the red flowers. Perhaps, I should have stitched the circles after the leaves. I decided to save that learning for another day.

Entredeux example
After stitching the flowers, I overlaid a piece of organza on the top. For the piece on the right, I free motioned stitched in cream silk thread a line around each of the leaves and flowers.

I can see these made up a sachets. I might try it again if I could have better results stitching the flowers. I did find switching back to the single hole stitch plate gave me better results.

Part four of the lesson was to create a piece of Entredeux. I had planned to use a 60 weight cotton thread on a light weight cotton fabric; but, then decided to stitch it on a piece of organza using a 40 weight polyester thread. Again, I got to use the wing needle and water soluble stabilizer.

I had some puckering as I created the design and possibly a lighter thread would have helped. Perhaps, I should have used an extra layer of stabilizer.  I took the photo before I rinsed away the stabilizer. This technique would make a great cuff embellishment.

Part five of the lessons was to join two pieces of linen together using faggoting as the method. I should have let my feather stitch overlap a bit more of the fabric so I would have had a wider space; but, it wasn't hard to create this little sample.
Faggoting example

This might make a fun way to join quilt sections together. . .at least it is a technique to consider! While my samples aren't terrific, I created and stitched them. I'm doing better than I ever have as I have completed all four of the lessons! I'm patting myself on the back!!

Last month, I trained nine lifeguard instructors in a review session. I enjoy these trainings because I get to work with a dear friend. We can finish one another's sentences!!! I trained 19 in Basic Life Support CPR. I trained 18 in lay rescuer CPR and I trained 10 babysitters.

I also went to a service award banquet and was awarded a 25 year of service plaque. Gosh, it is hard to believe that I will have my 26th anniversary of employment at the hospital in May. The time has flown!