Wednesday, August 30, 2017

Train to Dole, France--post 2 of 9

M's crab and grapefruit appetizer
We enjoyed a wonderful breakfast at the hotel before we walked 2.7 miles to the train station in Paris. We boarded a train for Dole at 10AM and arrived one and half hours later. J, N's boyfriend, met us at the station and drove us to his family's home in Tavaux which took about 20 minutes.

M's Monkfish in brown butter and wine
Apricot tart for dessert
I have been looking forward to meeting J's mom, M since the first time that we FaceTimed more than two years ago! M prepared a feast for us for lunch. We had a crab appetizer which was not only beautiful; but, light and delicious. The grapefruit was the perfect accompaniment to the crab. Of course there was bread and I saw first hand how "locals" put the bread on the table--it doesn't go on the plate! (You can seen some bread on the table in the above photos!)

The next course was monkfish and vegetables which was cooked in wine and brown butter. M served it with rice. It was divine and of all the dishes I ate on the trip, it was my favorite entree! We had a course of cheese and then M served us an apricot tart which was delicious!


M, N, J, B and me on the bridge over the canal in front of Notre Dame


After lunch, J took us for a walk around Dole. We went to the canal and passed by M's favorite pastry shop.

I learned that Louis Pasteur was born there and there is a museum of his works in the house where he was born!

There is also a visual history display of the industry there--tanning and leather works which was interesting to see and read about.


This barge served dinner for some guests later in the evening


We watched the captain dock this barge which he did as easily as some people parallel park! How fun it would have been to have had dinner on this barge!


Insect sculpture


The garden at the end of the bridge held wire framed insect sculptures amidst the flowers and grass.


As we walked through the area, I spied a shop that had sewing machines for sale. It was closed and there were bars on the windows so no photo. I also saw a yarn/floss shop that had these smocked items in the window.

It was a beautiful little town. We had dinner at a local restaurant at 8PM! Dinner is often served between 7 and 8 in the evening. After M's lunch, I was just the right amount of hungry for our late dinner.

View of the canal
We ate outside and after a hot day, it was a refreshing evening. I had a starter that was a wonderful green salad with goat cheese. My entree was sirloin steak and scalloped potatoes in Comté cheese. The potatoes were so creamy! The dessert souffle was a lot like ice cream heavily flavored with Grand Marnier.

We arrived home at 11PM and I promptly went to bed and slept like a rock! I walked five miles and my blister didn't get any worse thanks to bandaids and arnica! Aleve is helping the knees!

Sunday, August 27, 2017

Meeting in Paris, France--post 1 of 9

Stitched during Paris trip 2014. 
Stitched during Paris trip 2014
Stitched during London/Scotland/Paris
trip 2016
Stitched during France trip 2017
Husband B reading the daily newspaper
Our daughter, N, lives and works in London, England. I had planned to visit her sometime in 2017.  I was disappointed when I wasn't able to pin her down on a date last May when I celebrated my 60th birthday. I didn't know that she and our daughter, A, had planned a wonderful surprise party for me which you can read about here. When N was in town, she asked if we could come in August because her boyfriend, J, was having a birthday celebration. There were lots of communication exchanges and some schedule changes; but, we finally picked our dates--Leave August 2 and return August 11 and we would meet N in Paris! N even talked her dad, who does not enjoy traveling, to come.

Ahh. . .a little coffee to begin the day!
The trip was amazing in terms of sights seen, people met and food eaten. I will be sharing our trip here. You won't be reading much about quilting projects for awhile!

When I travel, I like to take a stitchery project with me and a couple books. (I still like reading the "real" thing!) I started the embroidery project when I visited Nicole in Paris when she worked there in 2014.

I stitch while I wait at the airport. Sometimes, there is enough light and space to stitch on the plane. Sometimes, I stitch during the trip when I'm resting my feet at the end of the day.

B, N and me in front of the Fountain of
the Observatory
This project has been to Paris 2014, Paris/Scotland/London 2016 and France 2017. I seem to complete a block and get a start on another during the trip. There are nine embroidered squares and this is as much as I've completed. Hmmm. . . I guess to make more progress, I'd better schedule more travel! :)

Daughter A dropped us at the Portland airport. (Thanks A for doing that for us!) We enjoyed the amenities of the United Club lounge while we waited for our flight to board. We flew to San Francisco and then to Paris. It is a long flight and for the first time, I slept about three hours on the longer leg of the journey! We had stayed up late the previous night just so that we might be able to sleep on the plane.

A sample of the red flowers in the garden
We took a taxi from the airport to the hotel. I've been practicing French with a Duolingo app on my phone; but, I'm far from fluent. The taxi was the best insurance for husband, B, that we would arrive at our destination. It was only about an hour before daughter N joined us and off we went to my favorite garden in the city.

Luxembourg garden happens to be N's favorite garden too. The fountain has an interesting spray pattern.

It doesn't matter what time of year you see the garden, it is always beautiful. This year, there happened to be a lot of red flowering plants. Of course, you know how I feel about red!

N and B in front of the circular basin

A fun part of the garden is the circular basin where kids rent a model sailboat to sail there. The rental fee is $5 euros for 35 minutes. It was fun watching the kids play and seeing the boats sail!

Also, my favorite bakery, Dalloyau, is across the street from the garden. It was late in the day when we passed.  The staff had put away the chairs outside of the cafe and they were out of pistachio macaroons so we walked on to our dinner destination.

Charcuterie for dinner (photo from 2016)
We ended our day having dinner at the same restaurant we visited the last time we were in Paris (Aidans) because B wanted to go there. I think he was remembering how wonderful the cheese was!

I walked 8.7 miles and got a little blister. . .arnica to the rescue!

Wednesday, August 23, 2017

Sashing the Quilt As You Go (QAYG)

The back of the quilt 
Just a little eclipse news since we were almost in the path of totality when the eclipse occurred on Monday. Seeing the eclipse, as we sat in the backyard, was amazing! Sharing the experience with daughter A and the grands was beyond priceless!

When I began the QAYG project, I gave myself a couple "just for me" rules. These were to:
--Only use fabric from my stash.
--Use one thread to quilt the blocks.
--Make the project two sided.
--Use batiks on one side and cottons on the other side.

After I finished quilting the Quilt As You Go (QAYG) blocks, I was curious how they looked laid out together. I hadn't trimmed the blocks. The fabrics on the back have been parts of other projects or after buying it, I decided it wasn't the best option for the project that I was beginning. The colors say happy to me.

Add caption
The batik fabrics on the front have been in my stash for more than nine years! I tried for a number of projects to use those striped fabrics; but, either the color wasn't right or there wasn't enough! I'm happy to put these fabrics to use!

Cutting the fabrics was challenging in the beginning because the fabric on the front is directional. I needed to try to keep the lines going in the same direction.

One person with whom I shared the photos of the front and the back with said it reminded her of the candy, Skittles. It sure does! Actually, this is a great name for this project!

Notice that orange fabric in each of the photos? This is the fabric that I chose for my sashing. It is a little too close in value for the striped orange/pink fabric; but, it was the best that I had in my stash.
Front of the quilt with sashing
I tried a new (to me) template ruler to help me stitch the narrow sashing to join these blocks. You can see the template ruler in action here.  The sashing is one inch wide. I like the accuracy of this technique.

On the back, I decided to hand stitch the edge of the sashing in place because I like handwork and I like the look of the sashing without stitching on it.

Back of the quilt with sashing
36"x36" nine patch unit
To combine the blocks, you stitch blocks together until you have a unit. Then, you combine units together until all the blocks have been joined. I've included a photo of joining three units into a larger unit. This combination is a giant nine patch!

Yes, it can be a little tricky to ensure that the sashing strips line up; but, it isn't impossible.


Finished quilted center
The directions were to put the quilt together at this point and then to quilt the center block a little more. Because my choice of thread doesn't show on the front of the block, I'll share the back.
Finished Front

The designs that I chose compliment the motifs that I had already stitched. I really had to work to not switch to a different thread and to not fall back on my free motion fill stitches. I was impressed with how flat this little wonky section is at this point!

It was challenging and then I realized impossible to keep this block symmetrical. Probably I got off in the very beginning and just didn't realize it. I am calling it "in the neighborhood", "good enough" and "finished" so I moved on to attaching the remaining pieces.

Finished back

Pile of scraps--the leftovers 


This is the pile of scraps that was left from trimming the pieces. I'll separate those into my scrap saving system.

What is left is on the QAYG project is to bind it, attach a sleeve and label. I may get to this in October.

Right now, I need to get back to the chicken project. I've been stitching French knots but still have a handful left before I quilt the flowers and border.

Next post, I'll be sharing about our trip to France.

Sunday, August 20, 2017

Mending/Alteration--2nd Finish for Third Quarter Finish Along ( FAL) 2017

Add caption

Luann over at Create Today was right. It didn't take long to shorten those pants that have been hanging in my closet for three years! I was to the point that I needed them. Plus, as few weeks ago, I found another pair of jeans on sale for $6 that I brought home. It was a bargain that I couldn't pass!!

Now, I had three pair of pants to shorten. I had to get the job DONE! There are lots of You Tube videos and tutorials available on how to shorten jeans keeping the existing hemline, if you are interested in doing this for yourself.

I didn't need to shorten two pair much at all. I was lazy and I didn't even trim that little piece away. What was the hold up was having to try on each pair of pants and mark the length. This is not impossible to do by yourself, but, not easy when you don't have a mirror where you can really see the proposed hemline on the pants.

Chewed sleeve portion cut away
The first time, I basted the hem and then tried on the pants again. I thought the pant leg was a little short so I redid that leg and found the 1/4" that I added to the length was just right. I had these done in about an hour. It took at least that long to repair the top that Bailey had chewed the sleeve on three years ago!

I ended up getting out the serger and
Three pair of pants, one shirt ready to wear!
serging the hemline to stabilize it so I could machine stitch a blind hem. The sleeves were long--almost to my wrist--now they are a little longer than three quarter length. The sleeves are still a length that I like. This little pile is now out of mending and into the closet so I can wear them!

I dislike mending so much; but, three years is a long time to procrastinate from completing a simple job. This was goal #9 of my list which you can review here and my second finish for the quarter!

It is back to work on the chicken and the QAYG projects; BUT, my sweet hubby and I are recently back from spending 10 days in France. The next posts will be about the trip!

Wednesday, August 16, 2017

Month 6 of 8 QAYG-(Quilt As You Go)--Part Two

Whoops. . .I posted a bit out of order; but, here is part two of Month 6 of 8!!  After I experienced so many challenges with trying to maintain a consistency with the ruler and trying to hit the marks as I quilted using the spacing gauge, I decided "in the neighborhood" was as good as it was going to get. I reminded myself that this is a learning project and to stop being so hard on myself.
Using the rotary cutting ruler as an
spacing gauge

Block three was another star. I attempted to place a curved line around the outer edge of the design to give the illusion that one was looking at a flower. Granddaughter K called it a flower so I thought that she was extra smart! I didn't do near the ripping that I had done on the other blocks.

I did try a different alignment technique which worked better for me. I used a small rotary cutting ruler to ensure that the angle I was going to stitch was the correct one. I then butted the template ruler next to the rotary cutting ruler. I removed the rotary cutting ruler and stitched. My lines were straighter and more consistent using this method.

Again I stitched vertical lines for the background. It is good enough and I'm glad that it is finished!
Block 3 of 8
Block 4 of 8


Block four was another opportunity to use my eye to gauge the center of the block and to line the end of the ruler template at that point. I was better; but, still not great. I again stitched vertical lines as the background fill. I will probably have at least two blocks that either contain a vertical or a horizontal straight line fill just so that when I get to putting all the blocks together, these blocks will have some consistency.

Now to get on with the next four blocks as time is ticking away'!

Sunday, August 13, 2017

Month 7 of 8 QAYG (Quilt As You Go)

Block 5 of 8
It was curious, but, in the links that I was sent to complete month 7 and 8, I was missing the video/directions to one of the blocks. One of my friends who is in the same class sent me her link and ta da. . .there it was! Interestingly, she was missing some information from the eighth month which I had. Something must have happened in the cyberspace when this information was coming to us.

I added the cross hatching and straight lines to the center motif to add some interest. I chose to use straight lines to quilt the background and I used a variety of widths to create some interest.

Again, I struggled with having the eye to get back to the center of the block each time; but, I called it good enough and moved on to stitching the next block.

Block 6 of 8
Stitching this block was a little like stitching giant pebbles! I can see using this to quilt a baby quilt. I liked the texture that it provided. Once I got the hang of how to travel, stitching the block went quickly. I stitched this with one start and one stop!
Block 7 of 8


This block was the one that I liked to stitch because I learned how to use a different template to stitch the pattern in the border squares on point. I also can see how this design would be fun in a quilt that needed some fireworks!

I stitched the last two blocks in less than half the time it took me to stitch the first block that I posted!
Block 8 of 8


I liked stitching the last block because we used the templates in a different manner and created our own design. I like the concept of what if I. . . .what will that look like??? kinds of queries. I was able to stitch this block without too much angst!

We use the 4" arc, the spin effects and curved ruler to create the design and I was better at "hitting" the mark.

Now it is on to trimming and sashing these blocks!

Wednesday, August 9, 2017

Month 6 of 8 QAYG (Quilt As You Go)--Part One

The quilt shop where I'm attending the lectures for the QAYG project, canceled the class for July. When we met in June, I learned we get to stitch eight 12"x15" blocks. The class was canceled in July because we had already received the videos in June on how to stitch the blocks. Of course, I was side tracked working on the HH Hall project and that chicken project.  In June, I didn't stitch any blocks. It doesn't take me long to get behind! 😀

I decided my goal was to finish all eight of the blocks by the August meeting. Sure, I may not make it; but, I'm going to try! The idea is that we would have our tops together for the August meeting; but, I'm doubtful that I will be that productive as I so want to see that chicken project hanging on my wall instead of in my "in process" pile!
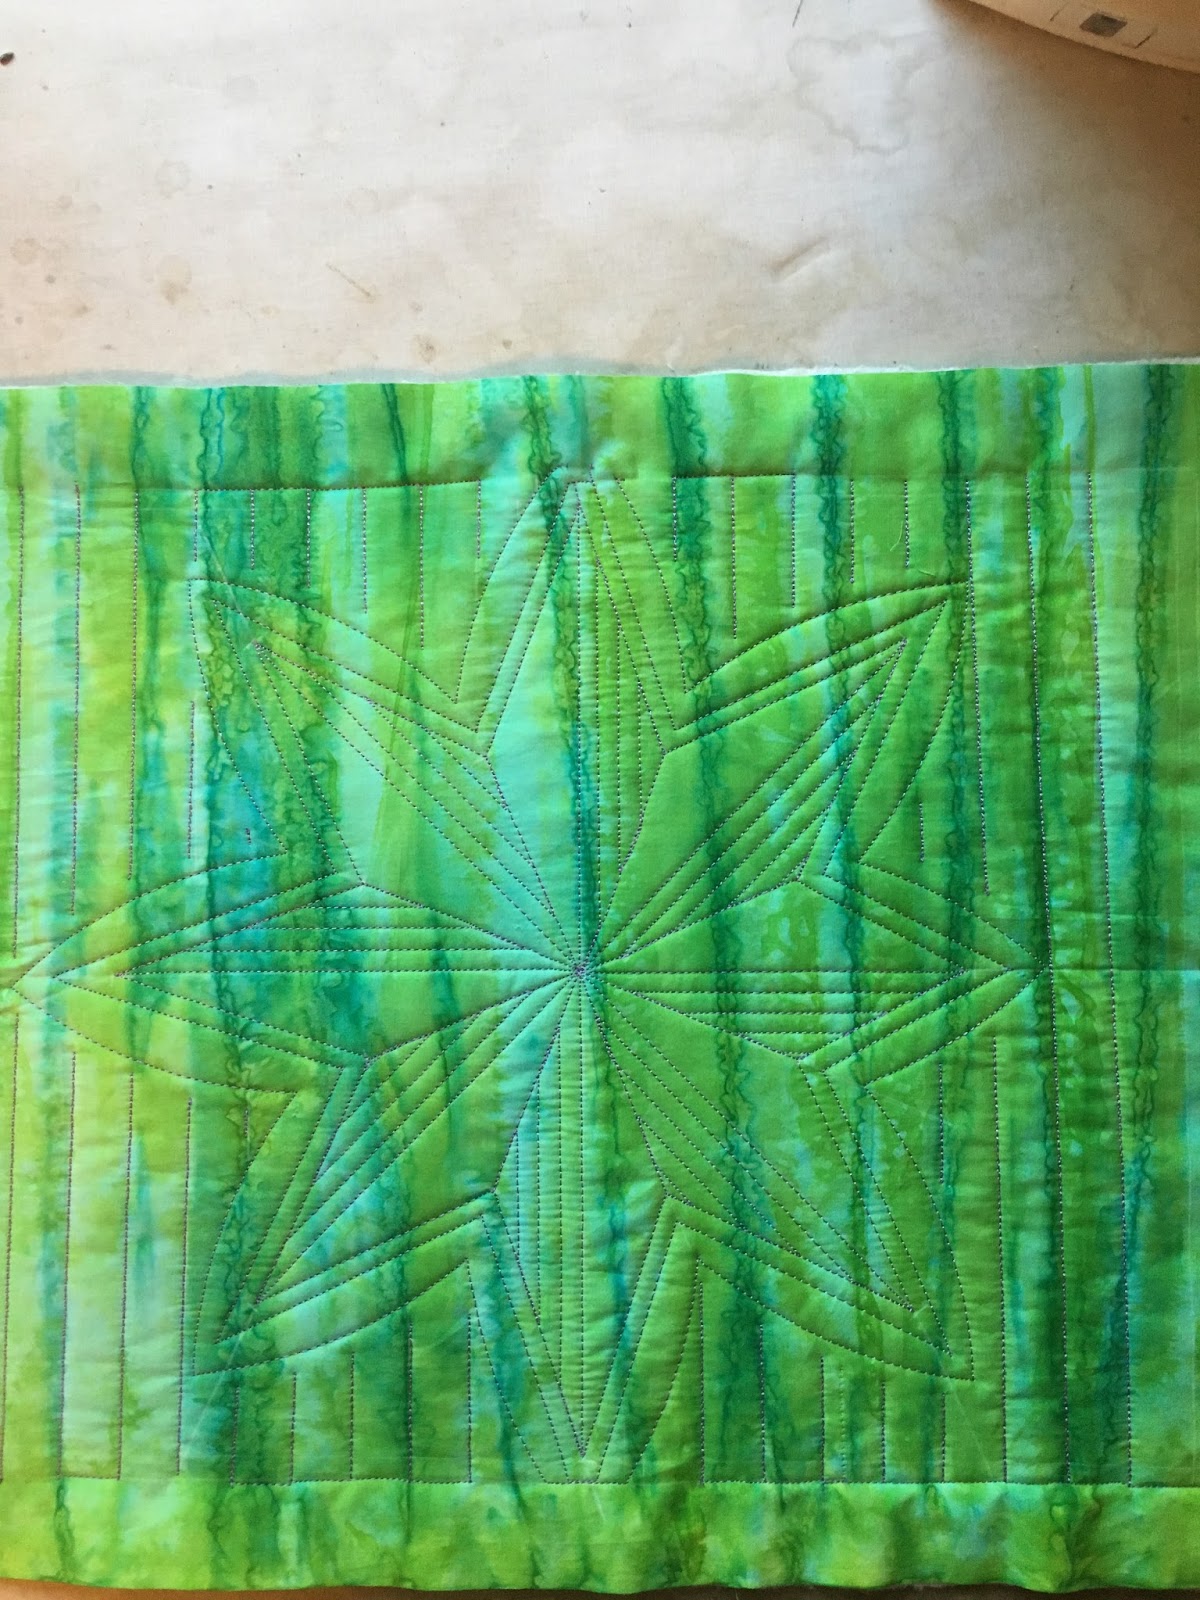
Block 1 of 8
Back to QAYG, I watched the video for the first block and then tried to stitch it. Watching the video, I felt confident that I could stitch this block. I started and had a dose of reality! I don't know why it was so difficult for me to mark the lines on the block; but, it was. The actual stitching of the block went okay. A couple of times, I neglected to put the ruler on the correct line and I "got" to rip that section to stitch again.

I also had a challenge stitching the background; but, after way too many hours, I finished it!  My challenge was that I had trouble keeping the spacing of the lines even.

Often the first block stitched is the easiest and the difficulty increases.


Using tape to mark a line

I started the second block. We were instructed to mark a line on our template to stitch the petal of a flower which was a cool way to use the template in a different way.  I stitched and then I ripped and then I repeated that sequence many more times! Stitching the motif was covered on the video and then we were given the direction to quilt the background as we wished!

Part of the issue with my frustration was that I couldn't tell in the video how the demonstrater was holding the template so that she was able to return to the starting position. Secondly, I couldn't tell how to measure the distance with the spacing gauge. (We were supposed to use the inch mark and measure from the stitching line to the template edge.)

Obviously, when my lines didn't match, I wasn't using the spacing gauge correctly or perhaps, I let the ruler slip!


First background
I really tried to have success; but, it wasn't happening. The project wasn't fun and I was getting more and more frustrated. So, I decided that the more stitches there are in the block; the less noticeable are the errors.  I just stitched. I finished it. While I liked the curved cross hatching effect, I don't know that I could replicate it.

I also understand that we should be figuring out our own background fills; but, my creative muse is on hiatus. I would have rather had some visual options to have a jumping off place for my creativity.  Perhaps, my muse would have engaged a little faster had I had this help.  In the video, the demonstrater verbally provides some options. I eventually figured out a background fill.

I've also been thinking about why I have such difficulty in hitting the points and keeping my lines even. I love the effect of ruler work, so I haven't given up yet. Below are some of the reasons I'm working through. If I only see the effect and can't figure out the cause, I'm not going to get past the issues I created!

--Perhaps, my ruler foot isn't round.
--Perhaps, my perspective is different when holding the ruler at the back of the machine and my perspective is different when holding at either side or the front of the machine.
--Perhaps, the width of my marked line makes a difference.
--Perhaps, I've stretched the fabric as I've stitched and that creates additional space.

Block 2 of 8
After stitching some of the background fill, I decided it was too blah. So I ripped and created something else. As I stitched the second background, I was having fun!

This design would have been more impactful had I quilted some of the areas more densely; but, I decided that I wasn't going to put that much effort into this block! After all, this project is a learning experience!

I'll post about the next two blocks in another post!

Sunday, August 6, 2017

Grands and Their Retreat at Papa's and Gran's

Enjoying an ice cream cone on the patio
When the Grands arrived for their retreat at our house, they were excited for a sleep over! They also put their order in for lunch. Miss K chose green salad. They prefer their salad ingredients to be separate and they prefer to serve themselves. I was not only surprised at how much salad they ate; but that they chose to eat it three times as a main dish! They like lettuce, peppers, carrots, cucumbers and jicama the best.

Purple basil ice cream
We baked cookies, blueberry muffins, sourdough pancakes and sourdough bread either on the day it was overcast or after breakfast; but, it was too hot to bake fruit cobbler.  Corn on the cob is a favorite vegetable and a couple evenings we had ice cream cones for dessert. Miss K added some purple basil to her cone which made it "delicious!" They also pretended the ice cream cones were microphones and serenaded us with a live musical show complete with dance moves. What a hoot! It was entertainment at its best because the music was original!

We had lots of activities lined up because the grands like to be busy! Our place is perfect for kid play. There are trees to climb and hide behind. There is a barn that can house pretend chickens, horses and cows. There is plenty of flat space for running games. The whole property is fenced and not near a street!

The rules for playing outside are few:
--Tell Papa or Gran that you are going to go outside
--Wear shoes
--Take Bailey (the dog)
--If called, come fast

Papa is being directed to make
a stepping stone
It took until Saturday before they each were following the outside rules. One had a tough time with coming when called and wearing shoes; they both thought that one of us needed to be outside with them.They both were great about telling us that they were headed outside.

We went to the library; we played in two parks and we gave Bailey a bath! We were in bed by 8:30 each evening and asleep soon after reading some stories. We read a really good chapter book too! Most mornings, they were up between five and six. I'm fortunate that I am an early riser!


The stepping stones; K's is second from the left; J's is the first on the left.
Papa helped the Grands make some stepping stones. There were lots of "gems" to create whatever they liked. Papa did a lot of helping; but, they were able to choose the design and materials to make there own creation. They took their creations home so they would have a memory of their retreat with us. Then they chose where our three stones should be placed. Daughter "A" purchased these for me at Christmas so it was fun to get these to the useable stage!

J's sleeping space
One of my favorite photos of the weekend was one of Miss J's sleeping spaces. (She had a different place to sleep every night although after a couple of hours, she snuggled in next to me!) Note the books, alarm clock and penguin pillow that she and her sister stitched earlier in the year.

K is so much like her mama and J is so much like her auntie that at times it was like we were watching our girls again.  Their parents are raising two awesome daughters. (Yes, I know that I'm biased!) We may do this again next year.

Wednesday, August 2, 2017

Published Blog and Here's the Proof!

Dust jacket covers 
Last year sometime, Luann over at Let's Create Today, posted that she had printed her blogs into a book form. At the time, I thought it was a great idea and a super way to preserve my posts. I forgot all about doing it. Then, when I posted about my second anniversary of blogging, Luann reminded me again.

Sample of the page
Luann, I needed your reminder! I visited Blog2Print. In a short time, I had made my choices and previewed what my book would look like! One of the choices that I made was that my posts followed each other--this option would decrease the total amount of pages. I liked being able to choose the photo that I wanted for the front and back of the dust cover. I liked what I saw so placed an order to print the first year of my blog! I split the year into two volumes. Last year I posted twice as often; so I'm thinking that I will have thicker volumes next time!

It was a little expensive; but, then when I remember losing several years of my previous blog posts when the host site did an update, the cost wasn't a factor. Today, the volumes arrived. It took about two weeks from placing my order until they arrived. I do plan to publish my blog from last year and will watch for a sale. I was able to take advantage of half off additional pages and will wait for a similar deal to order again.

Thanks, Luann for the little nudge. I'm glad I have a paper record of my posts!