Showing posts with label strings. Show all posts

Sunday, July 13, 2025

Piecing the Backing for Sweet Tooth--A Start--post four

Goal number five on my July list was to figure out the backing and binding for Sweet Tooth. I've looked at the bag of scraps which is not called SHIB (Squirrels Hiding in Bags) because was there one, two or more projects in there!

The small scraps
First, I took out the bag containing the small scraps. The larger bag which I didn't photograph, contains all the chunks. I separated the scraps into colors and then into sizes. I had a lot of 3/4 inch, 1/1/4 inch scraps. Granted, many people would call that size waste and throw it away. I am not one of those people! Instead, I began sewing the bits into sections of about 20 inches. 

The sorted piles
Choosing 20 inches was arbitrary. Since I have no clue how I will insert these strings, I can sew them together or cut them apart later! I randomly stitched the bits together trying not to sew the same fabric to each other was my only "rule."

Strings ready for pressing
After a small amount of time, I had a number of strings ready to press. I will be pressing the seam open to eliminate bulk. Whether these strings are part of the back or its own project is a mystery. I'll put the pressed strings on the design wall while I stitch the next group of scraps.

The next group of scraps
I'm thinking I want to piece the additional blocks that Bill and Weeks each week released as a way to play more with transparency. I'll see what sizes the block parts need to be and check the scraps to see what fits. I can use the chunks if I need more fabric. Some of the fabric sizes could come from the next group of scraps.  

Gertie in her "How about that?" mode
Gertie, my inner squirrel, has been quiet regarding my stitching. Although, she has been enjoying  viewing all the fabric prints. I haven't seen her "How about that?" mode or her "Why not?" mode. I do miss that tail swishing that precedes the "Why not?" mode!

I haven't met the goal I gave myself; but, I would say that I'm making progress toward it!

Linking to Oh Scrap and Melva Loves Scraps.

Wednesday, July 9, 2025

Grassy Creek clue 7--post 6

Available strings
Goal number four on my July list was to work on Grassy Creek at least twice. Sunday, I spent the day piecing more string blocks. By the end of the day, I had pieced and trimmed a dozen more blocks. Most of the available strings became blocks!

String blocks
I did cut and mark more more foundation papers so that the next time I work on this project, I will be closer to stitching. The following day, I cut a whole bunch more strings from the gray fabrics I had gathered for this project!

More strings cut and ready for more blocks
Because Monday was our in person Mavens sew day, I loaded my supplies to stitch more blocks for this project. Last month at Mavens, I stitched the center of the blocks together. At Mavens, I stitched seven blocks.

Blocks sewn so far
I pressed the blocks yesterday and discovered that I had mis-sewn a pair. Jack and I had a date. I corrected the error. Stuff like that happens while giggling and visiting with my in person friends; but, I don't mind the date with Jack. Times with friends is precious. At any rate, I have eight finished blocks!

I might work on this project one more day this month. If I don't, I still feel good that I've moved the project forward a little bit! At the rate I'm going, I might have the blocks finished by October!

Sunday, June 15, 2025

Grassy Creek clue 7 --post 5

Project bag
Happy Father's Day to all dad's. I had a good dad. Cancer took him Christmas Eve 2016. He was a farmer,/rancher and he loved to hunt and fish. He was diagnosed with cancer and given three to six months to live. He lived about two more years which shocked all of his doctors. The shocking part pleased my dad who said he had some items on his bucket list to do so "he" wasn't ready to go, yet! 

Will be making a bunch of centers
We chatted every day. It gave us the opportunity to say all that we wanted. Although, he never would tell me what he did during the Korean War. He didn't answer all of my questions; but, he did answer a lot of them. I do miss him, even this many years later. I do chuckle at something he would have enjoyed. 

I have done as he asked. He asked me to be the executive of his estate. I did as he asked even though I asked that he name one of my brothers. As a result, neither of my brothers speaks to me as they feel I wronged them by receiving a portion of my dad's estate. 

One block stitched
The other request my dad had was for me to call his wife like I had called him. I did until she asked that we call just once a week. There have been weeks that I've been out of town and weeks that she has been out of town; but, for the most part, we chat once a week. Mostly, we catch up with the activities of the week; but, sometimes, we share Dad stories which make us both laugh.

Now, back to quilting! Goal number six on my June list was to unearth my Grassy Creek project and make progress on it two times this month. The last time I posted about this project was January 10, 2021! Bonnie had revealed the finish a few days before my post. I wrote that I looked forward to finishing. Instead, other projects went under my needle. This project ended up in a big plastic bag.

Because I wanted to finish it, I put the bag on a chair in the studio where I would have to see it every day. Yet, it took me three and a half years to open the bag; review the contents and figure out what to do first. The first step was to cut some green squares and to make centers of the block. Cutting the squares was easy.

Some of the strings to be made into blocks
I laid out a center. I stitched it. I started another center and called it a day. The following day, I took my project to our in person sew day for Mystery Mavens. I made all but six centers needed! These went together easily. I spent a little time the day after our sew day to complete the remaining block centers. 

I thought that the next time we meet I would work on making the blocks. Because we are going to meet via Zoom, I decided that I would work on the string border instead. I will work on making the blocks at our next in person sew day because that part of the project is easier to transport.

Instead, I've now decided to work on my friend Rita's Rhododendron Trail quilt until it is a top. I'll share the reason behind my decision next month!

I did make one block because I was curious as to how the blocks went together. I also wanted to know what mine would look like! I like how nicely my scraps play together! 

The first few string blocks
I did cut a bunch of strings to start piecing the border blocks. I decided this would be a great project for times that I am stitching with my group virtually using the Zoom format. 

String piecing is messy especially when you get to cut the strings! Usually, my string piecing happens because the strings I've collected over time are overflowing my container! Cutting a bunch of strings from my fabrics was a start!

Perhaps by September, I'll be close to having a flimsy!

Linking to Cynthia at Oh Scrap!

Sunday, April 13, 2025

Strings From A Scrap Bag--post 1

Bag of scraps
Goal number six on my April list was to sort a bag of scraps. Chantal, At the Corner of Scraps and Quilts, often posts about scrap bags that have shown up on her doorstep. Cynthia, Quilting Is More Fun Than Housework, is the queen of turning scraps into amazing quilts. They inspire me with every post. My challenge is that I ALWAYS have way too many projects in process to stop and play. I tell my little inner squirrel, Gertie, to wait until I FINISH a project.

When I wrote the goal, I had envisioned tackling one of my large bags that came from my friend Martha. I thought I could get started on sorting the bits into what were strings, strips and bits as well as by color. This is not what happened.

Laying out the chances
Instead, I came across a bag that was left from a string project that I finished in 2022. The pros to the the bag was that it was a small and came from a project. A small bag wouldn't overwhelm my efforts to empty it. Because it was project leftovers, the pieces would go together.

I opened it. Of course, there were a few pieces that didn't belong so those were put where they can be used in another
project. There were also some string strips of various widths. I thought that these might work as a border and as blocks. There were a lot of HSTs of varying sizes so I started piecing those together.  

Auditioning background fabrics
Once I had a few pieces together, I started laying out the project. I kept going until the only remaining scraps were small triangles from the neutral fabric. My goal is to make a piece about 40 inches by 60 inches. Right away, I realized I needed a filler fabric or fabrics.

I went to my stash of solid fabrics and chose a purple. I liked it; but, knew that the yard of fabric wouldn't be enough. So I selected a blue fabric which is okay; but the value is a little too dark. I did have a little leftover piece of orange that I decided would work great as an accent. I decided that this might be my book project for "The Dressmaker of Khair Khana" by Gayle Tzemach Lemmon instead of the panel that I had identified last month.

In the book, Kamila is about to complete her studies to become a teacher. Unfortunately. she has to abandon that career option because the Taliban take over and women lose their freedom. Kamila ends up helping many other women and families in the process. The strings represent all the people she touched. The various patterns the leftovers became represent the girls she trained. It is interesting how projects present themselves and the journey they take!

It's been quite the week. I took Old Town to the quilter on Tuesday. Friday, I received word it was finished and I picked it up. I have it to bind as well as my 2021 Temperature quilt so I will be working on being able to report on a couple finishes soon! 

Tuesday, I wanted to sew the ruffle to the Santa Tree skirt. My Bernina 790plus acted like it was possessed. I had it on straight stitch; yet it was trying to vary the width of the stitch. The stitch length and width dials stopped working. It is back at the repair shop. I hope it will be repairable and that the repair is affordable.

Linking to Frédérique at Patchwork and Quilts and Cynthia at Oh Scrap.

Sunday, December 15, 2024

Rainbow Scrap Challenge Quilting--2021 Project Finished

Block ditch quilted
Goal number one on my December list was to finish the quilting on this Rainbow Scrap Challenge (RSC) that I started in 2021. One day when my oldest granddaughter was visiting, she saw the string blocks on the sewing table. Miss K asked if she could make some blocks with strings. 

She liked piecing the blocks. Then she asked if she could have the blocks. She laid out the blocks and stitched them into a top. She pieced a back. We pin basted it  In July, she started ditch quilting it. Although she hasn't said a negative word about quilting, I could tell it was difficult for her. I could also tell she wasn't confident with quilting in the ditch. Stitching in the ditch is hard!

Circle template from Sue Nickles
Last month, I decided that I would quilt it for her. I spent parts of three weeks completing quilting in the ditch. Originally, I thought that would be enough quilting. 

When I finished the ditch quilting, the quilt asked for more. I pondered the request for a few days. I decided to quilt a few circles on the blocks. I used two rulers from Sue Nickle's circle wedge set. For the inner circle, I used my two inch circle ruler from Westalee's starter sampler set.

Circle motif addition
I chose a yellow 40 weight polyester thread produced by Superior Threads for two reasons. First, yellow is Miss K's favorite color. Second, she likes a little glitz and the
polyester has a bit of a sheen.

I did have some thread shredding. When I switched from a size 80 topstitch needle to a size 90 topstitch needle, the shredding disappeared. There were a lot of starts and stops. In the end, the effort was worth it! The quilting provides texture and a little "specialness." Even though I spent parts of another two weeks on circle quilting, I'm glad the quilt talked to me. I'm also glad that I listened!

Quilting rulers used in the project
In the black area, I quilted straight-ish lines. Once the quilt is washed and the quilt takes on that rumpled look, the straightness or lack of straightness isn't going to show.

When I free motion quilt, I don't see much of the quilt as it is scrunched and mushed so that I can access a particular area. Honestly, it feels like eternity quilting because it doesn't feel like I'm getting anywhere!!! 

Adding some stitching to the sashing areas
To ensure that I give my body good breaks, I set the timer on my phone or watch for 30 minutes. Once it goes off, I get up and walk around for 5-10 minutes. Then, I return to quilting. When my knee is too tired for more, I stop. Sometimes that can be after a couple sessions and sometimes that can be after many sessions. I take a break to stretch and heat my knee and leg. Sometimes, I can return to quilting and sometimes I can't. 

When I finished quilting, I cut, prepared and attached the binding. The last two times that I have machine applied the binding has been successful. I found the best set up for me is to use the number 34D foot; set the needle position at 2, place the foot on the fabric edge so it s scant of the 3/8 inch
marking and carefully stitch the binding to the quilt. When I topstitched the binding to the quilt front, I found this combination worked the best.

Binding front view
Miss K wanted a hanging sleeve so I attached it. She selected an extra block as a label. I will let her fill out the label. I will help her attach it to the back of the quilt. Once the label is in place, the quilt is truly finished!

Binding back view
This quilt measures 77 x 93 inches. Many of the strings came from my friend Martha's stash. The link will take you to the projects that I have made with her strings and bits. We purchased no fabric for this project.

Back

I sure hope that she is okay with my finishing her project and my choice of designs for the quilting. Time will tell! 

My favorite memories of this project are: *When she was curious about the string piecing and making blocks in a specific color. *The expression on her face when saw the blocks in that color way on the design wall.

*The time she took to layout the blocks exactly to her liking, *The way she measured the project to ensure it was going to be large enough for her. (She laid down next to the blocks. If her body was outside of the blocks, the project needed to be bigger!) 

*How she checked every seam I pinned to be sure she was sewing the blocks as per her layout. (I pinned them in the wrong order multiple times until she took over quality control!) 

Front
*The absolute joy she had on her face when she completed piecing the top and the back! Her insistence that her quilt had a "hangy thingy." ("Hangy thingy is otherwise known as a quilt sleeve!) She was so fun to sew with!!! I hope we can do it many more times.

This project used 16.5 yards of fabric from my stash, bringing the total used 24.5 yards this year. While my total is paltry, I am thankful that I have a net loss! Next year, I'm planning to document how much fabric I purchase as well as how much I use. This year, as I purchased, I deducted that amount from what I used.

I was intrigued to begin this project because Allison over at New Every Morning had posted about making a string quilt. Her project didn't have the constant black fabric. I asked if I could copy her idea and she said yes! Quilters are generous people! Thank you Allison!!

Previous posts: Yellow Strings; Green Strings; Blue Strings; Red Strings; Purple Strings; Blue or Brown; Aqua; Orange; Lime Green; Granddaughter Time; Quilting w/two Granddaughters; Sleepover; Pinning Strings;

Linking to: Alycia at Finished or Not Friday; Frédérique at Patchwork and Quilts; Angela at Scrap Happy; Cynthia at Oh Scrap.


Sunday, November 12, 2023

Pinning Rainbow Strings

Pinning
Yesterday, Miss K came over for the day. Her mama and her papa (my hubby) went to the Oregon State football game. Our goal was to pin baste her string quilt. She quickly picked up the process. Documenting pin basting her quilt was goal number seven on my November list. Mid-way through the pin basting, it was closing in on lunch. I invited her to go out to eat.

We generally cook together; but today, everyone in her family was having lunch out so when I suggested we go out, her face lit up like a Christmas tree. She wanted to know where we were going, I suggested getting a blizzard with lunch and she let me know that the plan on the way home with her mama was to stop for a blizzard.

Repositioning the backing
I suggested that we pick up lunch at the Mediterranean  Grill which is about 20 minutes from our home. We both ordered chicken shawarma which is a pita sandwich. We each ordered a cinnamon roll. The owner/chef is Lebanese and grew up in Kuwait.  

Closing the pins
After moving to the United States, he worked a lot of years for Dunkin' Doughnuts. There are fresh donuts every day in addition to the Mediterranean offerings. His sister waits the tables and any other jobs that need doing. The sandwiches are huge. We ate half for lunch and the half for dinner! Miss K approved the restaurant choice and wants to return another day. As we ate, we watched Miss K's favorite channel--HGTV. She likes home make over shows.

After lunch, we got out Anne the CPR mannikin. I plan to teach her and her sister CPR and first aid the next time both of the girls are  over. Miss K is slight in the frame. I had her practice five cycles of 30 compressions five times during the day. I wanted her to feel confident with her compressions. 
Writing this post with Bailey providing
snuggles

In the beginning, she wasn't able to push hard enough to make the clicking sound which signifies adequate compression depth. On her fourth cycle, she could perform great compressions. As she practiced, she thought that this practice was enough for me to "give" her a certificate. I let her know that she would come to class and do the work to "earn" her certificate.

She wanted to know how to do the breaths; but, I told her she needed to come to class to practice those! She asked me to show her how to do it, I told her she would learn it in the class. She is excited about coming to class!

Then, we returned to pin basting the quilt. We had a couple repositioning moves remaining. We used lots of pins. Miss K was amazed at how many pins it takes to pin baste a quilt. She decided that she liked closing the pins the best. She was fast at closing the pins! Once we had pinned the entire quilt, we checked to be sure we had no wrinkles in the back.  

Miss K is so looking forward to quilting her strings. She is also looking forward to using her quilt. After we finished pinning, we took another break. Bailey, our dog really needed attention, so Miss K made sure that Bailey received plenty of it! 

We enjoyed watching the Beaver game on TV. The Beavers won which was great! We also looked at my Thread Tales quilts. She helped me select a number of them to show. More on that on another day!

We had a great day together. I look forward to our next sew day! I'm linking to Cynthia at Oh Scrap/Quilting Is More Fun Than Housework.

Wednesday, March 16, 2022

Happy Hearts Table Runner #2 Is Finished!

At the end of February, I attended a virtual retreat through one of my guilds. My first goal was to piece together the top of the heart table runner. 

Note to self: Don't wait more than a year to pick up a project in process to make progress! I couldn't remember how I planned to construct the top. 

I pieced the heart blocks with a light background. While I liked the light background for the small blocks; I didn't like it for the large hearts. I removed the light background and added a dark background. I liked this look better.

I added a bright pink strip in a couple places to give the top a more modern feel. I did piece more dark background between the sections to finish the top of the runner.

Bright pink accents

My second goal was to piece the back. I started this project in January 2021. I used the remaining background fabric, pink accent fabric and a 2 1/2 inch strip of a print to construct a back large enough for the top. I cut enough of the dark background fabric for binding before I pieced the back together.

Finished top and finished back

This week, I layered and pin basted the layers together. I used 80/20 batting leftover from previous projects that I had pieced together. 

Ready for quilting

Quilting in the ditch was how I began the quilting. I stitched around some of the motifs in the small heart blocks. 

Stitching around a motif of the print

I quilted a free motion design in the light backgrounds. 

Background swirl filler stitch

In the pink accent strips, I used the walking foot to quilt straight lines.

Straight line quilting with the walking foot example

I used a Westalee two inch simple circle template to quilt the dark background. I did use the foot attachment to decrease the size of the circle. I used the same color cotton thread, navy in the bobbin for all the quilting. In the needle, I switched cotton threads to match the fabric color. I wanted the quilting to add texture and not become a design feature.

Thread used for quilting and view of the back

I used about a yard and a half of fabric from my stash to finish this table runner. I have now used 34 yards of fabric this year from my stash. This is the second table runner I have made from the virtual Saturday Workshop I attended in January 2021! I gifted the first table runner to my oldest daughter. I plan to gift this table runner to my youngest daughter.

Label

This heart pattern is from Cluck Cluck Sew. The pattern is under the free tab and is the multi-sized heart pattern. 

Finished runner

This was goal number two on my First Quarter goal list. It was also goal number two on my March goal list.

Pieced back of runner


Sunday, February 27, 2022

String of Lightening

Walking foot straight line design
In December, I started stitching quilting in the ditch. I thought by the middle of January I would have finished the ditch quilting. I didn't. There were a couple other projects that took much more than I anticipated. To name two, the presentation for Saturday workshops and the legend for the temperature quilt. I did manage to squeeze in some time a couple of days in January to make progress with the ditch quilting.

In February, I completed the ditch quilting. While I prefer free motion quilting, I decided to quilt straight lines with the walking foot in the background of the strings. I used "Shifting Sands" a variegated 40 weight cotton thread available through Superior Threads and their King Tut line. The thread blends well into the background. I used a cotton 50 weight thread in the bobbin.

The reason I chose to use the walking foot was so many quilters shy away from the quilting part of the process. I decided this project could be an example of how quilting could be done at home.

Ghost strings
I used various marks on the foot to stitch the widths of the thread passes. I liked the texture the quilting produced. I liked how similar the texture was to all the ditch quilting I had already completed. 

For the ends of the string rows, I quilted ghost strings. It took me several long quilting sessions to complete the quilting. 

I continue to underestimate how long the quilting process takes. Since I track the time I spend on projects, I am seeing a correlation between making the top and quilting the layers as being about the same. 

Back

My initial question of how many strings can I produce from a gallon bag of strings is-- a top that is 45 inches by 45 inches plus a little extra!

The green fabrics in the back came from leftover pieces that I have used in several projects over the years. It felt fantastic to use it all. Although, after trimming the backing, I still have a couple of strings!

The yellow was a half yard piece of fabric that I purchased because I liked the sentiments printed. The sentiments were all bee related like "Bee Thoughtful" and "Bee Positive." It reminded me so much of my friend JoJo who moved to Alabama several years ago. Gosh, I miss her! We zoom fairly regularly; but, it isn't the same as being in the same room with her! However, Zooming is better than phone calls!

Label
This is finish is another example of a project from my friend Martha's strings. I have a page on my blog of projects where I am tracking what I have made from her strings, chunks, and UFOs. 

Thread used in quilting
She would be tickled that I have made so many items from the bits that were crammed into drawers, dropped on the floor and stored in a wire basket! Through her scraps, I've learnedI like stitching with strings. I would enjoy devoting more studio time to playing with strings; however, Gertie, has other plans for me. (Gertie is my inner squirrel!)

I used about five yards of stash for this project. I have now used 30 yards from stash this year. This is finish number four for the year. It was goal number six on my First Quarter list. It was goal number eight on my February list. It is the fifth project I've made using line as my inspiration. I am enjoying looking at it hang on my wall.

There were some bits leftover that I plan to put into another project. I'll leave the bag within eyesight so Gertie can remind me to play with the project before it can become a UFO!

I began this project to teach a Saturday Workshop using Bonnie Hunter's string piecing technique to guild members in 2021. Bonnie graciously gave me permission to use her "Diamond Strings" tutorial for class.

Many of my students finished their projects long ago. Fortunately, there was no deadline for a finish! Perhaps, I'll contact them for photos of their projects as it would be cool to document their projects. h m m m, Gertie's tail is swishing about!

If you want to review the previous posts regarding this project, please click the links below:

String-a-long Post 1;  

Front

String-a-long Post 2;

String-a-long Post 3

String of Lightening... Quilting in Process

I'm linking to Cynthia and Oh Scrap/Quilting Is More Fun Than Housework. Please click the link to see many fun projects others have made with scraps. 

Sunday, February 6, 2022

2021 Temperature Quilt Is A Top!

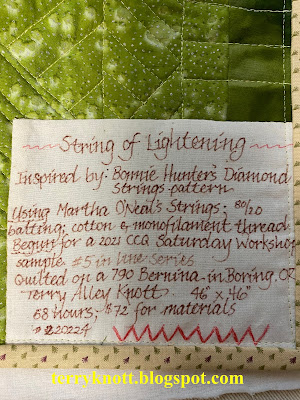
Embroidering the temperature range
It took time. . .much more than I had anticipated; BUT, I finally was successful in figuring out how to embroider the temperature ranges as well as the word, "Temperatures" and the year, "2021."  

First, I spent time auditioning the size and font that I thought would work well for the temperature ranges. I decided that I would make two of each range so that I could repeat the legend on each side border of the quilt.

Building the legend border
Next, I printed the print preview and placed it as if it were the border. I found this was a great way to view the size as well as the font. I made several changes before I found "the one!" I stitched a sample. I liked it. I stitched all of the number ranges. I removed the stabilizers from the back of the fabric. I stitched the fabric that was associated with the number range together and built the border. 

Math is not a strength. I sent a photo to my London daughter asking if I had used the greater than/less than sign correctly. I asked, does this read as less than 18 degrees? She replied I was correct. 

Whoops. . .
I had the borders ready to stitch the borders to the sides of the quilt and I realized I was incorrect with using the greater than symbol. My husband was near by so I asked him if this read more than 105. . .he shook his head. I re-embroidered that temperature range. I'm glad I caught the error before it was "in" the quilt!

Too Big
Gertie, my inner squirrel, had the idea to place the temperature range from coldest to warmest on the left side of the top and to place the temperature range from warmest to hottest on the right side of the quilt. I liked her plan. Of course, she was happy I incorporated her suggestion into the quilt. I did have to add a bit of grey fabric to make the border fit.

After stitching the side borders to the top, it was time to work on the top and bottom borders. Again, I auditioned the font size of the letters until I was happy with the size of the lettering. 

Rehopping alignment
I had a hiccup. I couldn't figure out how to access the fill stitch feature in the software. For those of you who don't work with embroidery software, I'll spare you the details. For those of you who do, I hadn't used the break apart feature enough! 

I placed a note in the Bernina software group asking for help and I also e-mailed my Bernina dealer.  My dealer called me fifteen minutes after I had sent the e-mail. She said it was easter and faster to just tell me what I needed to know. I had my answer in less than two minutes! 

In a couple hours, I had several responses from the software group. They provided the same answer as my dealer. I appreciated ALL of their help!

Finished top
I embroidered the year first. My original thought was to center the year in the bottom border and the word in the top border. Embroidering the word took me a full day because I needed to rehoop the design. I practiced until I felt that I would be successful.

When it was time to reboot. I had no issues. I have rarely rehooped a design. I would do it again. Viewing the stitch out, it seemed too plain to add more of the gray background. I was looking at the scraps I thought, "why not add a portion of strings" to finish the border. Gertie was on board with that idea!

I cut the leftovers of the strips into strings. I followed the color order as much as was possible and stitched the strings together. The result reminded me of colors in a crayon box. I decided that I wanted a little more than one repeat of the strings of the years and word.

Next I followed the pattern of reversing the colors as I had done with the side borders. I liked the results. I stitched the top and bottom border to the top and I had a finished top! 
Wahoo!

I've located a piece of fabric for the back and I might have enough batting on hand to layer and baste this project yet this month. Finishing this top was goal number four on my February list.

I'm linking to Cynthia and Oh Scrap/Quilting Is More Fun Than Housework. For some reason, Blogger is giving me a Whoops message when I try to comment on her posts. I also get that message when I visit other links in the link up. So if I haven't commented on your post in a while, that is the reason. I've reviewed my settings and didn't note any changes.