Sunday, May 31, 2020

Santa Tree Skirt--post 2

Add caption
Since my last post on this project, I began with a restart on the basting. The directions are to layer the the top right side up, the backing right side down and the batting. I followed the directions and placed pins around the outer edge. For batting, I used leftover chunks of  from previous projects that I stitched together. I find this is a good way to have little waste when it comes to batting. Also, because I quilt fairly densely, I don't find the batting "joins" to be an issue.

After pinning, I flipped the project over and pinned the outer edge of the layers together. After the crawling issues I had when trying to stitch the layers together the first time, I decided to take an extra step to stabilize the layers. I hand basted around the perimeter as well as around the inner edge.
Pinned layers ready for basting

The hand basting along with the pins and using a walking foot with a longer stitch worked great. I had little movement of the layers. I almost forgot to leave space to turn the project; but, I remembered that detail so no ripping was involved!

After I finished stitching the layers together, I trimmed or graded the edge and turned the project right side out. Grading is a method to reduce bulk along the edges of a project. I carefully pressed the outer edges. To keep the edges in place, I topstitched close to the edge of the project. I used tan thread in the the needle and red thread in the bobbin. I love my Bernina's tension because you can't tell what the thread is on the other side of the quilt!
Pinned ready for quilting

I pinned the layers together to ready the project for quilting. I quilted in the ditch to stabilize the layers. I used cotton threads that were close to the color of the fabric. This time, I used a similar color in the bobbin as the needle.

I used my Westalee 12 inch arc ruler which has a straight edge to quilt the coat of the Santa. I haven't used my rulers in some time so I needed to practice. I also am trying to mark less and I needed to practice alignments and think through the quilting pattern.
Close up of the first quilting

I did draw my quilting design on a piece of paper and liked it. When I quilted the top of the coat, my design was okay; but, I didn't like how it looked at the bottom of the coat. The piecing lines fought with the quilting lines.

I did like the texture of the quilting. I did like the way the thread blended into the fabric as well as the color. I used Superior Thread's Bottom line. I spent some time ripping the horizontal lines and found that I liked the quilting much better.
Coat quilting design

I stitched a second "coat" with only diagonal lines. I liked that quilting much better. I always find it interesting when less is more!

As I approached the seam intersections, I found that I need to lower the foot presser to be able to cross without pulling the fabric out of shape.

I thought that I had checked the back for issues; but, I managed to stitch in a big tuck. So I got to do a little frog stitching. I wasn't able to fix it completely; but, it is much better and the label will cover most of it!
Miss K modeling her birthday dress.

I wanted to share a photo of Miss K in her birthday dress. Gosh it was cute on her! The fit was right on. I posted about the birthday dress here if you missed that post. I sure miss spending time with the granddaughters. I really miss their hugs!

Regarding Covid-19:
Worldwide: 6.08M have it, 2.57M recovered, 370K deaths
U.S.: 1.81M have it, 390K recovered, 105K deaths
Oregon: 4,185 have it, 153 deaths

It was sad that more than 100K people in the U.S. have died. More businesses are opening in the area. I did have a massage which was helpful. Other than a trip to the chiropractor,  a massage appointment, the birthday party drive by and a pick up for my hubby who was out on a bike ride and needed support, I'm staying home. I so look forward to shopping without having to wear a mask or practice social distancing!

Yesterday in my home town in Central Oregon, they had a serious thunder/wind storm which caused a lot of damage. I think my family is all okay although they have a lot of property damage.

Friday night, rioters looted stores, burned buildings, broke windows and tagged stores in downtown Portland in response to the death of George Floyd. I was shocked at people causing damage to businesses. I don't understand how causing destruction furthers their cause. It is a crazy world and crazy times.




Wednesday, May 27, 2020

Unity--Post 5

Repurposing charm squares
For clue number seven, I needed some squares. I decided to repurpose the patriotic charm squares that I had exchanged in charm and strip exchange through my guild a number of years ago. I pulled the squares that could be used as light, dark blue and light blue. I am limited with the dark blue and light blue fabric. My goal is to piece this quilt entirely from my stash.

I used the HSTs (half square triangles) from clue number six. I began stitching blocks. There were a lot of blocks to stitch. I thought that I could stitch the blocks in about three days. Wrong!!! I spent about six days stitching.

First completed block
These aren't difficult blocks to stitch even though there are 24 pieces in each block! I found it best if I stitched one block at a time so that I could continue to rotate my limited dark fabrics as well as rotate the red HSTs to maximize the variety of all the fabrics I used.

A lot of these blocks are a bit eighth of an inch shy of what they were supposed to measure. There are a lot of points to match and to maintain. For the most part, I was successful.

Because random is a challenge for me, as I finish a block, I put it on the wall. I find I spend less time fiddling with block arrangement this way rather than putting them on the wall after I have sewn all of them. I also find watching the "holes" fill in helpful to keep going!
Clue seven finished

I can't say that I was successful in not having the same fabric close to each other; but, I decided that the overall look was pleasing to I stitched the blocks together into four borders. Then I stitched the borders to the quilt.

These blocks added so much interest to the overall look of the top. I'm glad I persevered and finished each one. I am relieved to have competed this clue!!!

Bonnie released the eighth and final clue more than a week ago. I've more blocks to make. In clue eight, I get to make a bunch of of sawtooth star blocks with economy block centers.

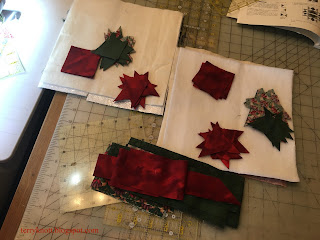
I am excited about finishing the top; but, I am going to take a little break and work on the tree skirt. I may cut kits for the stars so that I can put them together as leaders and enders.


Sunday, May 24, 2020

Birthday Dress--Seventh Finish 2nd Quarter FAL 2020

Add caption
Pieces pinned in place to appliqué
Originally, my plan was to construct this dress totally out of the green knit fabric. I planned to embellish it with embroidery. I copied the pattern onto a pattern material. The more I thought about the project, the more I thought that the green knit was too adult and most likely not a fabric a birthday granddaughter would wear!

Auditioning the skirt fabric
with the appliqué
I searched through my stash and found a couple pieces that would coordinate with the knit. Neither piece was pink. Pink is high on the "like" list for the birthday granddaughter. I decided that I would add an applique to the top in a slightly different color from the skirt fabrics to add interest to the dress. I used Karen Kay Buckley's Perfect Circle and Perfect Petals applique templates to make the flower center and petals. I used spray starch and a paint brush to apply the starch to the fabric. Then I ironed the fabric dry. This process worked well for me.
The last step in the French trim finish 

I chose to hand appliqué the pieces. After I had appliquéd the shapes in place, I topstitched around the shapes to add more security as well as to be more decorative. I liked how the skirt fabric worked with the color of the bodice and the applique. I stitched the skirt so it was ready to attach to the bodice. I even stitched the hem!

After I stitched a shoulder seam on the bodice, I stitched the neckline using a French trim type construction. It took a little time to finish the armholes the same way. I stitched the skirt to the bodice and I had a finish!
Finished dress

I hope she will like it. Her birthday is Wednesday. I'll wrap it so we can do a drive by to drop it off on her birthday. It might be warm enough for her to wear her dress Thursday and Friday as temperatures are forecasted to be in the upper 80s.

I used 1 1/2 yards of fabric from my stash. There is easily enough of the green knit for an adult t-shirt as well as another bodice for a dress for Miss J. I located a different skirt fabric in the stash. The remaining yard and a half of the skirt fabric, I placed in the Good Fortune project box because I think it might work as part of the pieced back.

I now have used 39 1/4 yards of fabric from my stash. This is my seventh finish this quarter and goal number nine on my finish along list. I have posted this finish to Instagram #2020falq2finish

In regards to Covid-19 Statistics:
Worldwide: 5.3lM confirmed cases; 2.11M recovered; 342K deaths
United States: 1.66M confirmed; 335K recovered; 97,426 deaths
Oregon: 3,888 confirmed; 147 deaths
This week, the county I live in applied to the state to open under the state's phase guidelines. The state granted the county to open yesterday. Restaurants, bars for sit down service, barbers, salons and massage services, gym and fitness centers, gatherings for up to 25 people are okay as long as social distancing, cleaning and wearing masks/gloves where appropriate is followed. The county has to be in phase one at least 21 days and meet some requirements before it can apply for phase 2 status. Phase two requirements haven't been released.

I do have a massage appointment scheduled for next week. I plan to wait to try any other activities. I plan to continue staying home as much as possible. I did train 31 people in healthcare provider CPR. Wearing a mask and gloves all day while necessary, is a challenge. Most of the time, I was able to maintain social distancing; but not always. In about three weeks, I have more CPR training scheduled at the hospital.

Wednesday, May 20, 2020

Pillow Cases--Sixth Finish 2nd Quarter FAL 2020

Fabrics cut and ready to stitch
Before I cut out the second and third potholder fabrics, I cut the fabrics for two pillow cases to go with my daughter's "Leaves" quilt. I used these fabrics in her quilt. I saved the top red fabric before I put the backing together. The red fabric at the bottom of the photo was the leftover binding fabric. It was just the right amount so it was serendipitous to make a second pillow case! To give the cases a modern flair, I decided to use the pieced backing as the band on each pillow case.
Band ready to stitch

The cases will be similar; but, not the same. I'm okay with the cases being different. From a decorating standpoint, different will look more interesting on the bed!

I started with stitching the band on the pillow case. I top stitched the band along the horizontal piecing lines to add a little interest and to ensure the seams will stay put after many washings.

Finished pillow cases
Pinning the band to the pillow case makes me chuckle because it looks odd. Once the band is attached, it didn't take much more time to stitch the side and the bottom of the case. I did finish the seams using a French seam  technique.

This is my sixth finish this quarter. I used two yards of fabric in making these cases.  I have now used 37 3/4 yards from my stash in projects this year. This was goal number 17 on my second quarter FAL list. I've posted this finish on Instagram #2020falq2finish

Sunday, May 17, 2020

Unity-Post 4

Contents of quart ziplock bag
As I reviewed the directions for the fifth clue on Bonnie Hunter's "Unity" sew a long, I remembered that I had a small zip lock bag with some smallish pieces of neutrals. I pulled out the pieces and sorted them. About a third of the bag were string size pieces. I put those in my string bag.

I trimmed some small pieces to 1 1/2 inch pieces. I added these strips to the 1 1/2 inch bag. I worked my way through the bag setting aside the bits that would work for this clue. When I finished, I cut the half square triangles for the goose wings.

Pieced geese and squares ready for 
I cut a section and then I pieced a section. From the neutral scraps, I was able to piece all the geese. Once I had pieced all the geese, I pulled all of the white and cream squares from my neutral bag of squares. In the end, I only needed to cut an additional 20 squares!

Bonnie Hunter's scrap saving system comes in handy. It is so nice to pick the size strip or square needed and start sewing rather than start cutting. I also like that when I've completed a project, I cut the leftover pieces into the various strips and squares. The bits are corralled into useful sizes for a future project. It is fun to use those pieces in a quilt project later!
Clue five finished

I was ready to stitch the goose border to the quilt when I realized that I had a couple fabrics too close together. I took some time and reworked those areas. Yes, I could have sewn it the way it was. It would have been okay. I like it better with the changes so taking the extra time was with the effort. I like the interest the flying geese borders added to the project.

Clue six was to make a lot of red and white half square triangles. (HSTs) From the neutral ziplock bag, I've used a lot of the chunks. I hope that I have enough to finish this project!

Clue six complete
Over several days, I used the Essential Triangle tool to cut triangles from the red strips that I had on hand. I sewed a few each day until I was finished. It helped to sew some as leaders and enders.

I had a birthday yesterday. My sweet husband wrote a note in a card that said, "I was looking for a specific gift that would be very unique; but, I couldn't find it. It was a whole day of quilting without having to rip. Amazon couldn't find it either."
My birthday dinner and the cook
He knows me so well! He also cooked me an amazing steak dinner. No, I couldn't eat all of it and will have about half of it for another mean! Our London daughter FaceTimed me. Our "in the area" daughter and family dropped by for a social distance visit. I received birthday wishes from many of my fellow quilters. It was a great day.

Regarding Covid statistics:
Worldwide--4.6M confirmed; 1.7M recovered; 312K deaths
U.S.--1.5M confirmed; 274K recovered; 89,439 deaths
Oregon--3,541 confirmed; 3,470 positive; 137 deaths

Last week, the Oregon governor approved 31 counties to reopen under specific guidelines. Two counties were not approved and three counties didn't apply. I live in one of the counties which didn't apply. My county didn't meet the
The next phase in CPR training
guidelines to apply to reopen. It might meet those guidelines in another month.

I did lead CPR skill sessions at the hospital two days last week. Wearing a mask and gloves, standing six feet away from the participants who are also masked and gloved was a different experience. Cleaning all the surfaces between participants was different too. It was a challenge to describe how to do a skill instead of demonstrating and/or physically moving a participant's hands into the correct position. I was tired at the end of each day! Still it felt good to "teach" again!

In terms of CPR, this CPR cart represents the next phase of training. This cart can be rolled into each department. The participant can log in and complete their certification without the assistance of an instructor.


Wednesday, May 13, 2020

Santa Tree Skirt--post 1

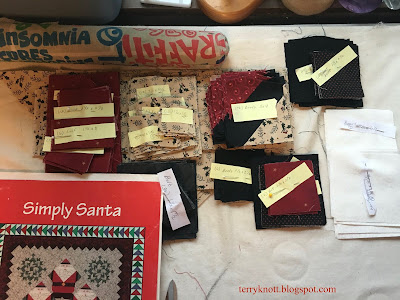
Fabrics cut and labeled for stitching.
My niece is planning to marry in August. She has been planning her wedding for more than a year. I hope she will be able to hold the wedding in the venue that she has reserved. I also hope that she will be able to invite all the guests she  had planned.

I'm planning to stitch her a Christmas tree skirt with pieced Santas as a wedding gift. It is a Lorraine Stangness pattern called "Simply Santa" which was printed in 1994.

Problem is the right hand section
I made a similar tree skirt as a Christmas gift for her mama many years ago. I started that tree skirt in a quilt until you wilt class at my local quilt shop. Sadly, that quilt shop closed long ago. Years later, I made this pattern into a tree skirt for my daughter as well as one for a  niece when each one married.

These fabrics are from my stash. I didn't know if I would have enough of the background fabric; but I did! The background fabric was what I had purchased when I made her mama's tree skirt! I thought that the leftover pieces from a previous project would save me some cutting and piecing. . .alas. . .they didn't not!
Boot section of the block

The black in the leftover pieces were too small; it took me a couple of days to figure out the problem. I couldn't let it go because I kept thinking it was my stitching or the size of the triangle corners.

I would have been better off to have continued to cut all the pieces listed in the handout. Eventually, I did manage to stitch the bottom corner of the block together. I was thankful that I only needed to make six of these blocks!

Stitching the other two sections of the block went together painlessly. I was impressed with how well all the seam intersections joined. It did take me about six hours to stitch the other parts of the block. At the end of the sewing session, I was almost to the point of stitching the fourth section of the block together.
Progress at the end of the second stitching day

The next step was to ink the eyes and prepare the mustache. When I snapped the photo, I didn't have the pieces oriented correctly. Of course, I didn't realize the error until I had stitched parts together. . .UGH!!! I even managed to sew the parts together wrong in every possible way!

Eventually, I was successful. I appliquéd each mustache using a zig zag setting on my Bernina that was about 2.4 wide and .60 long. Once I had the six blocks completed, I added the background pieces and stitched the blocks together.
Blocks one and seven stitched together

I'll admit, I was challenged with executing the directions. If the illustration had shown what my photo of blocks one and seven stitched together with the triangle positioned for setting into that space, I wouldn't not have been as challenged!  I do plan to make this project again so the photograph will be a helpful visual next time!

I liked seeing all the blocks together. The next step was to add the ruffle. The previous times I made the tree skirt, I gathered the ruffle. This time, I decided to try pleating it as per the directions.

All the blocks together
Pleating it took more time than I had thought and a whole lot of pins. I did stitch it to the ruffle. I also made the ties and have them pinned in place. The ties and the backing are the same fabric as the ruffle. I only used six of the eight widths of fabric so perhaps, there was an error in the directions.

While I liked the way the pleated fabric looked; I may plan to either pleat the fabric a little closer or to gather the ruffle for future projects.
Pleating the ruffle

I layered the project and stitched around the edge. . .but, I ended up ripping that out because the fabric didn't feed evenly. It is difficult to stitch when the batting is on the bottom of the quilt sandwich instead of in the middle.

I am planning to thread baste the layers together and I will stitch with a longer stitch and a walking foot. I anticipate that I will have a better result.

So far, I've spent about 36 hours on this project. I remember working on one of the tree skirts at a quilting retreat. I remember that it took me the weekend to get the tree skirt to a top and that was with precutting all of the fabrics!


Sunday, May 10, 2020

More Masks--

First mask ready to cut
A friend sent me an e-mail last week asking me for "Terry Masks" for her family. She said she had recycled t-shirts into masks. She wanted to be able to slip an additional filter into the mask for extra protection. Her pattern didn't allow for that function and she had seen the ones that I had made for my family.

She doesn't sew. She wrote, that her family would be happily surprised to get out of the "Seattle Grunge" kind  that she had created! I chuckled over that comment! I decided that I would need to stitch three pair of masks for males and two pair of masks for females.

I have little fabric that "speak" male. I won that red fat quarter several years ago. I don't remember what I made with it initially, but, it was the perfect fabric for this purpose!

The view at the mid-point
Over a couple days, I stitched 10 masks. Friday, my husband mailed the package to my friend who lives in Washington State near Seattle. Those of you who have stitched that many masks in a morning or an evening. My hat is off to you! I don't have that type of production in me!

I used a twist tie from the grocery store as the nose wire in most of these masks. I found that a nine inch by thirteen scrap was large enough to make a mask. I used more packages of my grandmother's bias tape. I now have all of the bias tape in one drawer.

There is the outer fabric, the lining and a muslin facing in this project. I used 1 3/4 yard of fabric. I have now used 35 3/4 yards from my stash in projects this year. This project was an addition to my finish a long goals so I won't be counting it as an "official" finish.
10 finished masks


Regarding Covid--
Worldwide:
4.02M confirmed; 1.38M recovered, 979K deaths
U.S.:
1.34M confirmed; 210K recovered, 76,696 deaths
Oregon:
3,160 confirmed, 71460 negative, 120 deaths

The Oregon Governor is allowing Oregon to slowly begin to open. In counties where there is little Covid activity, the county can apply to open boutiques, jewelry stores, furniture stores and art galleries as early as May 15. Kids summer camps also fall in this category.

Some outdoor parks opened on May 5 for people to be able to walk and hike. Social distancing and masks are to be used. Gyms might be able to open around the first of June.

Rice is still hard to find as is flour. We may have meat shortages; but, so far Bob has been able to purchase the items on the grocery list. We have quite
Readying the clippers for cutting hair
a bit of meat in the freezer so we should be okay for six months or more with what we have on hand.

Growing up, we canned and preserved foods in the summer months that we ate in the winter months. Our pantry was well stocked. In my married life, we've continued to keep a stocked pantry and have always had the space to do it.

Yesterday, I cut my husband's hair with dog clippers. In my life, I've trimmed horses, cattle and dogs but, I haven't trimmed human hair. I was nervous about clipping his ear or gouging his scalp. The first time, I used the shortest guards that came with the clippers. While the haircut felt better to Bob, it wasn't short enough for him.

He encouraged me to take the guard off and to cut it again. I took a deep breath and I recut his hair. I drew no blood. The results are good. I think it looks like he did see his barber. I trimmed his eyebrows, ears and nose too. He loved his hair cut. I hope that by the time he needs another hair cut, the barber will be open. Although I would cut his hair again if needed.
After the hair cut

I was surprised at the pile of hair that came off of his head. It was a windy day. We decided the best place to cut hair was outdoors so the hair was blown away before I could photograph the pile! I'll also admit, I hadn't seen his "curls" in many years. I did like seeing them!

He said he would do clip my hair for me; but I politely declined his offer. My hair can continue to grow. I can braid it if it bothers me too much!

We are still encouraged to shelter in place as much as possible. On Monday, I have a chiropractic appointment and that will be my first outing since March 19. She was the last place I visited. I will be wearing a mask during my appointment. Thursday and Friday, I will be teaching CPR skills at the hospital. I'll be wearing gloves and a mask the entire day.

Today, is Mother's Day. My mom dropped by for an unexpected overnight yesterday. She was on her way from Woodland, Washington to Bend, Oregon because she wanted to check on her Bend house. At 82, she lives her life according to her rules.

Happy Mother's Day to all moms. Moms of fur babies count too!


Wednesday, May 6, 2020

Potholders--Fifth Finish 2nd Quarter FAL

Pieces in progress for potholder #1
Layered and ready to quilt
I continue to work through my UFOs and WIPs! Last quarter, I cut fabric from the scraps in the ziplock bag for one potholder. This kit has been around a long time. When my oldest daughter was about 11, she packaged fabrics along with a note listing the block to stitch. She also included information about which fabric was the background, light, medium and dark! I sewed some pot holders which I gave away. Later, I packed away the "kits" in a shoe box.

There wasn't enough of the neutral feather background fabric so I supplemented other scraps with the same value. After I had cut the two main fabrics, which were a green solid and a red print, I thought that I could sew at least two more if I added another neutral fabric, another backing and maybe another binding.
Pieces kitted and ready for stitching the next two

At the end of April, I stitched the fabrics for the potholder. I also layered and pin basted the layers together so it was a ready to quilt project.

The pattern came from a 1997 book entitled 101 Patchwork Potholders. Linda Causee wrote the book.  It contained full size templates as the method to cut the block shapes. I used the Essential Triangle tool and strips to cut the shapes I needed. Using strips and rotary cutting simplified the cutting process.

For the most part, the shapes were the correct size or were easily trimmed to the correct size! I was pleased with the end result after stitching the potholder top.
Second potholder pieces ready to stitch

I decided not to put the scraps away; but, to cut fabrics for the other two pot holders. For the neutral, I used some of the leftover red that was in my daughter's "Leaves" quilt.

For one of the potholder backings, I used the orange backing fabric in my daughter's "Leaves" quilt. I liked laying out the fabric pieces as per the pattern. It gives me a sneak peak of how the pieces are going to look when they are stitched together.
Fabrics that remained

I added a fabric loop to each pot holder using an inch and a half strip with the edges folded in and then folded in half and stitched. The loop makes it possible to hang the potholder on a hook in the kitchen. I remember that my grandmother and my great grandmother each had a hook for their potholder. I will likely give these away as gifts over the next year.

Back of potholders
When I finished, I had little fabric remaining!  There isn't enough of the print to make into another potholder. I put the red fabric in the "Unity" project.  The green, I added to my "Good Fortune" project. The print went in my scrap saving system!

I've included a photo of the back of the potholders. I used a tan three ply 50 weight cotton thread for the tan background potholder. I used a two ply green 50 weight for the other two potholders. I free motion quilted in the ditch.

I used about three eighths of a yard of fabric to stitch these three potholders. I have now used 34 yards of fabric from my stash this year. This is my fifth finish for the quarter and goal number seven on my Finish A Long list. I've posted this finish on Instagram #2020falq2finish

There are a couple more sets of fabrics in the shoe box so there will be future potholders; but, for next quarter!
Finished potholders


Sunday, May 3, 2020

Cross Stitched Mini--Fourth Finish 2nd Quarter FAL

This little kitchen magnet kit was in my friend Martha's stash. She had a number of these little miniature cross stitch kits. The original price on this kit was $1.99. The clearance price was .99 and the lowest price sticker was .50! For kicks, I googled the company, "The New Berlin Co.," to see if it was still in business.

I couldn't find any information on the company; but, I did see similar kits offered for sale on e-bay and etsy. The price was $15! From the packaging, I found a 1992 copyright date.

It is small. The dimensions are three inches high by two and half inches wide. The kit came with a needle, plenty of floss, the frame, an adhesive mounting board and directions. It did not come with a magnet!

Originally, I thought that this was a project that the granddaughters would like to do. Unfortunately, it was too complicated for a six year old! The white and cream floss were too close in value for me to see the difference. It was a challenge for me to read and follow the pattern! Finished, I do like the subtleness of the thread color changes.

Finished cross stitch
I took this project with me when we were in Hawaii this fall. I thought that I would enjoy working on it while we waited in the airport and when we were being leisurely on the trip. I stitched about eight rows on the duck. I didn't work on it after we returned home.

In late March, I started stitching on it again in the evenings. It was a bit of a challenge to determine where I should be stitching next in the pattern; but, over the course of about a month, I finished it! I didn't work on it every evening. When I noticed that I hadn't made progress in several days, I would load a length of thread on a needle and try to stitch that length of thread before I stopped for the night.

It is finished. I have a small basket of these little kits and perhaps, next quarter, I'll add another kit to the list. I might add a ribbon hanger to make it into a Christmas ornament. Or, I could add a magnet and gift it as a refrigerator decoration!

This was goal number 18 on my second quarter FAL (Finish A Long) list. Although, I used no fabric from stash in this project, I'm happy to have completed another finish! It is my fourth finish for the quarter! I have posted the finished photo on Instagram under #2020falq2finish

The Covid virus statistics:
Worldwide: 3.45M have it; 1.1M have recovered; 244K have died
United States: 1.16M have it; 152K have recovered; 67,076 have died
Oregon: 2,635 have it, 109 have died

The same food items are limited as last week. Meat, poultry and fish products are sometimes in limited supply. We are blessed that we have a freezer full of meat so we will be okay.

Many people are worried about surviving when they can't work. Unemployment benefits are still slow in coming for some and benefit amount likely won't cover the individual's essential expenses. Businesses are likely to remain closed when this is over because they couldn't afford staying closed for this amount of time.

Some of the states that have partially reopened are having an escalation of people contracting the virus. Oregon continues to be a locked down state. In a couple weeks, I will be teaching CPR skills sessions at the hospital incorporating the updated American Heart Association protocols as well as the governor's guidelines. It is going to be interesting. I will be wearing a N-95 mask and gloves the entire time I am working so I feel I am well prepared.

I learned that of the 11 full time people in my department, nine were laid off temporarily. My heart was sad when I learned of the layoffs. The hospital didn't have elective surgeries to make room for Covid patients. The patients didn't materialize. The hospital has operated at less than half of the patients it usually serves for the last six weeks. I am heartened that the plan is to hire all people back in 90 days.

Other than my daily walk with the dog, I have not left the house since March 19. When my youngest daughter learned I was headed back to work, she wanted to know if I had my last meals planned. Clearly, she isn't happy about my return to work decision!