Showing posts with label applique. Show all posts

Sunday, June 16, 2024

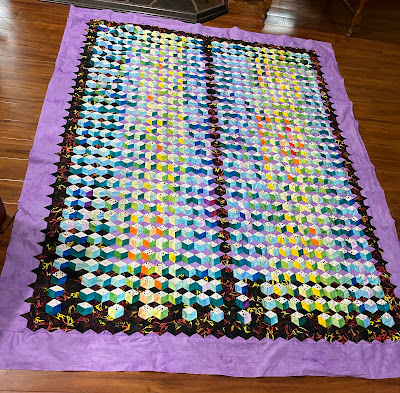
Temperature Quilt 2022-2023--It's A Top!

Goal number one on my June list was to cut the borders and begin stitching one to my 2022-2023 Temperature quilt. One afternoon, I cut the two remaining borders and marked the quarter inch sewing line. I noted the half and quarter marks on the length of each border.

Border cut and marked
Next, I needed to remove papers. This was a job I did while watching television with my husband! I spent several evenings creating a pile of thread and used papers!

Paper removal debris pile
As I positioned the border in place, I removed the papers along the outer edge. It didn't take as long to prep the border as I had led myself to believe. I marked the quarter sections on the quilt top and began to pin the border in place. I found I needed to ease the top to the border. I thought that stitching with the papers would have eliminated wonkiness. . .not so! 

Appliquéing a straight edge is much faster than going around all the points on the lengthwise borders! I thought that I'd applique one border this month and one border next month. . .nope. I finished both THIS month. It is now a finished top! 
Detail view of appliquéd edge
I do need to press the back carefully to tame all the seam allowances and I need to construct the back. Pressing and constructing the back may happen next month. Considering the quilting, I am thinking simple. The top is heavy with all those seams!

I'm linking to: Cynthia at Oh Scrap; Alycia at Finished or Not Friday and to Frédérique at Patchwork and Quilting.
Finished top

Sunday, April 28, 2024

Update on the 2022-2023 Temperature Quilt

Close up view of the border
Goal number one on my April list was to make progress on my 2022-2023 Temperature quilt. I sure thought that I not only would have finished appliquéing one border to the top; but, that I would well be on my way to appliquéing the second side on the top. I sure didn't realize how much I would be challenged with the knee joint replacement recovery!

Last night, I finished appliquéing one side in place. Next month, I'll work on getting the other side prepped and begin stitching it.

One border on 
Goal number four on my April list was to begin planning a modern mystery quilt along. I have begun the process. In June, I'm planning a get together on Zoom to share photos of the quilts/tops/blocks people made during the mystery this year. (We participated in Bonnie Hunter's Indigo Way mystery quilt.) At that wrap up meeting, I wanted to get feedback about sone of my thoughts for the next mystery. 

Because it is a mystery, I may write about it; but, I'll be keeping the design under wraps! I'm linking to Cynthia at Oh Scrap/Quilting Is More Fun Than Housework.


Wednesday, May 18, 2022

Old Sames--

Hand embroidery


Our Thread Tales book club read the book, "Snow Flower and the Secret Fan" by Lisa See. The book is about the lives of two girls who are friends throughout their lifetime. In the book, they are "old sames" and that was how I selected the title of my project. 

One girl begins life with little affluence but ends up affluent at the end of the book. The other girl begins life with affluence but ends up without it.


Broiderie perse on the shoes


The girls learn the needle arts: Sewing, embroidery and weaving. They make their own shoes.  They had bound feet and one of the girls achieved the perfect size foot. . . .three inches! I made a "shoe" that was three inches to applique on my quilt.


Fan


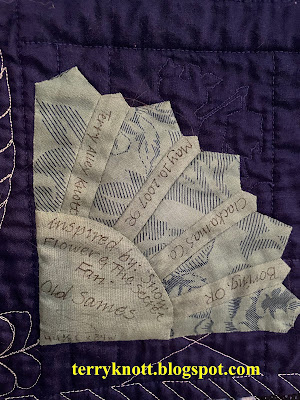
The girls communicate with one another writing on the folds of a fan. I designed my own fan pattern and I made a sample which became my label. 


Label


All of my fabrics are leftover from other quilts that I made. This is a technique piece. This project contains a bit of trapunto, hand embroidery, paper piecing, broiderie perse, free motion quilting and more techniques than I can remember.


Back


Since the fan was a central feature of the book, I used a stencil to mark a quilting pattern as well as a batik fabric that was printed with fans.

I was fortunate to have visited China and was impressed with the massive gates that were in front of places of reverence. I made my own sort of gate with the medium blue fabric. This fabric also represented a fabric that the girls could have woven.


Front


I made this project in 2007. It was the second project and second book of our Thread Tales group. My London daughter has this quilt.


Sunday, February 6, 2022

2021 Temperature Quilt Is A Top!

Embroidering the temperature range
It took time. . .much more than I had anticipated; BUT, I finally was successful in figuring out how to embroider the temperature ranges as well as the word, "Temperatures" and the year, "2021."  

First, I spent time auditioning the size and font that I thought would work well for the temperature ranges. I decided that I would make two of each range so that I could repeat the legend on each side border of the quilt.

Building the legend border
Next, I printed the print preview and placed it as if it were the border. I found this was a great way to view the size as well as the font. I made several changes before I found "the one!" I stitched a sample. I liked it. I stitched all of the number ranges. I removed the stabilizers from the back of the fabric. I stitched the fabric that was associated with the number range together and built the border. 

Math is not a strength. I sent a photo to my London daughter asking if I had used the greater than/less than sign correctly. I asked, does this read as less than 18 degrees? She replied I was correct. 

Whoops. . .
I had the borders ready to stitch the borders to the sides of the quilt and I realized I was incorrect with using the greater than symbol. My husband was near by so I asked him if this read more than 105. . .he shook his head. I re-embroidered that temperature range. I'm glad I caught the error before it was "in" the quilt!

Too Big
Gertie, my inner squirrel, had the idea to place the temperature range from coldest to warmest on the left side of the top and to place the temperature range from warmest to hottest on the right side of the quilt. I liked her plan. Of course, she was happy I incorporated her suggestion into the quilt. I did have to add a bit of grey fabric to make the border fit.

After stitching the side borders to the top, it was time to work on the top and bottom borders. Again, I auditioned the font size of the letters until I was happy with the size of the lettering. 

Rehopping alignment
I had a hiccup. I couldn't figure out how to access the fill stitch feature in the software. For those of you who don't work with embroidery software, I'll spare you the details. For those of you who do, I hadn't used the break apart feature enough! 

I placed a note in the Bernina software group asking for help and I also e-mailed my Bernina dealer.  My dealer called me fifteen minutes after I had sent the e-mail. She said it was easter and faster to just tell me what I needed to know. I had my answer in less than two minutes! 

In a couple hours, I had several responses from the software group. They provided the same answer as my dealer. I appreciated ALL of their help!

Finished top
I embroidered the year first. My original thought was to center the year in the bottom border and the word in the top border. Embroidering the word took me a full day because I needed to rehoop the design. I practiced until I felt that I would be successful.

When it was time to reboot. I had no issues. I have rarely rehooped a design. I would do it again. Viewing the stitch out, it seemed too plain to add more of the gray background. I was looking at the scraps I thought, "why not add a portion of strings" to finish the border. Gertie was on board with that idea!

I cut the leftovers of the strips into strings. I followed the color order as much as was possible and stitched the strings together. The result reminded me of colors in a crayon box. I decided that I wanted a little more than one repeat of the strings of the years and word.

Next I followed the pattern of reversing the colors as I had done with the side borders. I liked the results. I stitched the top and bottom border to the top and I had a finished top! 
Wahoo!

I've located a piece of fabric for the back and I might have enough batting on hand to layer and baste this project yet this month. Finishing this top was goal number four on my February list.

I'm linking to Cynthia and Oh Scrap/Quilting Is More Fun Than Housework. For some reason, Blogger is giving me a Whoops message when I try to comment on her posts. I also get that message when I visit other links in the link up. So if I haven't commented on your post in a while, that is the reason. I've reviewed my settings and didn't note any changes. 

Wednesday, January 19, 2022

The Journey-a 2009 Book Club Finish

Back


In 2009, our Thread Tales book club, read the book "The Tenth Gift" by Jane Johnson. In the book, Julia is given a book of old and beautiful embroidery designs. 

Close up of the quilting

Julia is a book seller. Upon examining the book more closely, Julia notices that it looks like there are diary entries listed. 

Cat has written the entries long ago and describes her life as an embroideress. Cat includes her experience of a Muslim pirate stealing her and members of her town to be auctioned off as a slave in Morocco. 
Label

While reading this book, I took a Nancy Chong two fabric hand applique class. One of the patterns we could stitch was this sailboat. 

The pattern reminded me of Cat's description of being in the ships' hold and having no idea of where she was being taken. She was sailing into the unknown, yet hopeful of a good outcome. Her sewing skills served her well when she uses her skills to stitch a wound of her kidnapper. 

The author weaves Julia's story and Cat's story throughout the pages. In the end, Julia finds that there is a connection between the two of them. While I had a hard time jumping between centuries, I did enjoy the story.

I used the print of the brown fabric to add dimension to the project. I placed a layer of wool batting under the top and stitched around some of the leaf print to provide dimension to the project. 

I trimmed the excess and then layered the top with wool batting. I quilted the piece in silk thread in the needle and cotton thread in the bobbin.

Front
I'm posting about this project so many years later because one of my goals is to record the various quilts I have made with my book club. Writing this post was goal number 13 on my January list


Wednesday, November 17, 2021

Butterfly Is Glued

My last post regarding this project was late November 2020. Gluing the edges of the fabric bits had been on my to do list for a year. It wasn't a project that Gertie, my inner squirrel, or I was excited about doing. Gertie reminded me that if I wanted to move the project forward, I had to spend time working on it.

Last month, I listed it as one of my goals. I spent one 20 minute session gluing. Obviously, I wasn't motivated to work on it. Gertie told me at that rate, I would be gluing for months! We had a brainstorming session about what was holding me back and how to get this job completed. 

Frankly, gluing is boring. I'd rather be quilting or piecing. I decided that I'd glue 20 minutes every day I was in the studio. Four days passed. I had managed to busy myself with other projects. Gertie suggested at the next Zoom sew day I had that this project would be my focus. The day came, I managed to work on a couple other projects for the majority of the day. At the last hour, I cleared the sewing space, spread the top on the table and glued. 

Glued butterfly
A few days later, I spent most of the Zoom sew session, gluing. The following week at another Zoom sew session, I finished gluing the butterfly. Gertie was right. The Zoom sessions were the best vehicle to conquer the gluing step in the project. I was able to visit while I worked through this step of the project.

Brilliant! I had planned to layer, baste and quilt it when I finished gluing it. Now, I'm rethinking my options. Perhaps, I want to try using some tulle in the project. I plan to play a bit before I layer it. This was goal number 13 on my November list. It was goal number one on my fourth quarter list

Many of the scraps in this project came from my friend Martha. She would be pleased to see how I used her scraps! For now, I plan to ponder my options and confer with Gertie. 

Sunday, November 14, 2021

Tea Quilt Is Finished--

Leaf filler stitch
Last month, I finished the top to this quilt. I began the quilting process with stitching in the ditch of all of the seams. I also stitched around the applique shapes. 

Next, I stitched about a quarter of an inch away from the applique. I added some other straight lines in the blue background so that I could quilt other motifs. At the time that I stitched the lines, I didn't have a vision of what I was going to stitching in those areas.

This project is a book club quilt. I read the book, "For All the Tea in China: How England Stole the World's Favorite Drink and Changed History" by Sarah Rose with my Thread Tales book club. The applique in the center is the Chinese character for tea. I quilted leaves in the background around the applique. I used a blue 100 weight YLI silk thread for all the filler quilting in the blue background.

Free motion sailing ship
Next I moved on to quilting the lower section of the blue background. I wanted to represent the ship that carried the tea plants and seeds to India. I looked at photos of Chinese sailing ships from that era. 

I drew my own version of the ship with three sails. I drew the shape on a piece of notebook paper. I traced it with my finger several times. Then I used a Bohin fine line marker to free hand draw the design. It is mostly a continues line design that I stitched about four times with a gold Floriani 40 weight polyester thread.  

Detail of quilting filler stitches
After I had completed the ship, I quilted a  filler stitch representing water around the ship. At the top of the piece, I quilted mountains using a ruler foot and ruler. Tea plants grow in mountainous terrain in China. I was stuck with how to quilt the sides until Gertie, my inner squirrel, reminded me that the tea plants were shipped in their own glass terrarium type container. She suggested circles with a couple filler stitches. 

I've wanted to learn how to stitch that type of circle. It took me a few minutes of drawing with paper and pencil before I determined a quilting path that I could do without having to apply my full attention to the process! I like the organic nature of the free motion stitching around the circles.

Label

The bold applique will catch a viewer's eye and encourage the viewer to step closer to the work. The reward for the viewer will be the texture of the background quilting. There will be a lot to see!

View of the pieced back
I added a facing, a label and sleeve. This was goal number one on my November list. It was goal number two on my fourth quarter list. It is my second finish for the second quarter of Devoted Quilter's 100 day challenge. It is my thirteenth finish for the year!

I used 2 3/4 yards of fabrics from my stash which brings the total of stash I have used this year to minus 19 1/4 yards.

Most of the thread used
I'm linking to Cynthia and Oh Scrap/Quilting Is More Fun Than Housework. Please visit the link. There is always a lot of inspiration at the link up!

Regarding COVID:

Worldwide: 253M cases; 5.1M deaths

Finished quilt
United States: 47M cases; 762K deaths

Oregon: 376K cases; 4,730 deaths

This week, the United States opened the borders for people outside of the United States for visit and for travel. 

My granddaughters, whose ages are almost eight and nine, will be getting their first COVID vaccination on Monday. I hope that they have no issues.  My husband received his Pfizer booster last week. Other than feeling extra tired for a day, he had no other symptoms. 

I plan to get my booster at the end of December. I've work scheduled until the winter holiday. I'd rather wait when I have a number of days off in a row to recuperate should I
need it!

The pool where I worked prior to COVID, is located on a community college campus. The pool remains closed to the public for lap swimming and lessons. I understand that swim teams are holding practice sessions. I have heard that the college has targeted January as a possible time to reopen to the public. I sure have missed swimming. I do plan to apply to be able to work there again after the pool opens.


Wednesday, June 30, 2021

"Family" of Penguins Finished--post 2; Sixth Finish of 2nd Quarter 2021

Texture created in the penguins 
Normally, I would free motion quilt filler stitches in the open areas of a project. For this quilt, I decided that I would use lines to denote the Mama and the Daddy penguins. I free motioned echo quilted the curved lines on the Mama penguin first. I also echo quilted the head of the Daddy penguin. 

Next, I used the walking foot to quilt straight lines on the Daddy penguin. I'm trying to play more with the walking foot because it is easier on my body for the machine to feed the fabric using the feed dogs than it is for me to be pushing it. However, all the turning of the fabric takes some time and effort so I don't see myself quilting big pieces using the walking foot!

Back of quilt
In the baby penguin, I free motion quilted the name Pip because that was the name Veronica gave the abandoned baby penguin she took back to the research station to save from death. I filled in the background with loops to the point that if I hadn't told you that I had quilted the name, you wouldn't see it. For the upper left of the piece, I wanted to free motion quilt a texture that represented a cloud filled sky.

It was tricky to try to mimic the stitch length that I used during the free motion quilting. It was trickier to try to keep all the free motion stitching similar as well! I got close and I liked the texture that the lines gave the piece. I used a 40 weight Floriani polyester white thread for all the quilting in the white area. The sheen of the thread complimented the silver fleck in the white fabric. I quilted the white area in an afternoon. The most challenging part was determining where to start and what to use as filler stitches! (I used a cotton thread in the bobbin.)

Detail of label
All that was left was to quilt the background. I used a 40 weight Glide silver metallic thread to quilt on the snowflake design. This type of quilting gave me a lot of practice following a motif as well as looking ahead to the next snowflake so that I quilted continuously. I spent many more hours quilting that background than I would have thought! The
texture the quilting created was good and the density of the quilting is consistent throughout the piece.

I used the background fabric to face the quilt and construct the sleeve. I had fun with the label. Our leader of the book, Kathy M, provided an activity at our second meeting. We made a penguin out of felt scraps. She mailed us a little kit before the meeting. We didn't open the envelope so it was a surprise as to what we were going to do! The penguin could have been a finger puppet; but, I decided that I would use mine to be part of the label.

Finished front
In the book, Veronica had her second best red handbag pecked by a juvenile penguin. I had to include a handbag as part of the label. My granddaughters drew a variety of bags for me to choose one that would work. I ended up using K's envelope bag and J's bucket bag. They were psyched that I gave them credit on the label for their work. 

I was stuck figuring out how to add the felt penguin to the label. My friend, Connie P., suggested the speech bubble. I'm glad she suggested it as and I think the label turned out great! I spent about 74 hours creating this project. It measures 25 inches wide by 34 inches tall. I used about 2 3/4 yards of fabric. I have now used 8 1/4 yards from my stash this year.

This was goal #21 on my second quarter list. It was goal #2 on my June list. It was also my one monthly goal for June. I'm linking to Elm Street Quilts One Monthly Goal - June Finish Link-upThis finish was down to the wire! 

FOLLOWING MY BLOG BY EMAIL
As of July 1, Google Blogger is discontinuing its Feedburner email auto-delivery of blog posts. This will affect all of the blogs you follow by email - mine, or anyone else's!

If you previously registered to receive email notifications of my posts, and would like to register to receive email notification of my blog posts, you'll need to re-register. Complete the Follow on Bloglovin by starting with your e-mail address in the form that is on the upper right of this blog page. 

Thank you to those who have already re-registered to continue following me by e-mail. I appreciate all of you have filled me here since I began this blog June 26, 2015!

Sunday, June 27, 2021

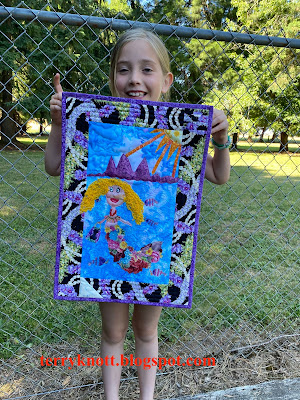
Miss K's Mermaid Is Finished--Post 6

Applying the glue to the binding
On our next sew day which was early March 2020, Miss K finished her binding. She liked cutting the 45 degree angle on the binding tails. 

I showed her how to glue her binding in place instead of using pins. She was skeptical about the glue; but, she gave the process a try. It worked well for her. She liked using the iron to make "the glue melt." I liked her description of the process. We spent about an hour finishing the binding.

Finally, we were at the stage to add beads for the fish eyes and to add the hair to the mermaid. I've wanted to see the mermaid have hair since Miss K first described her vision of the mermaid's hair. As we have worked on the project, the conversation about the mermaid's hair has evolved. Miss K has auditioned "hair" so that I would understand what the hair should resemble!

We had planned to spend Spring vacation working on her project. COVID restrictions sure curtailed progress on that plan! We didn't get together to discuss the project until the beginning of April 2021. Miss K auditioned beads for the fish eyes. She decided that she would rather stitch the eyes with thread--she was concerned with how the back would look. She did pick some beads to put in
Painting the fish
the hair.

When we finally got together to work on her project last week, she decided that she wanted to do something to make the fish more visible. She practiced making marks of various colors on a scrap of the background fabric. She used tsukineko inks and a brush applicator to apply the ink to the quilt surface. I purchased the inks and applicator brushes when I attended a class at the International Quilt Festival in Houston, Texas a lot of years ago. I haven't used the paints since.

Detail of fish
Miss K liked the effect of the paint. She was surprised how the color changed depending on the part of the fabric she was painting. She marveled that she could see the fish from a distance after painting them. She used a micron pen to make the dot for the eye. She also used the pen for line work to add a little detail to the tails. She liked that the inks left the hand of the fabric intact and that there was no stitching or knots on the back of her piece. 

Mermaid with yarn hair
Next, she added the hair to her mermaid. Originally, we had cut thin strips of fabric to make dreadlocks. From the free table at guild in 2019, I picked up a package of doll hair. It was curly yellow yarn. Miss K laid out pieces of the yarn in a pleasing layout to her eye. She liked the yarn better than the fabric strips. She wanted the yarn or hair to be "pouffy." 
Sewing the sleeve

With my help, she free motioned stitched/tacked the hair in place. To achieve the pouffy look, she left sections of the yarn unstitched. She also stitched the yarn with a metallic thread so that it would look like there was a net of sparkle in the hair. She had to stop and readjust the yarn as she adhered it to the quilt top. She loved the effect the hair added to her piece!

 She made an effort to not entirely cover up the fish on the top left. As she worked, she developed a story about the fish and the mermaid! It was fun to listen to her process. Throughout this process, it was challenging for me to figure out how she could achieve the look that was in her head!! 

I showed her how to position and hand stitch the hanging sleeve. She was NOT a fan of hand stitching. I didn't have a thimble that was small enough to fit her finger nor did I have any finger savers. She poked herself which hurt! She was NOT a fan of stitching the corners of the binding closed either. 
Using pliers to pull the thread

I thought that she would be excited because I thought she was finished. Nope, she wasn't finished. She said the mermaid needed a necklace, a nose and there was too much of a white space in the middle of the mermaid's face. Then she decided that the eyes needed paint to be more "real." She let me know her thoughts had "matured" since she drew her picture when she was seven. She had her ninth birthday last month!

She auditioned ribbon, beads and paint for the necklace. She wasn't excited about the options available. I suggested she audition a piece of red pearl cotton. She liked the color; but, she explained to me that it wasn't thick enough to be a necklace for a mermaid. We made a sample of a strand with colonial knots couched on the strand. She liked the texture. 
Necklace and nose

She laid the thread and pinned the center in
place so that it would remain in the position that she wanted it. She found it challenging to hold the wraps on her needle and impossible to hold it all in place to pull the thread to the back of her quilt. 

She found she was almost strong enough to pull the needle through all the layers with needle nosed pliers. She had me hold the threads on the top side of the project while she pulled. She wasn't happy that the embroidery covered a word of her story. BUT, she loved the effect. I loved the effect too!

She used color pencils to blend the color of the face better and she used a micron pencil to add a nose. We got out the acrylic paints and she gave the eyes more dimension. Now she was truly finished. (She decided her mermaid didn't need a crown after all!) She was excited! It measurers 15 inches wide by 25 inches high. It is constructed of scraps. Many of the scraps came from my friend Martha's string bin.
Finished back

Miss K began her journey with this project September 2019. Throughout the entire project, she built her quilt in her own vision. She chose the colors, fabrics and threads that worked the best for her design. She is letting me keep her quilt to enter in a quilt show or two should the shows be held.

You can read the previous posts of her journey by clicking the links below:
Miss K is Stitching--post 1
Miss K's Mermaid--post 2
Miss K's Mermaid--post 3
Miss K's Mermaid--post 4
Miss K's Mermaid--post 5

This was goal number five on my June list. We used about a yard of scraps so 5 3/4 yard of stash/scraps has been used this year. We have already decided what our next project will be.  Now, if we can find the time to get together! I'm also linking to Oh Scrap--Quilting Is More Fun Than Housework.
Finished front

Regarding COVID:
Worldwide: 181M cases; 3.92M deaths
United States: 33.6M cases; 604K deaths
Oregon: 208K cases; 2,704 deaths

The Oregon governor has announced that the state will open to "normal" on June 30. While I'm happy about the prospect of wearing a mask much less, I imagine that I still will  wear a mask because the people who aren't are either vaccinated or not. It's the unvaccinated group that concerns me. It seems odd that the magic number to open was 70% vaccinated. The state is 51% totally vaccinated and 57% of the population has received at least one dose of the vaccine.

On another note, we are having a heat wave. Yesterday, it was 104 degrees Fahrenheit as the high and 67 degrees as the low. Today, the forecast is for it to be 111 as the high and 72 as the low. I can't remember a time that the upper temperature was that high. It will be an indoor day for me. I'm thankful for air conditioning! Restrictions on the number of people in a swimming pool have been reduced as have the restrictions for number of people in a cooling center.


Wednesday, June 16, 2021

Family--Penguin Quilt--post 1

Applique in process
I've had this snowflake printed fabric for many years. I bought it thinking it would be a good background for a Santa Tree skirt. Then I got stymied as to how to make Santa's belt and boots show next to the snowflake fabric. It has been in my stash more than five years. Earlier this year, I decided it had "aged" sufficiently and I decided to use it as a ruffle on a Santa Tree skirt. 

In May, when I selected fabrics for this book club quilt project, I pulled this fabric too. I think it is perfect. I did purchase the white fabric with the little silver fleck in it. I drew the pattern on the snowflake fabric with a Bohn chalk pencil.

Finished applique
Then I layered the two fabrics and basted the two layers together. I began cutting on the lines and needle turning the cut edge. I worked on it in the evenings. By the end of the month, I had the majority of the applique finished.

This is a Pacific Rim Quilt Company 2-Fabric Applique pattern that Nancy Chong designed. Nancy has designed many two fabric applique patterns. Check out the link to see the what the company has to offer. The finished size is 24 inches wide by 36 inches tall. Click here to see a demonstration of the technique.
Pieced back

I felt I would be unsuccessful to cut the fabric around the eyes. I was stymied on how to be apply the eyes. In the end, I remembered Connie's advice from who has also made this pattern. She suggested appliquéing the pieces on top of the fabric and using a bead for the littlest penguin's eye. I appliquéd all the eyes. I used Liuxen Newman's technique of applique on the circle. I was successful enough. Can I do better? Sure. For this project, I'm pleased with my results.

One year at Spring retreat, I was gifted a set of fabric samples for a particular fabric line. I'm sure the fabrics are at least 10 years old. I liked them because a couple of the prints featured snowflakes and penguins. My oldest daughter liked penguins. She still likes penguins. From time to time, I would pull them out and look at them; but, I didn't know how to use them. I didn't think there was enough fabric to make a quilt.

Pin basted and ready for quilting
While I was appliquéing this project, I remembered the samples and decided that they would make the perfect back. I determined the arrangement and I thought that I would be close to having enough. Boy, was I WRONG! I had purchased a fabric with white dots on a blue background thinking it would work for some HSTs for Frolic. I pulled that fabric and it worked with the sample fabrics. I barely had enough to create the back. Actually, I could have used another inch in the width of the fabric; but, I "coaxed" the pin basting during the layering process and made what I had work.

I used a wool batting in this project.  I layered and pin basted this project. It is now ready for me to quilt it on my domestic 790 Bernina sewing machine. I'm thinking about quilting snowflakes in the upper corner of the white fabric. I'm thinking about echo quilting on the mama's body and straight lines for the daddy's body. I might do a sort of pattern on the baby's body. I'm thinking about using slightly different shades of white thread for the quilting on each penguin to help distinguish the penguins. I have an idea for the label that is different than what I usually do and it involves a red handbag. For now, as I "decide," I'm quilting the background fabric! 

This is my one monthly goal so I am motivated to have a finish by the end of the month!


Sunday, February 14, 2021

2021 Temperature Quilt-Post 2

Running stitch applied "organically"
A reminder about this project: The square represents the low for the day; the circle represents the high for the day. Hand stitching represents precipitation. 

Once I had hand appliquéd the circles to the squares, I stitched a running stitch around the circle if it was a rainy day. I purchased that thread when I went to the International Quilt Show in Houston, Texas a number of years ago. I bought it from Laura Wasilowski's booth.  It is a beautiful size eight hand dyed ombre thread. Laura is such a positive person. She has fun patterns and threads for sale on her website. She also has lots of tutorials which are free which include some stitch alongs that you can join at any time! 

Because it is a hand dyed thread, I tested it for color fastness. I don't intend to wash this project; but, if I wet it for blocking, I wanted to know I won't have bleeding issues. I was shocked at how much color came from the thread. I tried setting the color with a vinegar and salt solution. I don't know how successful I was because even with lots of rinsing in cold water, there was a lot of dye in the water. 

Sashing and alternate square selections
I'll be mindful of getting this project wet! With all the dye that was released from the thread at least I know that amount won't be on my fabric!

The thread adds a nice accent to the circles. I like adding my hand to a project. I had thought about using different stitches; but, decided to keep the design the same. On purpose, I am stitching "organically" circular as I like the wonkiness free form stitching creates. 

When the month begins or ends on a day other than Saturday, I decided to use square of a light grey fabric printed with dots. I liked the contrast that fabric provided. 

For the sashing between the weekdays, I auditioned all sorts of grey fabrics. I considered using no sashing and in the end, I used a fabric print of rocks. This fabric was left over from a long ago project. It was destined to be a in a baby quilt; but, after cutting almost all the pieces, there wasn't enough. All the pieces and parts ended up in a bag about nine years ago. . .but, who is counting???

First week in January complete
The smallest strips were cut at 7/8 of an inch so perhaps it is serendipity that this fabric ended up in this project after all! I don't know if there is enough fabric to sash all the blocks for this project. If I run out before the end of the year, I'll figure out another fabric that will work as well. I do plan to spend some time cutting the strips to size so I have a better idea of how many months of strips I have on hand.

The month of January complete
To sash each week, I did use a grey fabric and I added white corner stones so that matching the squares would be easier. I also wanted to provide the eye with another pattern to view. I slowly stitched the weeks of January together. I have a plan for the key; but, I haven't a plan for inserting the name of the month. I've time to work out that plan.

Because this is a scrappy project and because I'm using those bits housed for years in a plastic bag, I'm linking to Oh Scrap--Quilting Is More Fun Than Housework.

I had a pleasant surprise in my mail box twice this week. I received two Valentine post cards! One was from Connie and one was from Gail. I recognize the "girl" as Gail made a quilt for a special someone with that print some time ago. I helped her with the label. My friend, Bonnie Welte wrote the book on making post cards.

Valentine post cards
I agree with Connie that the granddaughters would have a hoot making these. How I miss our play dates! This year I was derelict in sending Valentine cards. I'll try to be better next year. In the meantime, I wish all of you a Happy Valentine's Day!

Speaking of Valentine's Day, my plan is to finish the table runner I started in a Saturday workshop. I have a plan of how to squeeze the leftover background fabric into a binding.

Today, I could have posted about our low temperatures (upper 20s) or the snow that fell--about six inches and the coat of ice--about half an inch. Instead, I'll save those photos for Wednesday when our "normal" temperatures are back in the 40s for this time of year. 

Valentine table runner
In the meantime, we are staying warm feeding the wood stove and staying away from the ice incased tree limbs as a number of those have crashed. Sigh, there is some damage from their fall; but nothing my husband can't repair when the conditions improve.

Regarding COVID:

  • Worldwide: 109M cases; 2.39M deaths 
  • United States: 27.6M cases; 484K deaths 
  • Oregon: 150K cases; 2,137 deaths

In the United States and also in Oregon, the number of new cases has plateaued. Distribution of vaccine continues to be an issue. In Oregon, the process to get on a list to receive the vaccine isn't any better than it was last week. People age 80 were eligible to receive the vaccine this week. 

Many may not have the ability to navigate the technology to schedule their appointment. COVID vaccine angels all across the United States are volunteering to help seniors book online appointments. Also, in Oregon the media reported four vaccinated people have contracted the virus. It wasn't reported what vaccine each had nor was it reported how the infection was contracted nor was it reported how long between the vaccine doses the exposure was. It was reported that the people have had light symptoms of the virus.

Proof of vaccination
Tuesday, I received the second dose of the Moderna vaccine. I arrived five minutes before the schedule start of the vaccination day. I was the third person to be vaccinated that day. The person who vaccinated me was working the day I received my first dose. I thanked her for doing this job. She said that she had worked every day that the vaccinations were distributed. She also said she planned to continue working every day that the vaccinations were offered because she felt so strongly about the value of the vaccinations! 

While my arm has not been as sore as it was with the first dose, the second dose packed a wallop! I experienced chills, fever, nausea for a full three days. I did not vomit. I ran a temperature of 101. The headache, muscle and joint pain have been constant. The dizziness is more profound this time than the last time. Ibuprofen helps the symptoms. About an hour before I can redose the Ibuprofen, all the symptoms I'm experiencing heighten. 

Again, I am thankful to have had the opportunity to access to the vaccine. I am thankful that the symptoms I am experiencing will pass without lingering effects. I am thankful that while the symptoms of the doses have kicked my butt, I am about five days away from my body building the optimum immunity. Exactly what I'll be immune to in terms of the new COVID variants remains to be known. This vaccination, however, is the beginning. I am one person that won't be an easy host for the virus to invade. May there be millions of us in this same position soon.