Wednesday, January 31, 2018

ID Badge #2--Fourth Finish of 1st Quarter FAL (Finish-A-Long) 2018

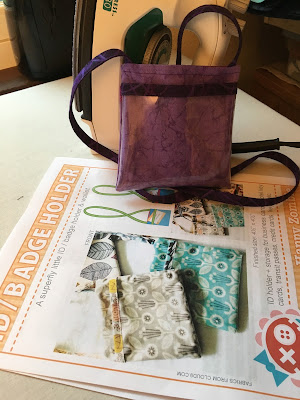
ID Badge holder number 2
I purchased the ID badge pattern from Craftsy. The second ID Badge went quicker than the first time. Being familiar with the steps and having cut the fabrics when I cut the first ID Badge just simplified the process.

This badge is also a gift for a person who loves the color purple. Again, I sorted through my larger scraps and found enough fabrics to stitch it.

What is fun about giving these two as gifts is that every month that I see these ladies at the guild meeting, I'll be seeing these ID Badges too!

I used 1/4 yard of fabric for this project bringing my total to 4 1/2 yards of fabric used from my stash. I'm slowly chipping away at that 50 yard goal! This is finish number four for the quarter and it was goal number 2 on my 1st Quarter FAL list. 
Block fabrics

On the quilting front, I've been drawing 8 1/2 inch circular designs. The block challenge for the CCQ guild is to make a circular block using the required Moda grunge and only Kaffe Fasset, Phillip  Jacobs and Brandon Mabry fabrics.  My thought was to take a traditional square block design and tweak the design to be circular. Some of my tries have looked so odd. . .meaning terrible!

I'm ready to try to draft a couple of designs. My progress has to be a secret until after the April quilt show. I can share the background fabrics and a couple of squares I was given for the contest. (I can use the squares or not! I haven't decided about using them yet!)

Oh and I thought that this year I would track how many people I've trained. . .30 in American Heart Association Basic Life Support CPR; 21 in American Red Cross BloodBorne Pathogens Training and 21 in a backboard inservice. The swimming lessons end next week so I won't count those numbers until the end of February. Still training 72 people in a month is a big number!!!

Sunday, January 28, 2018

ID Badge #1--Third Finish of 1st Quarter FAL(Finish-A-Long) 2018

I purchased the ID badge pattern from Craftsy. I had folded my name badge to ensure that it would fit in the vinyl section of the ID badge. I planned to make three of these. . .two are gifts for a couple friends that have January birthdays. I used scraps; but, I did have to purchase the vinyl.
Finished ID Badge
The friend that received this one likes yellow. She also likes polka dot fabric. It is great that there were some polka dots in my stash! I used the dots as the lining and trim for the back pocket. I figure that even though I have three fabrics in an ID badge, the total amount used is about a fat quarter.

I didn't find it difficult to stitch on the vinyl. Although, I found it easier to stitch with the vinyl side up rather than down/next to the feed dogs. I do have a roller foot that I may try on another project. As with any project, the first one generally takes me the longest to make as I work through the steps.

I had to laugh at myself. The last step is to turn the project right side out. I couldn't figure out what I had done wrong because the pocket was inside the bag instead of on the back. . .Well, I just needed to turn the vinyl pocket to the front instead of to the back! Ha Ha on me!!!! :)
6 inch star block for the outgoing guild president

This is my third finish of the quarter and goal #1 on my1st Quarter FAL 2018 list. I used 1/4 yard of fabric. My total of fabric used so far this year is 4 1/4 yards of my 50 yard goal.

Yesterday, I took my first exercise walk since I came down with the nasty crud. I made it a quarter of a mile before coughing over took me. I waited for the coughing to pass. I walked home. As I approached the door, I had another coughing attack. I declared that was enough and that I would try an exercise walk today. Surely, I can bypass coughing today!

This week, I also made a six inch star block for the outgoing Mt. Hood guild president. The other rules were that the fabric colors were red, white and blue. Two colors could be used. The fabrics should be on the brighter side. Any star pattern was acceptable and your name had to appear somewhere on the block. I'll turn in the block at the February 13 guild meeting.


Wednesday, January 24, 2018

Altered Hem Second Finish--1st Quarter FAL (Finish-A-Long) 2018

Covering the original hemline with ribbon
Miss J is growing so fast that this dress became a tunic top way too soon!

We spent an afternoon clipping the hem stitches so the stitches would be easier to remove. J liked using the seam ripper; but counting seven stitches and using the tool again became old too fast! She thought that pulling the long bobbin thread was cool though!

Adding lace to the bottom edge lengthened
the dress six inches
The hem was double so we were able to gain about four inches; but, we needed more length. I had a piece of gathered lace that came from the guild free table. I thought it would work. J agreed that she liked it. When I started to pin the trim in place, I found that there were some flaws.  Well, it was "free" so I can't complain too much!

The flaws were that the edge wasn't gathered in a couple spots. The edge finish was missing in several sections and the lace was sliced in two places.

Finished view
Miss J modeling her dress
I decided that I would place the edge of the lace under the hem line which would cover the unfinished area. I also ran a gathering thread along the areas that had been missed and gathered the edge myself. I made sure the "slice" became part of the seam allowance. The fixes took extra time. In the end it worked to use the lace! I like how much interest the lace added to her dress. The lace also extended the hemline an additional two inches. To cover the original hemline, we added a piece of pink ribbon. Miss J loved this part of the alteration! The lace was free as I've had the pink ribbon in my craft stash for 25 years! This alteration didn't cost anything more than thread and time!

I spent about three hours on this alteration. This was goal number 12 on my 1st Quarter FAL list. You can read the list here.

This dress is ready again for Miss J to wear when she is out and about!


Sunday, January 21, 2018

Rue--post 4 of 4--First Finish of 1st Quarter Finish-A-Long 2018

Chalking the edge before trimming


At the beginning of January, I caught a strain of flu that was making the rounds. It was a particularly nasty bug which kept me sidelined for weeks. Three weeks later, I'm finally feeling like maybe I can do a little more than cough and sip tea! Sitting in my chair to hand stitch the facing for this wall hanging was a good "healing" project!

I had considered adding beads to the lower edge of the wall hanging. The project is about 20 inches x 45 inches. I decided that because of the length, the beads would get lost so I proceeded with the facing. This is the first time that I have used wool batting on a small project. The project is light and I had some concern that the edges--especially the lower edge could use some "weight" to ensure that it hung well.

Label information
First step is to ready the edge. I could trim the edge; but, I like to chalk the line that is going to be the edge. I look to see if I want to cut on that line. Sometimes, I change the chalked line so this check step works for me. After all, I can't put fabric back that I've cut off!

I often add a piece of narrow ribbon or a piece of twill tape around the quilt perimeter. I do this because I tend to stretch the quilt edge as I'm applying the finish and then I have a slight wave to the edge of the quilt which negates the quilt to lie flat! I often use an 1/8 inch to a 3/8 inch piece of ribbon/twill tape that I couch to the quilt. It is going to be in the seam and enclosed with either the binding or in this case the facing. Therefore, it doesn't matter what color it is or what thread I use to anchor it to the quilt! I have a stash of my great grandmother's threads and I often use one of these spools just to have a little of her in the project!

Back of quilt
Next I apply the facing. I prepare my sleeve and label and hand stitch these to the back of the quilt as well. It feels terrific when I put that last stitch into the quilt! I then steam it and let it rest on the flat surface overnight. Last, I photograph it and share my progress here!

This label has hung out in my stash for years. I've had the blocks waiting for a setting plan since 2014. The important information is listed in the label. Yes, it takes a little extra time to make the label; but, I believe it is well worth the effort! Some day, this might be important information to know!

I like how much interest the orange ribbon and orange strips added to the project. I also like the depth the hand stitched hexagons added to the piece. Using different weights of thread to do the hand stitching was a plus. Adding quilting to the hexagons also provides interest.

Perhaps, the next time, it wouldn't take me as long to figure out what to stitch in the hexagon spaces! I would trapunto again as I like how these pieced hexagons pop from the background of the quilt. All in all, I'm pleased with this finish!

While I like how light this project is with the wool batting; I wondered how the project would hang. Rue has been hanging a few days and it still looks great. I would use wool batting again for a wall hanging.
Close up of the pebbles from the back of the quilt
This is quilt number two in my hexagon series. You can look at quilt number one in the series here. I do have another hexagon project started and another mulling about in my head. I like working with the hexagons. I like to EPP (English Paper Piece) as well as machine stitch these. There are so many different layouts that can be made with the hexagon unit! I could easily become side tracked with hexagons!  Since my goal this year is to finish five older UFOs, I'm going to try to stay away from becoming side tracked. Now I have four older projects left to finish this year!

Finished front
I used four yards of fabric from my stash. My goal is to use 50 yards from my stash this year. (I've 46 yards left to use.) I also haven't purchased any fabric so this is a gain of space in my studio!

You can read the previous posts about this project by clicking the links below:
Rue--post 1
Rue--post 2
Rue--post 3

This was goal number four on my 1st Quarter FAL (Finish-A-Long) list which you can read here.
Wednesday, January 17, 2018

Quilting Rue--post 3 of 4

Fill stitch I didn't like nor did Rue!


In my mind, I envisioned quilting different fill stitches in the hand stitched hexagons. I stitched one and thought. . .yuk! Rue started talking to me. So I asked myself what if I quilted pebbles in the center hexagon? I tried quilting pebbles. I liked that better as did Rue!


Quilted centers


As I pebbled the centers; I decided that I would pebble the background too. I wasn't sure if the larger hexagons would need some more stitching.


Hand stitched hexagons with fill stitches

After I had quilted a number of the centers, I stopped, stepped back and reviewed. I liked what I saw so I continued stitching. When I finished, I decided that the extra large and large hand stitched hexagons needed quilting.

Coming up with a variety of fills and then executing each fill stitch was a challenge. I stitched and then I unstitched and then I repeated that process numerous times!

I liked the openness of leaving the small and extra small hand stitched hexagons plain so I didn't embellish those with thread. I liked using the Westalee templates to create the fills. The practice was good for me.

Stitching the background pebbles
I wasn't excited about stitching more pebbles as I'm still "pebbled out" after finishing the chickens. Repetition is good in a quilting design so I decided that pebbles were a good choice. I talked myself into the stitching. I spent some afternoons, some early mornings and some late nights stitching pebbles.

I used the same 40wt polyester thread in both the top and bottom. Yes, this is an unusual step for me. I had planned to use silk; but, I wasn't that happy with the tension of the silk on the batik fabric on either the front or the back of the project.

Because a batik has a tighter weave, thread has a tendency to float on top of the fabric. The lighter the thread, the more it tends to float.

I wanted to be able to see some definition with the stitches and the 40wt polyester gave me what I wanted so that was why I used it.

Blocked and drying


Once the pebbling was complete it was on to the blocking stage. I needed to wet the quilt because I had used water soluble thread to anchor the polyester batting in place for the trapunto of the fabric hexagons. The thread dissolved easily. In the photo above you can see that I pieced the batting. Once I've finished the project; the pieced batting isn't noticeable. Piecing the batting is a good way to use up smaller pieces of batting.

In the next post, I'll share the finish steps. . .although, when the piecing is blocked and drying, I'm feeling terrific to have another project approaching the sleeve and label stage!


Thursday, January 11, 2018

Quilting Rue--post 2 of 4

Rue as an almost finished top
The embroidered hexagons that I added to the background only took me about 20 hours to complete. I like the whimsy the stitches add to the piece. It took strength to pull the thread through the fabric and my fingers became sore. I'm glad that I didn't try this technique with three layers!

In the end, it was worth the effort! Plus, I'm thinking that I will add pebbles between the hexagons so at least I have another quilting plan beyond stitching around all the appliqués!

I decided to use a wool batting. I was curious as to how much loft an extra layer of wool batting would add underneath the appliqué shapes. I decided that it wouldn't give me the loft that I wanted so I used some polyester batting that I was gifted a number of years ago. This batting is thick and it was used to tie quilts.  I used a water soluable thread to stitch the batting and then I trimmed next to the stitching.
Smallest hexagon quilting design
Largest hexagon--love the unquilted center

Then it was on to layering and basting. I thought the back I had prepared was large enough. It wasn't so I sorted through the bits and found a fat quarter that I liked the color with the existing fabrics.

Middle sized hexagon quilting design
I started stitching in the ditch and around all the shapes. After I had stitched around the large hexagons and the ribbon in the lower part of the design, I checked my work. I had tucks on the back!! So I spent hours unstitching. I unpinned the layers and pin basted again. This time, I used more pins. More pins equaled no tucks which was GREAT!

Medium large hexagon quilting design
I stitched around all the hexagons with a silk thread on the top and a cotton thread on the bottom. I did this to anchor the hexagon. I had fun quilting the trapunto hexagons. I used two Westalee Rulers--the straight edge and a curved arc for the designs. There is a design or an area on each hexagon that I like the best. Some of the designs went together quickly, some way not so much!!!

I wish you could see the depth the trapunto added. Of course, I quilted each a little differently although at a glance, one might think some are quilted the same!

Medium sized hexagon quilting design
I'm thinking about stitching pebbles in the open spaces and then filling the hexagons with  a variety of fill stitches. I had planned to stitch the pebbles in the same color as the background; but, it is difficult to see where you have been and where you are going. I may see what I have on hand and stitch with a different shade of brown.

Maybe, I will leave some of the hand stitched hexagons open. The small ones look great as is. Time will tell. I'm still listening to what this quilt has to say!

Time spent on the project thus far is about 44 hours.

Wednesday, January 10, 2018

Five for 2018

Last year, I set 10 goals for myself. You can read that post here. Below is a short recap.
Finished "Chickens"--a 10+ year project.
The goal next year is to finish five UFOs.
1 was to finish more. I wanted to finish 17 projects in the spirit of 2017. I completed 21. Granted a number of the projects were gifts, clothing or "gran related"; but, I am happy to have so many items out of one of my many to do piles! I am also grateful to the FAL (Finish-A-Long) group because having quarterly goals helped me stay on course. I was excited to finish my chicken project.

2 was to expand my "box". I did start and finish one of JoJo's projects over at Through My Hands. I plan to keep going as I can because she uses a plethora of techniques which are fun. I also took a painting on fabric class that was way cool and I look forward to doing it again.

3 was to start new projects. No problem there!

4 was to participate in my guild's challenge and block contest; enter at least two quilts in the guild quilt show. I did it!

More machine embroidery projects are
planned for 2018
5 was to expand my machine embroidery skills. I found that stitching at least one project a month helpful and plan to stay on that track this year. I still have a lot to learn!

6 was to stitch and create with the grands. We did and there are more projects in store for us in 2018.

7 was to sew 50 yards from my stash and purchase less than that so I have a net loss of fabric for the year. I did although it was close to a push so I didn't make as big a dent as I had thought that I would!

8 was to make progress on current projects. This was a mixed bag. I have learned that when I'm stuck, it is good to have a chat with a friend and pose some what if questions. When I did this, both of us came away with a different view of our projects!

9 was to stay the course with the physical therapy exercises. I'm still doing the exercises; but, I haven't regained the ability to walk the dog further than across the street. . .yet!
Utilizing techniques to keep them in my
tool box are planned for 2018

10 was to follow the fun. It helped to focus on the positives. I am thankful to get to stitch with people who are joyful. Most of all, I'm grateful for all the laughter that went along with following the fun.

I'm keeping my word organize for 2018 as I didn't do much more than start the process in my space.  Also my list for 2018 is shorter:
1. Stitch 50 yards from my stash and to purchase less than that so I have a net loss of fabric stored in my space! (Is it possible to not buy more fabric???)
2. Complete five UFOs that have been in the pile for more than a year. (I've way more than five so this should be doable!)
3. Keep expanding my toolbox. (I've registered for several quilting classes and am considering taking a painting/drawing class.)
4. Stitch and create with the grands as often as possible! (We've at least one project on the books already!)
5. Follow the fun. (I plan to allow myself to get sidetracked when something is enjoyable. I figure following the fun can only be a winner!)

I'm participating in the 2018 Finish-A-Long. I've found participating to be helpful to help me with finishes as well as inspirational to see what others are stitching! You too can participate as you have until January 15 to post your link regarding your intentions. If you are interested, click the 2018 Finish-A-Long blog button that is on the lower right side of this blog. You can review the rules from that link as well.

2018 is going to be a banner year!


Sunday, January 7, 2018

First Quarter Goals--2018 Finish-A-Long

#1-#3 Name badge holder
Last quarter, I finished 13 of the 25 projects listed and I made good progress on three other projects on the list. I hope to be able to keep up the momentum! This year, my plan to put projects on the list that I really will finish in the quarter. Being more realistic as well as keeping the list in front of me may help me to the finish line more often in 2018.

#1-#3 Name badge holders
I need to make a name badge holder. I've needed this since August; but, hey who cares. . .I'm planning to make three extra because they would make good gifts too. Surely, now that I've located a pattern, I will be able to finish three by the end of the quarter!

#4 Hexagon quilt. . .closing in on the finish

#4 Finish the hexagon quilt.
I made great progress last quarter and although I was well into the quilting phase by the end of the quarter, I wasn't able to get to the finish line.


#5-#6 Embroider and embellish these aprons


#5 and #6 Finish these aprons. Last quarter, I had a couple ideas for the embroidery and embellishments.


#7 Quilt this truck


#7 Add borders, layer and quilt the truck that I painted.


#8 and #9 Stitch these stuffies that Santa brought


#8-#9 Stitch these "stuffies"
that Santa brought the grands.
The grands are going to be part
of the process. They can't wait
to have a stitch date.  I haven't
worked with a panel in a long time.

#10 Stitch this embroidery into a bag.


#10. Stitch this daffodil embroidery into a bag.


#11. Stitch some of these selvages into a bag.

#11 Stitch these selvages into a bag


#12 Alter this dress


#12 Alter this little dress for the youngest grand. It needs to be longer. I have some lace and some ribbon that I think will work for just this purpose. 


Wednesday, January 3, 2018

Mt. Hood Quilt Guild

Dad with his Dad's Star quilt
In July, I joined the Mt. Hood Quilt Guild. This is a group that meets about a 15 minute drive from my house. It can take several hours for me to drive to the Clark County Quilters Guild (CCQ) meetings because the traffic traveling over the bridge from Oregon to Washington backs up easily!

I'm still an active member of CCQ. I joined the guild in 1998! The past couple of years, I've been looking at the time I spend getting to events, board meetings and general meetings.

This year, I'm taking a break for being a board member. I've assisted or led a committee six times in the last five years! (Last year, I headed two committees.)  I have helped at the Featured Artist show in October. I plan to teach a class at Saturday Workshops in February and I plan to help with the quilt show in April so I'm still a "supporting" member! From September through November, the meetings were held at a location that added about another half hour each way to my commute.

To get ahead of the traffic for a 7:00pm general meeting, I leave my house about 2:15 in the afternoon. Plus, in the winter when it is dark and rainy, traveling to the meetings is a chore. I often don't return home until 10:30pm! That is a lot of effort for a 90-120 minute activity! Granted I'm blessed that there are at least four of us that carpool together which makes the journey whiz because we engage in conversations, we shop at a local quilt shop and we have dinner before we attend the social hour that begins at 6pm.

At the Mt. Hood Quilt guild meeting, I was pleasantly surprised to see many people that I already knew! I loved arriving at the meeting and returning home from the meeting in 15 minutes! The program in July was Quilts of Valor (QOV).  The moving part of the program was when we witnessed a QOV presentation.  My dad was a veteran. He was deployed to Korea at the end of the Korean War. I'm sharing the quilt that I made him for his 80th birthday. You can read about his quilt here. I've made blocks for QOV and I've participated with a group in making several extra special quilts for servicemen. I even have a little red, white and blue in my stash to make a QOV on my own.

I missed the next couple of meetings but, next week, our book club will be the program. The plan is to feature some of our work.  I'll be sharing my Mt. Hood quilt, Rue, the hexagon wall hanging IF I can complete it and my Remember Me wall hanging if I don't finish the hexagon wall hanging. I plan to also share the first quilt I made through the book club. We read "The Davinci Code." I think there is room for two quilt guilds in my life! I guess I'd better get back to working on Rue!