Wednesday, January 29, 2020

Tea Room quilt--post 4 and the first finish for 2020!

The thread I used for quilting and piecing
After I completed the quilting on this piece, I blocked it. I used to wet the entire piece; roll it up in towels to remove most of the excess water; lay it on the carpet and pin it into a squarish measurement. This time, I sprayed the surface with a water bottle and then used the steam feature of the iron to get rid of the lumps and bumps that happen during the quilting phase. Wetting the piece is the better option.

Back of quilt
While the piece dried, I made the quilt sleeve, printed the label and cut the pieces for the facing.  After the piece had dried, I trimmed the edges and attached the facing. Again, I used steam to encourage the facing to lay flat. I understitch the facing to encourage the facing to roll nicely to the underside of the project.

Facings are a nice method to finish the edge of a quilt. Every piece of fabric in this project was a scrap. Had I more of the border fabric, I would have made a binding; but, I didn't. I had a leftover piece of a green dot fabric that made a perfect facing. As I looked at the facing fabric, I determined that it could have been the binding! It has been a while since I've applied a facing. I needed to practice so in the end a facing was a good choice!

The sleeve fabric came from the guild free table a couple years ago. I chose it from my stash because it went well with the other fabrics that I used on the back. In the novel, the Major lived in a small village. The label with the printed houses was the perfect choice. It was another find from the free table.
Finished label

As you look at the front, I wanted you to feel like a gust of wind had caught the "chain" on the sign and was about to cause it to swing. In the novel, one of the characters was on the precipice of something about to happen and I wanted to convey that feeling in this piece.

I'm pleased with the finished wall hanging and I was able to show it to JoJo before she moved away.  Although at the time she saw it, I hadn't finished hand stitching the facing in place.

This is my first finish for 2020. I used about 2 1/2 yards of my stash in this project. I didn't make a goal this year of how much yardage I want to use from my stash; but, I do plan to track the amount of yardage that I use! I spent about 83 hours and $40 getting this project to the finish. Yesterday, I shared this project with my book club group.

If you missed my earlier posts regarding this project, you can read them below:
Post 1
Post 2
Post 3

The Finish A Long for 2020 is happening again this year. Instead of linking our intentions at the beginning of a quarter and linking our finishes at the end of the quarter to a host, we will be posting to Instagram hashtag #2020falq1finish. I posted nine projects to the hashtag #2020falq1list by the January 19 deadline. It is a new process the hosts are trying this year. I got to learn how to post more than one photo at a time which was good; but, I miss reading other people's posts about their lists.
Finished front

Sunday, January 26, 2020

Teaching a Saturday Workshop

One participant's scraps
Last Saturday was the Clark County Quilters guild Saturday Workshop day. This is the day members teach members. There was a fabric painting class, a mile a minute piecing class, a how to create realistic doll faces class, a how to create lace with thread class, a how to make a quilted tote bag class, a how to stitch sashiko class, two different paper piecing classes, a how to make a jelly roll rug class, a gifts to make with fat quarters class, a how to make fabric twine class and my bust your stash class.

This is one of the activities that I look forward to attending each year. The cost of the class covers the rent for the facility and the teachers volunteer their time. A half day class is $10 and a full day class is $20. If the teacher has a kit for the class, the participants pay the fee to the teacher.

It is an affordable day, an opportunity to learn new techniques or to practice/perfect those techniques and a chance to make new friendships.

Making nine patches out of batik scraps
Five ladies attended my class. Of those five, I only knew one so I made four new friends! I decided to teach the workshop to support those people who were stuck doing the bust your stash guild challenge which I'm in charge of this year.  It is always interesting to learn why people register for a particular class!

I thought that people would be stuck in the quilting phase or how to attach a binding or a sleeve; but, I learned it was more of a "am I on the right track," "do my fabrics work with what I'm thinking" and "does this sashing work for these blocks" need for support instead. I learned that more people would have signed up for this class had I offered a specific pattern that they could sew. Hmmm perhaps, I will do that next year!!

I loved seeing all the beautiful scraps, two inch squares and fabric options that arrived. One participant said that her husband used to eat a lot of ice cream and that she used the clean and empty plastic tubs to sort her scraps by color.
Getting to work on the projects

One participant had sewn a number of kaleidoscope quilts over the last 20 years. She was ready to sew the bits into a useable project. She said she was able to cut one two inch square from each of her kaleidoscope leftovers. She was excited to use the yardage that she had accumulated and petted over those years.

She brought a small plastic rectangular organizer container with two layers.The top section contained a tray of her sewing supplies.  Her fabric squares were in the bottom section. She had named this section the "randomizer." She would "stir" the pieces a bit and then select five mediums for her nine patch block. She would sew the block and repeat the process. Her nine patches were beautifully sewn.

I recognized many of her fabrics and couldn't believe some of them were the age she said. Time moves quickly! She was making a pattern from one of Bonnie Hunter's books. Her quilt is going to be stunning when it is finished. She plans to hang it on a wall in her home.

Leftovers becoming a plan
A second lady shared her story about the first quilt that she had machine pieced. She said once she had the top together, she took it to a fabric store to learn how to put the "stuffing" in it. She laughs now. . .realizing it was batting and backing that she needed; but, at the time she thought quilters pushed the fiber in the middle of the layers somehow.

She ended up taking her top to a longarm quilter and the longarmer commented how her quilt wasn't square and wasn't flat which the quilt creator had no idea that square or flat mattered! The lady said she finished the quilt and even made a second quilt for a grandchild.

I loved her story. I admired her can do and see what happens attitude. She spent part of her time cutting  squares and parts for blocks. Then she sewed the pieces together intuitively. She said she couldn't follow a pattern and that she was more of a painter or potter. She said she that one of her friends told her to come to class to get ideas on what to do with her scraps. I so want to see what her project becomes!

The third participant brought samples of scrap quilts that she had made which gave us a great opportunity to talk about how to choose fabrics that work well together and to see different designs. She is a machine embroiderer and she brought samples of stitch outs that she was picking scrap fabrics to use as sashing. I sure want to see those quilt/quilts finished! I'm thinking that I might invest in some of those embroidery designs. . .

The fourth participant had participated in a 52 week block challenge with a friend last year. The participant completed all of the blocks. Her friend dropped out after a few weeks.
One nine patch finished

This participant used fabric that she had loved a number of years ago and which she had moved several times. The block challenge was a way for her to finally use the fabric she loved. She decided that the guild challenge was the way to get the blocks set and the quilt finished! She designed sashing using two inch squares. Her blocks were shades of blue and yellow which were so pretty and so beautifully made.

She made some choices regarding fabric so that her block setting would be more modern. She made a sample sashing and then decided to adjust it a bit. She was at the point to stitch a coping strip around her blocks when class ended. She too is creating a beautiful project.

The fifth participant had left over HST triangles from different projects. She stitched them together in a couple of sizes. She too made nine patches with her two inch squares. Her plan was to set the some of the nine patch blocks in the center and then follow up with larger squares. She is planning to gift the quilt to a great niece arriving in the spring.

All in all, it was a good day. I sure look forward to seeing their projects hang in the show in April!


Wednesday, January 22, 2020

Traveling in December-post 2

Outside the London Museum
Embroidery on the napkins
On our second day, we went to the fish market only to learn that it is always closed the day after a bank holiday. Upon consideration, this fact makes sense because the fishermen wouldn't have fished on the holiday so the market would be closed because there was no product to sell!
Dinner at Tetto's

Instead, we napped and then we took a walk to the Museum of London. This museum is about the history of London. . .from its inception to current day. A piece of a Roman wall is available to view. The exhibits are arranged chronologically to give you an idea of how London has evolved over time. There are a lot of interactive exhibits too so a visit can easily last several hours! I enjoyed the exhibits that were in the floor the most just as I did when I visited there a couple years earlier.

Some of the available fish for sale
For dinner, we went to Tetto's which is an Italian restaurant and steak house. We ordered the special mixed steak platter which we shared and we had leftovers! (We had two steaks to bring home!) I was surprised at the napkins, which were black linen with the restaurant logo embroidered into each one. The machine embroidery part of me saw a lot of lettering!

At this meal, no green beans were involved! Surprisingly, Bob ate and liked tzatkiki on his calamari appetizer which shocked us all. . .because he does not like yogurt!

Shoppers in the market
On our third morning, we made it to the fish market at Billingsgate. This is the market while open to the public, it is the place where the resterauteers go to purchase the fish they will serve later that day. The market opens at 4AM. We arrived at 5AM and were home by 6:30AM with our purchases. We purchased Scottish salmon, prawns and American scallops. I was surprised with all of the variety and how many people were there! To give you an idea of how large and well attended this market is, think about Costco right before a holiday with fish and seafood as the only products for sale!

Again, we rested. I indulged in another three hour nap! Late morning, we rode the train to Winchfield which is in the Hampshire area.

Hamshire is also near the area where the author of "Major Pettigrew's Last Stand" set the novel. It was fun to view the countryside and consider where the characters might have walked, had tea, etc!

The church in Odiham
At the train station, a couple met us. Allie knew Nicole as they had worked on a project together.  Her husband, Mark shared some interesting stories of the area history as they drove us to Odiham to visit the Old Church and The Bell pub.

The Bell has been an active pub since the 1500s. I was shocked at little the bar area was. Literally, it was about 48 inches wide and low! People were shorter in those days. I did enjoy a half pint of Guiness!

The Bell pub
From Mark, I learned that the pubs back in that time were named for what they were near because most of the population was illiterate. In this case, the pub was located across the street from the church! Hence, the name The Bell pub made sense!

Then, we drove to The Chequers at Well for a late lunch. We met another couple, Mel and Richard. Mel also worked on several projects with Nicole over the years. Richard is a well known chef in that area. I had heard her talk of them often. It was so nice to get to know these two couples and to be able to put faces to their names!

The gang at Chequers
The food was wonderful and the conversation was fun. After dinner, we went to A and M's home to see the result of their recent renovation. Their home was lovely. A's mom had made a number of quilts which were displayed about their home. I loved their yellow SMEG refrigerator.


Sunday, January 19, 2020

Tea Room Quilt--post 3

Background quilting on teapot and couched yarn
When my neighbor, Barbara borrowed my machine, Joi, I started quilting this project on Bernie my 1630.  I began quilting around the applique or in some cases on the applique. For most of the quilting, I stitched with a 100 weight invisifil thread produced by Wonderfil.

The light lavender thread color blended well into the background to add texture. I added some trim around the teapot that couched on by hand because the background and the teapot were too close in value. I liked the dimension the trim added to the piece.
Love example with tight stipple and two background fillers

I wish that you could see the bird on the tea pot. My plan was to make the bird stick out against the pot. It does and the tea pot has great depth. It reminds me of pottery that the artist has applied clay to the outside of the pot in a creative shape.

I decided to divide the background
Sample filler stitches
into five sections and label each section that was an underlying issue in the book, "Major Pettigrew's Last Stand" by Helen Simonson. I chose the words: Love, Tradition, Culture, Family and Friendship which I drew on the top and then stitched in a brown Floriani polyester thread. I often draw the lettering on my piece so I have less of a chance of misspelling! I stitched a shape around each letter. Later, I filled in the shape behind the letters with a tight stipple to emphasize the letters.

I stitched a different filler stitch in each section that I thought represented the word. I also stitched the fillers in about the same density. I had quilted three of the backgrounds when Barbara returned my 790 Bernina, Joi. At that time, I switched projects and worked on the leaves quilt for my daughter.

"Steam" against four of the filler backgrounds
When I returned home from our London trip, I picked up this project because I needed to finish it at the beginning of January as that was when the reveal for our book club was scheduled. However, we had the threat of bad weather (snow and ice) so I moved the reveal to the end of January.

I thought that I could finish the quilting in about four days. . .hah! I sure underestimated the time frame! I found an hour a day quilting was all my body could handle. I hadn't factored in jet lag!

About three days after we returned, I came down with the flu--I was fortunate it lasted one day. It was another three days before I felt like myself. Interestingly, I have had the flu vaccination. Perhaps, I could have felt awful for several days without it.

Shape quilted
I had started quilting the border a couple days before the flu hit. I had quilted the flower shape with my templates and followed up with echo quilting around the outer edge. It could have been enough to stop there. I decided to add dimension with pebbles and some loop quilting fillers.  I liked the dimension.

Shape after quilting the dimension
In the book, I decided the dimension fit the story line. The major was born in India and raised in England. His love interest was born and raised in England. Her parents were Pakistanis who had immigrated to England. The motif made me think of designs I've seen in fabrics made in India or fabrics worn by Pakistani women.

The echo quilting represented the waves at the base of a cliff at the end of the book. The book is a delightful read and worth savoring each page! While I wouldn't quilt another whole piece with a layer and a half of the wool batting again because the loft was too high, it did create some wonderful dimension in the border in the bird on the tea pot. I estimate that I spent about thirty hours quilting this piece!

As I write this post, the piece is ready for squaring, applying the facing, sleeve and label. I almost have a finished project. The reveal is in nine days. . .surely, I can finish it by then. I guess time will tell!


Wednesday, January 15, 2020

Traveling in December--post 1

Orientation to the exercise bike
Christmas Day, we flew to London, England to visit our daughter. I was surprised at how many people travel on Christmas! It was a short flight from Portland, Oregon to San Francisco, California. That flight from San Francisco to London. . .well, it was LONG! (It was made longer when neither of us slept much on that long leg! I felt for the crying baby and the coughing kid. Both kept it up almost non stop!)

N getting acquainted with "Bangkok Nights"
The best part of the trip was seeing our daughter as we left the baggage claims area at Heathrow airport! Traditionally, we have a coffee from Cafe Nero. It is interesting how much a cup of coffee and a walk can stave off jet lag.

When we arrived at her flat, she gave us a tour. N gave her dad an overview of her exercise bike. She bought a Peloton bike last fall and loves it. We all rode it during our stay. I actually had fun using it which surprised me.

We unpacked the two large suitcases we brought full of her requested items. I'll list a couple items. There were a couple jars of dad's applesauce, dad's pickled cucumbers and a jar of his pickled hot peppers. (Can you see a theme?)

Christmas wallhanging
Then, there were the quilts. I finished Bangkok Nights in 2004. I started it in 1998. Perhaps, I will write a short post about that quilt soon.

One reason why it took so long was that I had stippled three quarters of the background and I didn't like how it looked. I took a couple years to remove the stitches and start again. Removing stippling stitches in a thread that closely matched the background fabric was hard. I'm glad that I took the time to go a different route as I was much happier with the finish.

A test for the larger quilts is "sleep ability." This one is rated a ten out of ten for sleep ability. The photo is proof! The other quilt was a wall hanging that I gave her a few Christmases ago; but, she opted me to hold on to it for her. It looks right at home in her flat!

We took a walk to see Christmas decorations and a few stalls at a riverside Christmas market. On our walk, we spotted a number of artful snowmen along the way. We took a few photos along our route. I was surprised at how few people were out. Although, I did enjoy being able to see the river without looking at it through hundreds of people!

It was Boxing Day--a day when people are spending time with family and friends that they didn't see on Christmas Day. I learned that Christmas Eve isn't the big deal it is in the U.S.
One of the snowmen we encountered on our first walk

When we returned, we ordered take out from a nearby Indian restaurant. Every dish was delicious.  In one of the dishes, I thought I was eating a green bean; but, in reality, I was eating a hot pepper. While I like spicy foods, my body does not. Talk about a shock to the system! We all had a good laugh. I laughed the loudest once the shock to my mouth dulled a bit! I've seen the proof that my face and shirt were the same red color!

Sunday, January 12, 2020

Basting and Quilting Tips-Bust Your Stash post 4

Sample of a pieced back
I hope you are making great progress on your projects. This month our topic is basting and quilting tips.

Backing:
You’ve finished your top and selected your back. Personally, I like to piece my backs because often I’m able to use the leftovers from the front! I also LOVE using chunks from my stash because it is like a walk down memory lane as I remember making the quilt that used those fabrics.  I like creating an interesting backs. Rarely will I use just one piece of fabric!  At first, it took me a long time to piece a back. As with any process, the more you do it, the better you become at it. Angela Walters has a video of one way she pieced a back. The link is here

Batting:
Choose your batting. There are lots of choices. In fact, there are so many choices that you might be overwhelmed with what to choose! Carolina over at Craft Test Dummies posted a video and talked about some questions you should ask yourself before you buy. The link is here. In her video, she referenced a test that she had done on the Fairfield battings. The link to that test is here. 
A sample of my preferred basting method

I have tried cotton batting (Warm and Natural), wool batting (Hobbs and Dream), polyester (Fairfield), silk (Hobbs), bamboo, (Dream) and a blend of 80%cotton and 20% polyester (Hobbs and Pellon). My favorite battings are 80/20 and wool. Sometimes, I even use them together, although, not often! I like the 80/20 for the crinkle factor and I like the wool for the drape factor. Both battings are great to quilt. 

Basting:
A spray basting video link is here. Pin basting (floor), temporary spray basting, board basting options link is here. You could also take your project to a longarmer and ask them to baste it for you. I’ve done that a couple times and I asked the longarmer to use a wash away thread. I have tried all those methods of basting listed. 
Sample of QAYG

My knees object to kneeling so I use a modified version of Cindy Needham’s basting techniques in which she uses a table. I took a Craftsy class long ago that she instructed. Craftsy has since become Bluprint. The reason I stick with pin basting is that I’m not putting in a product in my quilt that I need to remove with washing later. I once over sprayed my kitchen floor with temporary adhesive spray. That spray was a bugger to remove! I decided it might not wash out as easily as I had envisioned. The smell of the spray bothered me and using it added cost to my quilt project. I can reuse my pins!!! 

Quilting:
Once your quilt is basted, you are ready to quilt it! Our quilting is like our signature, it is a symbol of our identity! This is the part I enjoy the most. It is also the part that sometimes leaves me stymied because I don’t know what to do! For me to start, I stitch in the ditch in every seam. I find the ditch stitching to anchor the quilt well enough that I can “play” in other areas without having to quilt from the center out to the quilt edge. This was a tip I learned from a Barbara Shapel class. Ditch quilting also gives me time to think about how I want to play in other areas of the quilt.

Sample of custom free motion quilting
Angela Walters in a video shares three tips about quilting designs.You can find it here. Laura Ann Coia from “SewVeryEasy” in a video shares how the letter “C” can become an all over design. You can find the video here. Wendy Gratz from “Shiny, Happy World” in a video shares how to quilt a big quilt on a standard machine. You can view the video here. 

If you haven’t stitched your blocks together yet, you could use the Quilt As You Go (QAYG) method. You can view a post from “Instructables Craft” here for more information. I’ve quilted a couple quilts using this method. Planning ahead is the key to making this option a success. 

If free motion quilting has you stymied, you can quilt with your walking foot. Leah Day has a tutorial about walking foot basics. You can find it here. You can even use your walking foot and your built in machine stitches to quilt your project. Carol Ann Waugh of “Stupendous Stitching” shares a video here. Carol also spends some time talking about threads. 

My tips for machine quilting are:
*Make a sample of your quilt sandwich and use this sample to test and to practice your stitches.
Sample of quilting with a walking foot


*Use the same thread top and bottom if you are having tension issues. Superior Threads has a great reference guide available for troubleshooting and tension. You can find the main reference page here. Sometimes you can rethread the machine or change the needle and that solves the challenge!
*Check the back regularly. It is maddening to find out you’ve quilted a tuck or a piece of fabric into the back when you hadn’t planned it!
*Plan that the quilting will take at least as long as the piecing did.
*Take breaks every 15-30 minutes. Your body will love you for it!
*Keep quilting, the more you quilt the better your skills become. You really can quilt!

Next month, our topic will be about finishing touches.  Don’t forget to post a comment at #2020bustyourstashchallenge on instagram or on my blog here. Thank you to those that have posted!


Wednesday, January 8, 2020

Tea Room Quilt--post 2

Cord that I used to make "chain"
I've made progress on my "Tea" quilt project! Since my first post at the end of December, I cut more suede for the decorative scroll located on the cross bar. I used Elmer's glue to anchor the shapes. Next, I figured out what to use for the "chain" that connected the signage to the cross bar and supported the tea pot, cup and steam. I had picked up a chunk of cording from the guild free table some time ago. I decided the color could work if I used more black thread; but, the cord was too big. JoJo suggested using one section of the cord.

I unwound one of the cords. I then peeled off some black threads and some white threads. I remembered seeing a demonstration at my Bernina dealer about winding threads together to make a cord using the bobbin winder. I experimented and then I googled twisted cord. I found a YouTube video. It wasn't long before I had made my cord.
The practice grommet and the crimping tool

Once I had constructed the cord, I needed to make holes in the sign so I had a way to thread the cord. I thought about making eyelets and then I remembered that I had a box of grommets from my grandmother's stash. These were small.

Bird details
I've had these grommets for years. I've never tried to use them. I thought that I could use a pair of pliers that I used for applying snaps to a shirt. The end of the pliers was too wide to fit into the grommet. Luckily, my grandmother had saved the directions on how to apply the grommets along with the two tools needed.

Using the cutting tool with the hammer, I made the hole. Next, I inserted the grommet and crimped the the edge. I did make a practice one to ensure that it would fit in the quilt sandwich. I also made sure that the cord would fit in the hole.

It was scary to cut the holes. It was awesome to see the results! I was challenged with how to secure the cord because I neglected to consider how bulky a knot would be. I do have a couple knots; but, I found that stitching across the end worked great.
Steam, tea pot, cup in place

That tea pot needed embellishment because the light color was too close in value to the background fabric. I used a decorative yarn in that area that I couched in place by hand. I added some paint to the bird wings, tail and eye. I added a French knot for the bird eye. I embroidered legs and feet too.

Then, I tackled the shape behind the cup which represented steam. I pulled a few ivory ribbons, a piece of grey tulle and cut a piece of stabilizer the steam shape. I determined the grey tulle was too dark.

Detail of the cord
Detail of cup and team stream
I was contemplating an alternate process when I thought about a piece I had made to represent a waterfall for another project. I auditioned it and it worked. This piece has cotton fabrics, Angelina fibers and white tulle that I stitched with metallic and   cotton threads. I have enough left that I might still be able to use it for a waterfall. . .how crazy is that???

Pieced back
Once I had the various shapes in place on the background, I started appliquéing each. The tea pot, cup, tea, sign and tea pot top were needle turned. I used a small zigzag with monofilament thread to secure the steam in place. I left the raw edge.

After I had the top together, I auditioned the border. I had considered leaving the bottom of the quilt top borderless; but, it looked "naked" without a border so I added it. I built the fabrics for this top around the border fabric.

I had used this fabric in a previous project and I had a limited amount of pieces remaining. I liked the dark/light effect the pieces had. I did have to do a little piecing to make the border fit all the sides.
Finished top
Ready for quilting

I looked at the remaining chunks and pieced a back. I'm planning to finish the edge with a facing so I saved the green dot fabric I used for the saucer for that purpose. I also pulled a purple fabric to use as the sleeve.

Originally, I was going to use a layer of 80/20 batting and a thin layer of wool. When I pulled my wool batting scraps, I had a piece that was about the size of the top as well as a piece for the thin layer. I haven't tried a two layers of wool batting so I took this opportunity to see how it quilted.

I wanted the loft of the wool to make the bird stand out on the tea pot as well as the quilting to have more texture.

So far, I used grommets, made cording, made a double wool batting for firsts. I have about 28 hours of my time in this project. I'm thinking about how to quilt various sections; but, the project hasn't spoken loudly enough for me to hear what it wants yet. I do hope to finish it before our group meets for the reveal. If I don't finish, I at least hope to have most of the quilting completed!


Sunday, January 5, 2020

First Quarter Goals FAL 2020

#1. Finish this project
#2. Bonnie Hunter Mystery--Good Fortune
I plan to continue my journey of finishing projects that I began; but, haven't finished. . . yet! Each month, I will continue using some of Martha's fabrics and "bits" in a project. I also will continue adding a Martha's project to each quarter.

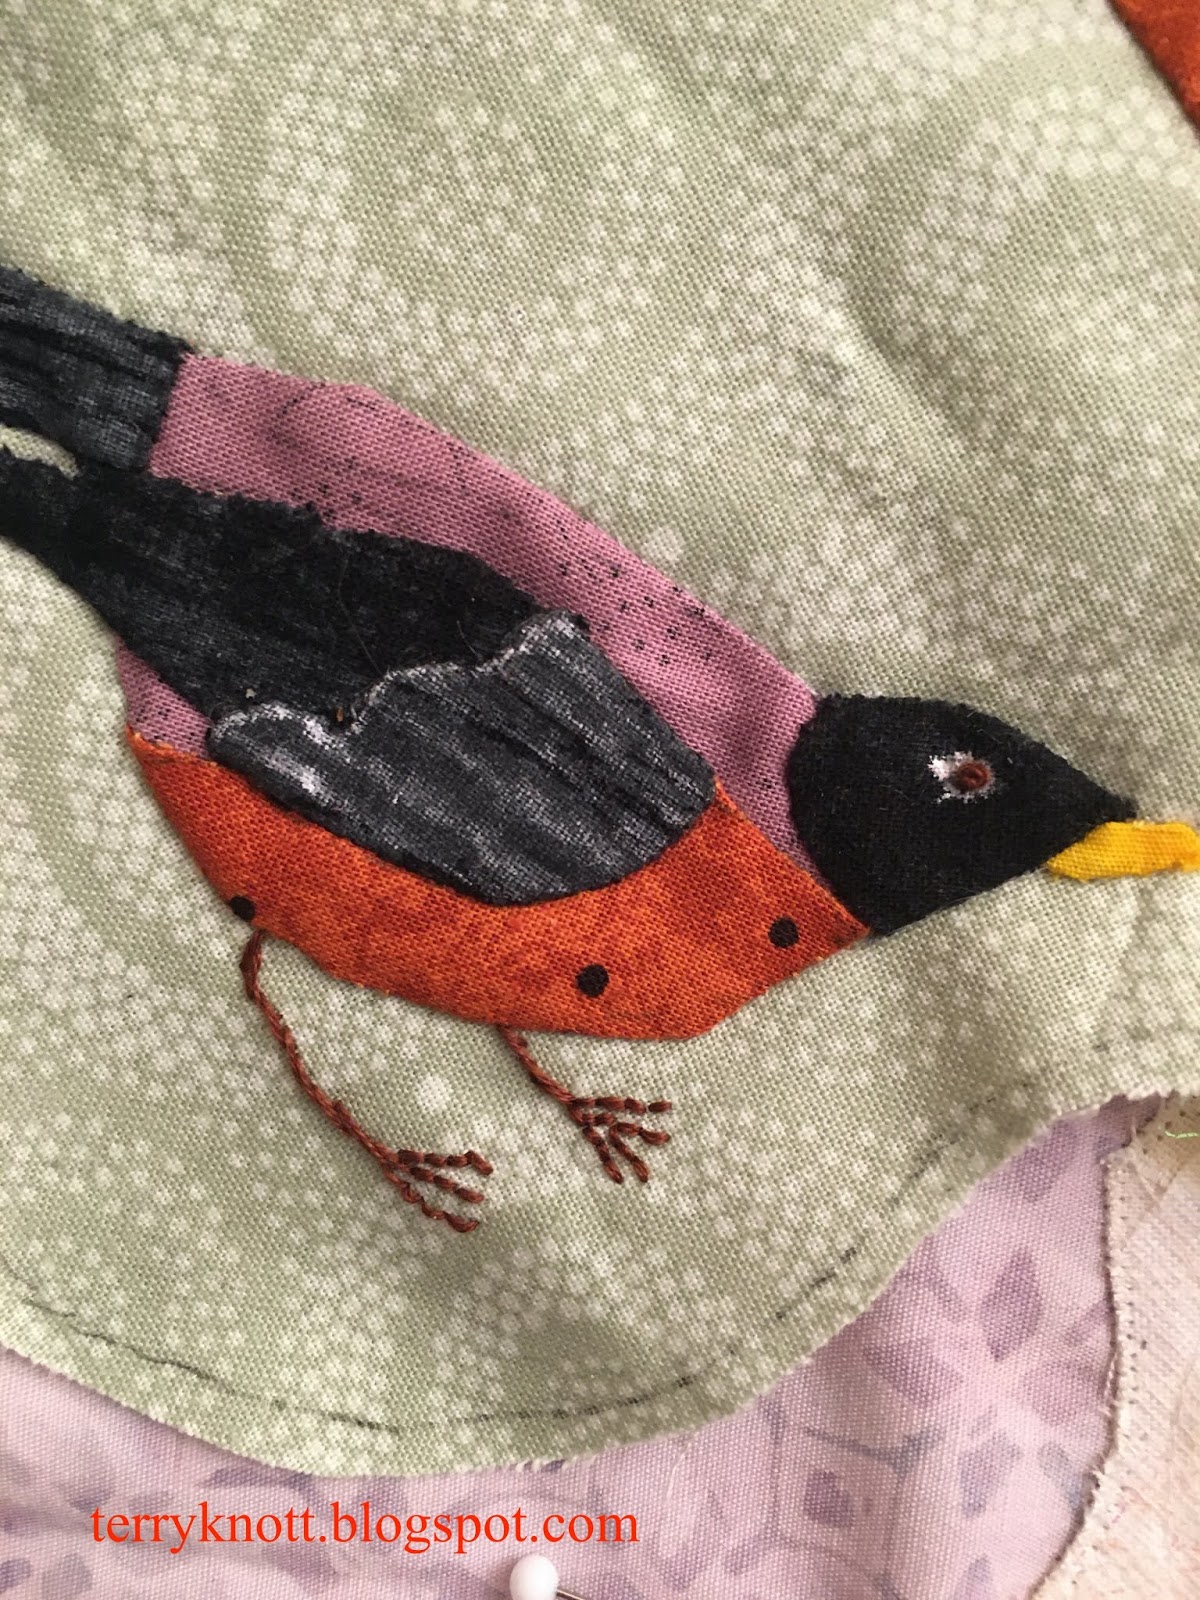
#3. Raw edge applique
#4. Maybe a pillow using this embroidery
I will start new projects and continue to have fun along the way. I anticipate trying a new technique or two.  This year, my "cold" daughter will finally be warmer!

Last quarter, I finished two of the 21 projects that I listed. I worked hard on two other projects; but, didn't finish them. . .I plan to finish those two projects and more this quarter!

I've listed 21 goals for the fourth quarter of the year. Most of the goals, I rolled over from last quarter!

#5. Stitch these materials into a project
I thank Finish-A-Long (FAL) for being an online community where you post your intentions for a quarter and then link up at the end to see how you did. There is no pressure and participating has helped me with finishes. There are a lot of people who participate and the hosts are amazing. There are even prizes for each quarter. I enjoy reading other people's link ups for their intentions and their finishes.
#6. Help Miss K finish her original design

Anyone can participate. Usually, the first quarter link up begins around January 10 and ends around January 18. If you want to participate, click the link above to learn more about the process. If you miss the link up for this quarter, you can join next quarter.

#1. Finish this project. I got close last quarter. I'm in the quilting phase! It is a book club quilt that I would like to finish the beginning of January. If I'm not finished by the book club reveal meeting, it won't be the end of the world.

#2. Finish Bonnie Hunter's Good Fortune Mystery which was her mystery last year. It was the first year I participated. I enjoyed the process! Last quarter, I completed the top. I have to decide to finish it as it is or add more to make it a little bigger.
#7. Make a few more Christmas ornaments

#8. Make three potholders
#3. Reconnect with the butterfly piece began in September 2018 in a Susan Carlson class.

I have at least three other quilts with a butterfly theme that need to be finished. Perhaps, I can make some progress this quarter on this project!


#9. Six burp cloths
#4. Maybe make a pillow out of this embroidery. Maybe, it will be a wallhanging. I completed this embroidery in 2014 and slipped it into a box. While it is time to stitch it into a finished item, it hasn't spoken to me as to what it wants to be yet!

#5. Use this leftover corduroy zigzag and this hand painted fabric to create a small wall hanging with a river as my inspiration. I had a brainstorming session and now have a plan of how to proceed!

#10. A long sleeved shirt
#11. Stitch a skirt for a granddaughter
#6. Work with Miss K to finish this original design. She is almost finished with the quilting stage. She has some great ideas for embellishing her piece. Unfortunately, school and other activities get in the way of stitching days!

#7. Finish the star Christmas ornaments. I think that there are enough supplies to make three more Christmas stars. I sure thought I would complete this project last month; but, I spent my time on other projects!

#12.-13. Stitch two tops out of this fabric
#14. Stitch a summer dress
#8. Sew three potholders from the shoebox. I cut the fabrics for one pot holder; but, seeing what remains, I might be able to sew two more pot holders. I will have to find a different neutral fabric for the other two potholders; but, that is okay!

#15. Flannel bits left from pot holders--a potential top
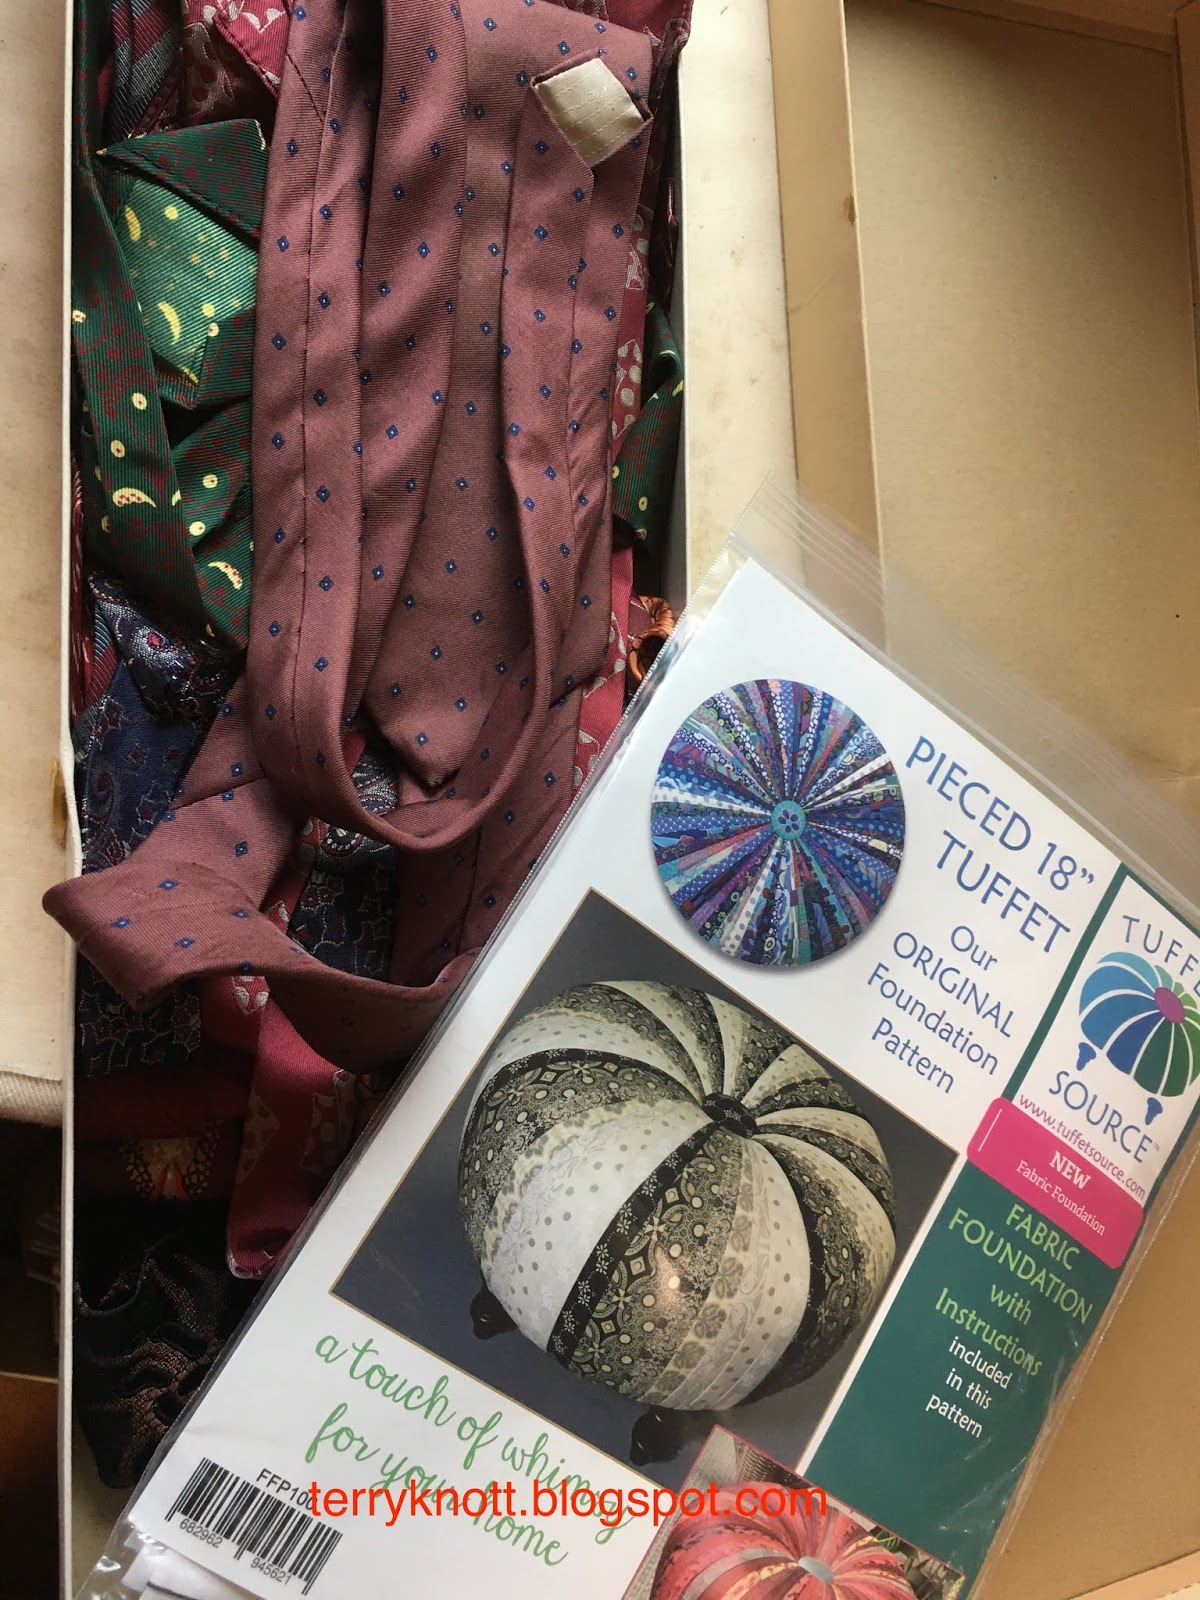
#16. Tie tuffet
My daughter picked the fabrics and the pattern for the potholders long ago. I think she was in middle school. Today, she is in her fifteenth year as a special education teacher. She has been married almost 13 years. She is mom to a six year old and an almost eight year old daughters. That fabric has aged enough! Note: there are two more "packages in the box. Perhaps, another quarter, I'll stitch another ""package."

#9. Make six burp cloths. I made six for my daughter. . .now that "baby" is nearing eight years old! I put these away and forgot about them.  I wonder if I can remember how I made them!!

#10. Make a long sleeved shirt for a granddaughter. This was a Martha fabric. It is a soft velour like polyester.

#11. This green and black print was also in Martha's stash. If I run the print so the lines run vertically, I think that I can sew a skirt for a granddaughter out of it. It is about 20 inches wide so I need to be thinking about adding some lace for length and maybe purchasing a black elastic that will function as the waistband as well.

#12.-#13. Stitch a couple tops out of this velour type knit fabric for a granddaughter. I think that there is enough fabric for two tops. If I stitch two, I'll need to be thinking about how to make them different. It is another fabric from Martha's stash. She probably planned to make a robe out of it.

#14. My mom gave me this fabric more than a year ago. It isn't a color that draws me to it; but, the feel of the cotton interlock is nice. I'm thinking it would make up well in this summer dress pattern. I have a granddaughter who would like wearing it. I'll be thinking of ways to embellish the dress.
#17. Needle turn appliqué border project

 #15. These are the flannel bits left from the potholders along with some other flannels that were in Martha's stash. JoJo contributed a couple fat quarters too. In Martha's stash were a few cotton prints--also fat quarter size that might work into this project. My goal is to make a useful quilt somehow!!!
#18. Stitch these fabrics into a bed sized quilt

#16. I posted once about a project using my grandfather's ties. JoJo made a wonderful tuffet and so I purchased the pattern and form. I don't have quite enough ties. . .some members of one of my stitching groups donated me some and I may have enough. I saw one with a neutral background fabric that looked awesome.
#19. Black swimsuits to be stitched


 #17. I started this applique project before I started "Chickens." "Chickens" took me more than 10 years to finish. This is an even older project as I had put it aside to begin "Chickens!"

I've a center of nine patch and hour glass blocks waiting for borders. I plan to make this my take along project for stitching. It is time to make progress.

#18. Last quarter, I stitched these fabrics into a top and a back. I even started quilting the project. I was sad I didn't finish it in time for my freezing daughter's  birthday; but, I will get it finished before her birthday next year! It is a huge quilt. . .100 inches x 108 inches which I have affectionately named, "The Beast" because of its size. Quilting it on my domestic machine is a challenge!
#21. "Frolic" fabrics

I collected the fabrics 11 years ago; but, wasn't able to come up with a plan for what to do with them!  A BQ pattern that a friend gave me became the inspiration.
#20. Cross stitch project

#19. Sew a couple black swimsuits. I'm wearing my back up black swimsuit so I need a couple more ready and waiting! A black swimsuit is the uniform a swim instructor has to wear when teaching lessons at one place where I work.

#20. Finish this little cross stitch piece that I started last fall.

#21. Make progress on Frolic the 2019 Bonnie Hunter mystery quilt. I've finished the first three clues.

There is enough variety to keep me busy if I'm stumped on another project. The list includes, clothing items. I've been "gifted" clothing fabrics that I need to use as I just don't have space to store those fabrics. I also have no desire to store those fabrics either! Finding a use for these fabrics terrific!

I also plan to continue documenting past finished quilts. Perhaps, this year, I'll get the blanks filled in with the book club quilts. It has surprised me just how many quilts I've made that were inspired fro the book group. Over the years, I've tried new to me techniques and have stretched me skills as a quilter. Some projects have been difficult to finish; but, most of the time the process was fun!

It's time to get cracking on this list!