Showing posts with label embroidery. Show all posts

Wednesday, June 26, 2024

Transparency Borders. . .Do They Work for Your Eye?--post 4

Back in April, my Transparency project was a top that measured 51 inches by 51 inches. I kept telling myself to piece a back and quilt it. I said to myself: finish it. The problem with my thought pattern was that I felt the top needed to be a little bigger so it could be used as a throw. The issue with making it bigger was that I didn't have enough scraps left from the project. . . or did I? 

Top 

Goal number 11 on my June list was to determine if I could add a bit to this project. I pulled out the scraps and had a look. I asked myself, "What if I extended the dark to the top and bottom.?" I looked at the dark blue and dark green scraps. I found I could cut enough fabric to increase the top six inches. If I supplemented the black fabric prints, I could squeeze out another six inches. 

Additional borders 
I carefully cut and stitched the pieces together. The top now measurers 51 inches wide by 63 inches tall. I like the size better. While I may not have maintained the transparency effect, the addition didn't obliterate the technique either. I plan to bind the project in a dark black fabric that I have on hand.

Trimming the scraps 
After giving the top a good press, I began to trim the scraps into usable segments to use on the quilt back. I decided to use half inch seams and to press the seams open to make the back easier for the needle to penetrate. 

Segments for back on the design wall
There were quite a few chunks which I placed on the design wall. Next month, I'll continue piecing the sections into a top. I will have to add some fabric from stash. Using the leftovers for the back will lessen the amount of scraps I'll be putting into my scrap stash!

Advanced applique May lesson
Goal number three on my June list was to complete the May and June embroidery software classes. I got stuck in the May lesson so that was the only lesson that I completed. I spent many hours on the May lesson. There is a challenge lesson too. While I reached a stuck spot, I'm a few minutes away from completing the entire offerings for May. There isn't a July lesson so I'll have a chance to catch up!

Mid way through the May embroidery challenge
I'm linking up to to Carol at To Do Tuesday and Alycia at Finished or Not Friday.


Sunday, May 26, 2024

Work, Play, Rest

Background auditions
Goal number seven on my May list was to figure out a plan for the current book club quilt. Not only did I meet the goal; but I exceeded it because I finished the project!!

Maybe shirting plaids as a background
We are reading "The Year of Less" by Cait Flanders. The author details how/why she stopped shopping, reduced the amount of belongings in her home and along the way discovered a more meaningful life for herself. 

For the last several years, I've tried to work from my stash; but, I still managed to bring in almost as much fabric as I sewed into projects. So this year and influenced by the book, I made my own shopping ban. 

My essentials list: toiletries, groceries, gifts, eating out, gas, quilting group memberships, subscriptions to online groups/online and printed magazines, pool/gym membership, dental/medical/eye massage/PT appointments. 

While some may think eating out shouldn't be on the essentials list, we don't eat out all
that often. If a friend invites me for a coffee or a lunch, the visit is worth more than money I will spend on the drink or the food! My quilting group memberships and online subscriptions help keep me connected to the quilting world. 

Not Allowed: impulse purchases of fabric, thread, notions and patterns, unless there is a purpose that the item will be used in 30 days.

Approved list: Replacements, travel, long arm, home remodel, hair cut, manicures and pedicures. 

Dark background audition
Replacements cover clothing, shoes, as well as fabric and notions. When I've worn out that pair of pants or shirt, I need to be able to purchase another one, If I use up all a particular size needle in my stash, I will need to replace it. If I decide to enroll in a class, I want to be able to do it. . .guilt free!

I plan to spend a year with the shopping ban. Next February, I'll evaluate how well I've done. Of course, I'm planning the experience will be successful. Not only will I have less fabric in my studio; but I'll also have more finished projects! 

I read the book in February. While I did buy some solid fabrics in January, I have managed to stick to the shopping ban. I have been tempted multiple times; but, I didn't purchase! Many times, I put items in a cart one day and the next day deleted the items when I decided I didn't really "need" them. This week, I did order fabric to replace some that I used up so I'm still on track! 

Maybe red or purple as a background
A lot of thought went into coming up with a plan for a book club project. I've challenged myself with the book club projects to use from my stash and to purchase nothing! If I choose to finish a project I've begun in a workshop is a goal too. One of the online Saturday workshops that I participated in was a shirt folding class. 

It was fun to fold the shirts, They are about four inches long and about four and half inches tall. A couple years ago, I went through my closet and purged a bunch of clothing that I no longer wore. Since then, I've done okay with purging an item when a new item comes into the wardrobe. 

I can remember my grandmother talking about clothing in her childhood. She had a school dress, a play dress and a Sunday dress. She said she wore a pinafore to keep her school dress clean and she wore an apron to keep her play dress clean. 

Auditioning shirt layouts
This memory got me to thinking about the three shirts that I had folded. I could use the theme of Work, Play and Rest to make a project. Thank you Nancy T for helping me come up with "Rest!"

Finished front
Nancy also helped me as I struggled with choosing a background. She said why choose one color? Choose three fabrics. Cut the fabrics into triangle like shapes. I tried it and I liked the mock up. So I pieced the fabrics into a background. The green fabric was a small scrap. I cut a diagonal line and added the red and brown sections. It is a small piece eight by 11 inches.

Top quilted and ready for facing.
I spent some time auditioning layouts of the shirts. I took photos along the way. I did layer and baste the project. I quilted it with a walking foot and cotton thread that was the color of the background.

It took me about 35 minutes to quilt the background. My knee was not happy quilting. Quilting isn't a task I can do just yet. I even took a break after I quilted each color! I miss quilting; but, I'm thankful that I can piece.

Back of project and the leftovers
The backing is a scrap left from a previous project. Once I had trimmed the edge of the piece, I serged the edge. I wanted to know if serging would make the edge more

stable so I'd have less distortion when adding the facing. I think I did so I will try that process on a larger project.

I decided that I would machine stitch the facing in place before I appliquéd the shirts. I looked through my two and a half inch strips and found a strip that was four inches larger than the piece so that was what I used for the facing fabric. 

Back with the sleeve and label
I spent more time auditioning other layouts until I found an orientation that I liked. I pinned the shirts in place and hand appliquéd them into position. The shirts are 3-D. The point of the collars are tacked into place; but, you could run your finger under the rest of the color edge. The back of the sleeve is appliquéd to the background. The front is also free. At this point, I decided that the piece needed some words.

At first, I thought about using my machine to embroider the words. I made some examples in the embroidery software. Then I thought about hand embroidering the words. Gertie, my inner squirrel thought hand work was a better fit.

I wrote the words on a piece of Grunge fabric using a fine line Micron Sigma pen. I placed a small piece of lightweight interfacing behind the words to prevent shadowing from the background fabric and/or the embroidery floss. I used two strands of embroidery floss and backstitched the words. I appliquéd the words to the background. I like the interest that the words added.

Label
I completed the label, hand stitched the facing and added the sleeve. I used some of the red fabric I had used in the background. Not much of the back of the project shows! 

It's good to have a finish! I used about a half a yard of fabric for this project. . .all of the pieces were scraps! I've cut the leftovers into useable sizes and placed them in the appropriate storage. 

This is a small project and simple project. Still it took me at least 15 hours to finish it! A finish, no matter how small, is terrific!

I did purchase four yards of fabric to replace what I had used for my temperature quilt. I'm planning to track my fabric purchases since I began the shopping ban in February. Fabric used from stash this year is two and a half yards. Fabric purchased since the shopping ban: four yards.

This is my second finish this year. Linking to Cynthia at Oh Scrap/Quilting Is More Fun Than Housework. Also, l'm linking to Patchwork and Quilts. Thank you again, Frédérique for the invitation to join your Linky party! 


Wednesday, May 22, 2024

Pink Selvages--Rainbow Scrap Challenge

Some of the selvages used
Goal number two on my May list was to glue the selvages for the Rainbow Scrap Challenge color of the month which is pink. Pink doesn't frequent my stash; so getting enough selvages was a challenge. I thought about putting out an SOS; but, in the end, I managed!

A few more selvages
This month, I did remember to take close up photos of the selvages. That Eiffel Tower fabric, I made into a skirt for my oldest granddaughter when she was in elementary school. (She's a sixth grader now!)

Squares in process
I did use some selvages twice. I did use more of the solid selvages than I usually use; but, in the end, I was able to make four sets of four selvages squares. 

Finished sets of four

Life is great! Linking up to Angela at SoScrappy/Rainbow Scrap Challenge 2024. I'm also linking up to To Do Tuesday and Finished or Not Friday!

Men's monogram
I also finished the March software embroidery software which was about monograms. I made a baby's monogram, had an introduction to the art canvas tool and made a men's monogram. It was fun! Shelly Fitzgerald, who is the instructor, is easy to follow. I'm enjoying these lessons. I am learning my Bernina 9 embroidery software. Goal number three on my May list was to complete the February, March, April and May software lessons. I've completed wo lessons; I've two lessons remaining!


Wednesday, May 15, 2024

Thank You Sally!!! AND Software Progress!!!

I was the winner of some scraps this month. I am going to have so much fun playing with these chunks! I especially am taken with the animal print laying on the top of the pile. I actually met Sally who writes "The Objects of Design" blog. We were sitting together at a table taking in quilts for the quilt show. In between drop offs, we chatted. She said she wrote a blog. . .that was a couple years before COVID and I've followed her ever since! 

I laugh at the antics of her quilt supervisors, Molly and Buddy. Her humor and projects using scraps inspire me with each post! This month, she drew my name to be the recipient of some scraps that she was ready to part with. I am feeling so fortunate! Thank you, Sally!!

Scraps, beautiful scraps

Regarding the embroidery software progress:
I thought that while I was in the first stage of my knee recovery I would be spending time catching up with my embroidery software lessons. To recap: at the end of January, I put aside the software lessons to work on my quilt show entries. At that point, I had a few minutes left of the additional January module to finish. 

Unfortunately, the position I needed for my knee didn't allow me to work on the software lessons until this month when I could again sit in my recliner chair. Getting back into the swing of the software program took some time too. Goodness, I forgot a lot in a few months!!! As I was reacquainting myself with that January lesson, I found that I had made an error early in that last lesson. It was easier to start the lesson from the beginning.

Bonus January lesson

It took time; but, repeating the exercise was a good review. Then, I began the February lesson. Shelly, our instructor, had posted a number of videos that were an overview of various keys/tabs in the software. I looked at those first and then launched into the lesson.

February lesson
It was a fun lesson. I like that the modules are around 15 minutes in length. I like being able to stop the video, rewind and replay it again. This is the class that I needed to orient me to my software and I've only completed the first two lessons!

Goal number three of my May list was to complete the February, March, April and May software lessons. I likely won't get caught up this month; but, I am making progress. At some point, I will stitch out the lessons; but, for now, I'll concentrate on learning the information in the lessons.


Sunday, April 16, 2023

The Embroidery Plan That Wasn't

Some of the supplies for the project
At the end of February, I had this idea that I would make some kitchen towels to take with me when we visited our London daughter at the end of March. Kitchen towels make great hostess gifts.

At first, I was going to decorate the towels using the pattern that I used for my Dad's wife's birthday gift. Over the years, I've made a lot of this type of towel. I went to the project box. What was on top was a package of three linen dish towels.

Test front
These towels have been hanging around in the project box for too many years. I decided I would decorate these. This type of towel would look better with a simple embroidery motif. 

I happened upon an embroidery video on the Oklahoma Embroidery Supply and Design (OESD) site that shared how to get perfect embroidery results embroidering on a tea towel. I liked the basil motif that was featured in the video. I could think of at least another use for the collection so I purchased the set for about $30.

Test back
Next, I purchased two types of stabilizer. One was a sticky back wash a way fusible and the other was a fusible to back the cotton fabric that stays in after the embroidery.  

Stitching the first thread color
I purchased a thirty yard bolt of the Shape Flex stabilizer. Before COVID, I believe this product was about five dollars a yard. It was $7.49 a yard. I had a 50% off coupon and because I purchased a bolt, I received another 10% discount from Joann Fabric and Craft store.
Second stitching--Out of the hoop
tear away stabilizer removed

I spent $130 on the fusible products. I had the sticky backed wash away fusible on hand.

I pulled a piece of white on white cotton fabric from my large chunk of scraps that was large enough to back all the motifs in the collection to put into a wall hanging project. I chose colors of 40 weight Floriani polyester thread and stitched a test sample. 

On the sample, I used a variety of threads in the bobbin: a 50 weight cotton, a 40 weight polyester and a 100 weight polyester. I knew for the tea towel, I would need to use the same color thread for the bobbin. For the wall hanging, I could use a lighter weight thread in the bobbin.

I'm glad I tested. Even though I used the same stabilizer combination that was shown in the video, my final embroidery rippled after removing all the stabilizer.  One of the thread colors didn't show well.

Regarding the test of bobbin threads, the 100 weight polyester thread made for the least thread build up. The motif, however, contained so many stitches that it was stiff like a badge. It wasn't at all what I had envisioned on the towel. 

Finished second stitch out
after removing the stabilizer 
and before pressing
I tried again. This time I added Shape Flex, a fusible stabilizer made by Pellon, to the back of the cotton fabric. I soaked the fusible backed fabric in Perfect Sew, a liquid stabilizer. This product is similar to Terial Magic. I let the fabric dry. I ironed out the wrinkles. The fabric was stiff like cardstock. 

I hooped a piece of wash away stabilizer. I floated two pieces of tear away under the hoop. I floated the fabric on the hooped stabilizer and I used a fusible wash away topper. The topper helps the embroidery stitches to not sink into the fabric. I changed one of the thread colors. I stitched out the design a second time.

The thread color change was a good choice. The second stitching looked great until I removed the stabilizer. I still got some rippling but, it was less than the first time. The motif was still too stiff to place on the tea towel.

In the end, I took no tea towels as hostess gifts. I'm back to the drawing board with the tea towels. I have options. I could hand embroider a design on the towels. I could search for a line drawing type of embroidery to purchase. I could develop my own design from a design in one of my books. 

Instead of pursuing the tea towel embroidery, I'm going to work on stitching out the other nine motifs in the herbal collection that I purchased. These will work into a wall hanging. I might sash the blocks with a lot of green scraps. 

This was goal number four on my April list. I'm linking to Cynthia at Oh Scrap/Quilting Is More Fun Than Housework because my white backing fabric is leftover from a previous project.

Wednesday, March 8, 2023

Embroidery Software and Chilhowie is in the Hands of the Quilter!

Christie checking out my Chilhowie
The first Monday of the month, our small group, Mystery Mavens meet. Seventeen of us made it to the March in person sew day. There are 30 of us in the group. Life happens and not all the members can come to the sew day. We sew from 10am to 5pm. People come and go as their schedules allow. One of these days, I'll be physically able to stay the day too. 

Christie attended and she is "my" quilter. It was exciting to hand off my Chilhowie to her for her magic touch to quilt it. I look forward to seeing what loopy type pattern she will choose to quilt it. Getting the quilt to the quilter was goal number two on my March list

I look forward to these sew days as there is lots of sharing and plenty of laughter too!

I'm making progress on V-9 which is the Bernina Embroidery software. I've played with the software every day this month. I've watched a few tutorials and I was inspired by a photo in one of the tutorials to design a little project.

Software exercise
Goal number eight on my March list was to play with the software each week. Since we are eight days into the month, I've more than met the goal of touching the software four times. I'll keep playing for the next couple of weeks. Perhaps, I'll even have a stitch out to show at some point!

The design I created is all done with stitches. There probably is a tutorial around somewhere for it; but, I wasn't able to find it. This design contains a lot of stitches because the plaid in the word home is created with thread. 

It isn't the sort of design that would work on a tea towel. It is the sort of design that would look great as framed art. I'm considering using batting as one of the stabilizers.

As I was pursuing tutorials, I came across one that demonstrated stitching a basil plant motif on a tea towel. I'm considering purchasing the collection of embroidered herbs that the basil is featured. The collection contains ten herbs. Each herb would look good on a tea towel, on a bag for a collection of dried herbs, on a napkin and/or in a block for a wall hanging. In short, I could get a return on my investment, make some gifts and practice embroidering! 

Wednesday, June 29, 2022

The Personal Librarian--Post 3

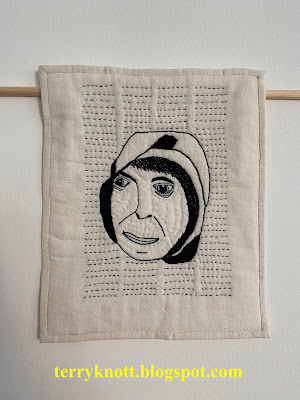
Piece after stitching all the facial details

In my second post about this project, I wrote that I wasn't happy with how puffy the face was after I had added all of the details. (If you want to read the first post, click the link.) 

I only brought the black Aurifil thread with me for this project. I really needed some neutral thread. I've walked through many parts of Central London. I've seen several tailor shops and dry cleaning shops. I've not seen a fabric store although my on line search showed me some that were a 40 minute bus ride from where I was staying. 

Face after adding a few quilted lines
What to do? I decided to ask my daughter's friend, Fritha, if she had any neutral thread I could have. She brought me a bag of "embroidery silks." There was a little bit of white sewing thread on a spool. She said that she didn't sew and that she hadn't done any cross stitch since before the pandemic. She said she would be happy if I used a bunch of the thread.

Label
I used a couple strands of Fritha's embroidery floss to solve the issue of the puffy face. I added a little definition to the eye area. In the book, the author reveals the character being close to tears that she would be discovered. If discovered, she would lose everything. I added some straight lines to represent the internal tears she allowed herself. I added some lines around the mouth to
represent the times she refrained from making a comment for fear of standing out rather than blending in.

Back
The quilting lines helped disperse the puffiness that was in the face. I pulled the backing to the front to finish the edge. I used tiny stitches to stitch the binding in place. I had envisioned adding some black embroidery stitches to edge; but decided I would leave the area plain so that the emphasis remained on the face and the facial features. I liked how life like her eyes are. I also liked the open space between the background text and the edge finish. The overall design reminds me of a page in a magazine or a book.

I did try to block the piece a bit with steam from my daughter's iron. My daughter said this was the second time an iron had been used in her flat and the first experience for this iron. She said she ironed some napkins for a Thanksgiving dinner that she hosted pre-pandemic. I didn't have a measuring tape nor an ironing board. I used a folded towel to press the project. I used a piece of computer paper to give me a rough estimate of square.

Front
For the sleeve, I used a piece of the leftover fabric from the project. I hand stitched the seam and hand stitched the hem at each end. I attached the label with my usual hand stitching. I mulled over what to call this project. I had a suggestion from my Mavens group. Unfortunately, I wrote the title in a book that I didn't bring with me. One of Nicole's friends, Victoria, who saw the piece used the term "Held" to describe what she saw in the figure's face. I decided that would be a great title for this project.

I learned that it is possible to create a project without a sewing machine and a few materials as long as there is a little help from friends. Thanks Fritha and Victoria, I could not have finished without you!

This was my one monthly goal for June. I'm linking to Patty at Elm Street Quilts. Please click on the link and see all the other great projects this month. Elm Street Quilts One Monthly Goal - June Finish Link-up


Sunday, June 19, 2022

The Personal Librarian book project--post 2

Completed pattern
At the end of my first post, I wrote that I combined the lines of text with the face drawing. I didn't redraw the face, I traced it in this manner: 

I taped the original drawing on the sliding glass door.          I taped the text lines on top of the drawing and I traced the face with a pencil line. Then I darkened areas and reshaped other areas until I felt that I had captured the expression of the face.

From there, I transferred the design to my fabric using a pencil with a number two lead. In my neck of the woods, this is an ordinary school pencil. I drew lightly. Again, I used the window as my light box to transfer the design to my fabric.

Basted project
The fabric that I used for this project was on the guild free table years ago. I made a small wall hanging from a lot of it. I speculate that the fabric was once a tablecloth. I had enough to keep the front and the back the same.

Stitching the background
Next I layered and basted the backing, wool batting and top. I pinned the layers together and then I basted the layers together with thread. The reason I basted with thread is that I didn't want my thread to catch on the pins. I stitched a grid with red basting thread.

Eye detail
From that point, I selected my black 12 weight Aurifil thread and began filling the background with embroidery stitches. I made an effort to make my stitches even most of the time. 

Although, on purpose, I made the stitches a bit uneven to represent that the character in the book was wary of being found out that she was a black woman working in a white world. Every day she walked a precarious path of fear!

When I left for London, my plan was to fill the fabric with a variety of hand embroider stitches in a design to reflect text. I decided not to stitch anything but a running stitch to represent text. 

It was helpful to have basted the lines for the columns. I attempted to make my stitches similar looking on the back. I traveled my thread from one row to the next. I buried my knots. It was relaxing to complete this part of the project. Working on the background first, allowed me time to consider different stitches to use to develop the facial features.
Colonial knots and bang detail


I did a stem stitch for the eye brows. I used a back stitch to outline the eyes and a satin stitch for the pupils. I used an outline stitch to mark the areas of the hat and hair. I stitched  Colonial knots in the hat buckle. I stitched coral stitches to give texture to the hair. 

I found it interesting how several stitches made the thread look like it was a richer black I did add a few stitches combining the black thread with a metallic thread in the bang area of the hair. In my work, I like to add a little
something different for the eye to find.

At this point, I was stuck. I was finished embroidering the piece. I could have left it at that point and moved on to the edge finish. . . but, I wasn't happy with how puffy the unstitched areas of the face had become. In my next post regarding this project, I'll share my solution. 

Yesterday, I received notification that my audio hold for this book was now available. Perhaps, I will be able to listen to the book before the reveal of projects in two weeks after all!

I've listened to two hours of the book. I smiled when I heard that she was attempting to smooth her curly hair in one passage. Choosing the coral stitch to represent hair was a great choice!


Wednesday, May 18, 2022

Old Sames--

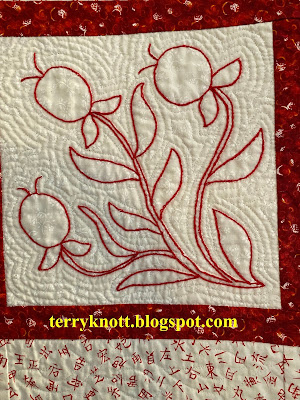
Hand embroidery


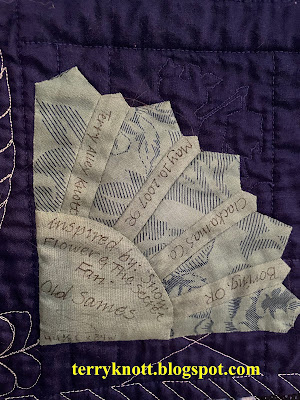
Our Thread Tales book club read the book, "Snow Flower and the Secret Fan" by Lisa See. The book is about the lives of two girls who are friends throughout their lifetime. In the book, they are "old sames" and that was how I selected the title of my project. 

One girl begins life with little affluence but ends up affluent at the end of the book. The other girl begins life with affluence but ends up without it.


Broiderie perse on the shoes


The girls learn the needle arts: Sewing, embroidery and weaving. They make their own shoes.  They had bound feet and one of the girls achieved the perfect size foot. . . .three inches! I made a "shoe" that was three inches to applique on my quilt.


Fan


The girls communicate with one another writing on the folds of a fan. I designed my own fan pattern and I made a sample which became my label. 


Label


All of my fabrics are leftover from other quilts that I made. This is a technique piece. This project contains a bit of trapunto, hand embroidery, paper piecing, broiderie perse, free motion quilting and more techniques than I can remember.


Back


Since the fan was a central feature of the book, I used a stencil to mark a quilting pattern as well as a batik fabric that was printed with fans.

I was fortunate to have visited China and was impressed with the massive gates that were in front of places of reverence. I made my own sort of gate with the medium blue fabric. This fabric also represented a fabric that the girls could have woven.


Front


I made this project in 2007. It was the second project and second book of our Thread Tales group. My London daughter has this quilt.


Wednesday, December 22, 2021

"Embellished Cabin"--A Finish

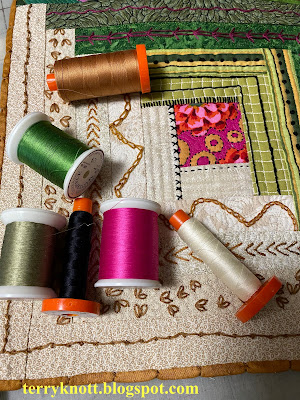
Thread selection
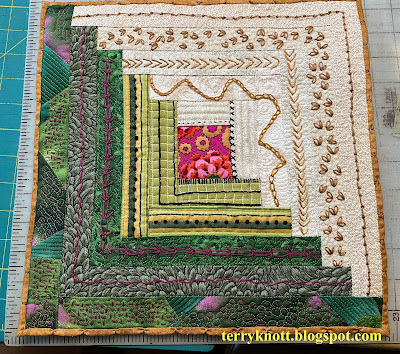
I finished free motion quilting the log cabin block with a variety of threads. I was inspired to finish this block after reading "Little Fires Everywhere" by Celeste Ng. I began this project last January in a Saturday Workshop through one of the guilds that I am a member.


I also used a variety of filler stitches. 

More filler stitches 
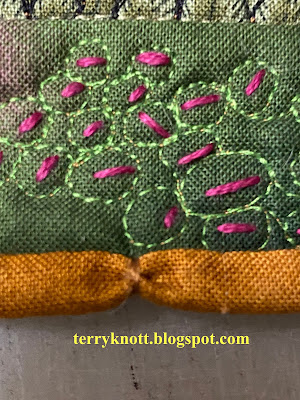
For the binding, I pulled the backing to the front. I wanted to carry the embroidery into the binding. I ended up making a straight stitch about every inch. Then I pulled the stitch tight to create a bit of texture.

Detail of binding
For the label, I filled in a pre-printed one. 

Label
The sleeve was a leftover from a previous project. I love it when that happens! I used the same thread in the bobbin for all the quilting. It's the rust colored thread in the first photo. I love my Bernina for the tension. There isn't one stitch on the back that would let you know what color of thread is on the front.

View of finished back

In the end, I used about a quarter of a yard of fabric. This brings the total yards of stash used to 21 1/4 yards. The project measurers about 12 inches by 12 inches. This was goal number 14 on my December goal list. It was goal number seven on my fourth quarter list.

Finished front