Showing posts with label TEMPLATES. Show all posts

Wednesday, September 11, 2024

Continuing to Quilt Transparency--post 6


Circles and more circles--front
Goal four number on my September list was to continue quilting Transparency. I had a plan that I was going to work on my walking foot skills and quilt spirals. I failed. I tried numerous times. . .I failed each time. I was not able to turn the quilt smoothly enough to create a nice line. I will try again. Although, I will do a little research to see if I can learn some hacks/tips on how to make the spiral.

Circles and more circles--back 
I decided to try an all over design using the two circle template that was in the starter set I purchased years ago. I haven't stitched an all over design on my domestic machine. Trying a different style is good. I have quilted about half of the top. I used a variegated thread of purple, blue, pink and turquoise. 

I've been disappointed in my ability to keep the tension even. It seems like when I travel over a seam and apply pressure to move the fabric, it messes with the tension. The old me would be ripping it out. The current me is leaving it. I'm chalking it up to a learning experience. Perhaps, by the time I'm finished I'll have figured out how to make it work. Had I used the same thread in the needle and the bobbin, the tension issues would have been less prevalent. I'll remember that for another time. . .maybe!!

With my granddaughter here until Saturday, I haven't spent much time in the studio. If I can quilt a few minutes when she is sleeping, I call it a win. Truth be told, I've found myself sleeping when she is as following after a two and a half year old has exhausted me!

Wednesday, July 31, 2024

Play--The Finish--post 3

To quilt this piece, I first stitched in the ditch in, as Cindy Needham says, "Every Stinkin' Seam!" I used a monofilament thread in the needle and a navy 50 weight thread in the bobbin. As I stitched in the ditch, I thought about the quilting I have seen on Modern quilts. There often aren't leaves, stipples or tiny hearts. There are lines. Often the lines are repeated evenly across the quilt. Some lines are straight. Some lines are curved. Sometimes there are grids and sometimes, there are bubbles. Often there are ghost blocks like nine patches, flying geese and triangles.

Getting ready to stitch bubbles
Bubbles seemed like the place to begin. I used a template from Westalee Design Starter Set that Sew Steady distributes. I liked the openness of the design. I used a light grey 50 weight cotton thread. In between the bubbles I added a few curved bumps. 

Completed bubbles
I'm coming clean here, there are even a few curved filler motifs, The variety gives the eye something to view. It was a challenge to not stitch more filler designs!

Free hand pebbles
I moved on to quilt another grey section. I like to make as few thread changes as possible so I'll often stitch with one color thread as long as I can. This time, I chose to free hand quilt large pebbles. The pebbles are a little more dense than the bubbles. I did leave a quarter inch of space around the blue X so the pebbles had a border. I also stitched down the center of the skinny grey strips I had pieced in the project.

Blue X shapes
As I had finished the blue X area quilting, I had "X" on my brain. Actually, my inner squirrel, Gertie, wanted to quilt X's. She liked them in the previous modern quilt that I finiahed. I decided to use a blue polyester 40 weight thread to quilt several large X shapes in the pumpkin shaded fabric of the lower left quadrant. So the stitching stood out more, I stitched over the lines four times. No ideas were coming to mind, as to how to fill in the space around the X. When that happens, I move to another space. Often an idea or two will come to me when I'm stitching in another space. I did use a template ruler to help me make the lines appear straight.

More blue Xs
Once completed, I looked at the piece to see where I could repeat the shape, but, on a smaller scale. I settled on a pumpkin curve in the upper left quadrant. I did chalk the Xs as a way to audition my idea and to evenly disperse the motif across the area.

Stitching a grid
There were more areas to use the blue thread; but, I was out of ideas. I switched to a dark green thread and stitched a grid in the upper and lower right quadrants.

Stitching another style of X
There were some other areas in upper left quadrant that I stitched an X and then echoed the design. 

Stitching a motif on the triangle bands
I also stitched a simple shape in the dark green triangles. I echoed this shape and stitched ghost triangles into the remaining area of the curved areas.I started with the light grey band and later, I switched to the grey thread and stitched triangles in the dark green bands. Again, chalking the line allowed me to audition the shape.

Straight line quilting
Using a couple shades darker orange thread than the fabric, I moved on to quilting the lighter orange areas. I decided to quilt straight lines as often as possible. I decided that I would use straight lines to outline the blue Xs that I had stitched earlier. I decided to keep the spacing the same; but, orient the lines in different directions. Changing the line orientation gives the eye some interest.

Another area of grid quilting
Then, I decided to move on to the blue section and create another grid in that area. I used a one inch grid on the diagonal. I wanted to stitch water in the other large blue area; but, I thought it would be better to add some stitches to the lime green areas first. I've found if I distribute the quilting as I work on the piece I have less of a chance of having to ease fullness later.

Stitching flying geese and a few curves
Using the triangle shape as inspiration, stitched triangles in the green band. I was careful to stitch the shapes in the same direction so I had a sort of flying geese effect. I measured inch and a half segments and marked each segmentwith chalk. I eyeballed an chalked a line in the center of the green. From there I used a ruler template to stitch the geese.

I also switched thread and stitched a curved shape into a light orange section of the quilt. I spaced the curves apart to give the area an airier feel. While the orange thread was in the machine I stitched a few flying geese in another section. I now had geese in three of the four quadrants.

Adding a few flying geese in the orange.
In the phot above, you a see my audition of some curved lines around the dark green triangles. 

View of the various textures
I did stitch the water. I used gently curved lines. I sewed about a quarter of the lines with the polyester thread and the remaining lines with a cotton thread that read the color of the fabric. In this piece, most of the time, I chose thread that matched the fabric. My goal with the quilting was to add texture. 

Stitched some ghost triangles in blue 
polyester thread
With each piece I stitch, I hope the initial design will catch your eye from across the room and you will want to view the piece more closely. I hope the quilting will keep your eye busy so that you will stay a while!

A section of the quilting motifs
It took me days to quilt this small piece. I contemplated what I'd like to stitch. Then I'd stitch it. Sometimes, I wasn't able to capture "the look" I had in my head or the stitching was too wobbly. In those cases, I spent some time unstitching. For the amount of thread in this piece, the unstitching was minimal.

View of the "water" lines
I added a few more lines in the green arcs. This time, I curved the lines slightly.

Adding a few more lines in the green arcs
When I found myself in an area that needed something, I often added large pebbles.

Transitions between motifs and shapes
When I became stuck with what to insert in one of the green arcs, I decided to add some petal shapes with pebbles in the background.

Adding some petal shapes

When I became stuck with the large lime green space, I followed Cindy's advice of dividing the space into a smaller unit. I eye balled some triangles that I filled in with a pattern and surrounded with pebbles.

My favorite section of the quilting
On I went, stitching shapes into each section. I did make an effort to relate the quilting to another part of the project. I also made an effort to tweak the quilting so it was similar; but not a match. I made the shapes smaller or larger. I changed thread colors. I moved the lines into a different arrangement. Sometimes, I used curved lines.

Added Xs in the cream fabric
I spent a little time in a light orange section and stitched a section of match sticks.

Did a little match stick quilting
I had fun quilting this project. I used a few ruler templates--12 inch arc; four inch arc and two inch circle from Westalee Designs.

Most of the thread used
While I am pleased with the final quilting, I am now wondering if I achieved the modern vibe.

Blocking in process.
I did need to block the quilt. Once it was dry, I squared the edges and readied it for a facing.

Back
With the leftover backing, I could have either used the remainder for the sleeve or for the facing. There wasn't enough for both. I decided I would use the remaining backing for the sleeve. I picked out a red solid for the facing.

Label
I used a leader/ender block I made during the process as the label. I estimate I used 3.75 yards of fabric from stash. To date, I've used four yards of fabric from stash. Total fabric purchased since my February fabric ban is 16 yards. I need to continue with the finishes to be able to count the fabric I've been using from my stash! This project finished at 37 inches wide by 34 inches high.

Front
Finishing this project was goal number 12 on my July list. If you missed the previous two posts on this subject, the links are: Post 1Post 2 It is my entry for the small group modern challenge which was to take a traditional block and modernize it. It is also my entry for the book, "Prayers for Sale" by Sandra Dallas.

I'm linking to: Carol at To Do Tuesday; Alycia at Finished or Not Friday and Frédérique at Patchwork and Quilting.

Wednesday, May 18, 2022

Old Sames--

Hand embroidery


Our Thread Tales book club read the book, "Snow Flower and the Secret Fan" by Lisa See. The book is about the lives of two girls who are friends throughout their lifetime. In the book, they are "old sames" and that was how I selected the title of my project. 

One girl begins life with little affluence but ends up affluent at the end of the book. The other girl begins life with affluence but ends up without it.


Broiderie perse on the shoes


The girls learn the needle arts: Sewing, embroidery and weaving. They make their own shoes.  They had bound feet and one of the girls achieved the perfect size foot. . . .three inches! I made a "shoe" that was three inches to applique on my quilt.


Fan


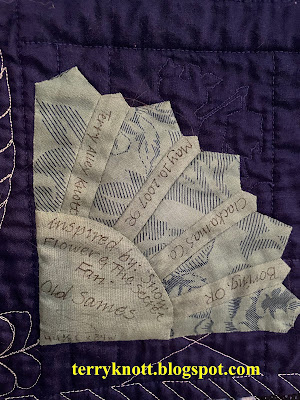
The girls communicate with one another writing on the folds of a fan. I designed my own fan pattern and I made a sample which became my label. 


Label


All of my fabrics are leftover from other quilts that I made. This is a technique piece. This project contains a bit of trapunto, hand embroidery, paper piecing, broiderie perse, free motion quilting and more techniques than I can remember.


Back


Since the fan was a central feature of the book, I used a stencil to mark a quilting pattern as well as a batik fabric that was printed with fans.

I was fortunate to have visited China and was impressed with the massive gates that were in front of places of reverence. I made my own sort of gate with the medium blue fabric. This fabric also represented a fabric that the girls could have woven.


Front


I made this project in 2007. It was the second project and second book of our Thread Tales group. My London daughter has this quilt.


Wednesday, April 28, 2021

Third Flannel Quilt Quilted--Second Finish 2nd Quarter 2021--One Monthly Goal MET!!

Some quilting motifs
Over the last week, I've been quilting the third flannel quilt that I stitched from Martha's flannel "adult" scraps. (I haven't started working with her "kid" flannel scraps.) I started stitching in the ditch with invisible thread. I used a walking foot because the flannel made it too challenging for my body to push the fabric through my machine. The flannel doesn't "glide" well because of its "cuddly" texture. With the invisible or monofilament thread, I quilted around the black triangles in the linen fabric. 

I also used the monofilament thread to free motion quilt a line in some of the larger strips of my strip piecing. In the bobbin, I used a 50 weight brown cotton thread that I've had in my stash for many years. Part of the challenge that I gave myself for quilting these scrap quilts was to use thread in my stash that has been around for awhile. I did use all the brown in this project so I've "room" for a replacement!

Half a feather motif
I used a 50 weight cotton green thread and I emptied that spool too. I did use all of a partial spool of a sage green thread to quilt the background of three of the stenciled flower blocks. I used a similar colored spool of thread to quilt the four stenciled flower block. The second thread wasn't an exact match; but, it was close enough!

Another challenge that I gave myself was to see how many templates I could use and how many different quilting methods I could use in this project. In the first photo, using brown thread in the needle, I stitched around the print in the fabric and then I used a medium sized stipple to fill in the space. I liked the effect it gave to the border. In the cream border I stitched half circles in green thread using a template. Using the circle template and the brown thread, I stitched circles in the outer border.

Templates and rulers used
I used a template to quilt the shape of a feather and then I followed up via free motion with an added line with a curved hook on the end using green thread. I don't remember using this feather template so it was good to play a bit with it. These are all Westalee rulers. I purchased the starter set a number or years ago and have since added a few other rulers/templates. I like the products. I also like that there are You Tube videos available with how to use the various rulers and templates.

In the sashings around the rectangular blocks, I stitched lines. I also stitched lines in the dark sashings. I varied the location of the lines for interest. In the center rectangular block, I also stitched lines. I used green, cream and monofilament thread. Sometimes, I used a ruler to stitch the lines. Sometimes, I used the edge of the foot as the guide for the line.

Background quilting 
Inspiration for the plain green blocks came from a book. I will reference that book in a few more paragraphs. In that book, there was a notation about how long it took for the flowers to return to a place where there was a lot of fighting. The writer talked about the soldiers fighting in muck and mud. 
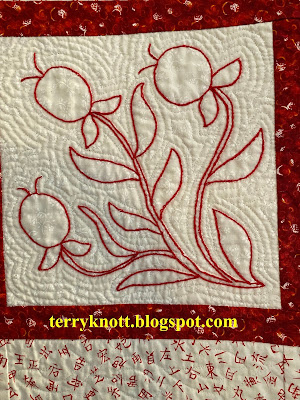
Stenciled flower

I had a flower stencil that I could make the design fit the space so I selected it. I used a pounce pad to mark the design. This time, I tried the white pounce powder; but, it wasn't visible enough for me to see to quilt the design. I used the pink and sometimes, I was able to mark a clear line. Most of the time, I was not. It could be that I need more practice with the pounce pad. It could be that my pad still needs to absorb the powder. It could be that the pounce pad isn't going to be one of my go to marking techniques. I'll give it a few more tries because I so want this technique to work as there are many pros to the process!

Label
When I quilted the motif, I kept my eye on the stencil and that helped me replicate the design. I quilted the motif in green thread. I quilted the background with a combination of a stipple, some leaves and a swirl. I used a light sage colored thread for the quilting.
It always takes me longer to quilt a project than I think it will. There are always times that I don't have a clear idea of what I want to quilt in a specific area. Just as often, I start and the motif comes to me or develops. If I'm stuck, I'll take the dog for a 20 minute walk. Breathing in the air, feeling the wind, or the rain or the sun, gives my brain a break. Often, when I sit back down to the machine, I have a plan to try. Sometimes, when I'm stuck, I'll think about the inspiration behind the project.

This is a book club quilt. Last March, I read an autobiography, "Wonderful Adventures of Mrs. Seacole in Many Lands," by Mary Seacole. It is the story of a Jamaican/Irish nurse who funds her building of a "hotel" to doctor/nurse wounded soldiers of the Crimean War on determination, wit and a strong belief she had the skills to improve a soldier's life.

Quilt back
Many times, she was down to her last few coins or the last of the food stocks. A few times in her lifetime, she lost the building from she operated her business. The half circles represent the limited funds she had with which to work. The full circles in the outer border represent the servicemen she touched giving back to her when she reached the end of her life with little money to support herself.

Once I had completed the quilting, I washed the quilt to remove the pink chalk. I added the binding, sleeve and label. My one monthly goal for April was to finish the quilting on this project. It was goal number four in my April list. Quilting it was also goal number one on my 2nd quarter list. It is my second finish for this quarter.  It measurers about 39 inches wide by 62 inches high.

I used about four and half yards of scraps in this project. I have now used about 8 1/4 yards of my stash in quilting projects this year. The entire project is scraps. The backing is pieced as is the batting! The binding is a leftover batik fabric that I made into a shirt for my younger brother many years ago. The thread to stitch it was from my stash. Most of that thread had been hanging around for many years. I emptied three spools of thread into this project and cleared a couple of bobbins in the process.

Quilt front
I named the quilt 'Tailings" because of all the leftover bits in it. It takes a lot of time to to piece little bits into bigger bits; but, it is worth the effort! The first post that I wrote about the project is here, should you want to read it.

I was asked why I note the hours spent and the money used to create the project. I loosely track the hours I spend on a project because too often quilt recipients have no clue about the length of time it takes to create a quilt. It generally takes more than a weekend to create a quilt! 

People also have no clue as to the amount of money one can get into a project. A project involves more than fabric and a pattern! Making a quilt isn't a cheap process. Truly, I bought nothing for this project; but, if I had purchased materials, the amount listed would get me in the neighborhood to recreating another quilt of similar size.  I'm linking to One Monthly Goal at Elm Street Quilts. I'm also linking to Oh Scrap at Quilting is More Fun Than Housework

This project will end up as someone's birthday present next year. Martha would be happy that I created a useable item out of her bits and that the bits didn't end up in the landfill. Now, I'm off to do a happy dance as it feels GREAT to have met my monthly goal!!!!

Wednesday, March 24, 2021

Spring--Eighth Finish 1st Quarter 2021

The embroidery for the project

Our book club read, "A Single Thread" by Tracy Chevalier this quarter. I enjoyed learning about the bell ringers of Winchester cathedral as well as the needle women who stitched kneelers. I like reading historical fiction.

While I was working on finishing my "Summer" wall hanging, I thought it would have been a good choice for this book; but, another book, "The Vinegar Girl" by Anne Tyler was the inspiration behind that wall hanging. I decided that I would stitch a second wall hanging and call it "Spring."

Two borders almost stitched
In the Chevalier book, the character finds working the stitches therapeutic. She meets new friends and she ultimately finds a purpose for her life. I thought spring when the first blooms appearing after a dark winter would be a good starting theme for me. The pansy embroidery seemed a great choice for the project. I definitely find stitching therapeutic!!

Auditioning a binding
This time, I wanted to make the wall hanging a bit larger. I thought about a checkerboard border; but, instead opted to paper piece strings using the colors that were in the embroidery. Sometimes, I repeated fabrics and sometimes I didn't. There wasn't a plan and perhaps, I repeated a fabric because there was another piece of it. The strings are mostly from my friend Martha's stash. Yes, there is a piece of my granddaughter's skirt because she is dear to me!

After I pieced two sections of the string border which finishes at three inches wide, I squared the embroidery and auditioned the string border. I liked what I saw. I stitched a couple more string borders. Then I sewed them in place.

Close up of the embroidery
English gardens can be formal; but, they can also be informal. I like the informal ones best. I like plants tucked in almost on top of one another. Pansies blooming next to daffodil shoots developing into blossoms which give way to a later blooming plant. I enjoy gardens that have color year around.

Quilting can be a formal and an informal process. One can use a few fabrics or a lot. Of late, I've been letting the design process happen. I've been playing with the parts and letting them speak to me. . .although sometimes, I disagree with I'm hearing. Sometimes, I miss the message all together! I'm liking the results of being spontaneous.

 Once I stitched the borders, I auditioned a fabric for the binding. While it is a fine choice, I decided that I didn't want to "fence" in my garden so I decided that I would finish the project with a facing. I also wanted to hand embroider "Spring" on the project. 

Quilt back
Again, the lettering is from my hand. I wrote "Spring" a number of different ways until I had one that I liked. Using a pencil, I lightly traced this the option to the project. In other words, I didn't use a particular font or enhance the image in some way. I used a stem stitch to embroider "Spring." Mary Corbet has a great tutorial on how to stitch the stem stitch. I do like this stitch because of the way the stitches are formed, tight curves look beautiful.

I used another of Cindy Needham's stencils from her Ultimate Background Stencil collection for quilting the background of the pansy. I used two layers of batting because I wanted a lot of definition in the pansy background. 

Once I had drawn the pattern, it looked too formal so I opted to place a few lines to denote an area for dense quilting around the word and the embroidery. Having an area of dense quilting will draw my eye into the piece. The shape sort of reminds me of a bell.  Perhaps, I will linger a bit when I walk by this piece when it hangs on the wall! I 
Label

also opted to draw those lines organically because I like the result better than trying to achieve a formal balance.

Using a blue 50 weight cotton thread, I quilted the curved grid lines. Using a light blue silk thread, I quilted a stipple around the embroidery motif and letters. Using a cream silk thread, I quilted pebbles between the letters. Using a 50 weight cotton thread, I quilted straight lines in the border.

After I finished quilting, I soaked the piece to remove the marking lines. I did use a little Dawn dish detergent. Again, it took a long time for the marker to disappear; but, it did. I blocked it. I created a label and I stitched a sleeve. I cut the strips for the facing and applied it to the edge of the quilt. The facing fabric is leftover bits from a project long ago. . .pre 2000! I still have a little left; but, much less! It went well with the backing that I picked up from the free table.
Quilt front

This is another project where all the supplies used were on hand and mostly scraps. I have some needles and thread as an expense. I used 3/4 yard of fabric. This brings the total yards of stash used this year to negative 1/4 of a yard. This was goal number four on my March plan. This was goal number nine on my 1st quarter list. It is my eighth finish for the quarter.