Sunday, April 28, 2019

Exercises in Artistry--part 2 of 5

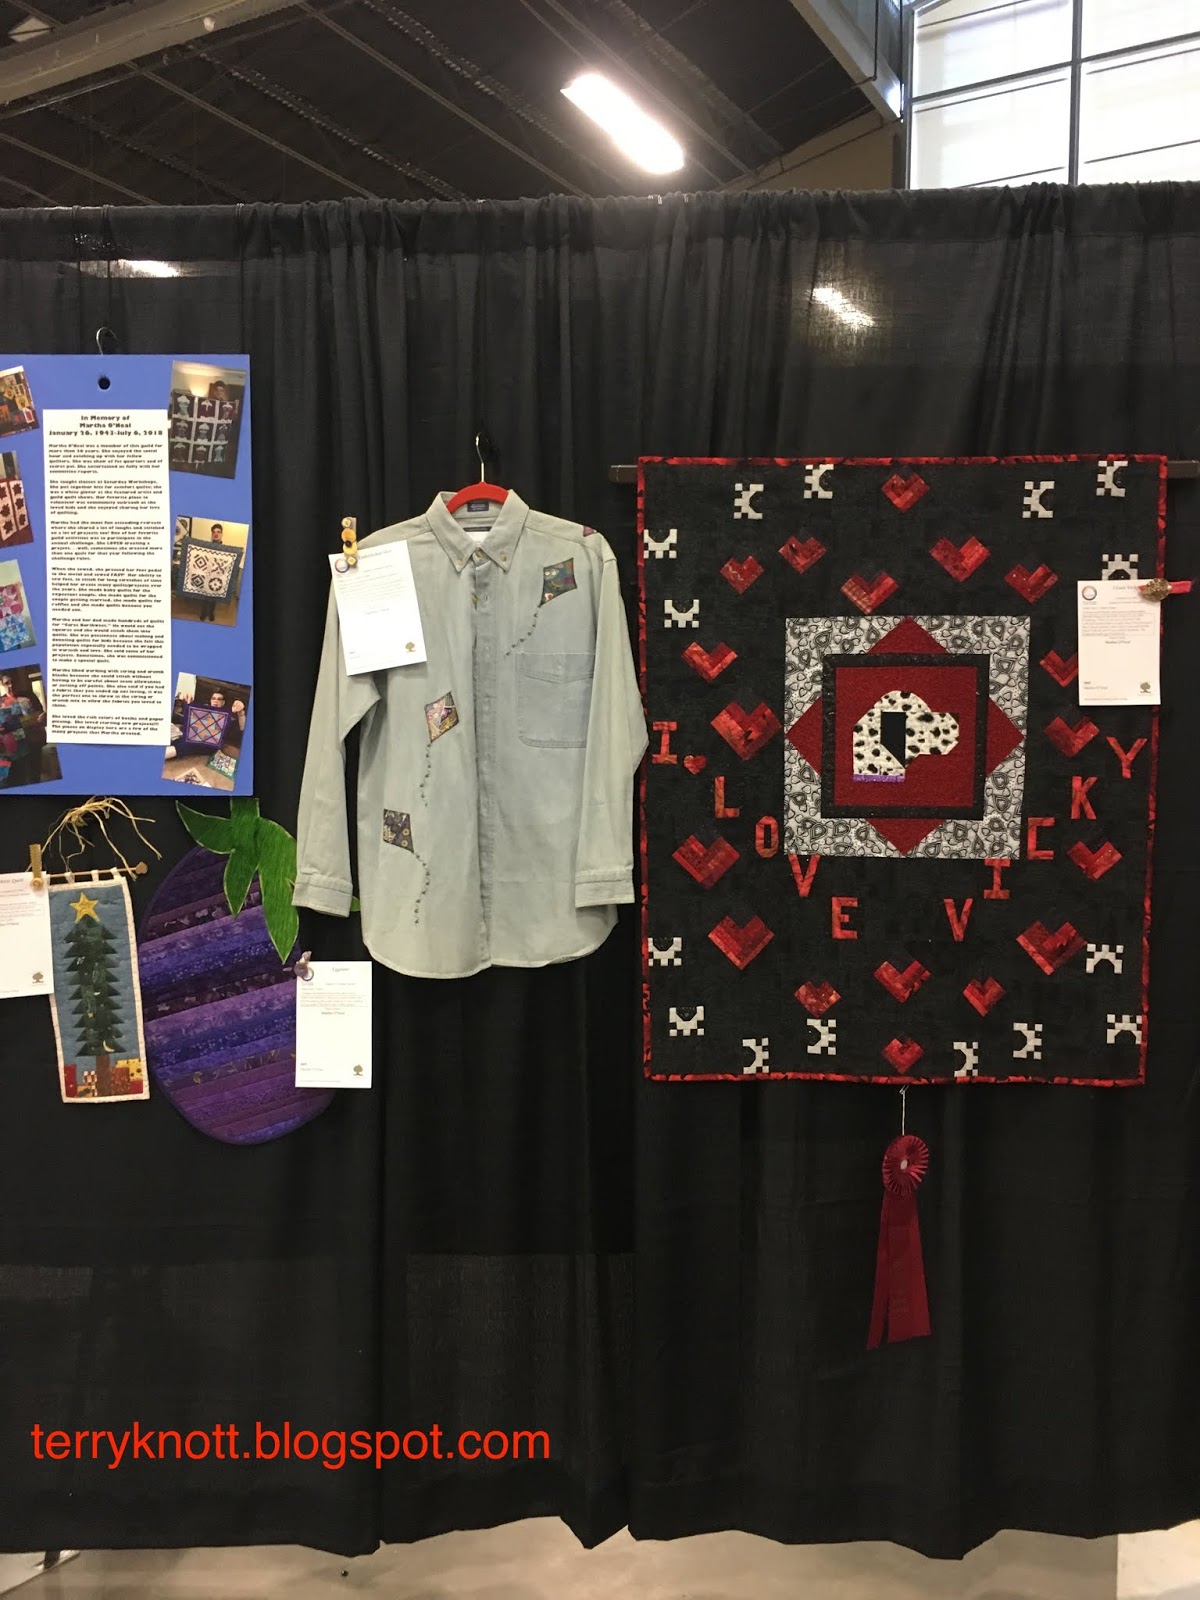
Experimenting with a pencil to create feathers
Continuing with the Sketchbook Revival lessons, I decided to participate in each session. I also decided to document my results. . .no matter how the results looked or felt to me.

Initially, I didn't realize that there were two different leaders on each day. So I went back to the original announcement and completed those lessons too. The second lesson on Day 1 was "Sidewalk Cracks: A Creativity Starter" with Carla Sonheim.

First, we free hand drew a bird shape with a fat marker. I learned how to shade and create feathers using a pencil and an eraser. She also shared how to audition where to put the pupil for the eye.

Carla shared a little about troubleshooting the body...namely how to fix a beak to make it more beaklike. She created the feathers with scribbling the area with the side of a pencil. Then she smudged the drawing with her finger which softened the drawing. I like the little bit of light that the smudging gave the bird's head.
Creating an animal from a base photo
She used the eraser from a mechanical pencil and removed some of the smudged pencil. It was a cool technique. I didn't have access to one of those erasers; but, my eraser also provided a similar effect. Finally, she used a color pencil the add a little definition and more marker to create some highlights.

For the second part of the lesson, she shared a photo that she had taken of cracks in a sidewalk. She said that she printed copies of her photo on plain paper. She would cut out the border off the paper and glue the photo copy into her sketchbook. She glued the copy in different orientations depending on what shapes she might see. I followed her "dog" drawing. I did see bird shapes as well; but, I liked the dog.
Mindful inspiration exercise result

Using a marker, I outlined the shape I saw. I liked extending the dog extremities outside of the photo boundary. We added a muzzle and legs. Then we used a color pencil to shade in the hair color. We used a second color pencil to add "fur" lines. I'll never look at a sidewalk without checking to see if it is worthy of becoming a drawing! What a great method to employ on a day when inspiration doesn't strike!

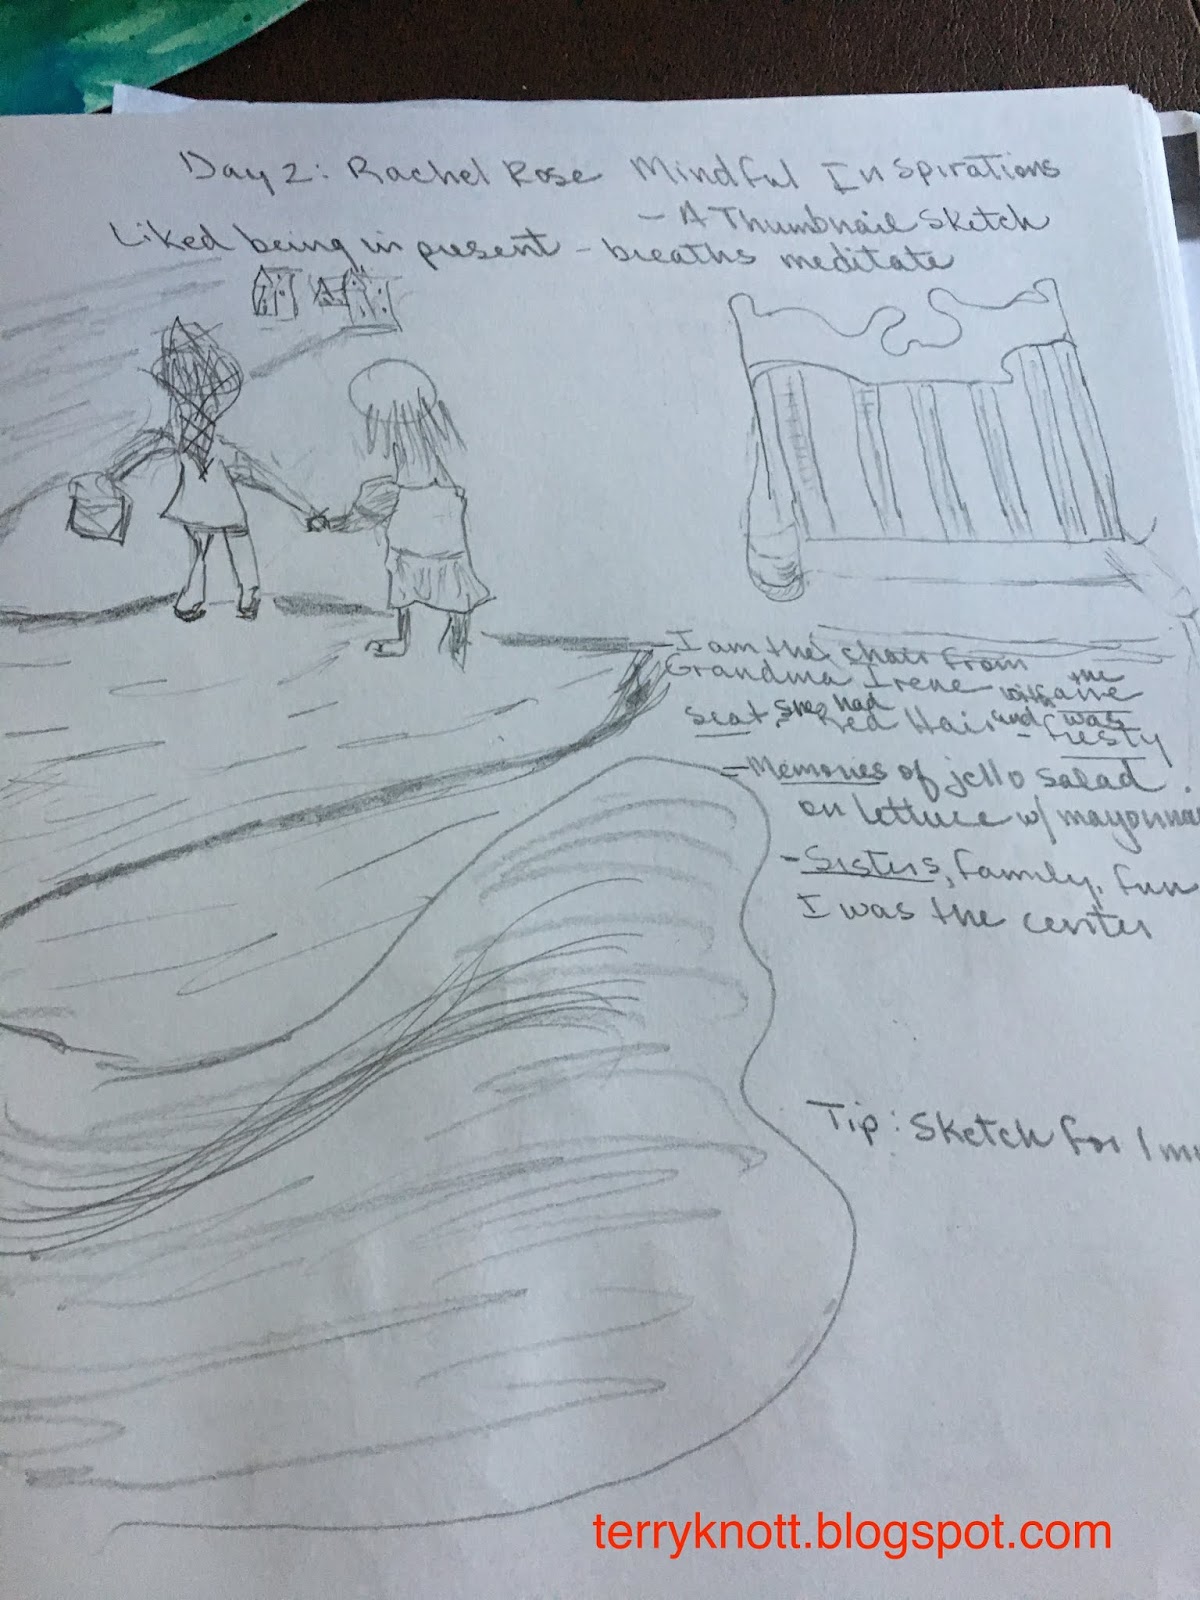
The second exercise on Day 2 was "Mindful Inspirations--A Thumbnail Sketch" with Rachel Rose. I liked her approach of being in the present and using breaths to meditate or center myself before beginning. We were supposed to use our thumb and pick something that we could draw that we could see from where we were sitting.
Getting in touch with our inner child exercise

I picked the top section of a special chair. After drawing it, we were to write four or five lines of words that pertained to the object. I wrote, "I am the chair from Grandma Irene with the cane seat. She had red hair and was feisty. Memories of Jello salad on lettuce w/mayonnaise. Sisters, family, fun, I was the center." Rachel emphasized not to correct the grammar. . .just write.

Then we underlined three to four words. I chose cane seat, feisty, memories and sisters. Last, we took a few minutes to sketch objects that pertained to one or more of those words. I chose to focus on the word sisters. My grandma had two sisters. She used to watch them come home from school. It was a good story to create! It was a fun exercise. I liked Rachel's tip of sketch for one minute each day. Her thought was often you would sketch for more than one minute. I agree. . .I take the same approach with quilting.
Playing with animals exercise
Day three of the Sketchbook Revival, we got in touch with our inner child. Charlie O'Shields of Doodlewash led us through a terrific exercise. First, he told us that we were on a nature walk and to pick something to draw with a pencil. I drew a few leaves. Then he had us draw a flower which we colored anyway we wanted using three different colored crayons. He showed us how to watercolor the flower. I loved his explanations. At that time, I didn't own a watercolor set or watercolor paper. I used color pencils to create some of the shading that he demonstrated. I liked the results. I did go to the store and purchase a set of watercolor paints. I think the last time I had watercolor paints was when I was in fourth grade which was a LONG time ago!

Star Patch quilt progress
The second exercise on Day three was "Playing with Animal Characters" with Nina Rycroft. We worked from a reference photo to create a drawing of a beagle. She used circles to create the spaces
for the head, chest and hip of the dog. Once we had our initial drawing, she shared how to alternate the portion of the head, legs, tail, ears to convey movement and to tell a story.

I estimate that I spent about half an hour on each of the exercises. . .truly doable and I am so amazed at the results. I'm noticing that I'm using some of the knowledge I picked up from previous exercises and using it with the current exercise.

Doing the sketchbook exercises has been a good break from quilting. Regarding quilting, I'm stitching a few echo quilting lines, some straight lines and lots and lots of pebbles. I've completed a quarter of the star patch quilt. At the beginning of the month, I thought that I could complete this project. . . .well, I thought wrong!!! I will finish it and those pebbles and the sketchbook exercises have given me opportunity to think about future projects!

Wednesday, April 24, 2019

Exercises in Artistry--No Fabric Involved (1 of 5)

Day one--continuous line drawing
Last year, I happened to catch a friend's announcement on Facebook encouraging others to sign up for an online workshop designed to encourage one to work in a sketchbook every day. The workshop was called Sketchbook Revival.

I wanted to improve my drawing skills as well as my confidence about drawing so I joined. I enjoyed all the sessions. I learned something from each session. I even participated in a few sessions.

When the workshop ended, while I didn't work in a sketchbook daily, I did do a little drawing practice almost every month. My thought was that working in different art forms would help me improve my quilt skills. . .whether that is pattern design, fabric selection, construction or quilting!

A few weeks ago, I saw the announcement that Sketchbook Revival was coming a second year. Immediately, I registered. This year, the sessions began on Monday, April 22 and will end on Saturday, May 4th. The host wrote the following about the event:

Selfie used for the exercise
"The artists leading the sessions will share their passions for creating in a sketchbook with everything from ink and graphite, to watercolor and acrylics, and collage and mixed media. You'll also get ideas of how sketchbooks can be tools for observing your world, stretching your imagination, playing with color, connecting with intuition, emotional healing and well being, and so much more."

If you want to join in on the fun, click here for the link to participate. There is no charge for the event.

The first day, we worked on an exercise to train eye/hand coordination using a continuous line drawing technique. Koosje Koene, whose website is sketchbookskool.com, lead the exercise. The top drawing is me feeling my face while drawing without looking at my paper. The only rule was that you couldn't lift your pen or in my case, my pencil! The drawing on the bottom left is me drawing my face from a selfie photo. Again, I didn't look at my drawing and left my pencil on the paper. The bottom right photo is me drawing my face again from the selfie photo; but, this time, I could sneak peeks at the paper. I also told myself, slow down. . .take your time. . .as I drew.

I was surprised that I could draw something like a face without seeing what I was drawing. I also think the first drawing might become a quilt project at some point. . .well, at least I have an idea. . .Back to the exercise!!!!! I was surprised at the resemblance of my drawing to my photo in my third attempt. I was amazed that I didn't spend more than 30 minutes on the entire exercise! Perhaps, drawing faces will become part of my skill set!
By the sea drawing
Tamara Laporte led the mixed media session yesterday. I found her exercise meditative. I had fun drawing the wonky houses. I even had fun using color pencils to color the drawing which surprised me. Tamara used water based supplies to color her drawing.

I spent about 30 minutes drawing and several hours coloring. I love the wonkiness of the houses and I can see some perspective in the photo. I drew a couple awnings and a few porches. Time ran out before I added steps, boats . . . . but, those could wait for another session. I was pleased with my result. . .especially since I hadn't tried something like this before. Perhaps, drawing could be one of my skill sets after all!

I don't know if I will sample all the lessons. I don't know if I will post more end results either. I was brave and posted photos of my work on the Sketchbook Revival Facebook page. I was also brave to write this post. Maybe, I am more of an artist than I think I am!


Sunday, April 21, 2019

Window Boxes

Pieced back
Happy Easter! May your celebrations be full of fun and love.

Today, I'm sharing a book club quilt. In 2014, our book club read "The Hundred Year Old Man Who Climbed Out the Window and Disappears." I was struck by the character crawling out the window and stepping through the window box full of flowers. I had won a cd of embroidery designs and I decided those could be my flowers.

My friend Martha had been on a trip and she brought me back the two purple print "Pickle Dish" fabrics. The rest of the fabrics came from my stash.
Quilting in one of the designs

Label
I stitched all but one of the embroidery designs twice. The second time I stitched the design, I altered the colors. Once it was finished, I was surprised at how many people thought that each of the flowers was different!

When it was time to make the back, I used the leftover pieces. Piecing the back is a good way to use leftovers! I start stitching the smallest pieces together into chunks. Then I stitch the chunks together into sections until eventually the sections become just the right size for a back!

I used a cotton batting and a wool batting. It was a challenging project to quilt with two layers of batting. The definition that the wool created was worth the extra effort. Sometimes, I quilted pebbles in the background and sometimes, I echo quilted.

It is a happy quilt. When J and I hung this quilt, she wanted to hear the story of what made me make it and the story of how I made it. It is so cool that she is beginning to understand that every quilt has a story. She has spent a lot of time finding the blocks that match. She has spent some time tracing the quilting lines with her finger! Displaying the quilt this time has brought me extra enjoyment!

Finished quilt


Wednesday, April 17, 2019

Judges' Comments From QuiltFest Northwest Show

Ole Truck
March 28-30 was QuiltFest Northwest--the Clark County Quilters quilt show. I entered four pieces into the show. I also put together a memorial of a few quilts that my friend Martha had created. I really liked the layout of the show this year because it was possible to see quilts from a distance as well as up close and personal!

The judge's feedback for "Ole Truck" was:
Wonderful job of depicting the patina of this ole truck Even the surface design of the clouds have an aged look. Micro-stippling on the truck add to the rusty feel. Mitered borders do a good job of framing the quilt. Facing is very well done.

It was awarded a Judge's Choice ribbon which was cool to receive. You can read more about this project here.

Aurora Borealis
The judge's feedback for "Aurora Borealis" was:
Good use of color and value to depict the Borealis. Hand-stitching and embellishments are appropriate and well applied. Quilting motif adds to the theme of the quilt. Binding corners are nicely mitered.

This entry was part of the "Thread Tales" exhibit and the members voted to not have ribbons awarded. You can read more about this project here.

Gladys


The judge's feedback for "Gladys" was:
Very interesting and innovative mosaic technique creates a charming quilt. Piecing and construction is well done. Quilting motif is fitting for the quilts. Binding edges should be straight. You can read more about this project here.

This was also a "Thread Tales" exhibit and no ribbons were awarded.


Gardner's Mystery


The judge's feedback for "Gardener's Mystery" was:
Good balance of color and value to move your eye around the quilt. Piecing is well done. Beautiful background leaf quilting. Absolutely charming flowered quilting with micro-bubbles. Ditch quilting should stay in the ditch.

It was awarded a third place ribbon in the Pieced Large category skill level advanced.

I was surprised at how vibrant the design of this quilt is. Without seeing it hang, I would not have had this view! Nor would I have seen how much I like the colors that I chose. Who knew a block of the month mystery quilt could have so much visual impact? I sure didn't! You can read more about this project here.

One section of the display
When my friend, Martha, died last summer, her family asked me if I wanted a few quilts that no one else wanted. The last time that I was in her house and after the estate sale, there were a few other finished projects that I couldn't see going to the Salvation Army so I picked those up to become part of my collection.

The "I Love Vicky" and the Cupboard quilts were projects that she had made as her answer to a couple guild challenges. We made vegetable table runners and she was always stitching gifts for someone using sparkly fabrics and threads.

Martha had a terrific eye for color and a wicked sense of humor. She had fun designing her projects and interpreting challenge rules. We laughed a lot when we stitched together once a week for many years. I appreciate that the show chairs supported this exhibit. I heard that as people who knew her passed by, they shared a story or two which would have tickled Martha.
Other section of the display

My favorite exhibit at the show was "The Lady." JoJo Hall designed "The Lady" ten years ago. JoJo spent the last decade letting "The Lady" speak her mind as to how she wanted to be pieced, quilted and embellished!! JoJo quilted words in the earth part of quilt. The words are adjectives that describe women. . .a few of my favorites are adventurous, caring, imaginative and teacher.

JoJo won first place in the Art Representational Category intermediate level and won best domestic machine quilting. Well done, JoJo!!

JoJo with "The Lady"


Sunday, April 14, 2019

A's Pillow Project--First Finish 2nd Quarter FAL 2019

Fabrics, old pillow and pillow form 
Some time ago, my daughter, A, purchased a couple pieces of fabric to make a few pillows to freshen the look of her living/family room. It seemed like each time we tried to get together to stitch the pillows, it didn't happen for one reason or another. Last week it happened!

Pushing out the corners
She brought her fabric, a reclaimed pillow form and one of the pillows that had been living on her couch. We measured the pillow that was about to be retired and determined it was about 19x18 inches. So we cut a length of fabric that was 19 inches wide. From there we cut a front that was 20 inches long.

Then, I had a brain freeze. I cut a piece of fabric that was quite a bit longer thinking that she could hem the edges and we could make a continued back. . .A was much wiser. After I had failed three times to execute my idea. She made a two piece back. We turned the edge in about three inches so the raw edge would be enclosed and so that the edge would be more stable. Once she made the back, the process came back to me. I have made many, many, many pillows through the years and used this technique most of the time.

Inserting the filler into the pillow case
She put the back and the front right sides together and then she stitched around the outer edge of the pillow. Because the back pieces overlapped, she could stitch the entire outer edge.  We talked about stitching almost to the corner and instead of pivoting at the corner, she stitched a few stitches  on the diagonal. This stitching allowed made turning the corners to be nicely square.
Finished pillows

While she stitched the outer part of the pillow, I washed and dried the filling from the old pillow. We cut a cover for the filling which she stitched. I stuffed it while she stitched he second pillow. I had a partial bag of little batting scraps that I had saved over the years that was just the perfect amount to add to the filling that I had washed. Then it was a matter of stuffing the filler into
the pillow. Of course, the first time that we did it, we had it turned so it didn't fit well. The second time the stuffing process worked well.

I like her second pillow. The foam form used to support a pillow that went with her bed quilt when she lived at home. The graphic fabric design of the new is wonderful and the design matches all four sides as well as the back.

I'm looking forward to the next time that she can come and stitch. She says that she has a couple more pillow forms and she says that she might want to stitch a long skinny type pillow. . . We can do that!!!

This is the first finish of the 2nd Quarter FAL. It was goal number 19 on my list. Since we used her fabric, I didn't reduce my stash goal. I still have stitched 39 yards of the 57 1/2 yards that I want to stitch before the end of the year. I have 18 1/2 yards remaining!

Wednesday, April 10, 2019

2nd Quarter FAL Goals 2019

#1. Quilt this top
I plan to continue my journey of finishing projects that I began; but, haven't finished, yet. I even have a few of Martha's projects to finish. I vow to start new projects and to have fun along the way. I anticipate trying a new technique or two. Perhaps, this will be the year that my "cold" daughter will finally be warmer!
#2. Complete trio of sisters

Last quarter, I finished ten of the 25 projects that I listed. Ten finishes was a great number! This quarter, I had planned to list a lot fewer projects as in rolling my list forward and adding a couple projects. I've 22 projects on this list! Will I complete the list? No. . .but, again, there is a lot of variety and if I can complete another ten projects that will be great progress!

My goals for the second quarter of the year are listed below.
#3. Stitch a skirt with this fabric
#4. Get this project out of the fabric phase

#6. A potential hat or purse?
#1. Finish this piece. It was the machine appliqué project in a Karen Kay Buckley class last May. Last winter, I finished the top. I need to figure out a back and quilt it.

#2. Finish the trio of sisters that I started last winter. This is a book club quilt. It is the first time that I've drawn a figure and then painted the details on cloth. I had great help from my five year old grand to draw the faces.
#5. Stitch a second tote


#3. Stitch this gingham fabric into a skirt for one of the grands. It's been on the list for two years.

#4. Make some progress on this project. It's been in the fabric stage for over two years.

#5. Last year, I made a tote with these fabrics and selvages. I had planned to add a pocket to the back of the tote; but, didn't because I would have sewn over my inside pockets. I plan to make another tote and put that pocket to good use! I'm not sure that I have enough of the rust. . . .but, I guess that is part of the journey to choose a fabric that will mix or another one all together!! I will need to select lining fabric.
#8. Bonnie Hunter Mystery
It will be a great project to use some of the selvages that I've collected instead of cutting strips!

#6. I made a skirt and a vest out of this fabric for one grand. I still have leftovers. It may become a hat or a purse for the youngest grand.

#7. Quilt this star top that I stitched last December. The whole project came from my stash. It started as a result from reading a blog post from Gigi's Thimble. Amber hosted a quilt a long making one of her patterns. I had fun piecing the top and I EVEN completed each step on time!!!

#8. Finish Bonnie Hunter's Good Fortune Mystery. This is the first year that I have participated. I enjoyed the process!

#9. Appliqué, quilt and bead
#9. Finish the appliqué, quilt and bead this piece. It was on the list last quarter.
#10. Raw edge applique

#10. Continue progress on the butterfly piece began in September in a Susan Carlson class.

I have at least three other quilts with a butterfly theme that need to be finished. Perhaps, I can make some progress this quarter on this project!

#11. Stitch a skirt with Miss K. This looks like a fun project and the supplies were given to me.
#11. Skirt for Miss K to sew

#12.  Potholder project
#12. Finish the other five potholders that were a Martha project. I stitched five last quarter. I thought that there were at least enough supplies for four. She sure could pack a project bag!

#13. Stitch the accessories to the placemats
#13. Make the bread basket, napkin and napkin rings to accessorize the placemats I made last month. I will need to purchase fabric for the napkins and bread basket.

#14. I picked up this sparkly green fabric from the free table last fall. I thought there was enough fabric to stitch a pair of shorts for Miss J. When I went to cut the shorts out, there wasn't enough fabric. I have enough to make an exercise type top. . .I need to move it out of my stash!


#14. Stitch a workout type top
#15. and #16. Add embroidery to these two t-shirts. . .one for each grand. It will be a good exercise for me for placement and it will be my first experience to embroider on a knit fabric.


#15. and #16. Embroidery projects


#17. Stitch this bag
#17. I picked up this bag kit
from the free table last fall. I think it might be an item that could be sold at the quilt show next fall.


#18. Thread catcher/small item catcher. I purchased this kit at least four years ago. I was ready to stitch it and then I was gifted the completed project at a retreat. I put the project in a tote. Last month, I cleared out that tote and rediscovered the project. It is time to get it sewn!
#18. Thread catcher project

#19. Stitch these fabrics into pillows. My daughter purchased the fabrics and we've tried to get together several times to make them. Perhaps, this will be the magic quarter!

#20. Make a pillow out of this embroidery. I completed this embroidery in 2014 and slipped it into a box. Time to stitch it up!!!
#19. Stitch two pillows using these fabrics

#21. Make a jacket or a vest out of this minky fabric. It is so soft!

#21. Make a jacket or vest with this minky
#20. Make a pillow using this embroidery
#22. Finish this original design of Miss J's.

I believe that there is a enough variety to keep me busy if I'm stumped on another project. The list includes, clothing items. I've been "gifted" clothing fabrics that I need to use as I just don't have space to store those fabrics.
#22 Finish Miss J's girl
I have no desire to store those fabrics either! Finding a use for them is terrific!


Sunday, April 7, 2019

Bitter Sweet Memories

Back of quilt
Crazy quilt block
Label
In 2014, our book club, Thread Tales, read "On the Corner of Bitter and Sweet." I was struck by one of the characters purchasing flowers for his mother on a regular basis and the hardship that happened for Japanese people living in the United States during World War II. In the story, there is a budding relationship between two youths--one was of Chinese descent and the other was of Japanese descent.
Flower example
During the time we were reading this book, my embroidery software lessons were to make a wall hanging using embroidered flowers and crazy quilting which was part of the lessons. I had a yard of a busy floral print that I decided would be the sashing and binding. I also had a half yard of a coordinating green fabric that I added to the mix. I went on a search and found a purple that would work as the main fabric.
Finished front
Then, it was all about finding leftover bits for the crazy quilt blocks. Creating the blocks was a different way to stitch in the hoop. I liked being able to add embellishment to the blocks. Although, because of the embellishment, quilting the blocks was challenging.

I wanted to create a lace like background behind the embroidery so I stitched different filler stitches behind the flowers. Another time, I would add more spaces between the filler stitches so it was easier to see the variety of stitches. All in all though, I was pleased with my results.