Wednesday, June 30, 2021

"Family" of Penguins Finished--post 2; Sixth Finish of 2nd Quarter 2021

Texture created in the penguins 
Normally, I would free motion quilt filler stitches in the open areas of a project. For this quilt, I decided that I would use lines to denote the Mama and the Daddy penguins. I free motioned echo quilted the curved lines on the Mama penguin first. I also echo quilted the head of the Daddy penguin. 

Next, I used the walking foot to quilt straight lines on the Daddy penguin. I'm trying to play more with the walking foot because it is easier on my body for the machine to feed the fabric using the feed dogs than it is for me to be pushing it. However, all the turning of the fabric takes some time and effort so I don't see myself quilting big pieces using the walking foot!

Back of quilt
In the baby penguin, I free motion quilted the name Pip because that was the name Veronica gave the abandoned baby penguin she took back to the research station to save from death. I filled in the background with loops to the point that if I hadn't told you that I had quilted the name, you wouldn't see it. For the upper left of the piece, I wanted to free motion quilt a texture that represented a cloud filled sky.

It was tricky to try to mimic the stitch length that I used during the free motion quilting. It was trickier to try to keep all the free motion stitching similar as well! I got close and I liked the texture that the lines gave the piece. I used a 40 weight Floriani polyester white thread for all the quilting in the white area. The sheen of the thread complimented the silver fleck in the white fabric. I quilted the white area in an afternoon. The most challenging part was determining where to start and what to use as filler stitches! (I used a cotton thread in the bobbin.)

Detail of label
All that was left was to quilt the background. I used a 40 weight Glide silver metallic thread to quilt on the snowflake design. This type of quilting gave me a lot of practice following a motif as well as looking ahead to the next snowflake so that I quilted continuously. I spent many more hours quilting that background than I would have thought! The
texture the quilting created was good and the density of the quilting is consistent throughout the piece.

I used the background fabric to face the quilt and construct the sleeve. I had fun with the label. Our leader of the book, Kathy M, provided an activity at our second meeting. We made a penguin out of felt scraps. She mailed us a little kit before the meeting. We didn't open the envelope so it was a surprise as to what we were going to do! The penguin could have been a finger puppet; but, I decided that I would use mine to be part of the label.

Finished front
In the book, Veronica had her second best red handbag pecked by a juvenile penguin. I had to include a handbag as part of the label. My granddaughters drew a variety of bags for me to choose one that would work. I ended up using K's envelope bag and J's bucket bag. They were psyched that I gave them credit on the label for their work. 

I was stuck figuring out how to add the felt penguin to the label. My friend, Connie P., suggested the speech bubble. I'm glad she suggested it as and I think the label turned out great! I spent about 74 hours creating this project. It measures 25 inches wide by 34 inches tall. I used about 2 3/4 yards of fabric. I have now used 8 1/4 yards from my stash this year.

This was goal #21 on my second quarter list. It was goal #2 on my June list. It was also my one monthly goal for June. I'm linking to Elm Street Quilts One Monthly Goal - June Finish Link-upThis finish was down to the wire! 

FOLLOWING MY BLOG BY EMAIL
As of July 1, Google Blogger is discontinuing its Feedburner email auto-delivery of blog posts. This will affect all of the blogs you follow by email - mine, or anyone else's!

If you previously registered to receive email notifications of my posts, and would like to register to receive email notification of my blog posts, you'll need to re-register. Complete the Follow on Bloglovin by starting with your e-mail address in the form that is on the upper right of this blog page. 

Thank you to those who have already re-registered to continue following me by e-mail. I appreciate all of you have filled me here since I began this blog June 26, 2015!

Sunday, June 27, 2021

Miss K's Mermaid Is Finished--Post 6

Applying the glue to the binding
On our next sew day which was early March 2020, Miss K finished her binding. She liked cutting the 45 degree angle on the binding tails. 

I showed her how to glue her binding in place instead of using pins. She was skeptical about the glue; but, she gave the process a try. It worked well for her. She liked using the iron to make "the glue melt." I liked her description of the process. We spent about an hour finishing the binding.

Finally, we were at the stage to add beads for the fish eyes and to add the hair to the mermaid. I've wanted to see the mermaid have hair since Miss K first described her vision of the mermaid's hair. As we have worked on the project, the conversation about the mermaid's hair has evolved. Miss K has auditioned "hair" so that I would understand what the hair should resemble!

We had planned to spend Spring vacation working on her project. COVID restrictions sure curtailed progress on that plan! We didn't get together to discuss the project until the beginning of April 2021. Miss K auditioned beads for the fish eyes. She decided that she would rather stitch the eyes with thread--she was concerned with how the back would look. She did pick some beads to put in
Painting the fish
the hair.

When we finally got together to work on her project last week, she decided that she wanted to do something to make the fish more visible. She practiced making marks of various colors on a scrap of the background fabric. She used tsukineko inks and a brush applicator to apply the ink to the quilt surface. I purchased the inks and applicator brushes when I attended a class at the International Quilt Festival in Houston, Texas a lot of years ago. I haven't used the paints since.

Detail of fish
Miss K liked the effect of the paint. She was surprised how the color changed depending on the part of the fabric she was painting. She marveled that she could see the fish from a distance after painting them. She used a micron pen to make the dot for the eye. She also used the pen for line work to add a little detail to the tails. She liked that the inks left the hand of the fabric intact and that there was no stitching or knots on the back of her piece. 

Mermaid with yarn hair
Next, she added the hair to her mermaid. Originally, we had cut thin strips of fabric to make dreadlocks. From the free table at guild in 2019, I picked up a package of doll hair. It was curly yellow yarn. Miss K laid out pieces of the yarn in a pleasing layout to her eye. She liked the yarn better than the fabric strips. She wanted the yarn or hair to be "pouffy." 
Sewing the sleeve

With my help, she free motioned stitched/tacked the hair in place. To achieve the pouffy look, she left sections of the yarn unstitched. She also stitched the yarn with a metallic thread so that it would look like there was a net of sparkle in the hair. She had to stop and readjust the yarn as she adhered it to the quilt top. She loved the effect the hair added to her piece!

 She made an effort to not entirely cover up the fish on the top left. As she worked, she developed a story about the fish and the mermaid! It was fun to listen to her process. Throughout this process, it was challenging for me to figure out how she could achieve the look that was in her head!! 

I showed her how to position and hand stitch the hanging sleeve. She was NOT a fan of hand stitching. I didn't have a thimble that was small enough to fit her finger nor did I have any finger savers. She poked herself which hurt! She was NOT a fan of stitching the corners of the binding closed either. 
Using pliers to pull the thread

I thought that she would be excited because I thought she was finished. Nope, she wasn't finished. She said the mermaid needed a necklace, a nose and there was too much of a white space in the middle of the mermaid's face. Then she decided that the eyes needed paint to be more "real." She let me know her thoughts had "matured" since she drew her picture when she was seven. She had her ninth birthday last month!

She auditioned ribbon, beads and paint for the necklace. She wasn't excited about the options available. I suggested she audition a piece of red pearl cotton. She liked the color; but, she explained to me that it wasn't thick enough to be a necklace for a mermaid. We made a sample of a strand with colonial knots couched on the strand. She liked the texture. 
Necklace and nose

She laid the thread and pinned the center in
place so that it would remain in the position that she wanted it. She found it challenging to hold the wraps on her needle and impossible to hold it all in place to pull the thread to the back of her quilt. 

She found she was almost strong enough to pull the needle through all the layers with needle nosed pliers. She had me hold the threads on the top side of the project while she pulled. She wasn't happy that the embroidery covered a word of her story. BUT, she loved the effect. I loved the effect too!

She used color pencils to blend the color of the face better and she used a micron pencil to add a nose. We got out the acrylic paints and she gave the eyes more dimension. Now she was truly finished. (She decided her mermaid didn't need a crown after all!) She was excited! It measurers 15 inches wide by 25 inches high. It is constructed of scraps. Many of the scraps came from my friend Martha's string bin.
Finished back

Miss K began her journey with this project September 2019. Throughout the entire project, she built her quilt in her own vision. She chose the colors, fabrics and threads that worked the best for her design. She is letting me keep her quilt to enter in a quilt show or two should the shows be held.

You can read the previous posts of her journey by clicking the links below:
Miss K is Stitching--post 1
Miss K's Mermaid--post 2
Miss K's Mermaid--post 3
Miss K's Mermaid--post 4
Miss K's Mermaid--post 5

This was goal number five on my June list. We used about a yard of scraps so 5 3/4 yard of stash/scraps has been used this year. We have already decided what our next project will be.  Now, if we can find the time to get together! I'm also linking to Oh Scrap--Quilting Is More Fun Than Housework.
Finished front

Regarding COVID:
Worldwide: 181M cases; 3.92M deaths
United States: 33.6M cases; 604K deaths
Oregon: 208K cases; 2,704 deaths

The Oregon governor has announced that the state will open to "normal" on June 30. While I'm happy about the prospect of wearing a mask much less, I imagine that I still will  wear a mask because the people who aren't are either vaccinated or not. It's the unvaccinated group that concerns me. It seems odd that the magic number to open was 70% vaccinated. The state is 51% totally vaccinated and 57% of the population has received at least one dose of the vaccine.

On another note, we are having a heat wave. Yesterday, it was 104 degrees Fahrenheit as the high and 67 degrees as the low. Today, the forecast is for it to be 111 as the high and 72 as the low. I can't remember a time that the upper temperature was that high. It will be an indoor day for me. I'm thankful for air conditioning! Restrictions on the number of people in a swimming pool have been reduced as have the restrictions for number of people in a cooling center.


Wednesday, June 23, 2021

How I'm Spending Wednesday--Today!!

Whipped cream & maple syrup--mmm good
This morning, we welcomed our granddaughters with day one of a several day visit. It is hard to tell just who is the most excited them or us! So far, we have cooked sourdough pancakes and bacon for breakfast.

We picked strawberries for the pancakes. With strawberries, one must have a little whip cream! If you are dairy intolerant, then one must have a little ice cream! When our daughters were about the granddaughters' ages, we often had waffles with strawberries and whip cream!

We put together overnight French toast so breakfast is ready to be baked when we wake up tomorrow. We drew some handbags. They humored me with the drawing topic because I need a red handbag for the label of my penguin quilt. Tomorrow, we will look at the felt scraps and see what we can make from the handbag one of them drew. We spent an hour at my friend's pool. They shot hoops with my husband and they also walked the dog before the pavement got too hot.

Oat milk ice cream is good on pancakes
This afternoon, we are going to be working on hand stitching projects. Miss K gets to make progress on her mermaid quilt. I think we all will sleep well tonight. . .well, that is after we tell stories and play games this evening.

Sunday, June 20, 2021

Month Six Purple--Rainbow Scrap Challenge

Purple strings 
Angela at So Scrappy is the one behind the Rainbow Scrap Challenge (RSC). This month, she chose purple as the color to stitch blocks. My friend, Martha, loved purple. She sewed many quilts with purple fabrics. She had a variety of purple strings in her scraps.

I started stitching the string blocks late Friday. I almost forgot to take a photo of the scraps at the beginning of the process! By the evening, I had completed four blocks. I had a good start on the second set of four blocks. Yesterday, I finished stitching the blocks. 

After six months of playing along with the RSC, the string bag from which I'm using, is no longer overflowing. As I've made blocks, I've separated the leftovers by color in quart zip lock bags because I'm thinking it might be easier to play along in a future RSC. I do have a plan for another string quilt which I plan to begin soon. 

Blocks before trimming
I continue to be awed at how quickly the blocks go together. Yes, there is some prep time. I cut enough black and neutral strips and then I sort the appropriate colored strips. Finally, I prepare the newsprint squares. Then, I'm ready to piece the strings!

I am amazed at how well the various shades of purple look when they are assembled in blocks. Red purple, blue purple, lilac, dusty purple and pink purple strips made their way into the blocks. If the strip was the right length, I used it without paying attention to the contrast or trying to make a coordinated block!

I did manage to cut one newsprint square incorrectly, so I "got to" make an additional block. I'll use the incorrect square as the label or as part of the back. It won't go to waste!

The few leftover strips
I'm linking to Angela at The Rainbow Scrap Challenge. I'm also linking to Cynthia at Quilting Is More Fun Than Housework.

Regarding COVID:

Worldwide: 1.78M cases; 3.86M deaths

United States: 33.5M cases; 601K deaths

Oregon: 207K cases; 2,783 deaths

Because of the uptick in COVID cases with the latest variant of the virus in the UK, Biden has kept flights from the UK to the U.S. grounded. The Canadian border remains closed.

Sixty-five percent of the population has received at least one dose of the vaccine in the United States. Meanwhile, the number of people infected with the virus has increased. Most of the cases are of people who have chosen to not be vaccinated. 

Finished purple string blocks
In Oregon, 57% of the population has received at least one dose of the vaccine. Last night, the Portland soccer teams could have 80% of the fans in the stands. People were excited to be able to attend the games in person. Many of the fans attended their last game March 1, 2020!

Wednesday, June 16, 2021

Family--Penguin Quilt--post 1

Applique in process
I've had this snowflake printed fabric for many years. I bought it thinking it would be a good background for a Santa Tree skirt. Then I got stymied as to how to make Santa's belt and boots show next to the snowflake fabric. It has been in my stash more than five years. Earlier this year, I decided it had "aged" sufficiently and I decided to use it as a ruffle on a Santa Tree skirt. 

In May, when I selected fabrics for this book club quilt project, I pulled this fabric too. I think it is perfect. I did purchase the white fabric with the little silver fleck in it. I drew the pattern on the snowflake fabric with a Bohn chalk pencil.

Finished applique
Then I layered the two fabrics and basted the two layers together. I began cutting on the lines and needle turning the cut edge. I worked on it in the evenings. By the end of the month, I had the majority of the applique finished.

This is a Pacific Rim Quilt Company 2-Fabric Applique pattern that Nancy Chong designed. Nancy has designed many two fabric applique patterns. Check out the link to see the what the company has to offer. The finished size is 24 inches wide by 36 inches tall. Click here to see a demonstration of the technique.
Pieced back

I felt I would be unsuccessful to cut the fabric around the eyes. I was stymied on how to be apply the eyes. In the end, I remembered Connie's advice from who has also made this pattern. She suggested appliquéing the pieces on top of the fabric and using a bead for the littlest penguin's eye. I appliquéd all the eyes. I used Liuxen Newman's technique of applique on the circle. I was successful enough. Can I do better? Sure. For this project, I'm pleased with my results.

One year at Spring retreat, I was gifted a set of fabric samples for a particular fabric line. I'm sure the fabrics are at least 10 years old. I liked them because a couple of the prints featured snowflakes and penguins. My oldest daughter liked penguins. She still likes penguins. From time to time, I would pull them out and look at them; but, I didn't know how to use them. I didn't think there was enough fabric to make a quilt.

Pin basted and ready for quilting
While I was appliquéing this project, I remembered the samples and decided that they would make the perfect back. I determined the arrangement and I thought that I would be close to having enough. Boy, was I WRONG! I had purchased a fabric with white dots on a blue background thinking it would work for some HSTs for Frolic. I pulled that fabric and it worked with the sample fabrics. I barely had enough to create the back. Actually, I could have used another inch in the width of the fabric; but, I "coaxed" the pin basting during the layering process and made what I had work.

I used a wool batting in this project.  I layered and pin basted this project. It is now ready for me to quilt it on my domestic 790 Bernina sewing machine. I'm thinking about quilting snowflakes in the upper corner of the white fabric. I'm thinking about echo quilting on the mama's body and straight lines for the daddy's body. I might do a sort of pattern on the baby's body. I'm thinking about using slightly different shades of white thread for the quilting on each penguin to help distinguish the penguins. I have an idea for the label that is different than what I usually do and it involves a red handbag. For now, as I "decide," I'm quilting the background fabric! 

This is my one monthly goal so I am motivated to have a finish by the end of the month!


Sunday, June 13, 2021

Jingle Bell Dance Blocks Completed

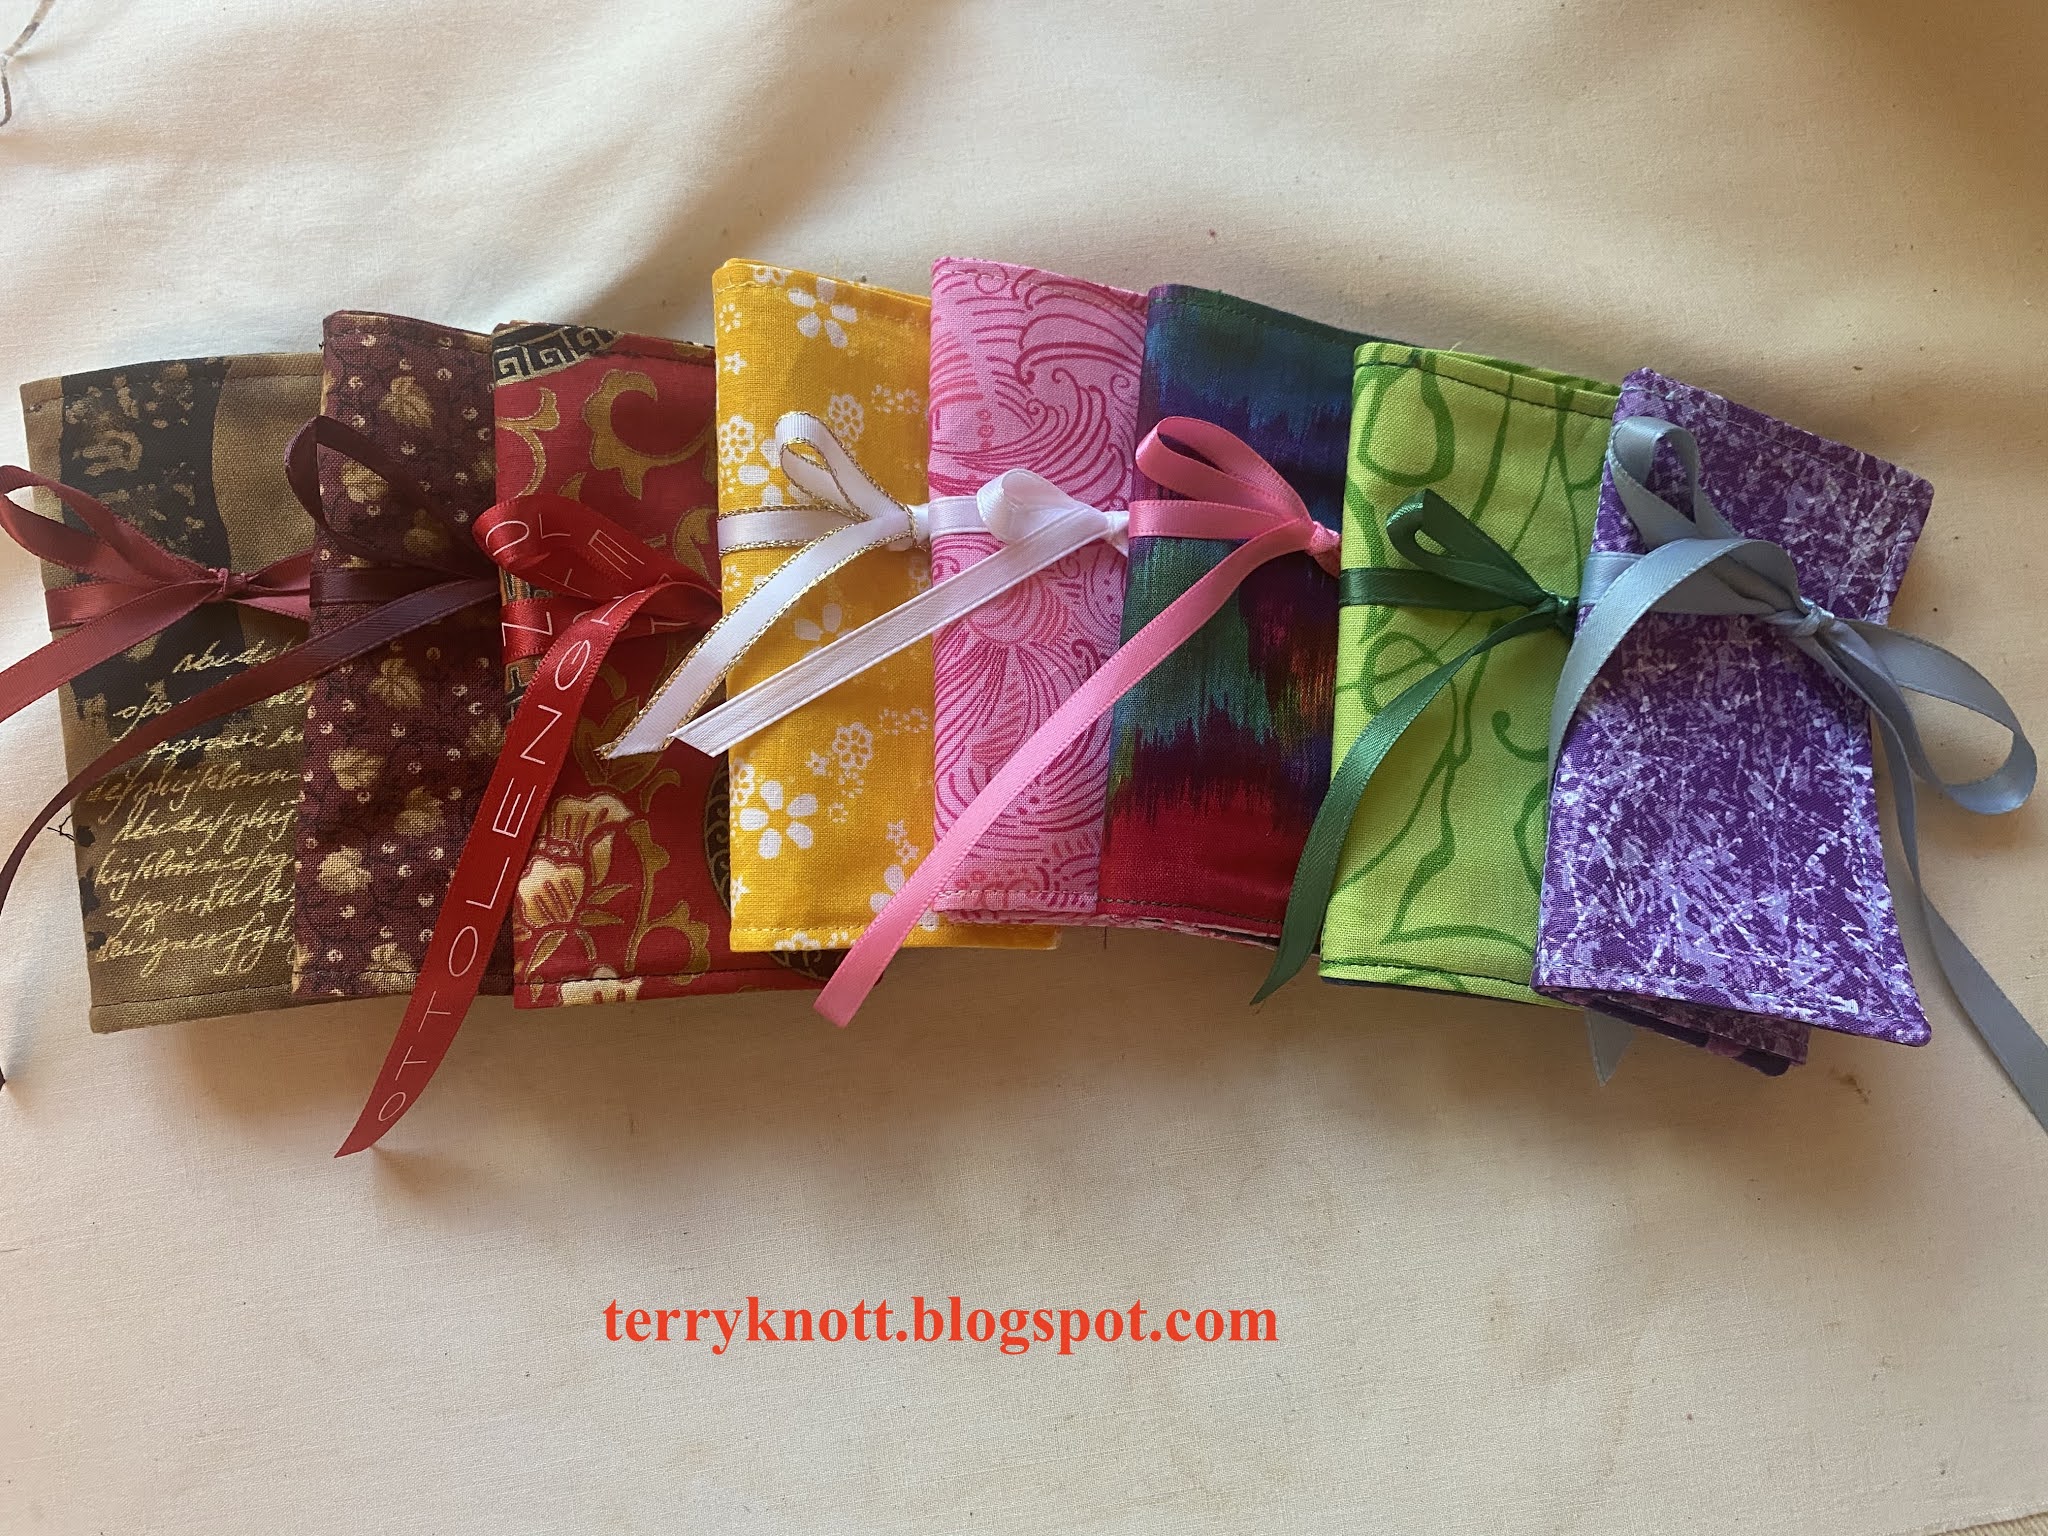
Scrap selection for the blocks
In May, one of the Mystery Mavens suggested we have a block swap. This small group formed to stitch the Bonnie Hunter mystery quilt because it is more fun to stitch a project together. Bonnie's mystery stitching begins in November and ends in January. We spend the rest of the year finishing the mystery or stitching other projects. Some members stitch other patterns of Bonnie's. It is a fun group of ladies.

Debbie suggested the swap and suggested the pattern. While I was "in" for the red and green color way because I have a lot of red and green scraps, others were not. In the end we decided to use the color wheel and to make complimentary colored blocks.

Joen Wolfrom's color wheel
My inner squirrel was all in for the swap. I resisted for about a minute. Fabric selection is the part of the quilting process that causes me the most angst. I believed practicing with the color wheel while constructing the blocks would be a good growing exercise for me.

The group also determined that we would use our stash and that we would make three Jingle Bell Square blocks and three hour glass blocks for each person who wanted to participate in the swap. Because this swap was to be fun,
we set the due date months out. We talked about kitting the blocks and sewing them as a leader ender project as a way to make blocks without taking away from sewing time on our other projects.

Rainbow color wheel
I planned to sew my blocks as leader/enders until I started to pull possible fabrics for the process. What you see in the photo is some of the green fabric choices. In my head, I planned red blocks with a green accent. I sifted through the chunks in the red drawer and pulled possibilities. I did stitch a few red blocks. Because I couldn't close the green scrap drawer, green became my main fabric color. 

I sorted the fabrics into color ways. Sometimes, it was a struggle to find the third red or green fabric to finish the block. Sometimes it was a struggle to find the red or green accent fabric! For the first blocks, I used Joen Wolfrom's color wheel. I liked it because it represents the true colors. Some of my fabridcs had a lot of gray tones in them which made it harder for me to decipher what colors I had. 

First block
I also used the  Rainbow color wheel. I liked this color wheel because it contained the complimentary colors of the shades. Sometimes to make a block, I had to use fabric shades to have enough fabrics. Of course, as I used up the scraps, my options became more limited so I had to stretch myself to really look at the fabric to determine what colors I was really working with.

I've mixed batiks, tone on tones, and small prints together as long as I could determine the color range was complementary. It was a good exercise. My eye is better at seeing the yellow or the blue hues in the green now. While I wouldn't say that I'm a color expert, I am more confident pairing fabrics. I also am more confident using the color wheels. I ended up using both through stitching the blocks.

Some of the greens from my stash
Once I had selected and cut the fabrics, I stitched them together following the block diagram. I did my share of unstitching. If there was a way to misplace a block element, I did it. I also did it more than once! Hour glasses oriented vertical instead of horizontal, center sashing that was flipped so the accent color wasn't against the inner hour glass block and points that didn't match, cut off or were floating in the background.

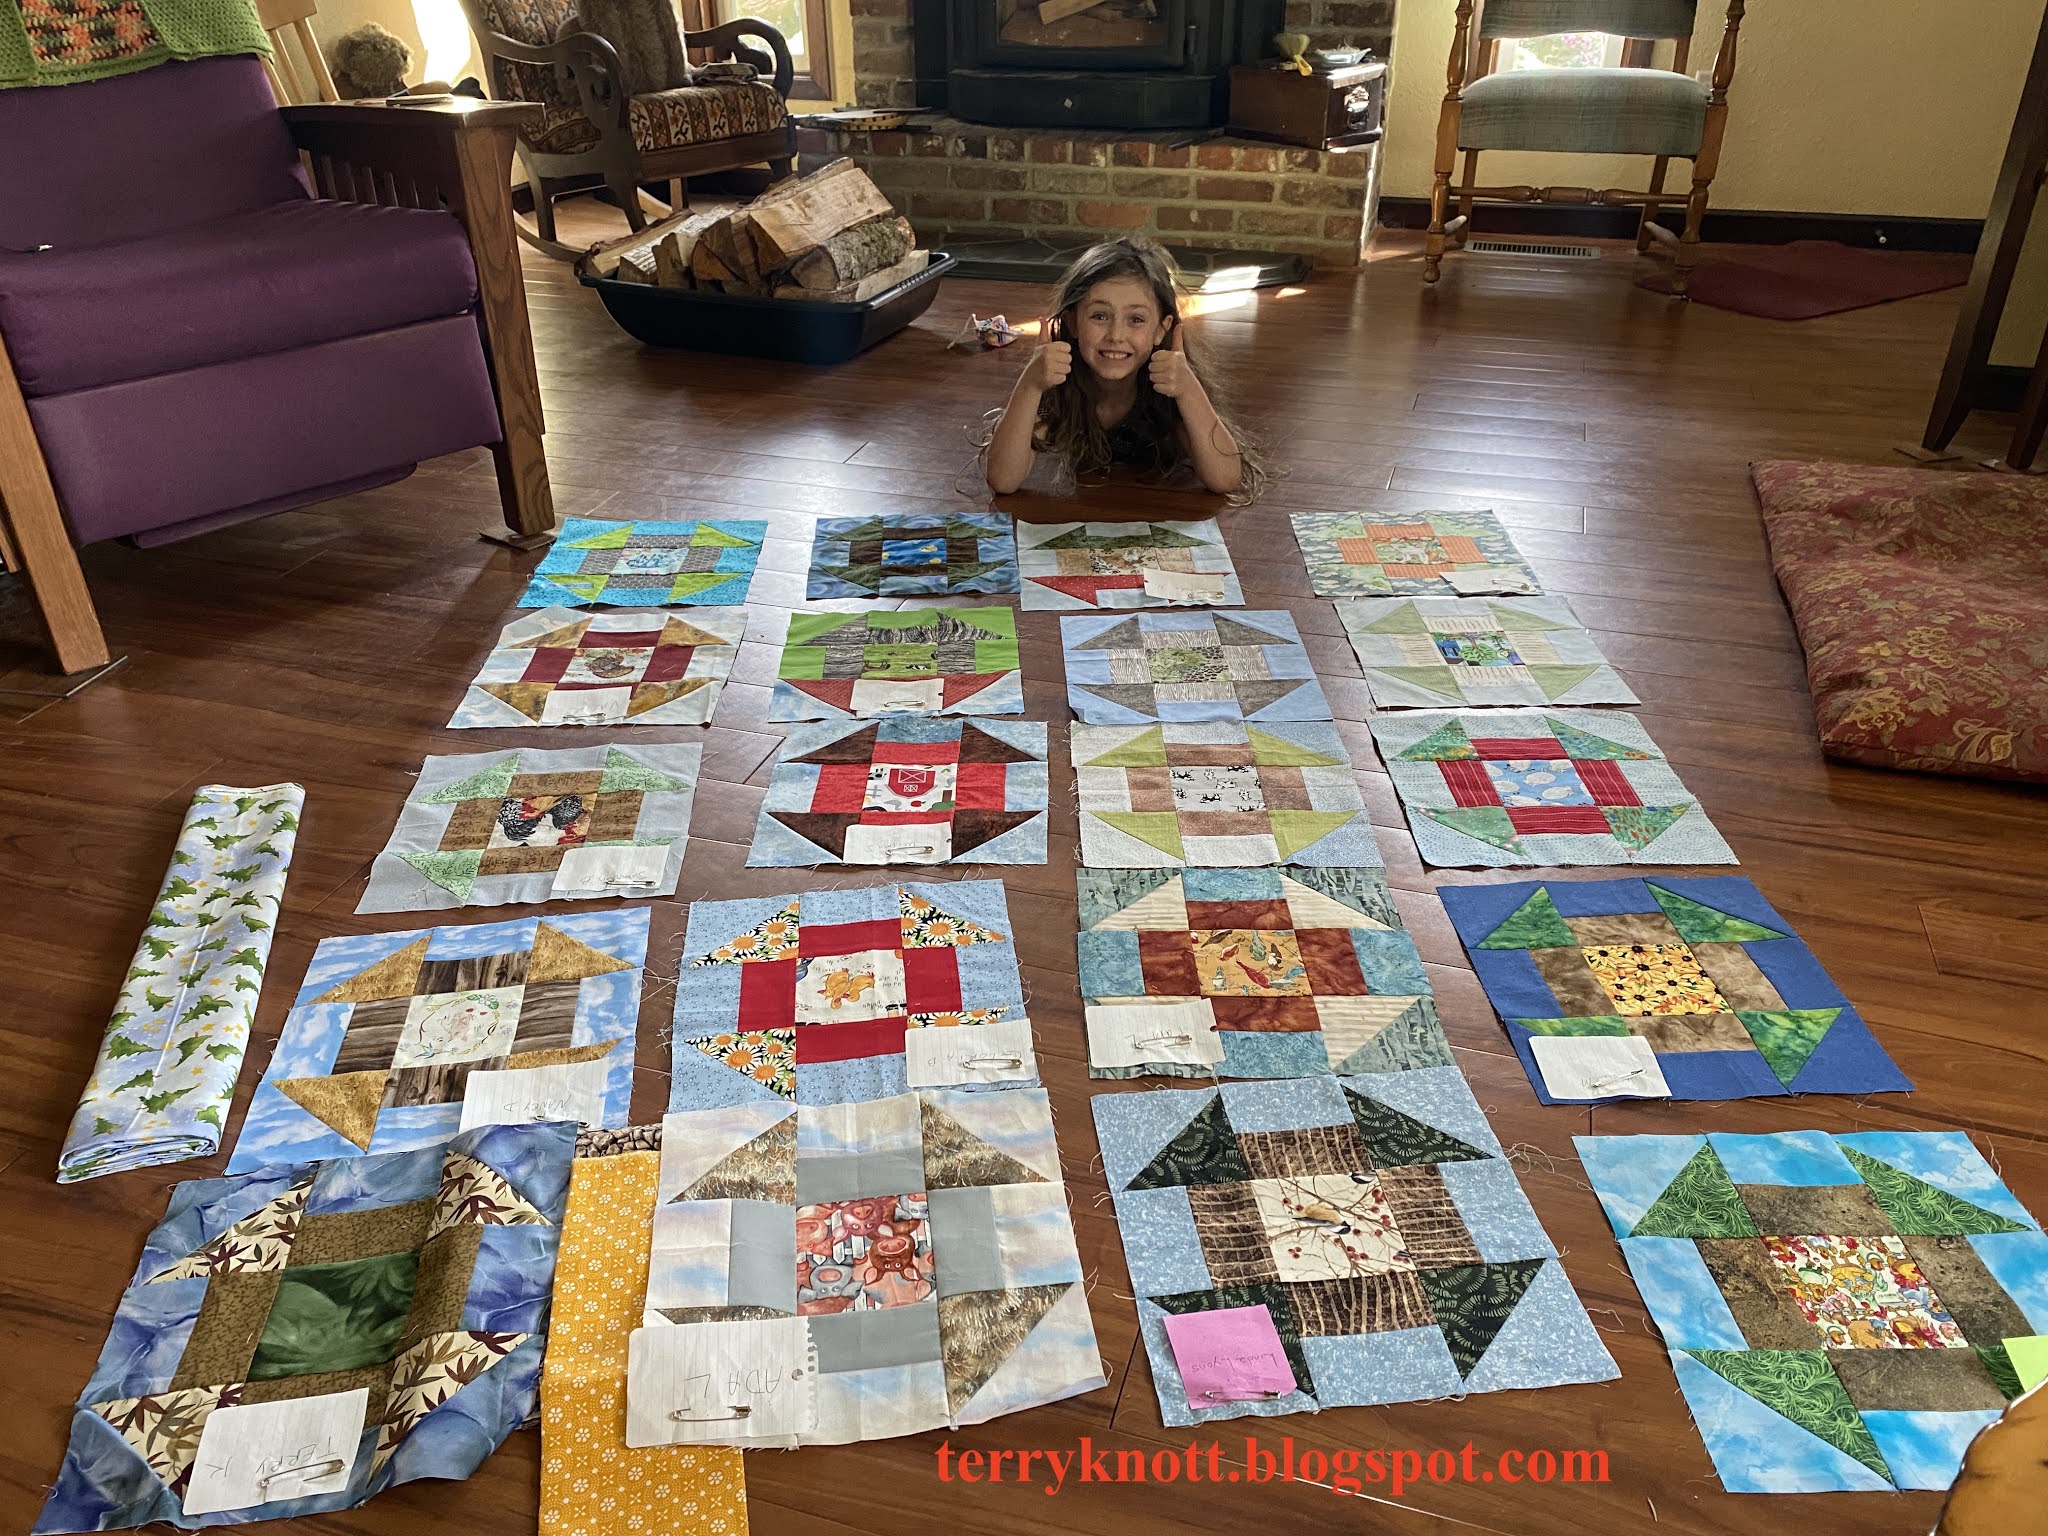
For a simple block, I found it challenging at times to end up with an 8 1/2 inch unfinished block! In the end, I finished the main blocks as well as the additional hour glass blocks for the exchange. My inner squirrel patted me on the back for stretching my fabric selection skills.

We plan to exchange the blocks towards the end of September. When we exchange, I don't know if I'll stitch the blocks into a 4x6 configuration or if I'll make more blocks. I don't know if I'll use the small hour glass blocks as a partial border or if I'll make more. My next steps will depend on what the blocks look like together as well as what my inner squirrel wants to do. Already, she is getting excited about the block possibilities that might be making their way to our studio!

Blocks ready for the exchange
This was goal number eight on my June goal list. I'm linking to Oh Scrap/Quilting Is More Fun Than Housework. I'm enjoying that my green scrap drawer closes easily. There are however many more block possibilities residing in that drawer!

Regarding COVID:

Worldwide: 176M cases; 3.79M deaths

United States: 33.4M cases; 600K deaths

Oregon: 205K cases; 2,759 deaths

In the United States, the number of deaths and hospitalizations continue to decrease. However, there is yet another variant which is causing an increase in the number of COVID cases.

In Oregon, about 56% of the state population has received at least one dose of the vaccine. Now, people could pick up a $100 gift cards for Safeway or Fred Meyer (grocery stores) when they receive their first shot.

Friday, the county where I live was moved from the moderate risk category to the low risk category. We have reached 65% vaccinated meaning that people have received at least one dose of the vaccine. This is a big step! We are also about five weeks from our daughter visiting us from London. . . .I hope President Biden lifts the travel ban soon so it will be easier for her to arrive!

Wednesday, June 9, 2021

Squirreling Around AKA Playing with Needle Punch Attachment

Needle Punch tools
My inner squirrel has been itching to get involved in other projects. She has been in my ear whispering her ideas as I've stitched leggings and Frolic blocks. She has hung out on my shoulder as I stitched my granddaughter's dress and the wool pincushion. I've been tentative to tune in to her thoughts or to acknowledge her presence because she often will sidetrack me to the point where progress on all other WIPs halt for months.

Samples of fibers used to punch
While I love her enthusiasm, I desire to finish more than I start! BUT, I did purchase this needle punch attachment at least four years ago. I never did more than read the manual and look at the parts that came with the attachment. I even bought the throat plate. My friend, JoJo, also purchased the same attachment. She hadn't used it either. We both had seen an in person demonstration of the attachment. I had even punched a few fibers myself at a demo.

JoJo suggested at our monthly Zoom catch up that we get the attachment out and play with it. I thought it was a great plan. The day arrived and while I had pulled a bunch of bits to play with, I didn't have a clue what would be my base fabric. She used a wool fabric square as her base. I thought about using a variety of fabrics as the base so I could see what a fiber looked like punched across the various base fabrics. In the end, I used a scrap piece of cotton velveteen. 

What fun it was to play with various fibers! I snipped a small pieces of white polyester lace. I free hand cut circles of metallic snowflakes. I used polyester ribbon, polyester lining,  polyester formal dress fabric and even some gold polyester netting. I'd been saving the frayed threads of fabric after I had pre-washed the fabric. I even used some acrylic yarn, wool roving and thin strips of waste cotton fabric. It was fun to see how all the fibers punched! 

Collaged top
In about an hour, I had covered the the face of the about
five inch cotton velveteen square. I went with a collage type approach. My friend used a more organized approach to her sample. We both enjoyed the session. We both thought that we would play with this attachment again. My inner squirrel is thinking about how to incorporate felting in a quilt project. I'll let her ruminate on that issue. I hope that she will be "occupied" trouble shooting what challenges could happen using needle punching in a quilt.

I decided to make my "top" into a pincushion. Yesterday, I dropped by a Goodwill store to check out their tin and glassware sections. I didn't find a square decorative tin to fit the bill; but, perhaps, the glassware container that I purchased for two dollars will work. If not, I'm not out much money.

Perhaps, my inner squirrel will also figure out how to convert the top into a pincushion! This was goal number 11 on my June list and it wasn't listed on my 2nd Quarter goal list.

After finishing the play session, I thoroughly cleaned my machine. While I anticipated a lot of lint in the bobbin area, there wasn't as much as I had expected. Perhaps, punching mostly polyester fibers was the reason for the lesser amount of lint. At any rate, my next project is to stitch the exchange Jingle Bell square blocks for an exchange that I'm participating in September. 

Sunday, June 6, 2021

May Recap and June Goal Setting

61 full blocks of Frolic
In May, I listed nine projects to either finish or move forward toward completion. I fully finished the president's block, the wool pincushion and my granddaughter's dress. I did finish five pairs of leggings. Four for myself and one for my granddaughter. My granddaughter's pair was too large so in June, I'll revamp them so that they fit. I'll also make a pair for her sister. I also finished all of the pocket wallets

I did piece and sash all the blocks for Frolic. I even stitched the center together. It measurers 109 inches by 109 inches. Now, I'm trying to decide if I want to piece a border, or add a strip and then a piece a border or do I want to call it finished. I don't know what the next step will be; however I'm happy with my progress. 

I did begin my book club quilt for the book "How the Penguins Saved Veronica." I am about two thirds of the way through the software lesson. I did complete the blocks for the Rainbow Scrap Challenge and I am caught up with the Temperature Quilt project. I met eight of the nine goals that I listed and made progress on the ninth foal.

Five months of blocks for the Temperature Quilt
I was a winner of a gift certificate from "The Fat Quarter Shop." Thank you to Patty at Elm Street Quilts and her One Monthly Goal (OMG). She drew my pincushion project!

I also helped 47 staff earn their American Heart Basic Life Support certificate. I helped four lifeguard instructor candidates earn their lifeguard instructor certificates. All in all, it was a great month.

Thank you Linda H for your kind comment about my progress. It came at just the right time. I was struggling with getting back to the "water" side of my life and having less time to quilt!

For June, I have a plan. It was easier to write the pan this month than it was last month. My inner squirrel, however, wants
Book Club quilt
to start new projects. I've tried to stall her; but, she is relentless in tempting me with more projects every day. We have had serious chat sessions; however, she's talked me into beginning new projects this month. 

My June list:

Tree skirt 
1. Continue with the Rainbow Scrap Challenge. This month the color is purple! I also plan to continue piecing Temperature Quilt blocks. So far, I've kept up with completing the blocks each month.

2. Finish my book club quilt. It is a hand applique project. In May, I worked on the project during waiting times and in the evenings. I made fair progress on this project. Actually, I need to appliqué the eyes and I'm ready to figure out the back for the project! 
A possible border for Frolic

It takes time to hand applique. While I enjoy the process, I probably should have started this project in April! This is going to be my OMG this month. Check Out Elm Street Quilts. Patty writes an entertaining blog in addition to being home to the OMG. If you want to participate or be inspired visit the OMG at her link: Elm Street Quilts One Monthly Goal June Link-up

3. Make the top of the tree skirt that I cut out at the end of February. 

4. Determine if I'm going to add a border to Frolic. If I'm adding a border, determine what kind of border. This project continues to be such a process! Some projects are like that. This project has had a mind of its own since the beginning of the mystery in 2019! I am so looking forward to having a completed top!!!

5. Work with Miss K so she can finish her mermaid quilt. She is so close!

Jingle Bell Square possible fabrics
6. Make progress on my CCQ challenge quilt. I haven't started! August is when I need to enter the paperwork for the project and it would be nice to at least have the top finished!

7. Finish the 3rd software lesson that I started last month and begin another.

The next projects on my list are from my inner squirrel. 8. Start making "Jingle Bell Square" blocks. My Mystery Mavens small group is planning to do a block exchange and I want to participate. Jingle Bell Square is a Bonnie Hunter pattern. The block fabric rule is to choose complimentary colors from our stash fabrics. My inner squirrel is looking forward to working with the color wheel. I need to make 24 blocks to exchange and possibly some smaller hour glass blocks by the end of September.

Sash these blocks with Miss J
9. Start a selvage block project. I've lots of selvages. My squirrel first whispered in my ear about a project months ago. It's been awhile since I let the squirrel out to play. I hope that allowing her this playtime doesn't mean that she takes me down a rabbit hole. Taking me down a rabbit hole often happens when she comes for a play date!

10. Work with Miss J on sashing the blocks that I won at the spring retreat last February. She has the blocks labeled
to be sure that we stitch them as per her layout. I've preshrunk the sashing fabric. I need to cut it and help her sew it to the blocks.

11. Play with the needle felting attachment on my machine.

Last, I may make progress on other projects listed on my 2nd Quarter goal list. Time will tell. 

Regarding COVID: 

Worldwide: 173M cases; 3.71M deaths

United States: 33.4M cases; 596K deaths

Play with this needle felting attachment

Oregon: 203K cases; 2,717 deaths

This past week, the Oregon governor announced restrictions will be lifted once we reach 70% vaccinated adults age 18 and older who have received at least one dose of a COVID vaccine. The million dollar lottery incentive hasn't spurred on people to become vaccinated. At last count, 66.2% of the population is vaccinated. About 127,000 more people need to be vaccinated to get to 70%. On June 1, 4,885 people were vaccinated. In mid May 20,000 people a day were vaccinated. Later in the month it dropped to 12,000 people a day. I'm so ready to be maskless!!!

Wednesday, June 2, 2021

Pocket Wallets--Fifth Finish 2nd Quarter 2021

Fabrics for pocket wallets
At the end of April, I cut out fabrics to make 11 pocket wallets. I made one of these from materials gifted in our bags at the March on line retreat that I attended. I chose fabrics that the recipients would like from my scraps drawer. 

The pattern which takes two pieces of fabric that are 5 inches x 11 inches and one piece of fabric that is 6 inches x 11 inches. I takes a couple pieces of ribbon for the tie. I added a piece of light interfacing or stabilizer to give the pocket wallet a little firmer feeling.

The ribbon ties came from a gallon zip lock bag I picked up from the free table at a guild meeting several years ago. The bag was stuffed with a variety of ribbon widths, colors and lengths. I have used a lot of ribbon from that bag so it was a good item to bring home! 

Pattern and a finished wallet

By the middle of the month, I had given away three wallets. One for a birthday and two for Mother's Day. At the end of the month, I had eight more pocket wallets to stitch. After I had finished my granddaughter's dress, I pulled out this project. In a couple afternoons, I finished all eight of them.

Inside view
I don't know how well I would like tying the bow every time I opened the pocket wallet. I do think they make a wonderful container to "wrap" small items or to insert gift cards. I like giving gifts that can be a
Eight finished pocket wallets

vessel to another gift. I also like giving gifts that I made and can tailor to the recipient's likes.

I plan to put needles and other small notions in a couple of these wallets. I plan to put gift cards and jewelry in another couple. They sure look "festive" lined up with their bow ties! The eight finished pocket wallets represent five birthday presents and three Christmas presents.

I do see being able to put a car or house key in one of the pockets, a little cash in another and a credit card in another which leave a pocket for a tissue, chap stick or ???

I used one and one quarter yards of stash fabric in this project which bring the total number of yards used from my stash at four and half yards. This is finish number seven on my May goal list. The fabrics for the project were in a photo in my 2nd Quarter list; but, I didn't actually list the project. Any finish is good! Now on to determine my June goal list!