Monday, March 26, 2018

Leeds Castle, Dover and Canterbury--day three of the London Adventure 2018

Leeds Castle
Jérôme had another breakfast packed for me and both he and Nicole walked me most of the way to my bus stop on the second day of my pre-planned tour days. The hour bus ride to the meeting place was more relaxing because I knew where I should be going after I exited the bus. Meeting up with the tour was just as easy as it was the previous day.

One of the interior rooms
Our first stop was Leeds Castle. The symmetry of the Castle and the openness of the grounds made it my favorite of the English castles that I've visited. Upon arriving, we were treated to a small sample of the honey mead that King Henry VIII liked so much. I'll admit it, the honey with the alcohol was a good combination. I was glad that the taste was small because the drink packs a punch! Then we had a couple hours to view the interior of the house.

Before I went, I did know that a wealthy woman had purchased it in the 1920s and then spent about the purchase price repairing and refurbishing it. I also knew that she threw huge parties on the weekends that movie stars as well as other political celebrities attended. What I didn't know was that she had an outdoor swimming pool installed with heated water and that during WWII she turned a portion of the new castle into a hospital that served badly burned pilots on both sides of the war.

White cliffs of Dover
I also didn't know that you could stay there as a bed and breakfast and there are even upscale tents available for families. Some families come and spend the day there as there is a castle filled with all sorts of activities geared to kids and families.

The next stop of the day has been on my bucket list--to see the white cliffs of Dover! The bonus was to see how narrow the English Channel really is and to read about swimmers who prepare and train to swim the channel from May through October.

Outside of Canterbury Cathedral
Then, we drove to Canterbury to see the cathedral. I had no desire to see the cathedral until I read several fictional historical novels  of King Henry VIII by Philippa Gregory.  I was particularly interested in the life of Thomas Becket who was murdered in the cathedral. My
mom and oldest daughter had visited years ago. Each had their own reasons for why it was the best cathedral on their lists. The outside is currently under going restoration. I snapped a photo of the area recently finished.

I appreciated the grounds and interior of the church. I am awestruck at how structures built so long ago are still used as they were intended. What amazing craftsmanship and preservation!

Suspended clothing sculpture
I was drawn to an exhibit that was displayed in the center of the church. It was entitled "Suspended." It was made of clothing that refugees left behind on the beaches and camps of Lesbos and Calais after being offered clean clothing to replace what was wet and dirty. Each piece of clothing was suspended in an artful way. The entire piece was lit from the center. It is one of three exhibits that the church is sponsoring to commemorate the 100th anniversary of the end of WWI. The exhibits highlight the impact of war and the Cathedral as a place of refuge. This exhibit will be in place until May 16, 2018.

Jérôme's truffled potatoes and white fish
The last stop of our day was Greenwich and we took a boat from Greenwich to where we wanted to get off. I got off at Tower Bridge. It was another full day. I couldn't figure out how to
get myself back to Nicole and Jérôme. Turns out, I was on the wrong side of the bridge--no wonder I couldn't find my way. Starbucks was near so I had a coffee and Jérôme came to escort me home. I'm thankful for WiFi and for cell phone technology.

For dinner, Jérôme served baked white fish with an accent of melted cheese; grated carrot/chopped onion salad; potatoes par boiled and finished off in the oven with garlic and a hint of truffle oil. It was delicious!

Since this is the last post of the month, I'm sharing the number of students that I taught this month.  Eight students in a lifeguard class; 17 students in swim lessons (YTD 23) and 23 students in Basic Life Support CPR (YTD 73) class. I taught a total of 48 people in March (YTD 152)!

Sunday, March 25, 2018

Windsor Castle, Stonehenge and Bath--day two of London Adventure 2018

The guard moving off shift
This morning, Jérôme, made me a breakfast sandwich (bread and cheese). Nicole packed me a few fruits and crackers for my tour. Jérôme even walked me to the bus stop as they had figured out the best route for me to meet up with the tour. The bus ride took about an hour and I easily located the meeting place for the tour.

Stonehenge  
Our first stop was Windsor Castle which is one of the places that the Queen resides. She was not at home so there was no chance of running into her. I enjoyed touring the grounds and the various rooms of the castle. I even saw the parade of the changing of the guard which was unique!

Next up, we drove to Stonehenge. Visiting this location has been on my bucket list. Had I come one day earlier, I wouldn't have been able to see it because of the snow! As it was, one walkway to the stone wasn't cleared of snow but, the rest of the area was cleared. Most of the snow had melted from the previous day leaving what had been cleared along the roadways as a reminder of the significant amount that had been there!

Dwelling interior
It was windy and cold. I thought that the sky was particularly interesting. At the visitor's center, there were some replicas of the homes that were thought to have been in the area when this was built. I liked looking at the home furnishings. Each dwelling was furnished differently so each was worth a peek!

The last stop of the day was Bath. The Romans built the structure. I enjoyed walking through the rooms. There are hologram movies that are played in many of the rooms to give you an inside view of people using the baths back in the day.

The main bath
I thought that pumping the water, holding it in place with a lead lining, as well as building a structure to house it all, was amazing design and skilled workmanship. In its day, the amount of people who used the "spa" were varied and many. Now, the water isn't filtered so the baths aren't operable; but it was unique to see it.

I was also amazed at the stonework for the flooring and foundations. Various techniques were used and updates were made over the years.

This day, I walked 8.7 miles. The previous day, I walked 6.5 miles and my knees were swelling; but my feet were okay! The reason I walked a couple extra miles was that coming back to my daughter's, I missed turning on a particular street so I had a more scenic route!

Wednesday, March 21, 2018

A Departure From Quilting--London Adventure 2018

My travel project.
Last August, I decided to visit our daughter in London, England this Spring. I bought the tickets in September. It seemed like a long time to wait; but, March 18 arrived and I was flying to meet her and her boyfriend.

When I travel, I pack a handwork project in my carry on bag. This blackwork project of different eight blocks with a Halloween theme has been in the travel box for a number of trips. This is what this block looked like when I left Oregon. I stitch in the airport or maybe on the plane or maybe in the evening. It is a good project because there is no thinking. . .just stitching!!! You can see the other finished blocks here.
Graphic wall in San Francisco
View of the landscape
Visiting my daughter, means leaving room in the suitcase for "goodies" to share from Oregon as well as leaving room for special essentials. Originally, I had packed the checked bag to be about 45 pounds; then, I added a few more "needed" items. Imagine my shock at the check in counter when my bag weighed 63 pounds and it would be an additional $200 to send it.

I can think of many other more fun ways to spend $200, so I transferred goods out of the bag I planned to check. First, I filled the carry on. Second, I filled my handbag and last, I filled my coat pockets! It was a tight fit; but all items made it to London. I had to laugh at myself because I had a pound of filberts in one pocket and a pound of almonds in the other pocket which made my coat heavy to wear! My purse and carryon bag was packed so tightly that both could have been turned upside and shaken and nothing would have fallen out. This was a good thing because the bags were too full to zip and they were knocked over during the trips so the theory was true!
Coffee at Cafe Ne

I snapped a photo of a wall as I walked to my gate at theSan Francisco airport. I thought that the line shapes were interesting and of course I was drawn to the bright colors! This trip, I traveled solo. My sweet husband isn't in to long flights. Traveling on my own was okay. The flight left San Francisco at 4 in the afternoon and arrived in London at 9:45 in the morning. I slept about five of the nine hour flight. I was surprised to see snow on the landscape as we approached Heathrow airport.
Walking along the River Thames
Jérôme met me at the airport. He treated me to a coffee at Cafe Nero to help me stay awake during my first day. We rode the train to Central London. He prepared a proper French lunch for me---pasta, meat/vegetable sauté with a glass of wine. Yes, there was a cheese course after the main course and the last course was a chocolate cake that he baked specially in my honor. It was delicious and I felt honored!
Fruit display at Borough Market

After lunch we walked along the River Thames past Tower Bridge to Borough Market. On a Monday, a number of stalls were closed; but there was still lots to see! I love the colors in the vegetable/fruit market! We also stopped at a French cheese shop to compare the cheeses that I remembered eating in France last August with the ones that I could purchase at the market.

On the way back, we walked to St. Paul Cathedral which is a beautiful old structure surrounded by modern architecture. We found a book store and I picked up a couple of books for the grands.

We walked through the bank district and by the Monument to the Great Fire of London in 1666. I had read the facts about it; but, hadn't seen it. It was impressive! The weather was cold and windy; but, there was no rain. Sometimes, we even had some sunshine.

Thanks J and N for make my first day so special!
Enjoying the sights on the way to St. Paul Cathedral


Sunday, March 18, 2018

Painting the Truck--post 1 of 3

Painting an old truck
Last September, I took a two day class, Luminous Painted Illusions, from Esterita Austin. The class was at the NW Quilting Expo in Portland, Oregon. In writing this blog, I learned that this truck is featured in her student gallery. I am honored!

Near where I live, this old truck has been parked in a field  promoting a plant nursery for years. Each year, it has become a little more rusted which has added to its character. Last year, the property was sold for development. The time it will be spent parked alongside a busy road, must be short. Of the photos, I submitted, this was the one that Estertia picked. I'm so glad she did!

This was the second class I took with her as an instructor. I have no artistic background. I grew up in a small farming community. There were less than 80 students in my high school. When I was in elementary school, art projects were basic. I can remember using chalk on black construction paper thinking what a cool process that was. I only remember using water color paints once.  In high school, the closest program to art was either home economics or shop classes!

Esterita explaining the process of fusing 
Esterita is a retired middle school art teacher. She is an entrepreneur who developed the product Misty Fuse as well as painting techniques for people like me! I could follow her directions and had fun creating this piece of "art!" She empowered me to keep playing. She made me feel like I am artful! If she is teaching in your area, sign up for her class. You will learn a lot and have fun too!

The process was to come to class with a full size photo. I took an 11x16 inch size; but, next time I will make it larger like at least 16x20 inches. We made a line drawing of the photo on a piece of medium weight vinyl with a black sharpie pen. From there, we used the line drawing underneath a piece of parchment paper. We painted in the details with metallic paints. I was shocked that I actually finished the painting before class had ended! With help from Esterita, I was surprised that I could actually blend paint colors to come up with rustic colors that fit my project!
Possible border fabrics

Once the painting was finished, the parchment paper was layered with misty fuse and transparent organza.  Using a warm iron and taking care to keep the iron moving, she fused the misty fuse to the organza and the design transferred to the organza. The metallic paints worked so well! Unfortunately, I was so into the process and experimenting that I forgot to take photos while I was working on my truck. I do look forward to playing with her technique again.

Esterita layered and quilted her projects at this point. I wanted to add borders so that my piece resembled a framed painting. Last October, I purchased a piece of gold/rust Grunge fabric by Moda that I just knew would be right for one of the three borders that I had planned. As I auditioned the pieces for the borders, I found that maybe that piece was too strong. I pulled other fabrics from my stash. In the photo you can see the variety of possibilities.

In the last photo, you can see my edited fabrics. Although it took me along time to pull the fabrics and to audition them, I was able to narrow my choices. Even better, I like the choices that remained! I'm planning to make three borders--a narrow black, followed by a wider orange, followed by a blue. I haven't gone further with this project because I have an idea of how I want to finish the edge. It is a variation of a facing, but since the idea is in my head, I haven't tried it. I will test my idea on another project before I add the borders to this project.

Edited border fabrics


Wednesday, March 14, 2018

Crayon Doodle post 1

Miss J's doodle filled in with coloring
This quarter, our book club read "Sweetness at the Bottom of the Pie," by Alan Bradley. In January, I purchased a couple fat quarters that spoke to me for making a project which was inspired by this book. At that point, I was a few chapters into the book.

By the time that I finished the book, I wanted to focus on another element. The character rides a bike as she solves a mystery. She rides that bike, which she has named, "Gladys," all over the countryside. It made me think of a cartoon where the cartoonist has shown the path a kid has traveled to bring his mother something she requested or the path that he traveled to come home. . .in both cases, the path was far from direct!

Our youngest grand had made a drawing for me months ago. It was simple lines. I decided that I wanted to preserve her work in my art. So I asked permission--it is important to ask the artist for permission to use their original work! She said yes!
Drawing with marker applied over crayon

Doodle outlined with black marker
In February, I took it off the refrigerator and we colored it. Then, I had the idea that I would transfer the design to a piece of fabric.  The transfer didn't work well because we hadn't colored with Crayola brand crayons. So, we filled in the spaces with Crayola brand crayons and ironed it again. The color choices and most of the color placement are all Miss J.  I liked it better; but, it wasn't vibrant enough. I had some fabric markers so I colored over the crayons.

The drawing at this point reminded me of looking down at the countryside while flying over it. I liked the drawing better with the marker applied. I think it needs a little machine embroidery and of course, machine quilting! I'll let it set and talk to me for a bit. It will be interesting to see what results from our conversations!

Sunday, March 11, 2018

Selvage Tote--9th Finish for 1st Quarter FAL 2018

Selvages crammed into a plastic bag
As I've cut fabrics for projects, I've saved the selvages into a plastic bag. I filled the bag. I used more fabrics and saved more selvages. I crammed the selvages into the bag. When I couldn't cram any more in the bag, I laid them on top of the bag. I used more fabrics and saved even more selvages. These last selvages I threw in the general direction of the bag. Consequently, the floor became a storage vessel. . . .which is not good! The time to use some of these selvages had come!

Pattern and some of the fabrics
I selected my pattern along with a piece of 70s calico, that I was gifted and that I intended to use as a foundation for piecing the strips. It took longer than I had envisioned, but, I did stitch the selvages into "fabric" for the main bag. The pattern used a random selection of 1 1/2 inch to 3 1/2 inch strips.  Two separate panels were to be constructed.
Selvage fabric ready for quilting
I decided that it would be easier to match the panel side seams if the front and back were cut from one piece of fabric so I stitched one panel and cut it into pieces. I used an overlapping technique of stitching the selvages. You can click here for a tutorial by Avery Lane Sewing. My "muslin" square was 42" x 27"!

I liked the color effect of using the printed edge of the selvage in the grouping. Another time, I might try a different technique with the selvages, like glue basting them together and omitting stitching them to a foundation. Also, 42 inches can be unwieldy so I might try two 22 inch wide sandwiches next time. In the end, my muslin square wasn't quite wide enough.  You'll need to keep reading as to when I discovered that as well as what I did to remedy the issue.

Webbing that created some challenges
I could have layered my selvages onto the batting and backing and quilted as I went. I decided I would layer it all after I had finished. Yes, I would have an extra layer of cotton fabric in my bag; but, I decided that this would add more substance to the bag.
Sorted selvages

When I finished stitching the fabric, I sorted the remaining selvages into a plastic bag that has lengths longer than 42",  a plastic bag that contains selvages between 18" to 42" and a plastic bag that contains less than 18" lengths of selvages. I still have a lot of selvages! I hope that my updated storage system is more useable as I have several other projects noodling in my head that I would like to make. I do plan to stitch another project sooner rather than later so that I can deplete these plastic bags of their contents a bit and keep the storage system under better control!

I pulled out my 80/20 batting scraps and found that I had a chunk that was almost the right size; but, not quite. I pieced it.  For bags, placemats and small projects, I will use pieced batting. Yes, it takes time and thread to stitch the pieces together. Yes, the batting gets a bit wonky. By the time it is quilted into the project, you wouldn't know that the batting is pieced. I'd rather spend my money on other supplies so I will take the time to piece together the leftover pieces of batting and have them ready for use.
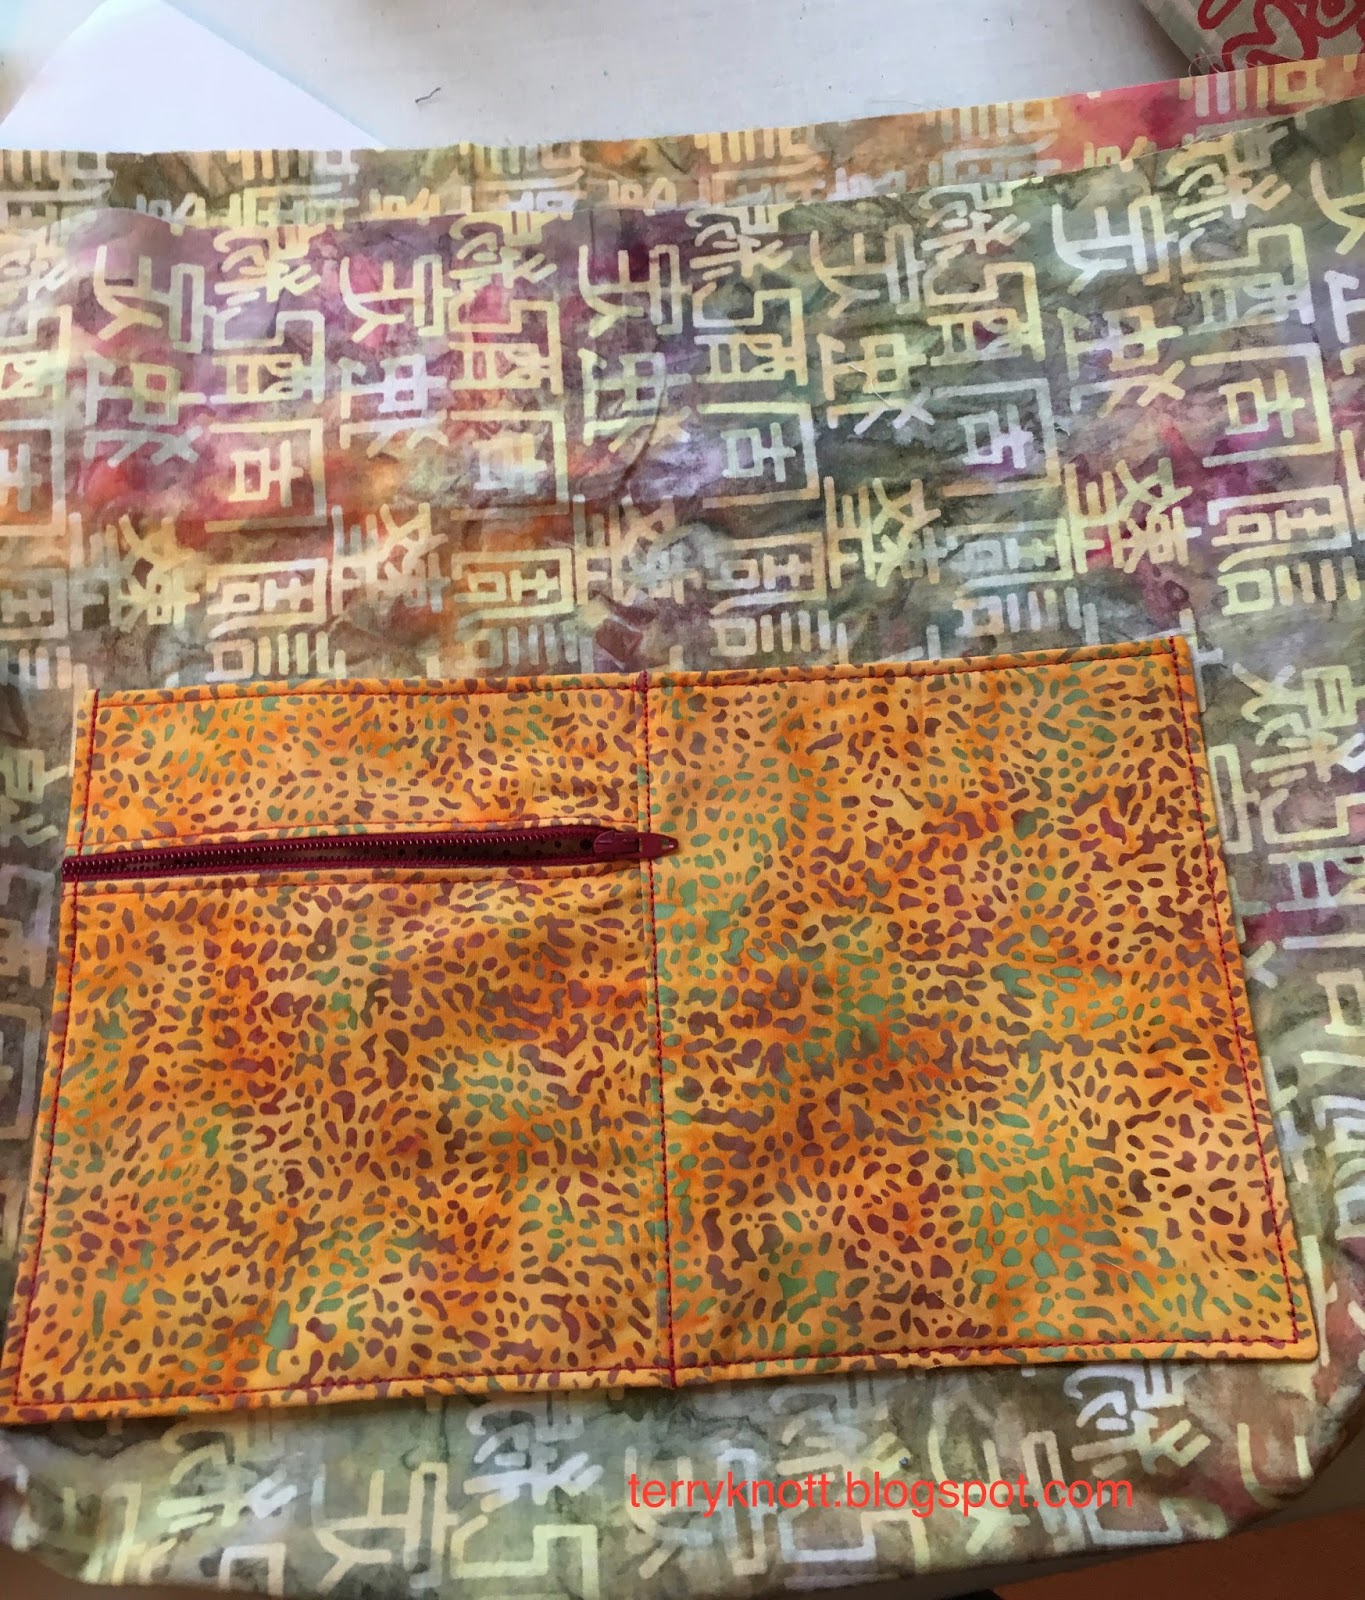
Inside pockets on the bag back 

As I quilted, I found that my 39C foot produced the best results for stitching 1/8"-1/16" from the selvage edge. I tried a variety of free motion feet and the walking foot.  Moving the needle slightly to the right achieved the close edge stitching. Since the foot had more contact with the selvage edge, it was faster and easier to quilt the strips. Sometimes, free motion quilting isn't the best alternative!

My end piece was about 20"x26" and it should have been 21"x26". I didn't think that the inch would matter much so I added the outer pocket and began working on the inner pockets. I'm glad that I had pinned the inner pockets in place because when I added the 2" webbing, I found several challenges. First, I chose that webbing because I liked the design and because I thought that two inches would feel better carrying the bag weight on my shoulder than the 1" that was listed on the pattern supply list.

Finished bag back
I didn't have enough room for the inner pockets with the 2" webbing. I also realized that the additional outer pockets that I added to the bag back, would interfere with the usability of the inner pockets. I thought about what to do. I decided that I would remove the outer pockets from the bag back.

I decided to add 3 1/2"  pieces to each side of the selvage fabric. Of course, I would need to add strips to the lining as well. In the end, this was a great solution. First, it made the bag a bit larger so my cutting mat slides in easily. Second, I no longer had to be concerned about matching the selvages at the side seams. Third, the strips added a nice decorative touch to the bag. Fourth, I used more of my stash!!

The lining fabric I bought more than fifteen years ago. When I tried to use it in projects, I either didn't have enough or the grey in the green fought with my other fabric choices. I have petted it often over the years. Now, I have about half a yard left! The rust red fabric that I used for the binding, pockets and side pieces were purchased when I visited our youngest daughter in Philadelphia about twelve years ago! Just a few strips remain of that fabric!

Finished bag front
I bound the edges of the tote with binding which made for a nice finish. Joie, my Bernina 790, stitched through all the layers beautifully. She stitched through the thick portion of the bag bottom which contained the pockets and the webbing like she was stitching on two layers of cotton!

I love the finished tote and I have an outer pocket for another bag in the future. Another time, I might use a lighter stabilizer as this bag is fairly heavy empty! This is my ninth finish for the quarter and goal number 11 on my Finish-A-Long list. 

I used five yards of fabric from my stash which brings my "net loss" of fabric for the year to eight yards. (Only 42 yards to go to meet my goal of 50 yards for 2018!)


Wednesday, March 7, 2018

A Power Issue and "Dad's Ties"

A box containing some of my grandad's ties
A few months ago, my mom was doing a bit of down sizing and sent me a large sack of fabric--mostly non cotton fabrics and this box. I'm thinking about what to do with the fabrics; but, decided to check out the box.

My granddad died in 1991.  His wife, my grandmother, saved some of his ties. She died in 2004. I helped my mom clear my grandmother's house; but, I didn't remember handling this box.

My granddad was color blind. Generally, my granddad wore overalls and the same color/style of shirt when he worked in his manufacturing shop. He built pumps. If he needed to dress up, he would have selected one of two suits that my grandmother would have had hanging in the closet. She hung the whole outfit together so his colors would go together. That's my grandmother's handwriting on the box.

Last Saturday, while I was stitching in the studio, the lights slowly went out, came back on briefly and then went out. I thought we were having a power outage. When I went to check another room of the house, I was surprised that it had power.

I thought that I had tripped a breaker so I checked. . .nope. There was no power to our bedroom or the studio; but, there was power to the plug we had installed in the floor so
The tie selection
I could keep sewing. (I did.) The rest of the house had power. It was just odd that there was no power to the back of the house. My sweet husband called the power company who came out and checked that we were getting a sufficient amount of power from their power box to our house. We were.

My husband decided it must be a wiring issue so he called a couple area electricians. Monday,  he received a call back from one company and he scheduled an appointment with an electrician for Tuesday. I agreed with his wiring speculation on the issue. Although I didn't voice it, I thought the iron might have been the cause.

My husband, prepared the areas--the crawl space, the breaker box, the areas in front of all the plugs. This was no small task! On Tuesday, the electrician took a couple hours to find the issue and to repair it. Part of our house was built in 1928. Part of our house was built in the 60s and part of our house was remodeled in 2011! So following the path of the wiring in the house was a puzzle.

Removing the interfacing
In the end, hours of running the iron on the same circuit as all the rest of the lights between the two rooms, television, phone, clock and sewing machine was the cause. What happened was that as the iron used more power than could be supplied, the wiring melted to the point that the electrical connection was broken and that was why those rooms lost power. The iron should have had its own circuit because it uses so much energy. I'll be using the floor plug so we don't have a repeat issue in the future!

The repair was expensive; but, we are happy that we can turn the light on in our bedroom and I love being able to stitch and listen to ball games again.

During the chaos, I saw this box again and thought. . .hey, I should check those out and take them apart. Yesterday, after the electrician left, I was invited to stitch with some friends. I decided to take the tie project.  I was surprised that there were a couple red ties as well as a couple ties with a wild print. I only remember my granddad wearing green ties and I remember he was ultra conservative! Of the 11 ties in the box, I recognized none of them.
The pile of removed interfacing

My grandparents were frugal--they made sure their items lasted a long time. They were masters at repairs.  They would not have purchased an expensive silk tie when a moderately priced acetate one would have worked as well.

"New" was something saved weddings and funerals. A trip to the dry cleaners was too expensive for their budget. The ties have stains and feel dusty--they were probably stored for years on a hanger in a closet. For the most part, the fabric content is acetate--gosh, it has been a long while since I have seen that as a fiber content. One tie was a wool and silk mix. As for the fiber content of the other eight ties. . .well, the content is a secret because those ties were produced before content needed to be included on the product!

I saved the tags that were on some of the ties. Not all of the ties had a tag. I even had a little help in removing the stitching and the interfacing! My grandmother always said many hands make light work. She was right!

I plan to clean the ties. Cleaning the ties will be my next step. I'll do some research about what might work the best. If the colors run, or the stains don't come out or I ruin the tie, I'm okay with whatever happens. After all, hanging out in a box for the last 27 years wasn't a good solution either!

I don't have a plan for piecing the ties; but, maybe one will come to me while I'm washing them. I can check out Pinterest. I will apply interfacing to the ties once they are clean! Stabilizing all the bias edges will be helpful. This was a good project for yesterday! Have you worked with ties before or some other special item from a loved one? How did you handle it?


Sunday, March 4, 2018

Bag Using Embroidered Daffodil--8th Finish for 1st Quarter FAL 2018

Pieces cut and ready for stitching. 
The embroidered daffodil came from my photo of daffodils blooming in our yard years ago. You can read the embroidery post here. I digitized the photo as a lesson in my embroidery software February of 2017. I trimmed the embroidery so that I had a quarter inch seam allowance.

I had planned to make a smaller bag using this embroidery. The problem was that the daffodil was too tall for the bag so I switched to a different style of bag. I had picked batik fat quarters from my over flowing batik FQ stash for the smaller bag. The new bag pattern used half yard pieces of fabric. My goal is to use from my stash of batik FQs so I did a little revising. Also, my stash doesn't have many half yard pieces of batiks so I became creative with the revamping!

I haven't made many bags and I haven't used many patterns in the last 30 years. While I understand that pattern makers conserve space in their patterns by providing few illustrations and abbreviated descriptions, I am finding that an extra illustration or another line of written text might make the stitching more pleasurable! Writing directions is a skill.

Outside zipper pocket
In cutting out this pattern, there was a diagram labeled not to scale; but the size of the pieces wouldn't fit on my fat quarter because when I washed this fat quarter, it shrunk! I changed some of the pocket sizes. I added another fat quarter to the mix. It worked in the end! This pattern suggested decor bond as the stabilizer.  I tried it; but, I have to admit that I wonder how it will wear. Will it get crinkly?

Inside zipper pocket
View of the inside pockets
During construction of the bag, I first stitched the strap. If I were to make this pattern again, I would add webbing to the inside of the strap to strengthen it. Then I stitched the outer pockets. I added an outside zipper pocket to increase the functionality. I also added fabric to the outer edges of the pockets so that the space for the handles would be a little wider. At the end of the project, I was glad that I had done this. I pinned the pockets in place and then stitched them to the bag. Next, I worked on the inside pockets. I was short of fabric, so I pieced the bottle stabilizer. I liked it! I also added interfacing to all the pockets to give them more body. I added a zipper pocket to one of the inside pockets because it is nice to be able to keep an item like change in its place!
Finished bag

To add the pockets, I stitched on the previous stitching line to secure the pockets to either the bag or the lining. I found that my #10 foot made this an easy task as I used the "rudder" to glide next to the pocket and easily stitched in the previous stitches. I liked the effect of the double top stitching!

Preparing the lining for  inserting in to the bag and constructing the bag went well. Soon, I was stitching around the top edge to attach the lining and then I pulled the bag through a hole I had left in the bottom of the lining to expose the right sides of the project. . I top stitched the upper edge and closed the hole in the lining.

I like it! I wish I could keep it; but, it will be either be a Christmas gift or a birthday gift for someone that loves daffodils.

This was goal number 10 on my Finish A Long list and it is finish number 8 this quarter! I used 2 1/4 yards from my stash for a net "loss" of 3 yards! (Only 47 more yards to go to meet my goal for 2018!)