Wednesday, December 28, 2016

My Dad--April 9, 1935-December 24, 2016

Christmas Eve, my dad passed away. He was a rancher/farmer who lived a mountain pass and about 120 miles from my driveway. The drive would take about two and a half hours. . .depending on the weather and the traffic.
My dad reading the label on his quilt
In honor of my dad's 80th birthday in 2015, I stitched him Dad's Stars. Last August, medical staff determined that his bladder cancer had returned. His lung and heart conditions prevented him from having surgery, radiation or chemotherapy. He opted to go into hospice care at home. He was unable to walk or stand which bugged him because he led an active life. (His hobbies were hunting, fishing, trapshooting and playing cribbage.)

I appreciate the care his wife provided as she was the motivating force for me being able to visit with him for a couple more years. His long term memory stayed sharp. I enjoyed our evening  phone conversations between seven and eight.

My DH and I surprised him on Friday, December 23, showing up on his doorstep for coffee and a cookie. He said the visit was the best Christmas gift we could give him. We visited; then we headed home. We had planned to make the trip Christmas morning; but, the weather report was looking like chains required to get over the mountain pass with heavy snow fall so we decided to go earlier.

Christmas eve day about lunch time, we chatted again. I called earlier that day because I knew that my family would be celebrating with him and I knew he would be busy. During our conversation, he let me know that his quilt was still nice and warm. He told me that he was glad I had an activity that I enjoyed so much. He said he liked trap shooting that way; but, he didn't do it but on the weekends and over time he collected a number of guns that he didn't use all that often. He thought I was smart to pick an activity I could do every day as well as have enough machines to get the job done. He sort of understood the time it took to make a quilt when I involved him in the process of making him his quilt. Although, he would look at a block and ask how long it took me to quilt it, then shake his head at my answer. His response meant, he had a crazy daughter!

Christmas was one of his favorite times of the year. The season, for him, always began when decorating the fresh tree commenced. He liked tinsel on the tree, added one strand at a time and thick! Christmas morning, he was so excited to see what Santa had left everyone under the tree and delighted in package unwrapping because there were new toys and games to play. He didn't care if it was a top for the toddler, a train set for the first grader or a basketball for a middle schooler. All toys had to be "tested!" He remained the oldest "kid" when it came to Christmas joy.

His wife called us at 11:25PM Christmas eve to let us know that he had passed. I guess he decided that he had some deliveries to make himself and couldn't stick around to greet Santa after all.

I appreciated all of our visits, I left nothing unsaid. Monday, I wrote his obituary.  It will appear in his local paper soon. Service arrangements and a celebration of his life are pending. I won't be surprised if both are held in March in conjunction with an event he established 15 years ago in the memory of a friend.

Today, I worked and shared his passing with one person. I didn't realize how difficult it was to say the words!

Love you, Dad!

Quilting will wait.


Saturday, December 24, 2016

Merry Christmas!

Wishing you all a Merry Christmas or a happy whatever you celebrate! May your holiday be full of friends and family with lots of good food and cheer! I always wish for a white Christmas; but, we often aren't lucky enough for one! May there be much happiness and peace in the coming year!

Tall Tree
Our quilts are hung.
This very tall tree hangs on a door. My mother-in-law made and gifted this to us years ago. I enjoy listening to the bells jingle when the door is opened and closed.


Home Grown Santa

This is the small wall hanging that hangs in the kitchen. I made this for my grandmother in 1992 and it hung in her house every year until she passed. I think of her when I hang it each season. She always liked a little sparkle on her packages so I used lame on the bows!


Angel on High


This is the little larger angel wall hanging that hangs in the bedroom. I made this in 1994 for a friend. She called me a couple years ago saying that she was moving from a 3500 square foot house to an 800 square foot apartment and would I like it back? Of course, I would welcome it back!

Life happens. When I give a quilt, I tell the recipient that if the quilt outgrows its usefulness, it is always welcome back--no questions asked!

For many years of my quilt making, I gave what I stitched away and as life has happened, a number of those projects have returned. They are like past friends coming home to retire!


Santa's Sleigh
This wall hanging of Santa in his sleigh, I made in 1998. It was an early attempt to free motion quilt with metallic thread and to create texture using different stitch designs. It is one of my husband's favorite quilts. I had quite the challenge figuring out how to attach the cord that I used for the sleigh runners.


Better Homes and Gardens
Block of the Month


My mother-in-law made two of these quilts from a block of the month through Better Homes and Gardens. She started the quilt in the late 80s and gifted this one to us in 2009. The other, she made for her daughter and son-in-law. Ours decorates the bed.


Serenaded with a song


The tree is decorated with many homemade ornaments from friends and family members. There are even a few ornaments that I picked up during some of my travels. This year, it is extra special because the grands helped with the decorations. The oldest grand was terrific with the decorations. Although, when I showed her the first box, she was concerned that there weren't nearly enough to decorate such a big tree. She delighted in touching the ornaments and hanging them "just so!"

She tickled me with the comment, "Look Gran, I made a line!!! It looks so nice!! It is just the way I want it!" When I was about her age, I remember our tree was "redecorated" to disperse the ornaments in a more pleasing arrangement. That redecorating hurt my heart. I said, "Hmmm, we need to step back and look. Do you see any bare spaces? No?? Terrific, because I LOVE it!" Then the grand had to sing and dance a song for me. What a special memory!

The cookies are baked, the breads are ready for gifting. The packages are wrapped. Christmas is here!!!!


SaveSave

Thursday, December 22, 2016

Ultimate Stencil Use

Ultimate Shape stencils 
Using Cindy Needham's Ultimate Shape Stencils, I quilted the purple squares in the star blocks.  I used the smallest size for the two inch squares and the medium sized stencil for the four inch center squares. I plan to use the medium large size for the six inch nine patch blocks later even though the large size stencil fits the nine patch with the setting triangles!

I liked using her stencil because it was easy to mark with my chacoliner. I also liked that I got to work with curves!!! There were a lot of stops and starts. Again, I used the variegated 40wt cotton Valdani thread.


Chalked Lines
It is easier to see the chalk marks than it is to see the thread. Those other chalked lines are lines I drew to audition whether I wanted to quilt those next . . or come up with a different design!


Finished small squares
This is what the design looks like stitched. Notice that because I used a variegated thread that was about the same value of the purple fabric, the thread blends. Also, because it is variegated, I think the bobbles don't show as much!!! This step only took about 18 hours!

I played around with some alternative patterns for the pink/purple section of the quilt and that is what I'll be quilting next. I also did a little brainstorming on what to do for the background in this area; but, nothing "spoke" to me. Maybe tomorrow I'll hear what the quilt wants in those areas.


SaveSave

Bernie to the Rescue

Quilted design in purple squares
I had hoped to finish quilting this project by the end of the year. Well, I didn't make it!!!

Quilting is a journey and it is okay that I didn't finish at the end of December. My plan now is to finish it by the end of January. (My fingers are crossed!!!)

I had to decide how to quilt the pinkish star points. I decided that I would use the design on the right side of the star points.

These were quilting okay. Again, I tried to use the ruler; but, I found that from a sitting position, I could only use it on one side as I was unable to hold the ruler in position when it was behind the machine. Also, I find the foot "heavy" in that some points are bulky and as I approach those areas, the foot acts as if it has run into a concrete wall!
Also, as I began and ended each stitching line, it was harder and harder to get the balance wheel to turn to bring the threads to the top of the quilt. Then. . .I heard a rattle as I stitched and when I tried to move the balance wheel, the wheel turned; but, the needle didn't move. I packed the machine to take in for a check. The part is on order and my fingers are crossed the part arrives early next week! The repair man said he hasn't seen this issue with this model of machine. I sure hope this doesn't happen again as I have to be able to pull my threads to the top of the quilt!!!!

Bernie at work!
I do have a back up machine. . .thank goodness! I saved her so I would have a machine that I could take to class if I needed to zig zag. Meet Bernie who has lived and worked hard for many years! She is a 1630 Bernina and my first Bernina. Recently, Nick  from Ace Sewing and Vacuum rebuilt  her mother board so she could hang around and be productive for a bunch more years!!!  He has serviced Bernie for 20 years!  If you live around Newberg, Oregon, check out his shop.

Right away, I missed the light, the extra harp space and the speed of stitching that Joie, my newer Bernina exhibits. Still, I was thankful that I didn't have to put this project away while I wait for my other machine to be repaired!
Three of four legs of the star quilted

Although I also almost had to get out the manual to wind the bobbin. I guess, I bonded more with Joie than I had realized! In the end, I remembered. It took me about ten hours to quilt these lines!

I sure wish I could have used a ruler, but with this small harp, there isn't room! Also, I doubt that the ruler foot will fit this older machine. I'm hoping that the bobbles don't show up all that much. After all, there are going to be a lot more quilting lines in this piece!


The block thus far!


I like how flat the block is laying. I like the quilting. . .I'm still thinking about those background squares and yet, no idea of a keeper design has entered my head! This quilting took me about 12 hours. Pushing and pulling the fabric through Bernie's smaller harp is a workout! I find I must take more breaks.

Next part to quilt are the nine patch blocks that are in the alternate blocks. I'm planning to use a larger size of the Ultimate stencil.

No ideas have lit on those background squares. . .hmmmmmm

Sunday, December 18, 2016

A Bit of a Detour

J learning how to fold a strip in half.
There was a folded star tutorial on "The Quilt Show" a bit ago. Those folded stars looked interesting and would use some of my smaller scrap stash. So I made one.

These are addictive. I couldn't stop at one. Although, it took me quite awhile to make that first one! I think these would make a good give away at a retreat. They would be a good give away to cheer someone or thank someone too. They are small enough that they could be tucked into a card.

So far I've made 15 and used about 2 yards of scraps! Each one takes a 12" x 3 1/2" strip of fabric. The tutorial says to use a 3 1/4" strip; but, I save 3 1/2" strips so that was what I used. It takes four strips of fabric. I suppose that you could repeat two of the strips; but, I liked the scrappy nature of four different strips.


K's favorite step of the process. . .spraying the Best Press!
When I was folding the strips, the oldest granddaughter was really interested in making one. So I walked her through the process. She did some strip pressing and is just about at the point where she could use the iron on her own. . .except that she sometimes forgets where her left hand is. I wouldn't want her to burn herself!

After we put her star together, her sister decided she needed to make one too. So she took a stint at the ironing station with her Miss K supervising each step!


Some of the stars. . . Look out. Making these is like eating candy. You can't stop at one!


If you want to make one, or two, or more, check the link for a tutorial. It was fun to take a little detour from my quilting process. Next time, I'll share my progress on that project.

Wednesday, December 14, 2016

72 Star Points--Grid Quilted!

Design inspiration
This was the inspiration behind the grid quilting in the 72 star points. I wanted quilting that would blend with the overall design. I thought about the squares that make up the chains in the design. I was looking around the studio and my eye stopped on the leftovers from K's skirt.


Auditioning the lines
I drew a few lines and decided. . .hey, this could work. It did! Again, I found that the ruler wasn't the ticket. I stitched most of the lines free hand. Yes, the lines aren't super straight. But, this is a learning experience and as a teacher once said, "Done is better than perfect!" These are done!

Also, a thanks to Nancy at Dizzy Dog Quilting, who in one of her comments said that she liked it when she was stitching in the ditch because she knew where she was going next and she knew what she would be stitching. I took her comment to heart. In the past quilting those repetitious lines, I have had a difficult time staying on course. This time, telling myself that I knew where I was going to stitch next and also what the stitch was going to look like kept me on course! Thanks, Nancy!

View of the finished star points. 
Hey--This part of the process only took 36 hours! (Ripping was involved; but, I won't go into that part of the journey!)

The next section to quilt will either be the dark purple small and large squares or the lighter purple/pink rectangles and half square triangles.

What will be quilted there? Well, I haven't figured that out yet!

Sunday, December 11, 2016

Outer Border Beginnings!

Thread that I auditioned and used
Quilting this project has been such a trip outside my comfortable box! First, there is the work to incorporate rulers. Second, has been the work to create designs that are more on the modern side. Third, has been the use of straight lines.

Moving on to the outer border, I just had to have some curves in this piece SOMEWHERE!!! So, I again used the blocks and setting triangles to be the markers for dividing this border too. Hey, this way of dividing the blocks into quilting units works great!

First, I chalked a straight line.


The basic design
Then I added a couple curved lines.
Yes!!! Curves!! Curves are usually what I like to use on blocks that have straight lines. It has felt so odd to be quilting straight lines on a block with straight lines!


The corner
Next, I got to decide how to handle the corner. I played with a few chalk lines and came up with design. I didn't draw it on paper first! I don't have a plan for the embellishing and that could present an "opportunity" for me when I get to that point!


Chalked line of the outer border
Because it is hard to see the thread, this is a small section that I chalked. My plan for the outer edge of the border is to quilt lines that are perpendicular to the purple border. I also plan to quilt some of the spaces with a fill that is similar to a fill that I will use on the inside of the outer border.

This is my idea for now. . .it could change!


Adding additional lines using the ruler
Once I had this part of the outer border completed, I went back to the purple border and added more lines.

I was able to use the ruler this time. I still find it challenging to stay lined up on my stitching line, adjusting how much pressure I need to apply to the foot to hold it against the ruler as well as how much pressure it takes to slide the quilt. That foot is difficult to maneuver over seams.


The box or X in the purple border
The thread blends well with the border. I'm still thinking that it will be an adequate transition between the two borders.

Purposely, I chose a sort of thread that would blend in the spaces because I wanted the quilting to be more of a texture than an eye catcher. The piecing should be the eye candy that draws the viewer to the piece and the quilting should be what brings that viewer closer to it. Additionally, if some of my lines aren't right on. . .well, it will be less obvious!

The next step is to determine what the plan is for the 72 star points.  Originally, I wanted to stitch a curved design; but, my concern is that a curve design will look off from all those straight lines!

Check back on Wednesday!

Wednesday, December 7, 2016

Border Design and Ruler Work

Checking the spacing
Here it is Wednesday. I won't bore you with my pencil drawings of the X design I thought would be a good transition for this narrow border. To check how the X would fit on the border, I carefully chalk marked it. Of course, I didn't get it quite right--I had a little more border than I had design. So I remarked, and although better, it wasn't right on.

Then, I realized that I could extend the markings from the block into the border and my design would fit perfectly! That plan worked. I need to remember that tip because no math was involved! Because I needed a chalked line to start, I didn't use the ruler.

 Perhaps, when I get to adding the additional lines, the rulers will be just the tool I need to finish the design! My free motion quilting on a line is improving!


Auditioning this design
My plan for this border was to stitch one line and after I stitched some of the outer boarder, I would return and stitch the remaining lines on this border.

Remember, I'm working to keep the quilting density even as I work on this project. At the end of the process, I will evaluate whether or not I have less distortion working in this manner.

It's difficult to see in the photo that I used a blue variegated thread in the purple border. I liked the effect! See how much the chalk disappears after stitching?

Next up, is designing that wide outer border. Hmmm. . .I've been doodling; but, I haven't penciled a design that I want to use yet. You will have to check back on Sunday!
First line stitched; Notice how the points line up with the points of the previous setting
triangles and setting squares.


Sunday, December 4, 2016

The Design and Rulers

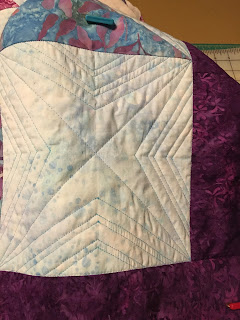
Corner Setting Block 
I'm learning that straight line ruler work is challenging. I've made certain design elements work great with the ruler. With this design, I ended up just going on my own!!

These were the challenges:
*The design required the use of a longer ruler. The longer ruler was difficult to use because the slide on tray of my machine has a bit of a curve. I wasn't able to keep the ruler flat and lined up on my markings as I needed.

*The stitching line in some cases was less than a quarter of an inch away from the next stitching line. I found that I didn't have "reference points" to be able to use the ruler. Had I marked some reference points, I decided that I would have confused the reference points with the stitching points!

*My view of the stitching line was difficult to see moving backward. I have my puddle of fabric so that I have "room" to stitch. But, this puddle then makes it challenging to use the ruler.
Triangle Setting Block
*The ruler I have has some posts that are handy for gripping; but, these same posts won't glide past the foot if used in back of the machine. The ruler won't slide past the posts on the right side of the machine. So, I'm limited using it to the left and front which would make me do a lot of quilt turning to use it consistently. Not turning the quilt was why I wanted to free motion quilt. Also, since my car accident seven years ago, I just don't have the strength in my hands to be pushing and pulling all that fabric through the harp!

*I'm continually challenged to keep the ruler lined up, the fabric flat and then stitch smoothly all at the same time!

My solution was to use a blue ink pen and draw the lines. The lines will disappear when wet with cool water. I didn't want to "mark" the quilt; but, in the end, it was the best option this time!

A sign of having just enough thread!

Check out how much thread I had left after stitching the main design lines. . .not much! It was a good estimate on my part! This spool was part of a retreat gift a number of years ago. It feels great to use it up!

Getting back to the ruler subject, I could quit. I have given rulers a good try; however, I want to work with rulers. I just need to keep practicing until I figure out what is going to work for me with the set up I have. With this in mind, I drew a more simplified shape to quilt in the four inch border. Using what I learned from stitching the previous section, I think, although I'm not confident, that I can use the ruler for this stitching!

Side Setting Block


You will have to check in with me on Wednesday to see if I was successful!

Note: If I had unlimited resources, I would have purchased a longarm years ago. The longarm would be the "cheap" part of the purchase because a serious remodel would have to happen to fit that piece of equipment in the studio! Actually, the only room it could fit in now, is the living room.