Showing posts with label sashings/borders. Show all posts

Sunday, June 15, 2025

Grassy Creek clue 7 --post 5

Project bag
Happy Father's Day to all dad's. I had a good dad. Cancer took him Christmas Eve 2016. He was a farmer,/rancher and he loved to hunt and fish. He was diagnosed with cancer and given three to six months to live. He lived about two more years which shocked all of his doctors. The shocking part pleased my dad who said he had some items on his bucket list to do so "he" wasn't ready to go, yet! 

Will be making a bunch of centers
We chatted every day. It gave us the opportunity to say all that we wanted. Although, he never would tell me what he did during the Korean War. He didn't answer all of my questions; but, he did answer a lot of them. I do miss him, even this many years later. I do chuckle at something he would have enjoyed. 

I have done as he asked. He asked me to be the executive of his estate. I did as he asked even though I asked that he name one of my brothers. As a result, neither of my brothers speaks to me as they feel I wronged them by receiving a portion of my dad's estate. 

One block stitched
The other request my dad had was for me to call his wife like I had called him. I did until she asked that we call just once a week. There have been weeks that I've been out of town and weeks that she has been out of town; but, for the most part, we chat once a week. Mostly, we catch up with the activities of the week; but, sometimes, we share Dad stories which make us both laugh.

Now, back to quilting! Goal number six on my June list was to unearth my Grassy Creek project and make progress on it two times this month. The last time I posted about this project was January 10, 2021! Bonnie had revealed the finish a few days before my post. I wrote that I looked forward to finishing. Instead, other projects went under my needle. This project ended up in a big plastic bag.

Because I wanted to finish it, I put the bag on a chair in the studio where I would have to see it every day. Yet, it took me three and a half years to open the bag; review the contents and figure out what to do first. The first step was to cut some green squares and to make centers of the block. Cutting the squares was easy.

Some of the strings to be made into blocks
I laid out a center. I stitched it. I started another center and called it a day. The following day, I took my project to our in person sew day for Mystery Mavens. I made all but six centers needed! These went together easily. I spent a little time the day after our sew day to complete the remaining block centers. 

I thought that the next time we meet I would work on making the blocks. Because we are going to meet via Zoom, I decided that I would work on the string border instead. I will work on making the blocks at our next in person sew day because that part of the project is easier to transport.

Instead, I've now decided to work on my friend Rita's Rhododendron Trail quilt until it is a top. I'll share the reason behind my decision next month!

I did make one block because I was curious as to how the blocks went together. I also wanted to know what mine would look like! I like how nicely my scraps play together! 

The first few string blocks
I did cut a bunch of strings to start piecing the border blocks. I decided this would be a great project for times that I am stitching with my group virtually using the Zoom format. 

String piecing is messy especially when you get to cut the strings! Usually, my string piecing happens because the strings I've collected over time are overflowing my container! Cutting a bunch of strings from my fabrics was a start!

Perhaps by September, I'll be close to having a flimsy!

Linking to Cynthia at Oh Scrap!

Wednesday, March 5, 2025

Old Town Mystery--It Is A TOP!--post six

Old Town center complete
Goal number five on my March list was to continue to make progress on my version of Bonnie Hunter's Old Town mystery. At the end of February, I had managed to sew the center of the project together.

My friend, Alvera, added an aqua skinny border to her quilt. I liked how that border brought out the blue color in her quilt. I decided to follow suit. I had to dig around in my stash for another piece of blue because I used up all the larger chunks of my aqua and blue fabric on the center. 

Center with the first border
Stitching the skinny blue border was not easy. My center measured within a quarter of an inch of the width measurement versus the length measurement which was about half an inch less than Bonnie's measurement. I didn't measure the outer edges; but, I did need to ease all four sides!

The fabric I used I purchased years ago at a stash bazaar. I pre-washed it. I was surprised that it was only 36 inches wide! I cut the border strips lengthwise and carefully stitched them to the quilt top. I like how blue the top reads!

Pinned and ready to stitch
Next I stitched the four patch border. It was tricky because it was important to begin with one color of the four patch on the sides and the other color was used to begin the top and bottom borders. If there is a way to create a different pattern, I will find it! 

Second border stitched 
The sides went on easily. I had to ease the top and bottom borders a small amount. My four patches were too large. I pinned the borders in place and stitched them. Again, I liked how the top still read blue.

Last border in progress
The final border was red and white squares alternating each other. Just like with the four patch border, it was important to begin with a certain color for the sides and another color for the top and bottom borders.

Finished top
Once I had stitched the borders to the project, the top was finished! Hooray! I will be ordering blue fabric to back the quilt. I plan to use a light wool batting and I will be paying a longarmer to quilt it. I plan to gift the finished quilt to my oldest daughter whose favorite color is aqua/turquoise. 

Linking to Alycia at Finished or Not Friday.

Wednesday, August 14, 2024

Guild Challenge Blocks--Working Via A Committee


One block
Goal number seven on my August list was to work on the challenge blocks. I didn't think that I would be able to share this project because generally the project is kept under wraps until it is revealed the month after the guild quilt show. 

Such a variety in the blocks
I decided that I could share the blocks and some of the progress that we made last Sunday when five committee members gathered to make a start on assembling the blocks into a quilt.

Instruments, treble clefs and piano keys
Guild members made these blocks for the block contest last year. The theme of the contest was music and the contest was titled "As Noted." 

An arrangement of notes
Participants were to make a block that represented music. If notes and/or words were used, the notes and words should be represented in black. Background fabric should be cream. Finished size of the block could be six inches by six inches, or nine inches by nine inches or six inches by twelve inches. Any other colors could be used. No hard embellishments, machine embroidery was okay.

Chopin made an appearance
More than sixty blocks were submitted. On one block, the maker wrote, "Swift Power." So even Taylor will be part of this quilt! Quilt show attendees voted on their favorite block.

The bird in this group was the contest winner
A few blocks contained words that were lyrics. The creativity of our members is always amazing. 

Some of the words in the blocks
Of course, the challenge was figuring out a way to put all of the blocks together into a quilt! When we met to determine the challenge, there was a consensus among the committee members to turn the blocks into a quilt that had a modern feel. Going in the modern direction would challenge all of us!

After the block contest, we had an e-mail conversation about possible setting options. When the committee members ran into one another, they had conversations about the blocks. I drew four thumbnail sketches and emailed the sketches to the group. The blocks provided the inspiration for my sketches.

More notes and piano key blocks
The finished quilt will become the guild opportunity quilt for the year 2025. A committee will be showing it a various events around our community and selling tickets. The proceeds of the  ticket sales will go to a charity that the membership selected via a vote.

Stitching strips
Last Sunday was the first time that I saw the blocks in person. The blocks shared in this blog are not all of the the blocks. Even with the partial representation here, it is easy to see the variations of the blocks! We chose to group blocks into sets of four. Were the parameters of the contest followed? Nope! Cream fabric wasn't used and the blocks are a variety of sizes. We plan to make it all work. . .somehow!

We spent about four hours determining a design, drawing a huge musical motif and stitching strip sets. The musical design we drew is planned for the center of the quilt.

Terry(me) sewing strip sets
One person ironed, two people sewed and two people cut strips and strip sub sets. With that many hands working, we made great progress.
Su at the pressing station

Sharron and Linda H. cut strips. They also pressed seams and fabric for cutting. 

Checking the strip sets
At our third hour of being together, we decided that we had enough strips cut and enough strip sets made and subcut so we could "see" if our design idea was going to work.

Linda H. auditioning strip sets and noting which
blocks were selected as quartets.
Next we laid out some of the sashing to audition our idea. We liked what we saw so Terry and Linda P  stitched the rows together.

Linda P with her first quadrant of blocks
While we embraced the improv technique, it still took us time to stitch a quadrant of four blocks together. With Linda H.'s help, Terry K pieced a quadrant too! Su shared it for the camera.

Su held up a second quadrant of blocks.
Terry took home the extra music fabric since she volunteered to piece a back for this projects. We all felt like we made great progress. Fingers crossed we have a successful sew day next week too! 

You've had a sneak peak at the blocks and met the committee members.  The members all have good ideas, take on tasks without being asked and are kind to each other. It's a pleasure to be part of the "play" for this project! Let's see if we are able to construct a modern quilt out of these blocks! Likely, you won't get more peaks; but, I will share the back when I get it pieced!


Wednesday, June 26, 2024

Transparency Borders. . .Do They Work for Your Eye?--post 4

Back in April, my Transparency project was a top that measured 51 inches by 51 inches. I kept telling myself to piece a back and quilt it. I said to myself: finish it. The problem with my thought pattern was that I felt the top needed to be a little bigger so it could be used as a throw. The issue with making it bigger was that I didn't have enough scraps left from the project. . . or did I? 

Top 

Goal number 11 on my June list was to determine if I could add a bit to this project. I pulled out the scraps and had a look. I asked myself, "What if I extended the dark to the top and bottom.?" I looked at the dark blue and dark green scraps. I found I could cut enough fabric to increase the top six inches. If I supplemented the black fabric prints, I could squeeze out another six inches. 

Additional borders 
I carefully cut and stitched the pieces together. The top now measurers 51 inches wide by 63 inches tall. I like the size better. While I may not have maintained the transparency effect, the addition didn't obliterate the technique either. I plan to bind the project in a dark black fabric that I have on hand.

Trimming the scraps 
After giving the top a good press, I began to trim the scraps into usable segments to use on the quilt back. I decided to use half inch seams and to press the seams open to make the back easier for the needle to penetrate. 

Segments for back on the design wall
There were quite a few chunks which I placed on the design wall. Next month, I'll continue piecing the sections into a top. I will have to add some fabric from stash. Using the leftovers for the back will lessen the amount of scraps I'll be putting into my scrap stash!

Advanced applique May lesson
Goal number three on my June list was to complete the May and June embroidery software classes. I got stuck in the May lesson so that was the only lesson that I completed. I spent many hours on the May lesson. There is a challenge lesson too. While I reached a stuck spot, I'm a few minutes away from completing the entire offerings for May. There isn't a July lesson so I'll have a chance to catch up!

Mid way through the May embroidery challenge
I'm linking up to to Carol at To Do Tuesday and Alycia at Finished or Not Friday.


Sunday, February 6, 2022

2021 Temperature Quilt Is A Top!

Embroidering the temperature range
It took time. . .much more than I had anticipated; BUT, I finally was successful in figuring out how to embroider the temperature ranges as well as the word, "Temperatures" and the year, "2021."  

First, I spent time auditioning the size and font that I thought would work well for the temperature ranges. I decided that I would make two of each range so that I could repeat the legend on each side border of the quilt.

Building the legend border
Next, I printed the print preview and placed it as if it were the border. I found this was a great way to view the size as well as the font. I made several changes before I found "the one!" I stitched a sample. I liked it. I stitched all of the number ranges. I removed the stabilizers from the back of the fabric. I stitched the fabric that was associated with the number range together and built the border. 

Math is not a strength. I sent a photo to my London daughter asking if I had used the greater than/less than sign correctly. I asked, does this read as less than 18 degrees? She replied I was correct. 

Whoops. . .
I had the borders ready to stitch the borders to the sides of the quilt and I realized I was incorrect with using the greater than symbol. My husband was near by so I asked him if this read more than 105. . .he shook his head. I re-embroidered that temperature range. I'm glad I caught the error before it was "in" the quilt!

Too Big
Gertie, my inner squirrel, had the idea to place the temperature range from coldest to warmest on the left side of the top and to place the temperature range from warmest to hottest on the right side of the quilt. I liked her plan. Of course, she was happy I incorporated her suggestion into the quilt. I did have to add a bit of grey fabric to make the border fit.

After stitching the side borders to the top, it was time to work on the top and bottom borders. Again, I auditioned the font size of the letters until I was happy with the size of the lettering. 

Rehopping alignment
I had a hiccup. I couldn't figure out how to access the fill stitch feature in the software. For those of you who don't work with embroidery software, I'll spare you the details. For those of you who do, I hadn't used the break apart feature enough! 

I placed a note in the Bernina software group asking for help and I also e-mailed my Bernina dealer.  My dealer called me fifteen minutes after I had sent the e-mail. She said it was easter and faster to just tell me what I needed to know. I had my answer in less than two minutes! 

In a couple hours, I had several responses from the software group. They provided the same answer as my dealer. I appreciated ALL of their help!

Finished top
I embroidered the year first. My original thought was to center the year in the bottom border and the word in the top border. Embroidering the word took me a full day because I needed to rehoop the design. I practiced until I felt that I would be successful.

When it was time to reboot. I had no issues. I have rarely rehooped a design. I would do it again. Viewing the stitch out, it seemed too plain to add more of the gray background. I was looking at the scraps I thought, "why not add a portion of strings" to finish the border. Gertie was on board with that idea!

I cut the leftovers of the strips into strings. I followed the color order as much as was possible and stitched the strings together. The result reminded me of colors in a crayon box. I decided that I wanted a little more than one repeat of the strings of the years and word.

Next I followed the pattern of reversing the colors as I had done with the side borders. I liked the results. I stitched the top and bottom border to the top and I had a finished top! 
Wahoo!

I've located a piece of fabric for the back and I might have enough batting on hand to layer and baste this project yet this month. Finishing this top was goal number four on my February list.

I'm linking to Cynthia and Oh Scrap/Quilting Is More Fun Than Housework. For some reason, Blogger is giving me a Whoops message when I try to comment on her posts. I also get that message when I visit other links in the link up. So if I haven't commented on your post in a while, that is the reason. I've reviewed my settings and didn't note any changes. 

Tuesday, October 12, 2021

Lime Green Rainbow Scrap Challenge

Pressing the strips
With the help of my ghost sewer, we've completed 12 lime green string blocks! She and her sister were over for a day because they had no school. We started the day with finding the mail box.  Then we made sourdough pancakes and bacon for breakfast. 

(The mailbox is small, about six inches long and about three inches high. It contains a letter to the girls. The letter is an agenda of the day. I hide it and the girls take great pleasure in finding it. Generally, the mailbox contains a treat too!)

Miss K made the sourdough pancakes and cooked about three griddles of pancakes while Miss J cooked the bacon. They make a great team. They ate while I finished cooking the pancake batter.

Leftovers and trimmed bits
After breakfast, Miss J set the timer for an hour sewing session. I had string blocks prepped for Miss K. I had sashing strips prepped for Miss J. We began sewing. When the timer sounded, Miss J wanted to know what was next. I told her that we needed to take a break and to set the timer for 15 minutes. Miss J wanted to know what I meant by "break." I told her break meant a time to stretch, to get a drink and to let your mind rest. 

Completed lime blocks
Miss J was all over a break. Miss K replied she wasn't tired, she didn't need a bathroom break and she planned to make progress on her blocks. I explained how the change in pace often helps increase productivity. Miss K decided a break was in order! While they had their break, I prepped more blocks and sashing strips.

For other breaks, we walked the dog, baked a chocolate sourdough cake and worked on our watercolor project. We used baking chocolate in the cake. Miss J was in charge of melting it. Both girls wanted to lick the spoon. I let them know that this chocolate had no sugar and it would taste bitter. The look of their faces from the anticipation to the realization that it was awful tasting chocolate was priceless. I remember a similar realization in my younger days!

Rows ready to stitch together
Miss J was quite concerned the cake was ruined and Miss K agreed. They weren't at all on board that the sugar In the batter was going to be enough. They licked the beaters and determined it would be an edible cake after all! To their delight, it was delicious!

At the end of the day, Miss K had finished sewing the lime green blocks. We trimmed them so that she could layout the design. All I did was pin the strips to the blocks. She completed the rest of the process. Her quarter inch seam is much improved. She is so proud of her accomplishment! (I am also proud of what she can do!)

Miss J stitched her sashing together. She stitched her blocks
into rows. She even stitched a few rows together. She told us so many stories about the pins in the pincushions which were aliens or eyes for the turtle. She can sort of sew a quarter inch seam if the seam is about two and half inches. She likes talking about the feed dogs. She would "Woof" "Woof" when she started a seam! We had a great day. She thinks it is cool that the quilt is taller than she is!

They were tired. Gertie, my inner squirrel, and I were exhausted! Although, we can't wait until we can stitch together again!

I'm linking to Angela and Scrap Happy Saturday. Completing the lime green blocks was goal nine on my October list

Sunday, February 14, 2021

2021 Temperature Quilt-Post 2

Running stitch applied "organically"
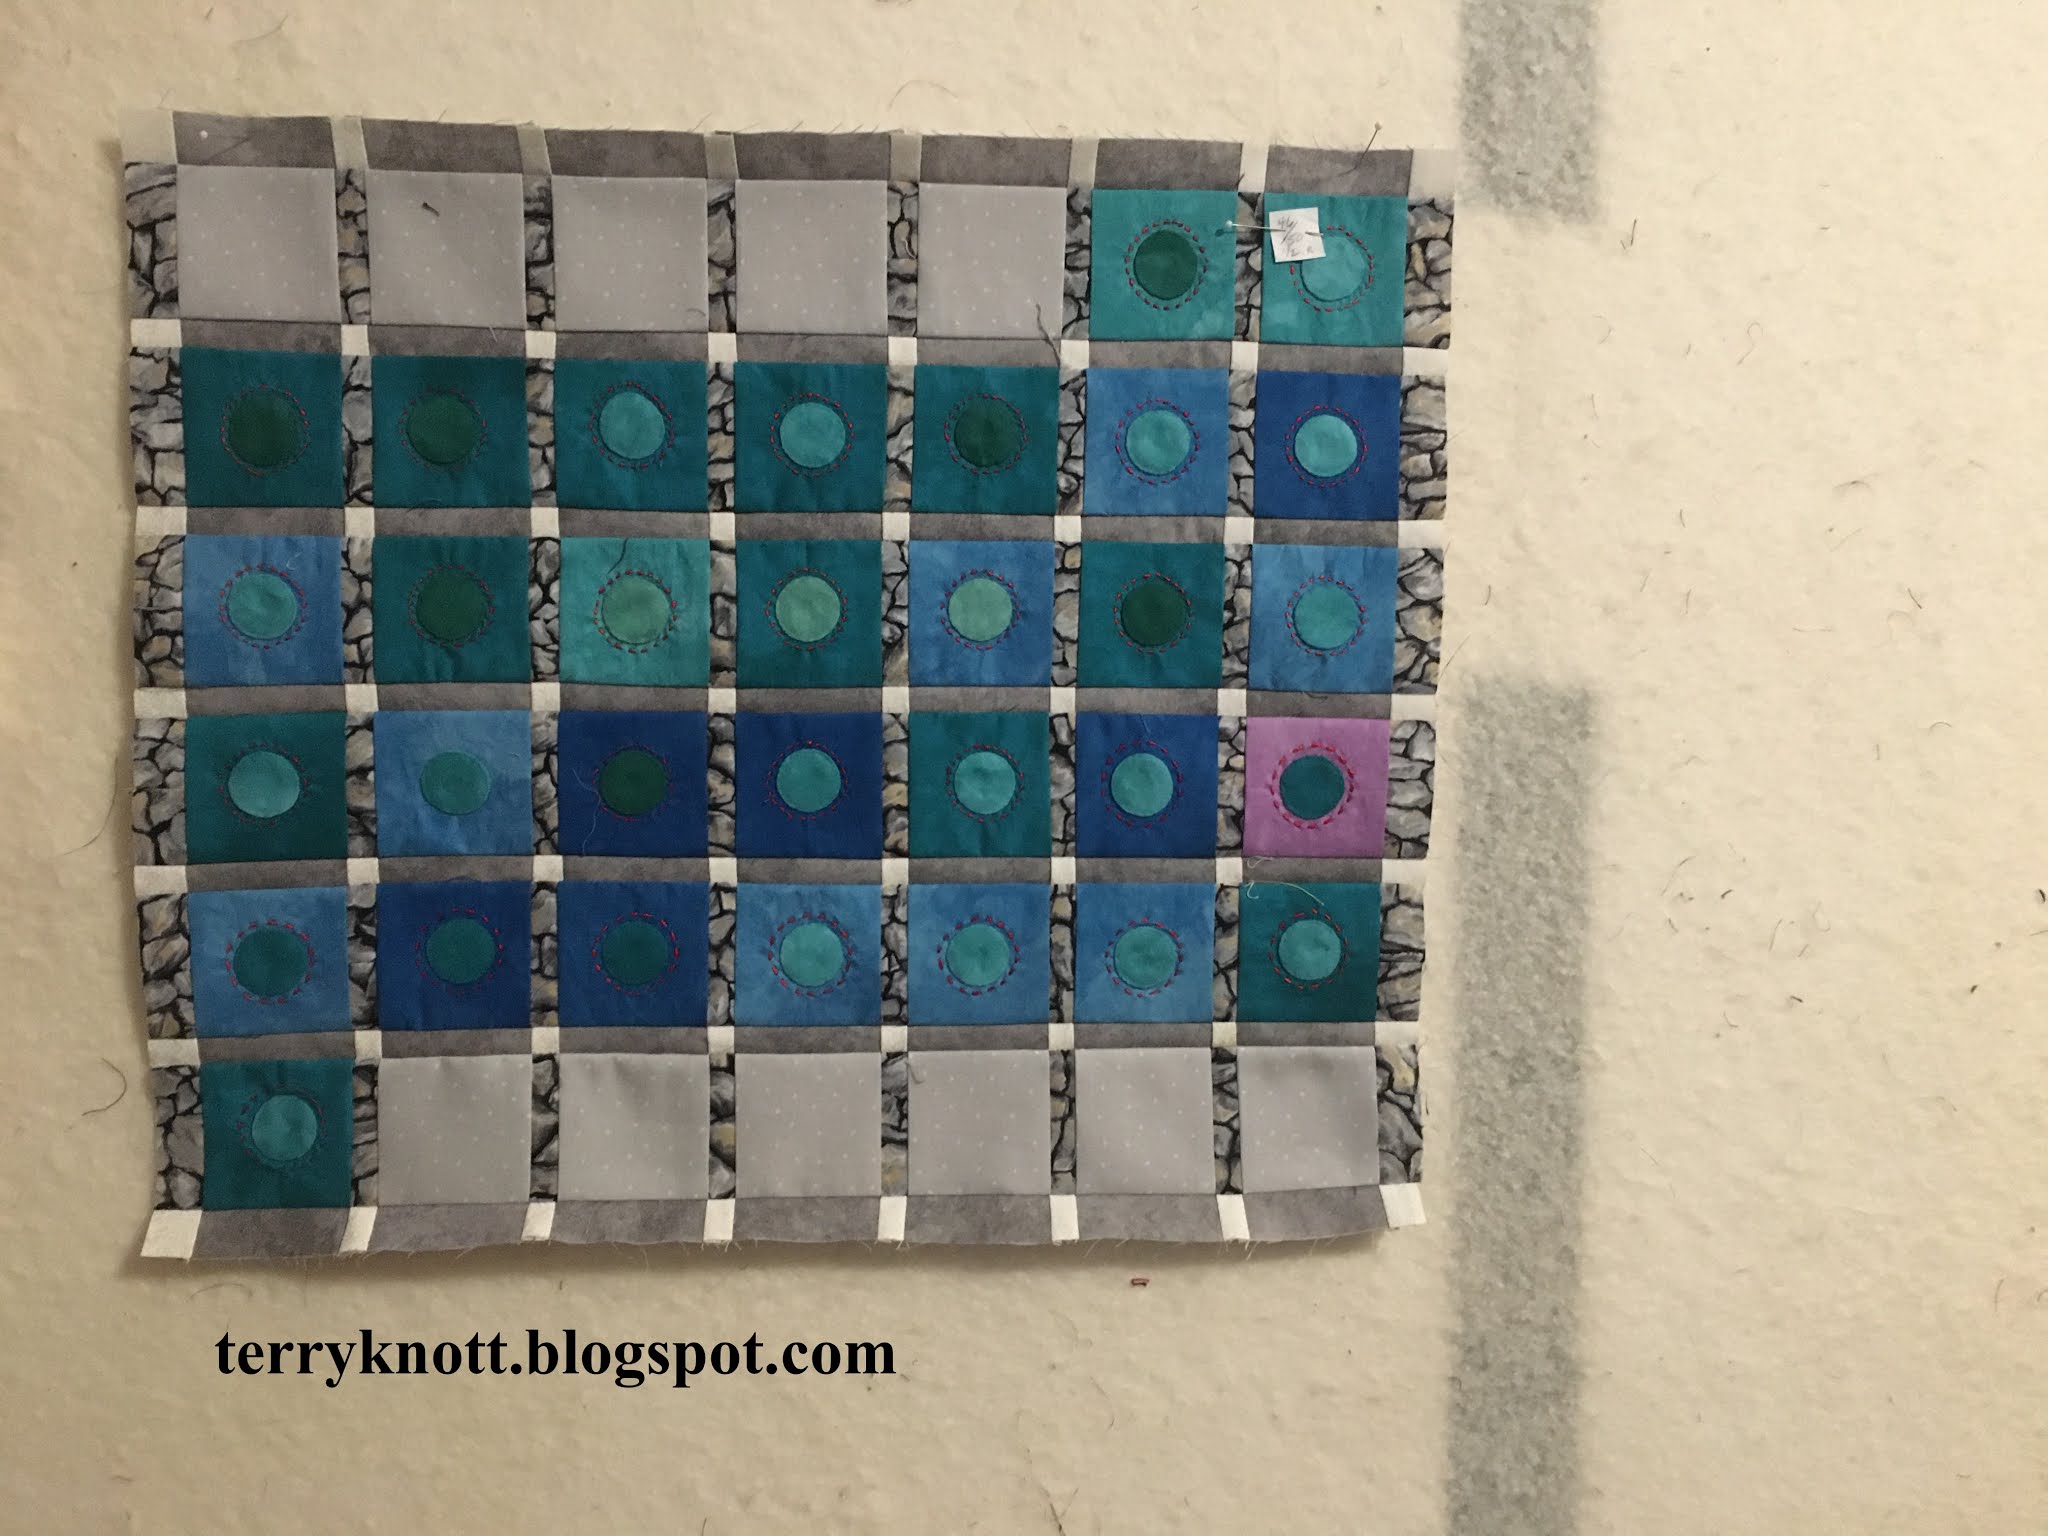
A reminder about this project: The square represents the low for the day; the circle represents the high for the day. Hand stitching represents precipitation. 

Once I had hand appliquéd the circles to the squares, I stitched a running stitch around the circle if it was a rainy day. I purchased that thread when I went to the International Quilt Show in Houston, Texas a number of years ago. I bought it from Laura Wasilowski's booth.  It is a beautiful size eight hand dyed ombre thread. Laura is such a positive person. She has fun patterns and threads for sale on her website. She also has lots of tutorials which are free which include some stitch alongs that you can join at any time! 

Because it is a hand dyed thread, I tested it for color fastness. I don't intend to wash this project; but, if I wet it for blocking, I wanted to know I won't have bleeding issues. I was shocked at how much color came from the thread. I tried setting the color with a vinegar and salt solution. I don't know how successful I was because even with lots of rinsing in cold water, there was a lot of dye in the water. 

Sashing and alternate square selections
I'll be mindful of getting this project wet! With all the dye that was released from the thread at least I know that amount won't be on my fabric!

The thread adds a nice accent to the circles. I like adding my hand to a project. I had thought about using different stitches; but, decided to keep the design the same. On purpose, I am stitching "organically" circular as I like the wonkiness free form stitching creates. 

When the month begins or ends on a day other than Saturday, I decided to use square of a light grey fabric printed with dots. I liked the contrast that fabric provided. 

For the sashing between the weekdays, I auditioned all sorts of grey fabrics. I considered using no sashing and in the end, I used a fabric print of rocks. This fabric was left over from a long ago project. It was destined to be a in a baby quilt; but, after cutting almost all the pieces, there wasn't enough. All the pieces and parts ended up in a bag about nine years ago. . .but, who is counting???

First week in January complete
The smallest strips were cut at 7/8 of an inch so perhaps it is serendipity that this fabric ended up in this project after all! I don't know if there is enough fabric to sash all the blocks for this project. If I run out before the end of the year, I'll figure out another fabric that will work as well. I do plan to spend some time cutting the strips to size so I have a better idea of how many months of strips I have on hand.

The month of January complete
To sash each week, I did use a grey fabric and I added white corner stones so that matching the squares would be easier. I also wanted to provide the eye with another pattern to view. I slowly stitched the weeks of January together. I have a plan for the key; but, I haven't a plan for inserting the name of the month. I've time to work out that plan.

Because this is a scrappy project and because I'm using those bits housed for years in a plastic bag, I'm linking to Oh Scrap--Quilting Is More Fun Than Housework.

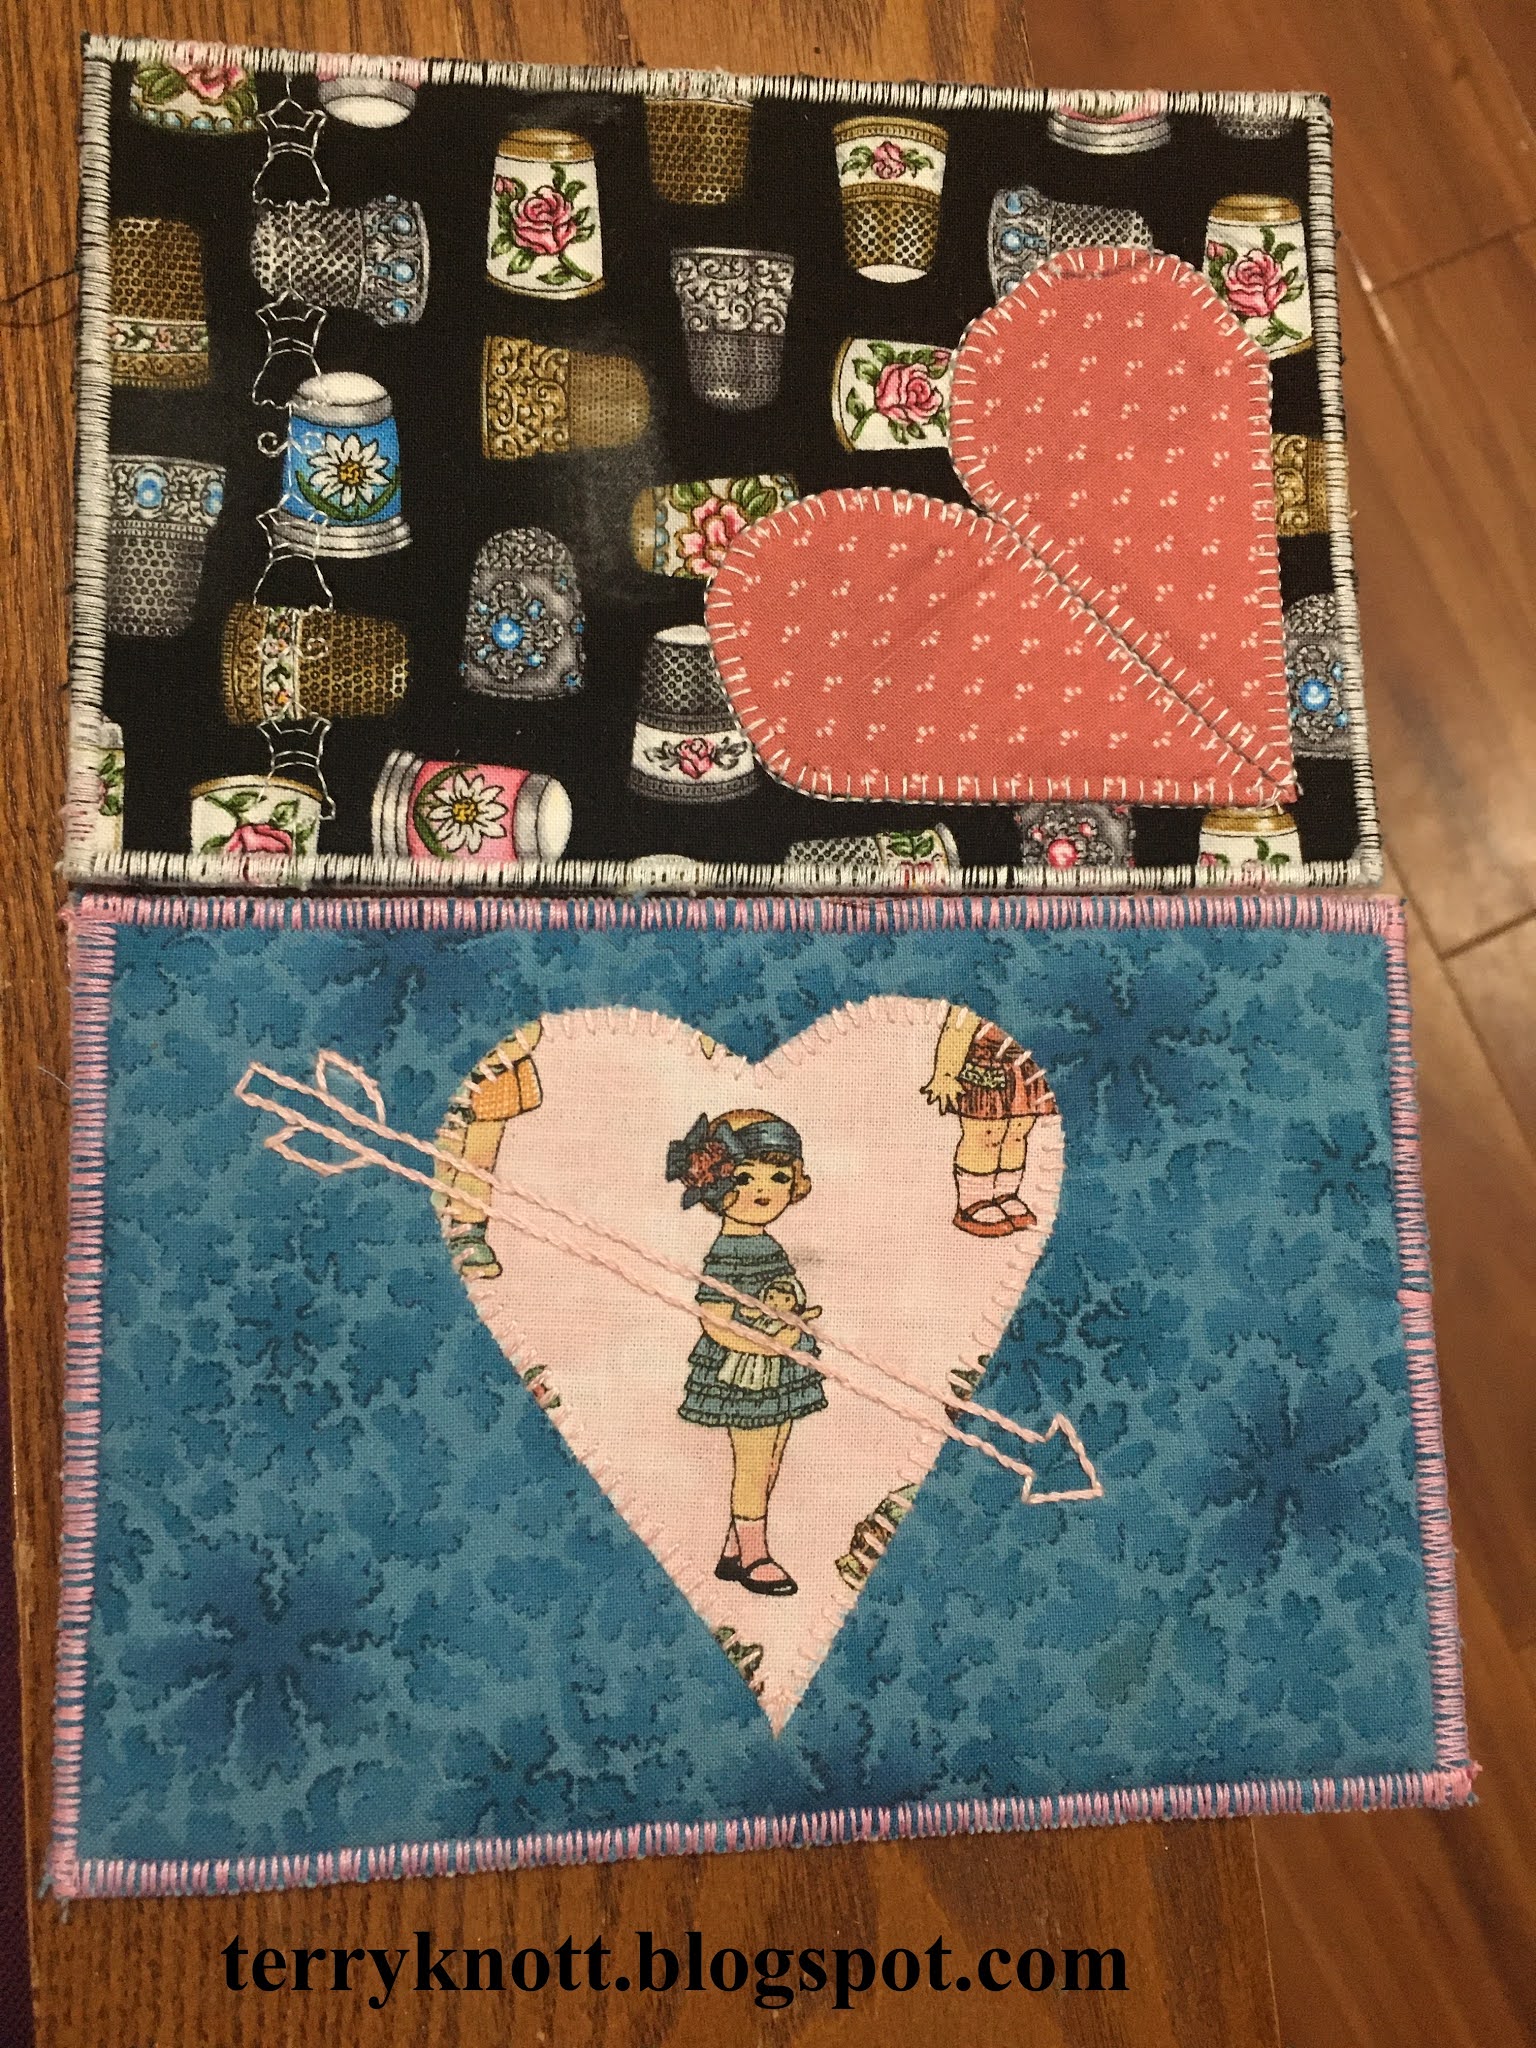
I had a pleasant surprise in my mail box twice this week. I received two Valentine post cards! One was from Connie and one was from Gail. I recognize the "girl" as Gail made a quilt for a special someone with that print some time ago. I helped her with the label. My friend, Bonnie Welte wrote the book on making post cards.

Valentine post cards
I agree with Connie that the granddaughters would have a hoot making these. How I miss our play dates! This year I was derelict in sending Valentine cards. I'll try to be better next year. In the meantime, I wish all of you a Happy Valentine's Day!

Speaking of Valentine's Day, my plan is to finish the table runner I started in a Saturday workshop. I have a plan of how to squeeze the leftover background fabric into a binding.

Today, I could have posted about our low temperatures (upper 20s) or the snow that fell--about six inches and the coat of ice--about half an inch. Instead, I'll save those photos for Wednesday when our "normal" temperatures are back in the 40s for this time of year. 

Valentine table runner
In the meantime, we are staying warm feeding the wood stove and staying away from the ice incased tree limbs as a number of those have crashed. Sigh, there is some damage from their fall; but nothing my husband can't repair when the conditions improve.

Regarding COVID:

  • Worldwide: 109M cases; 2.39M deaths 
  • United States: 27.6M cases; 484K deaths 
  • Oregon: 150K cases; 2,137 deaths

In the United States and also in Oregon, the number of new cases has plateaued. Distribution of vaccine continues to be an issue. In Oregon, the process to get on a list to receive the vaccine isn't any better than it was last week. People age 80 were eligible to receive the vaccine this week. 

Many may not have the ability to navigate the technology to schedule their appointment. COVID vaccine angels all across the United States are volunteering to help seniors book online appointments. Also, in Oregon the media reported four vaccinated people have contracted the virus. It wasn't reported what vaccine each had nor was it reported how the infection was contracted nor was it reported how long between the vaccine doses the exposure was. It was reported that the people have had light symptoms of the virus.

Proof of vaccination
Tuesday, I received the second dose of the Moderna vaccine. I arrived five minutes before the schedule start of the vaccination day. I was the third person to be vaccinated that day. The person who vaccinated me was working the day I received my first dose. I thanked her for doing this job. She said that she had worked every day that the vaccinations were distributed. She also said she planned to continue working every day that the vaccinations were offered because she felt so strongly about the value of the vaccinations! 

While my arm has not been as sore as it was with the first dose, the second dose packed a wallop! I experienced chills, fever, nausea for a full three days. I did not vomit. I ran a temperature of 101. The headache, muscle and joint pain have been constant. The dizziness is more profound this time than the last time. Ibuprofen helps the symptoms. About an hour before I can redose the Ibuprofen, all the symptoms I'm experiencing heighten. 

Again, I am thankful to have had the opportunity to access to the vaccine. I am thankful that the symptoms I am experiencing will pass without lingering effects. I am thankful that while the symptoms of the doses have kicked my butt, I am about five days away from my body building the optimum immunity. Exactly what I'll be immune to in terms of the new COVID variants remains to be known. This vaccination, however, is the beginning. I am one person that won't be an easy host for the virus to invade. May there be millions of us in this same position soon.


Sunday, August 2, 2020

Unity--Post 10

Continuing with stitching lines
Determining what motifs to quilt in the next round had me thinking for awhile. I try to use a ruler in a different way or to quilt a motif in several sizes so I can practice a similar design using the same tools. My first thought when looking at the HSTs was to stitch continuous curves. I've stitched continuous curves often over the years and then there was the decision of what to do in the background of the HST. 

When I can't decide what to quilt, I will look at what I have quilted and determine if a motif could be repeated or changed slightly. The word repeated gave me an idea. Thinking a bit more I had a plan. I would stitch lines in the HSTs as I had done in the angled shapes in the center of the quilt. I used a 50 wt cotton thread in a color that blended with the fabrics in the needle and the polyester red thread in the bobbin.

I do like the effect. The bulk of the seams
Circle in the center of square in a square block
caused some of the lines to go askew. For awhile, I ripped and restitched; but, the result usually didn't make much of a difference. Also, any fullness that was in the square skewed the lines. I decided that I would aim for an organic line and leave the lines.

In the center of the square in a square blocks, I wanted to use the Westalee circle template. I wasn't able to use this template in the center block of the quilt because I was unable to hold it in place as I quilted the circle. The center of the square in a square block has no seams to cross so I was able to stitch a circle that was mostly round.

Detail of the shapes around the circle 
Again, I used thread that blended with the quilt fabrics. For this project, the piecing is what I want to highlight so the quilting should compliment the piecing and provide texture. In the large triangles, I stitched half a circle. In the corners, I stitched three quarters of a circle.

I liked the circles; but, they seemed a bit bare so I decided to add some shapes to the outer edge of the circle. It is just a doodle.  I didn't try to make each circle the same either; but, as I worked on the second border, I found a doodle that I sort of repeated. 

I used 50 wt thread in the bobbin and in the needle. Again, I matched the color in the
View of the quilted border
needle; but, used an off white in the bobbin. It took some time; eventually, I finished quilting this border! 

The skinny border is the next section that I will quilt. I plan to quilt circles and pebbles, like I did on the first skinny border. It is going to take me some time! 

I'l be linking this blog to Longarm Quilting on Tuesday. I added her linkey to my blog post so feel free to check it out. I encourage you to check out Cheeky Cognoscenti's blog as she writes interesting posts about a variety of quilting topics. 

In regards to Covid:
Worldwide: 17.9K confirmed; 10.6K recovered; 685K deaths
U.S.: 4.71M confirmed; 2.3M recovered; 157K deaths
Oregon: 18,492 confirmed; 322 deaths
Over all view of completed quilting
Umatilla County had so many new cases that the governor reverted the county's status back to staying at home! Cases in Clackamas County, where I live, continue to rise; but, at a lower rate. Still, we are all being cautious.

School plans are confirmed that distance learning will be in place at least until the end of October. Parents at that point have the choice of hybrid learning or continuing with distance learning. 

A vaccine is in the third stage of trials. It could be available as early as December. My fingers are crossed it will be available and effective then!

Regarding the protesting, it continues into the ninth week. Friday was the first night of media reported "peaceful" protests. The state police replaced the federal marshals in protecting federal property. The media reported that there were still fires started; but, other protestors put out the fires. 

We had a run of hot temperatures--upper 90s and day of 100 degrees! My daughter ordered a wading pool for the grandkids. It was supposed to arrive between July 19 and July 27. It still isn't here. The tracking says it is still on the east coast. A friend of hers had a pool her children had outgrown. Friday, my daughter and Miss J delivered the pool to our house because they don't have space for that size of pool. 
Filling the pool with air


 Daughter A and her dad repaired the one known hole. Miss J  supervised the project. It was a hoot watching Miss J as the electric pump aired the pool. She crept closer to the project. Bob asked if she wanted to air up the pool. Of course she did! She held the electric pump and then she got to hold her finger over the intake spout while her papa removed the pump. Her eyes got bigger with every completed section aired. 

When it came time to fill the pool, it was obvious she wanted in the pool! I asked if she had thought about asking her mama if it would be okay to take her shoes and socks off to wade in the water. Her mama said okay and in a flash, she was wading in the pool. Soon, it became obvious, she was going to get her clothing wet. I asked if she had thought about asking her mama if she could take off her skirt and shirt to keep them dry. Her mama said yes. . .The skirt was down in a flash. . .too quick to stay dry! Mama said, "let's get out of the pool, first."Mama hung the skirt to dry on the fence. 

Miss J loved the water. . .it didn't matter that the water was cold. Miss J bobbed about until her mama said it was time to go home. It was hard; but, she got out without any negative comment. It was movie night at their house and she had some cleaning to do. (Her sister, K, stayed home to have enough time to finish her cleaning chores.) J had told her papa earlier that her sister would have all the cleaning done by the time they returned home and that she would still be able to watch the movie. 
Enjoying the water

Her mama reported that there was vacuuming, toilet scrubbing and dusting which equaled the cleaning her sister did earlier. I still chuckled. I think that her thought process functions well beyond her actual age! 

Today, she and her sister will be coming out to swim in the pool. Their mom and dad are coming too although, this pool isn't large enough for all of them at once! If J's first experience is any indication of the fun factor, I hope that we have a lot of swimming days left in the summer!

I sure have missed swimming in the pool!