Showing posts with label pieced back. Show all posts

Wednesday, July 29, 2026

Stars and Stripes Guild Challenge Quilted--post 2

Stitching in the ditch
Goal number eight on my July list was to begin quilting the Stars and Stripes challenge. I started stitching in the ditch. I used matching thread in the needle and bobbin to complete the ditch quilting.

Straight lines for the top and bottom of the project
At the top and bottom of the project, I stitched straight lines. I had planned to use a blue silk thread and stitch the lines vertically. I abandoned this plan because the thread wanted to lay on top of the fabric and the stitches looked like the tension was incorrect. The vertical lines looked odd because they didn't line up with the striped fabric. I quilted vertical lines on the side borders. I chose to use white thread on the needle and bobbin to quilt horizontal lines that were a quarter of an inch apart.

Quilting lines in the stripe
In the stripe, I quilted more straight lines following the print of the stripe. I again used white thread.

Quilted vertical lines in the star center
In the center of the star, I quilted vertical lines using blue thread. I continued the theme of a quarter inch spacing for the lines. I had planned to divide the space into quarters and quilt the lines in a "V" shape; but, the vertical lines created the better texture.
Quilting curved lines

The quilting remained was the background of the star. I chose to continue the quarter inch spacing and the white thread. I chose a curved quilting ruler to stitch the lines. For the most part, I was able to join the lines from one section to another. 

Evidence of bleeding
It took me about 14 hours to complete the quilting which seems over the top because the piece measures 20 by 31 inches! I blocked it and  some of the red fabric bled. I wet the project again. I started with Dawn detergent and scrubbed the bleeding areas. The bleeding areas lightened; but, were still visible. I tried the Synthrapol detergent process next. The bleeding is mostly out. It is what it is. I can live with it.

Bleeding area after treatment
I quilted this project with cotton thread. I matched the bobbin thread to the color of thread in the needle.
Thread used to quilt the project
I added a facing and mitered corners. I hand stitched the loose edge of the facing to the quilt back. I added the hanging sleeve and label. 

Label
I used a yard and a half of scraps to complete this project. I've reduced my stash by two yards this month. I have a net loss of 75 and three quarter yards of stash used this year! With five full months remaining in the year, I'm close to meeting my annual goal of using 100 yards of stash. 

Back of project
Photos of the front will be shared and this post updated in October after the quilt has been shown in the guild quilt show. 

Linking to I Quilted This, Finished or Not Friday and Patchwork and Quilts.

Sunday, July 19, 2026

Triple Treat Is A Top--post 4

Layout on the design wall
At an in person sew day with the Mavens, I sewed the remaining blocks that I needed for the top. I didn't take photos. At home, I added the blocks to the design wall. I did find one block that I hadn't sewn the neutral squares correctly. I also had two extra blocks which I used on the back.

The top
Stitching the blocks into rows and the rows together didn't take long. It measured 60 by 72 inches. I had planned to use a wide back for the backing. Instead, I decided to go into stash and choose fabrics to piece a back.

The fabrics
I started with a couple pieces of red; but, went instead with a brown, a tan and a red fabric. I've had these fabrics since 2005. Their time to leave my curated art collection, more commonly known as stash, had finally arrived! 

The back
I did cut a sleeve from the tan fabric. I used four and half yards of stash to make the back! Soon, I'll be taking the top and the back to the quilter! Making progress on this project was goal number one one my July list.

Linking to Oh Scrap and Sew & Tell.

Wednesday, April 22, 2026

Scrappy Kaffe--A Finish!

Quilting design
This project is the back that became a front! I'm glad it did. Becoming a front meant I needed to piece a back for the challenge and a back for this project! The Gresham Senior Center longarmed it. The pantograph pattern is Botanical Blossoms.

Green binding
I used a different green for the binding as I didn't have enough left of what I had used in the front. I like the added depth of dimension the binding added.

Label

The label came from the guild free table long ago, I've been using the free table labels when I can figure out how best to use them! This time, I added the information I wanted to include around the preprinted information.

Hand stitching the sleeve
I did have to piece the sleeve as I was about two inches short of having a piece of fabric wide enough! The pieced part is next to the quilt so it appears the sleeve is all one fabric. Shhhh. . .we will keep that piecing fact between us!

Finished back
The handwork on this project was to close the corners of the binding, attach the label and sleeve. I machine stitched the binding to this project. 

Close up of quilting from front
In no time, I had another finish! This is the fourth finish of the year! It was goal number two on my April list. This project meets goal number three on my annual list. I used 11 yards of fabric in this project. I've used 30 yards of stash this month! Hooray!!!

Finished front
I have another finish to share with Finished or not Friday, Quilting and Patchwork, and Slow Stitching. Since there is a measurable amount of pink in this project which is the Rainbow Scrap Challenge color this month, I'll link up with So Scrappy too.


Sunday, March 15, 2026

Piecing A Back for the Kaffe Challenge Take Two!--post 5

Top on left; stash fabric on right
I spent a lot of time online shopping for a Kaffe print for the backing. I found several; but, I couldn't justify spending so much money on a backing! I decided to look into my stash for an option. If I couldn't find something suitable then I would make a purchase.
Auditioning the pieces

I found a purple Paula Nadelstern print. She came to our guild in 2002. I likely purchased that two yard piece of fabric around that time. I haven't used it for making blocks that have a kaleidoscope effect in all this time so I used it.

Three seams remaining
I'm glad I pre-washed it as it bled purple! There was a little of the green fabric remaining from piecing the back  of Scrappy Kaffe, I used it. After I had trimmed the length of the Nadelstern print, I found it was almost the perfect size if I turned the print to run horizontally rather than vertically. I like the interest turning the fabric gave to the back.

Finished back
I stitched the pieces together. Soon, I had a finished back. This one will be used for the challenge top! There is about three yards of fabric in this back. I chose a red purple fabric from stash to be the sleeve. I cut the purple binding. One day, I'll layer and baste this project. Documenting making the back was goal number one on my March list

Linking to: Oh Scrap and Sew & Tell.


Sunday, March 8, 2026

Piecing a Back for Scrappy Kaffe--post 1

Back before the scrap addition
This was supposed to be the back to my small group Kaffe challenge. I "found" a few more scraps after I thought that I had finished the back. Gertie, my inner squirrel was adamant that I add the bits to the backing. I thought adding the scraps was a good idea as I am trying to not add more bits to my scrap bags!

Finished back--er top
As I pieced, I laughed and said this back could become a top. Gertie replied and why not? What a debate we had! I wanted to make a reversible quilt. Gertie claimed with the addition of the scraps the back was too big for the top. It was. It measured 65 x 80. The top measures 48 by 65. That meant there would be a lot of chunks leftover after quilting. 

Remaining scraps
I did have a tiny amount of scraps remaining! The largest are the oranges. The top orange is about a half yard and the dark orange is about two thirds of a yard. The bits are: one four by 12 inch scrap, two green strings, one 1.5 inch blue strip, two 1.5 inch squares and one two inch square. All the Kaffe prints are in the project!

Auditioning pieces
Gertie said this back wanted to be a top and to let it. I could have a bonus quilt instead. I countered with now I need to make two backs! She said it was worth it and to pull from stash. I said I would look in the stash to see what was available. 
Pieced backing in progress

I found a combination while wild and not that great looking on its own, does relate to the quilt top. The batik on the left has been in my stash for a couple decades. The batik on the right was a leftover from a backing I used six years ago. The orange and green print fabrics were leftover from previous backings this year! 

Finished back
I began sewing the pieces together. Again, I was surprised at how the chunks went together with little scraps left! There are four yards of stash/scraps used in this backing. So now that I have a back for the back that became a top, the top needs a name! I'm calling it Scrappy Kaffe!

I'm definitely not quilting this "bonus" on my domestic machine. I took it to the Gresham Senior Center longarmers. I usually determine the binding and have it ready to go when the piece is finished at the senior center. This time. . .I don't know for sure what I will use. . .that is "to be determined!" I'll audition options until I locate the one that speaks to me or rather Gertie, my inner squirrel agrees with the choice.

Linking to Oh Scrap and Sew & Tell.


Wednesday, February 18, 2026

Making A Back for the Small Group Challenge--post 4

Most of the leftover block parts and bits
Goal number one on my February list was to work the back to for my small group challenge flimsy. I finished the flimsy last month. My plan was to use the leftover bits, pieces and chunks to construct the back. First, I placed the leftover block parts and bits on the design wall.

Auditioning fabric placement of the Kaffe leftovers
Next, I placed the leftover chunks of the Kaffe fabric on the design wall. Gertie wanted to place the pieced sections vertically; but, they looked better in the horizontal orientation. Using the scraps, I pieced the parts together to begin making a row. 

Piecing sections into rows
Once I had made several rows, I checked the row width against the flimsy and learned it needed to be a few inches wider. Kept stitching until I made rows. I auditioned the rows in different configurations. When Gertie, my inner squirrel, approved, I stitched the rows together. I added the blue to unify the piece as well as make it a little longer.

60 x 72 inch back
I was amazed at how I many scraps I used! The scraps needed little trimming. I took a photo of the leftovers. In addition to the bits in the photo, I had about third of a yard left of the bright orange and 2/3 yard left of the dark orange fabric. I had about 3/4 yard left of the purple.(I'll use the purple as binding.)
The leftovers 
As I was cleaning up the space, I found the scraps I couldn't find earlier. I asked myself. Now what? I auditioned the remaining leftovers. I may be able to add 10 more inches in length and about eight inches in width. Gertie, my inner squirrel, squealed with delight. She thinks this back has become a top. She could be right!
Auditioning the remaining leftovers
I'll piece these bits into the project and see what it looks like. Working on the back was goal number five on my February list. Linking to Finished or Not Friday and Patchwork and Quilts.

Wednesday, November 19, 2025

Piecing the Back For the Selvage Top--post 20

Novelty sewing themed print fabric
Goal number nine on my November list was to piece a back for the selvage top which I'm calling "Hidden Seven." I started with the piece of green I had left over from cutting the background for the selvage blocks. 

I cut and prepared the binding. I decided to use one cut of the fabric pieced horizontally. Next, I went to the stash. In 2011, my friend JoJo and I went fabric shopping. I was on the hunt for a particular background fabric. I found what I needed. Together we found a fun novelty print. 

Two yards of the newsprint/Sewing Daily print remained on the bolt. She and I split it. I liked it so much that every time I went to cut it up, I couldn't! I don't know how JoJo used her fabric.

Pieced back

The novelty fabric seemed just right for the back. Still, I needed another chunk of fabric. I chose a red fabric. It was also a yard. With a little more piecing, I finished stitching the back. I had enough of the green to cut the sleeve. I will cut the batting. This project will be ready to go to the longarmer! 

Sunday, July 20, 2025

A Back for Sweet Tooth--post five

Auditioning for the binding
Goal number five on my July list was to figure out the back and binding for the Sweet Tooth mystery. I started with figuring out the binding. I laid out scraps and when I got to the chocolate scrap, Gertie said that is the one. I agreed! Gertie is my inner squirrel. I will need to purchase it.

Binding choice
Then I spent a lot of time stitching more of my small bits together. I like to work with the small stuff first. The small bits make good strings and can provide good visual interest. It also gives me time to think about what to do with the bigger chunks!

All the parts
Gertie was right about these small bits becoming their own quilt. I did make the "Sweet Additions" blocks that Bill and Weeks added to our mystery each week. I didn't make the blocks until after I had finished my top. I used the small scraps to make the blocks. When I finished making blocks, I made at least five blocks of each addition. It was fu to play a little more with transparency. I made the process more challenging because I limited myself to working with the small scraps!

The scraps after piecing the small bits
When I had finished with the block and bit piecing, I took a photo of the remaining scraps. It is amazing how little was left! Then I tackled cutting the chunks into useable segments. In this mystery, we cut small segments. If you cut strips and then sub cut into segments, you would run out of fabric. 

More bits!
Trimming the chunks created a whole bunch more small bits! Goodness!!! Gertie was happy. I will use them in the new project. . . Gertie is on board with this plan!

First section
I started piecing the vertical chunks first. I didn't layout the pieces. Instead, I randomly selected two pieces to stitch together. I did cut the fabrics to the same length so it was easier to keep the pieces straight. I wanted to place the "recipe" section next. 
Adding the "recipe"

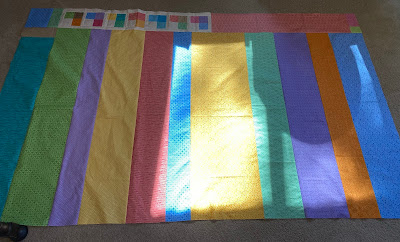
I sewed even larger chunks together. I created a horizontal grouping of fabrics.

Horizontal section added
I thought that I needed about 14 more inches, so I went back to the remaining scraps and started piecing. My little bits pile continued to grow as my larger chunk pile diminished.

Then I discovered that I needed a couple more inches. Back to the scraps I went. It wasn't much to piece that last section!

More vertical strips and one more horizontal strip
I laid the top on the backing and discovered that I made the top too wide. No worries. I cut the excess off with the rotary cutter. I added the excess back to the scrap pile!
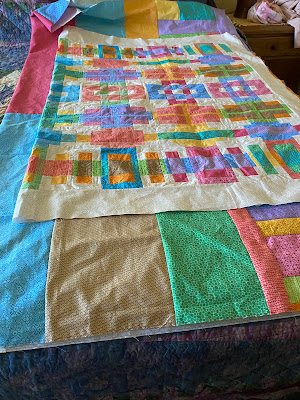
Oops, the backing is too large
It took me hours to cut and sew this back. But, it was a great way to use a lot of the leftover fabrics from the mystery. It could be a two sided quilt!

Most of the remaining scraps
I do have more little bits, some pieces and a couple chunks for leftovers. Maybe those cut off fabrics will find their way on the next back. I'm happy that the top and backing are ready to go to the longarmer. Perhaps, I can get it dropped off next week!

Ready for the longarmer
Linking to Oh Scrap and Sew and Tell.