 |
Daughter's first quilt
|
In 2020 when Oregon was on fire and we were under a warning to be ready to evacuate, I had packed up all my finished quilts. When I unpacked and inventoried the quilts, I had two that didn't have hanging sleeves. I placed them where I could see them and thought that I would get to that project "soon."
Three years later, the quilts hadn't moved. It was time to ask myself what was holding me back from the task. Q: Why hadn't I done it already? A: I dislike putting sleeves on the quilt. A: I didn't have enough of the backing fabric to make a "proper" sized sleeve. A: I would have to locate a fabric for the second quilt. A: I had other projects that I would rather stitch.
Sigh. . . . .
 |
| The Road Home |
The first quilt is one my youngest daughter stitched in 1996. The fabrics were scraps from her quilt that I had made her and from a vest that her sister had stitched for herself. Nicole did all the cutting, piecing and quilting on the project. While I hoped it would be the project that hooked her into quilting, it wasn't. Although, I still hope that the "quilt pox" is latent and will appear later in her life!
This little quilt had hung on her door from the time she had finished it until we readied for the evacuation. She had thumb tacked it to her door. It is an Eleanor Burns Quilt In A Day pattern. I had to locate a fabric for the sleeve. In my blue chunks of scraps, was a piece that was a little larger in width and the perfect length so I stitched the sleeve and pinned it into place on the quilt back.
 |
| Scrap for the sleeve |
The second quilt is one that I started in a "Quilt Til You Wilt" workshop that was held at a local quilt shop. Once a month, the shop would hold a class that started at 6PM and went until midnight or until you wilted! The shop closed many years ago; but, that was such a fun activity to attend. Rarely, did I last until midnight! I finished it in 1996.
My husband's favorite aunt had a cabin at the coast. She would travel from her home to the cabin often. She regularly spent about half her time at the coast. We spent some time there with her as well each year. We played a lot of pinochle and took walks on the beach. It was a great place to visit. I used to tease her that she had driven that road so many times that her car knew the route!
 |
| Width of sleeve |
I named this quilt, "The Road Home" and thought that she would use it as a lap quilt. Instead, she pinned it to her wall so all who came to visit would see it. When she died, her son-in-law asked if I wanted it back. He let me know that it really wasn't a quilt because it was machine pieced and quilted. Additionally the design was an abomination.
He was going to make a traditional nine patch. . .hand piecing and hand quilting because that would be a "real" quilt. I know he made his nine patches; but, I don't know if he ever finished his quilt. I was happy to have "The Road Home" back!
I had enough of the backing fabric to make a two and three quarter inch sleeve. I decided that this size sleeve would work because I use a dowel to insert in the sleeve when I hang quilts in my home. I made the sleeve and pinned it to the quilt back.
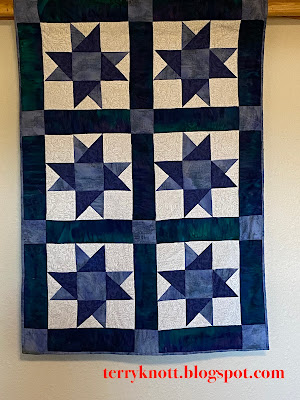 |
| Nicole's quilt |
Last week, I spent some time hand stitching the sleeves to the quilt backs. It didn't take forever and as I finished, I chided myself for the length of time it took to complete the task! Putting it on my monthly list definitely was the key to finishing the task!
This was goal number eight on my June list. I used about a quarter yard of fabric so I've now used seven yards of fabric from my stash. When I went to hang "The Road Home" quilt, I laughed at myself. I don't have a dowel/rod in my house wide enough to accommodate the width of the quilt!
Since both of these projects were made from scraps, I'm linking to Cynthia and Oh Scrap/Quilting Is More Fun Than Housework.
Goal number nine on my June list was to document an activity my friend Theresa invited me to attend. It was a lot of fun. We went to the Red Chair Farm in Estacada, Oregon. We made a stained glass window in a two and a half hour class.
First, we placed glass on our window. Then, we picked up each piece of glass and added a little bit of glue to hold the place in place so we could grout our piece with sand.
 |
| Beginning the process |
The instructor had made up the grout ahead of time so when we were ready, we placed the grout between and over the glass pieces. Then, we spent time gently wiping away the group from the glass. When we were finished, the instructor screwed hooks into the frame and gave us some chain to be able to hang the piece at home.
 |
| Allowing the grout to cure |
Before we hung it, we were to leave it upside down for a day to allow the grout to cure and dry. I've "auditioned" my piece in a number of windows. Rather than hang it, I'm planning to leave it propped against the kitchen window.
It was a fun activity to do with my friend! It makes me smile every time I see it!
 |
| Finished window |


