Showing posts with label TUTORIAL. Show all posts

Wednesday, February 12, 2025

Positively is Ready for Quilting! --A Tutorial--post 2

Goal number two on my February list was to document layering and basting the Positively top. Goal number three on my February list was to write a tutorial about layering and basting a top. I can do both in this post! 

Plastic picnic cloth clips
First, I use plastic clips that are used on an outdoor picnic table to hold a tablecloth in place. I've had these for many years. I bought all that were at the store. Since it was fall, the product was deeply discounted. Depending on the depth of the table, binder clips might be an option.

Apply some tension
I press the backing to remove any lumps or bumps. The smoother the backing, the less chance for tucks later. I lay the backing on the table right side down. I use the clips to hold the backing to the table. I apply a little bit of pressure to the backing to add some tension.

Backing secured to the table
If the backing isn't large enough to hang over the side, I'll use painter's tape to hold the back to the table. If the backing is larger than the table, I let the extra hang off to one side and/or off one end. In the photo above, the extra fabric is hanging off the left side and the bottom of the project.

Batting smoothed into place
Next, I lay the batting on the backing. Any extra is placed on the same side as the extra backing. If the batting has scrim, I place that side next to the backing. I gently pat and smooth the batting. I don't worry that the batting is going to shift. The fibers in the batting make it act a bit "sticky."

Loose thread removal
The last layer is the top. First, I clip all the loose threads. If there is a light area on the top, I wouldn't want a dark thread showing beneath the top. This clipping takes time; but, it is worth the effort. Next, I press the top well for the same reason I pressed the backing.

Positioning the top
I gently placed the top on the batting. I pat and smooth the top in place. I will lay a ruler along a straight area. In this case, that area was the stem. I try to keep the lines straight. I pin baste about every four inches. The pins I use are size number two. The pins sit in a plastic cover that makes it easier on my fingers to open and close the pins. I also have a lot of pins without covers so when I use all the pins with covers, I use the plain pins. They all work!

More checking on positioning
I work slowly and methodically. one section at a time. Once I have the pins in place I close them. I use a tool called a Kwik Clip. The tool makes it easier on my fingers for closing the pins. A grapefruit spoon will work too. 
The view half way through sliding the 
pinned area to one side of the table
When the initial area is pinned, I release the plastic clips. Then I scoot the entire project to the edge of the table and repeat the process. Again, I smooth the back. It is important to ensure that the backing is smooth as it is easy to have a wrinkle in the fabric. I still add a bit of tension to the backing. I use a plastic clip to hold the fabric in place. This time, the weight of the project on the overhang side of the table will hold the project in place.
Replacing the plastic clamps
Next, I smooth the batting in place, I move the clamps to include the backing and the batting. In the photo above you can see that the extra fabric is at the foot of the table. I pat and smooth the top into place. I add more pins. I do like to pin close to the outer edge of the project.
Checking the back for wrinkles/tucks
Once all the pins are in and closed, I remove the clamps. I turn it over and make sure that there aren't any wrinkles in the backing. If there are wrinkles, I remove the pins and start again with smoothing the backing, clamping, then the batting and clamping before patting the top into place.
Trimming the extra batting and backing
Then, I trim the extra batting and backing so that it is about an inch larger than the top. Trimming helps me have fewer instances of catching the extra fabric during the quilting process.
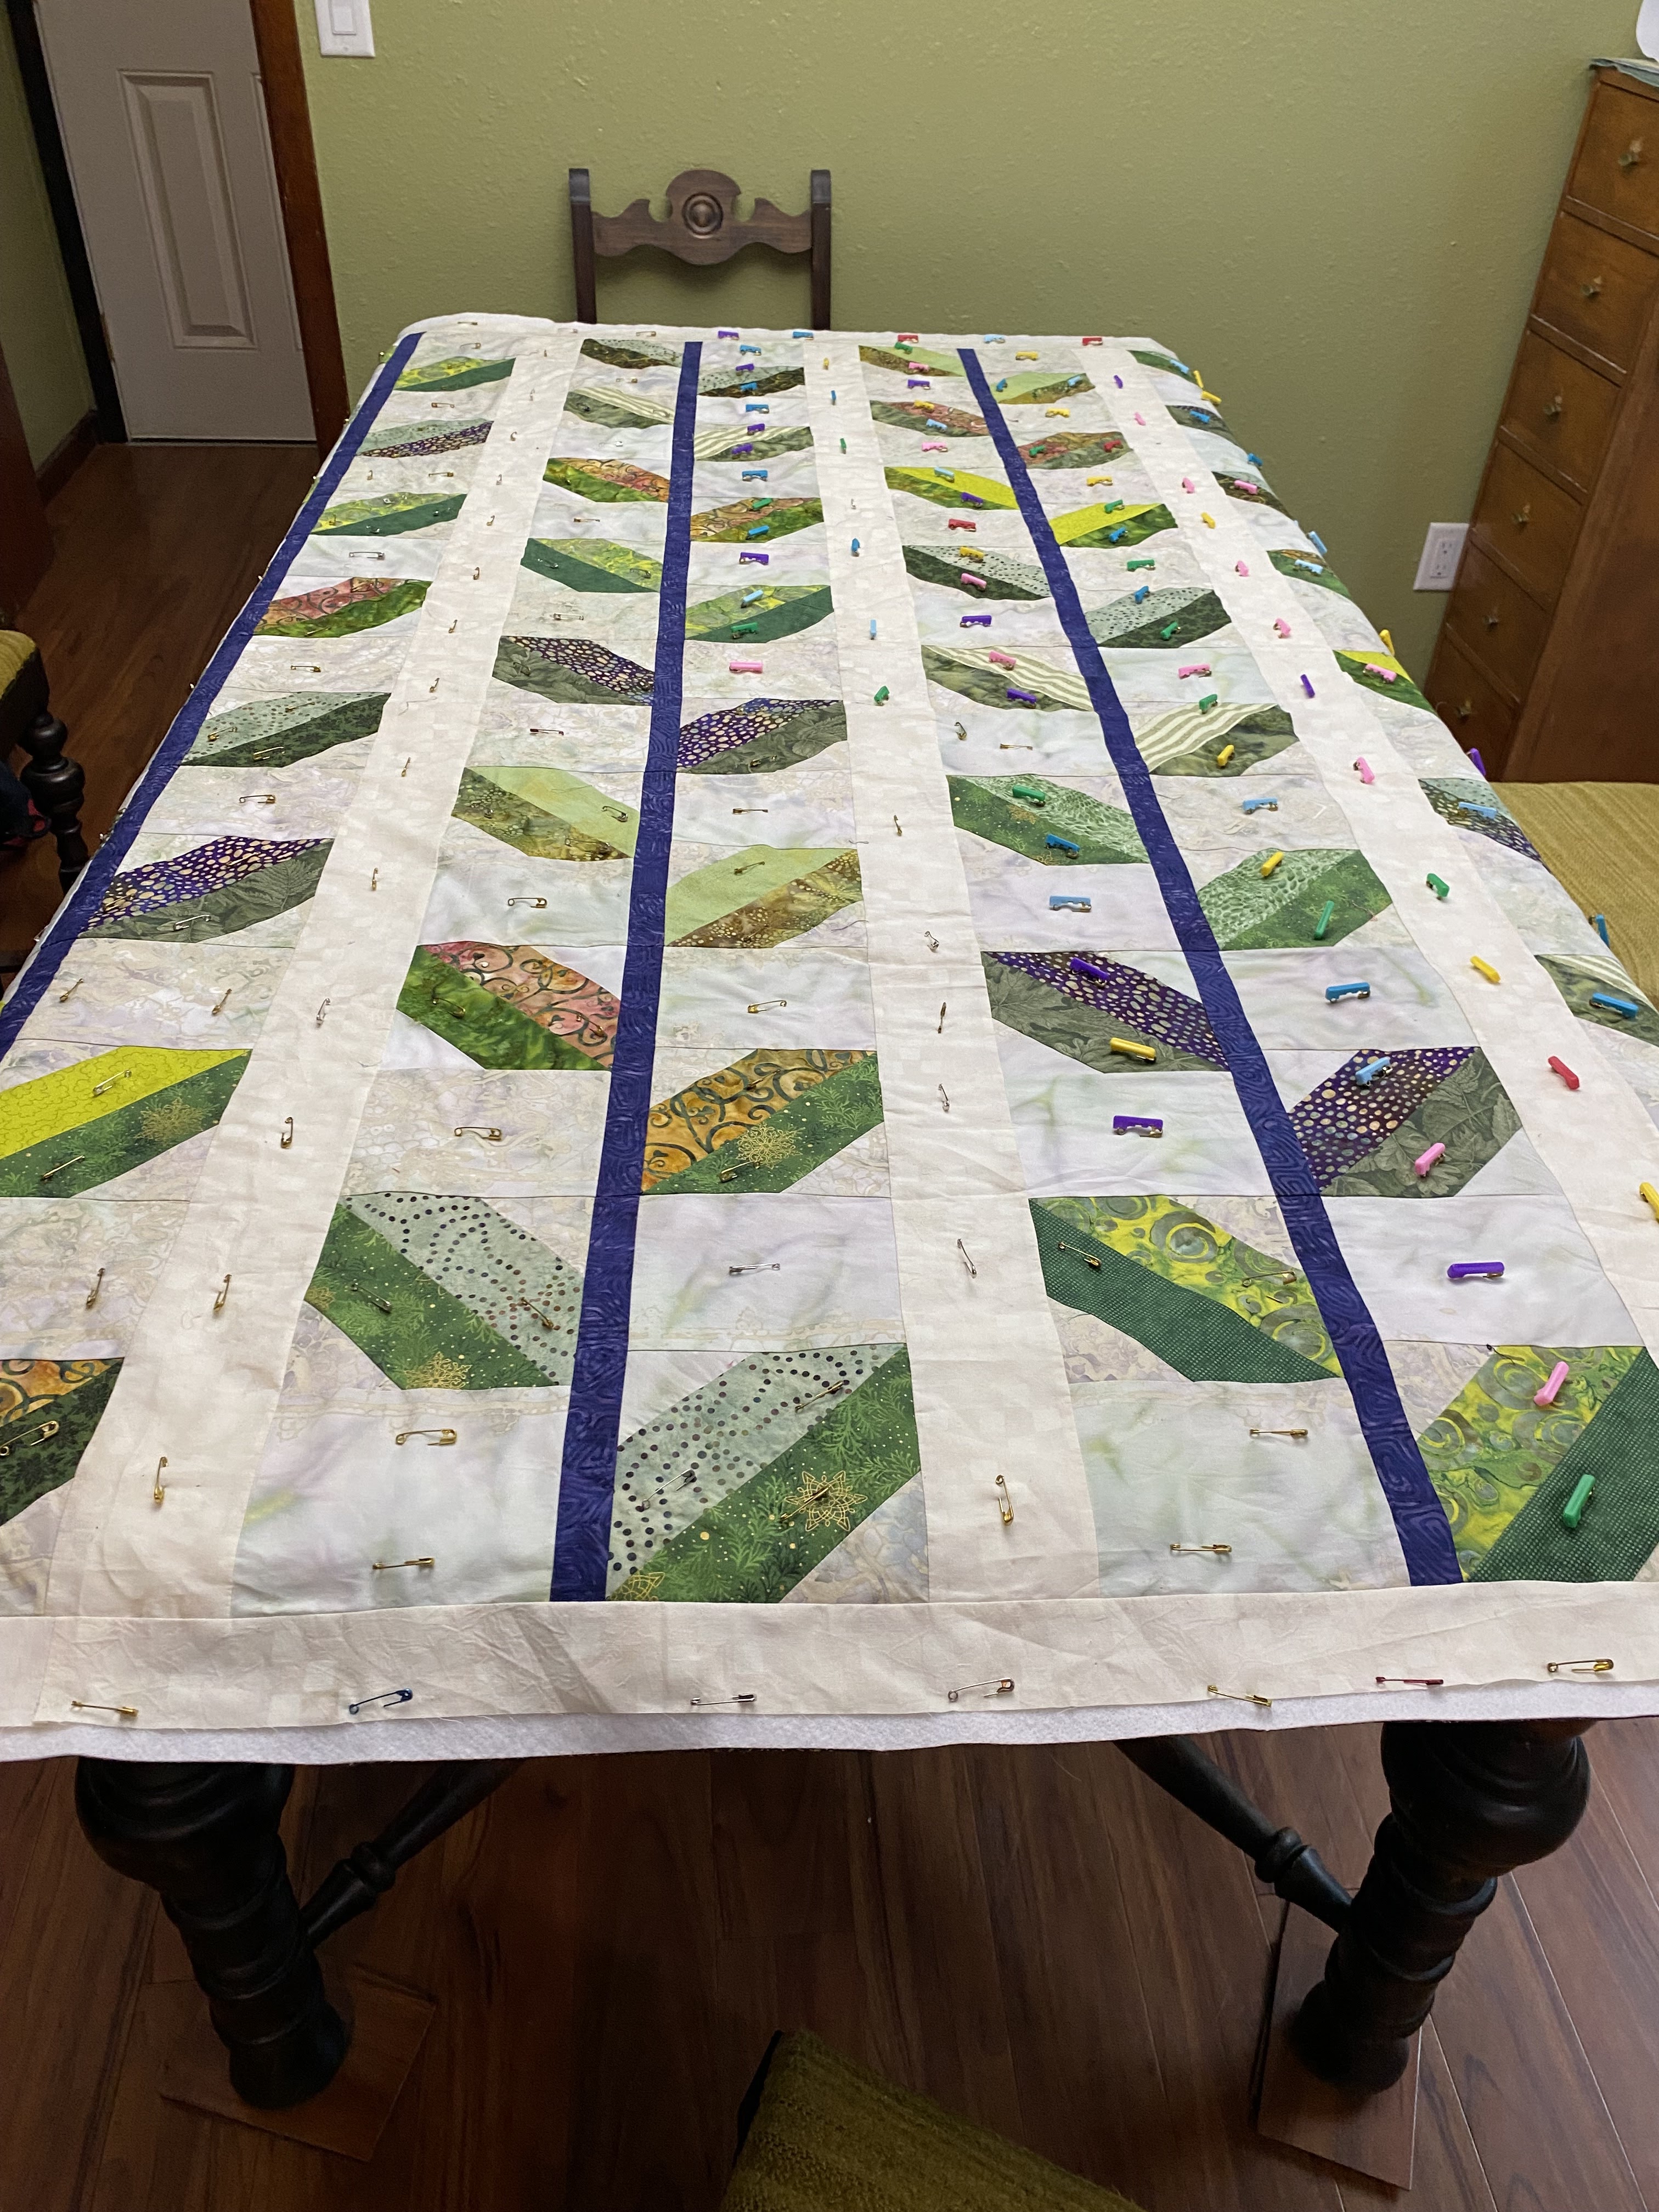
Finished pin basting
I often take a photo of the project when it is pin basted and trimmed. Now my Positively quilt is ready for quilting. I will stitch in the ditch first and go from there. . .AFTER, I finish a couple other projects. While I have a destination in mind for this quilt, there is no deadline as to when it needs to be finished.

Linking to Alycia at Finished or Nor Friday.

Wednesday, February 5, 2025

Piecing Batting

Batting scraps needing to be pieced
Goal number nine on my February list was to piece together the batting chunks that have accumulated since I finished Indigo Way. I know that some quilters label their chunks. I piece my chunks together. I'd rather keep track of one or two pieces of batting instead of a bunch of chunks. I also piece like battings together. . .all 80/20 and all wool; but, I don't mix the battings.

Piecing the batting with Bernie

With the larger chunks, I butt the edges together. Using a wide and long zig zag stitch (I use a 9 mm wide by 5mm long stitch setting.) I stitch until I have used all the big chunks of fabric. I generally square the piece so that when I'm ready to use it, it will play nice in my batting sandwich. I ended up with a piece that was around 70 inches square. 

Batting ready for use
There isn't much to see in the photo; but it is of the chunk that is ready to be used in a project. I use these pieces as I would any other piece of batting. 

Slicing the narrow strips into bits
Any skinny or narrow strips of batting, I cut into small pieces with my rotary cutting. I store these in a two gallon plastic ziplock bag. When I need to stuff a pincushion or a pillow, I'll use those stored bits.No batting scraps go in the trash.

Batting scraps ready to use as stuffing
In keeping the bits out of the landfill, I figure I am doing my part to reduce the impact on the environment. I really do use all the leftover pieces. Yes, it takes some time to piece the chunks together. I do save money because I can stretch the batting into more projects. Although, if I were to consider the amount of time it takes, I probably don't save as much as I think! In the end, I have a piece ready to use. I'm not sorting though pieces to find one that is the right size nor am I storing many batting scraps. It is a win for me!

Linking to Alycia at Finished or Not Friday.


Sunday, February 11, 2024

Swimsuit Tutorial

Cut the fabric so the greater stretch goes
around the body or crosswise
This is a long post.

Several people have asked me to share how I sew a swimsuit. I've made swimsuits for myself, my kids and now my grandkids. I made my first swimsuit during my first pregnancy. I learned the tips of stitching suits from my mom who taught a number of adult education classes, Swimwear was one class she taught! She made my suits when I was in high school.

My patterns are 35 to 40 years old. Mostly they are Stretch N Sew; but, there are a few Kwik Sew and even a Butterick! In addition to choosing a pattern size that reflects your bust, hip and waist measurements, you also need to look at the overall measurement. If you've ever had a suit that made you feel shorter, or pulled on your shoulders, likely, the overall measurement was too small. 

Crotch front compared to crotch back
Your overall measurement is the distance from your crotch to over one shoulder. The tape goes around your whole body: front, back and breast. The measurement reflects the depth of your body. A suit with the correct overall measurement is comfortable to wear for hours and hours. I lengthen my suits a couple of inches because over the years, I've gotten much thicker through the middle!

Crotch seam pinned and ready to sew
Once you've selected your pattern, made the necessary adjustments and drawn the pattern on tissue paper or some other pattern type paper; it's time to cut out your suit. Swimwear fabric stretches in both directions. Often the lengthwise and crosswise stretch are the same. Sometimes, there is a difference. Pay attention to the stretch. You want the crosswise stretch going around your body. If you make
a suit with the stretch going vertically, it is uncomfortable and difficult to get on and off.
Stitching the crotch with a 5/8" seam

Some people say not to poke holes in swimwear fabric and to use weights to cut out the pattern pieces. I use sharp pins and don't have issues. I have used pattern weights too and both ways work. If you want to line a suit, cut out your lining now as well. The lining fabric has stretch too so treat it just like you did your swimwear fabric with the greatest stretch going around your body. If you are lining your suit, you won't need to cut a crotch lining piece.

The suit I'm making in this tutorial isn't lined. In this case, there is a crotch lining which is a small pattern piece. Sometimes people are concerned about the crotch seam because the back of the fabric piece is larger than the front of the pattern piece. This is normal. You will pin the sides and then ease the pieces to fit.

For this suit, I've pinned the front and back crotch seams right sides together. I've added the crotch lining, right side to the wrong side of the back crotch. Use a cotton or cotton/poly thread. I used the stretch thread and found it didn't hold up well to the chlorine.

With an 80/20 needle, I stitched with a 5/8" seam allowance stretching it as I stitched. If you find the needle causing little runs in the fabrics, you could try a ball point needle. I've used universal, sharp and ball point needles. All worked. I am a Schmetz needle fan.

Serging the seam

Stretching the seam allows the seam to take stress when you are putting the suit on and taking it off. If you hear popping noises, you are ripping stitches which means that suit isn't going to wear well! Don't panic if you hear those noises the first time you wear it, you do sew the seam a second time. I use a stitch length of 3.5.

Serged crotch seam
Then I serged the seam, leaving a quarter inch seam allowance. The serger is set up to in normal stitch mode. If you don't have a serger, stitch the seam a second time. I don't stretch the seams much when I serge and that works fine. I was asked about using the stretch stitch in my machine. I have used it years ago. When I purchased a serger, it was faster to straight stitch and then serge. That stretch stitch is not a stitch that you want to rip!

(If you are lining your suit, you will follow the same steps except you won't have the crotch lining piece in the mix. You will sew the front and the back of the suit together. You will repeat that step for the lining.) 

Crotch lining edges pinned in place
Then, I flipped the crotch lining piece to the front of the suit. The crotch seam is enclosed. From the right side, I pinned the edges together. Later the elastic will enclose these edges.

Stitch 1/4 inch away from crotch seam
I stitched a quarter of an inch away from the crotch seam. This holds the fabric in place. 

Crotch seam view from the wrong side of the suit
This is what the seam looks like from the wrong side of the fabric.

Stretching the fabric as I sew
Next, stitch the side seams and the shoulder seams using a 1/4 seam. Stretch the side seams in front and in back of the needle as you sew. The more you stretch, the more give the seam will have when putting the on and pulling it off.

1/4" seam. Don't sew over pins!
Sometimes people are concerned after stretching the seam that the stitch looks a bit wonky. That is okay. Next serge of stitch the seam a second time. (If you are lining your suit, repeat for the lining.)

View of the stitched and serged seam
If you are lining your suit, place the lining wrong sides next to the wrong sides of the suit. Pin around all openings: arm holes, neck and leg opening. With another color of thread, Baste the edges together using a long basting stitch. Stretch as you stitch. Trim the lining close to the basted stitching. 

Roll of 3/8" elastic
Now it is time for elastic insertion. The pattern instructions will give you guidance on how much elastic to cut and what size to use. I use 3/8 inch swimwear elastic. I bought a roll of it on line years ago. This elastic holds up better to the pool chemicals. Manufactures often use clear elastic as it is less bulky than the elastic in the photo. I haven't stitched with that so I can't comment on its use.

Setting used to sew elastic ends together
Most of the patterns will say to use a one to one stretch for the neck and armhole openings. I like the elastics to fit more snuggly to my body so I cut the pieces at least one and half inches less than the measurement of the opening.

Stitching in progress
When I sew the ends of the elastic together, I butt the edges together and I use a zigzag stitch. I snapped a photo of the setting that I used. I butt the edges together because it reduces bulk. I stitch back and forth several times to secure the join.

Edges joined together
This is what it looks like when the edges are joined together.

Divide the elastic into quarters
For the armhole and neck openings, I divide the elastic into quarters with pins. I then divide the suit opening (neck or armhole) into quarters. I change the position of my needle and lengthen my stitch length and narrow the zigzag width. For the first round of stitching, I move my needle all the way to the right. (The photo shows the needle position for the second round of stitching. I forgot to take a photo of the machine setting for the first round!)

Setting that I use 
I pin the elastic to the wrong side of the suit matching the quarter marks. When I begin stitching, I stretch the fabric in front and behind the needle as well as position the edge of the elastic about one eighth inch inside the edge of the fabric. My goal is to stitch on the outside edge of the elastic. Honestly, I feel like I did as a kid when I would pat my stomach and rub my head! 

Needle and elastic position on the fabric
The reason I want to stitch so close to the outer edge of the fabric is because the elastic will fit better against the body and the suit will be more comfortable to wear. If there is a little fabric to the outside of the elastic, the finish looks nicer.

Example of the first row of stitching
You can stitch with a straight stitch or you could apply the elastic with a cover stitch if you have access to serge that contains that stitch. I find the zigzag has less popping when I wear the garment. My serger doesn't have a cover stitch. For years, I've stitched with a wider zig zag because I felt more stitches equaled more stability. I like how the narrower zig zag looks and I haven't had an issue with thread popping.

Second row of stitching applying elastic
Once you finish the first application of the elastic, the second stitching is simple. You will turn the elastic to the inside of the suit and stitch again. This time, you stitch on the inside edge of the elastic.

One to one ratio (top of curve)
Applying the leg opening elastic is a little different. First, I make the elastic at least two inches less than the leg measurement. Second, I apply the elastic to the front of the leg opening at a ratio of one to one. As I approach the back of the leg opening, I stretch the elastic to the maximum possible. I stretch the swim fabric too. I stretch in front of the needle as well as behind the needle.

Stretching the elastic
This stretching the back of the leg opening is the key to eliminate the uncomfortable issue of the suit riding up your backside. Once you've finished the first application, then turn the elastic to the inside and stitch again. 

Note more gathering on the left side of the 
photo. This is the back of the leg.
If you lined your suit, all the openings are now enclosed. You can remove the basting stitches. I use a different colored thread so that it is easy to see which thread to pull. 

Finished leg opening. Note more gathers 
in the fabric next to the table. This is the
back of the leg opening.
You've completed stitching your suit! Put it on. Notice how it feels. Make notes to improve the fit of the next one that you make.

Finished back
There is no more of this fabric left. I used it all. My stash use will stand at negative 6.75 yards because I made this suit out of the other half of the quarter yard that I made the new baby suit that I posted about last month. Finishing this suit was goal number 15 on my February list.

Finished front
I'm linking to Cynthia at Oh Scrap/Quilting Is More Fun Than Housekeeping. Go visit. There is so much inspiration there!