Wednesday, August 29, 2018

Bullet Journaling--An August Start

Cover of my bullet journal
Keeping a calendar, detailing notes in a planner, journaling activities and making to do lists have been part of my daily task list for many years. For about 15 years, I worked four different part time jobs, picked up/dropped off the daughters to swim lessons, dance lessons and play dates. An accurate calendar was a must!

When I worked a full time job plus two part time jobs and balanced attending the swim meets and water polo matches, I was introduced to a planner system. I found many techniques in a planner helpful and it was easy to transition because I was already documenting much of my life in my calendar system. I have tried a digital planner/calendar; however, I prefer a paper system!

A key to the various marks
Dedicated journaling began four years ago when six of us got together and tackled the lessons in an Artist's Way by Julia Cameron together. I found the morning pages a great help to identify what was blocking my creativity as well as how to expand my skill sets. The time we spent together was
invaluable. I doubt that I would have gained as much insight through the process had I taken the journey on my own.

Last August, I stopped journaling. When I found that I didn't miss it, I didn't pick it up again. My blog posts, joining the 2018 Finish-A-Long, my calendar and my planner provided me the formats to continue to explore, develop and hone my various skills.
View of the index

Last April, I saw a posting on FaceBook about a sketchbook revival that was a free online workshop intended to start, maintain and grow sketchbook practice. I want to develop my drawing skills so I took it. I loved the course. I tried different techniques. Some techniques were beyond my skill level; but, I picked up little "nuggets" of information from each presenter. I didn't stick with the practice.

I follow Barbara Black who blogs at My Joyful Journey. In July, she posted her top three tips to time management and shared her journal. I found some overlap of what she does and what I was doing. Then a member of "The Quilt Show" (TQS) brought up bullet journaling and mentioned she was trying to find a better way to organize aspects of her life. She shared a link to a video at bulletjournal.com. She also shared BoHo Berry's youtube video about her setting up her bullet journal. While I enjoyed the video, I thought, too much work!
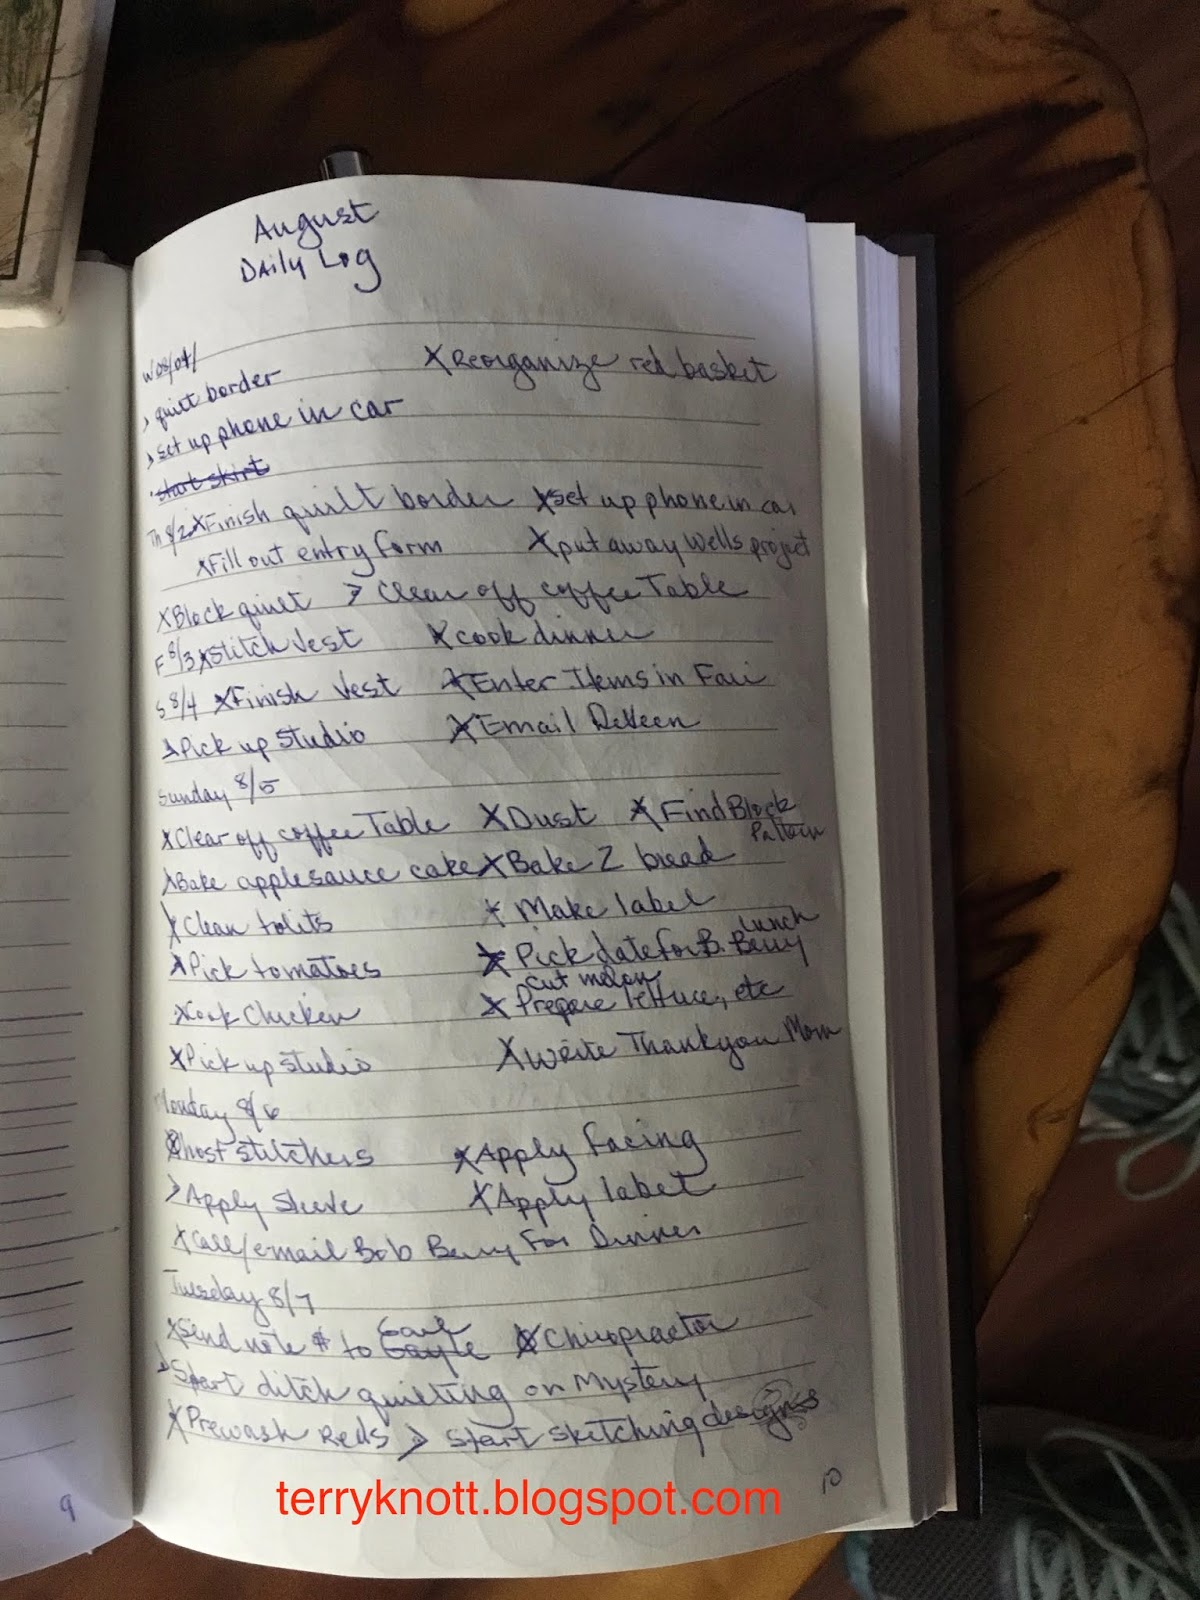
Daily log page

A few days passed; I googled BoHo Berry and found her blog. I went down the rabbit hole and researched bullet journals. I looked at several bullet journal set ups. I rewatched BoHo Berry's youtube video and I watched several more! Then, I decided to try it for four months. I had a lined small book on hand. I began my new journey at the beginning of the month and I spent nothing!

Why I took the leap is because I could see the value in having my quilting ideas in the same "container" as my to do lists.  I LOVED the index as I would lose where I wrote some of the same information in my planner. Before my planner days, my calendar was a small book. Using this system, I can go back to a less complicated calendar which will be cheaper in addition to taking up less space! The journal and the calendar will be less than I spend on the planner. Eventually, I'll doodle/sketch in the journal. The paper in this journal is too thin for paint; but, pencil and/or ink sketches will work fine. I can get out my color pencils for playtime too! This system will provide me more flexibility than I have had. It will truly be my own!

Monthly goal page
I'll share a few photos of my first journal. It is truly a Work In Process. (WIP) I plan to adapt it as I go and to keep it simple so it is easy to use.

Before the bullet journal, my to do lists were longer. I realized I have a number of tasks that I do daily. I started a Habit Tracker page for the month. The space I have saved writing walk with the dog and quilt is small; but, adds up over time. Also, sometimes, I'd miss the bigger chunks of my day because I'd be focusing on the exercise. Now, my habit tracker is like background music--there; but, not the focus of the day. I like the streamlining the habit tracker provides and I will be tracking other activities in the future.

My daily task list has shrunk. Even better--I'm getting what is on the list completed. I do plan to add an envelope to the front and back cover as there might be bits I want to save. I do carry the journal around with me so I can refer to my monthly goals or add entries. At the beginning of the day, I review my list and at the end of the day, I add the appropriate mark to the list entry. I also plan for the next day.

I am thinking about adding a week at a glance page. My first month has gone well. I completed all but three of my monthly goals. Of the three I didn't complete, I made good progress on two of the three! I've even started to doodle on the pages. My journal is beginning to evolve! I'm glad I tried the bullet journal!

Since this is my last post for the month, I need to tally of the participants that I taught this month:
34 Basic Life Support CPR (240 YTD); 12 Babysitter's Training (22 YTD) This is a total of 46 for August (total 370 YTD).


Sunday, August 26, 2018

Vest--Eighth Finish 3rd Quarter Finish-A-Long 2018

Copyright on pattern 1979
After completing the "Ole Truck" project, I decided to work on the vest for the youngest grand. This will be either a birthday gift for her in November or a Christmas present in December.

I had some fabric leftover when I stitched her a corduroy skirt. My mom gifted me the pattern many years ago. I can't remember if my daughters were the size of the pattern when she gave it to me or not. The copyright on the pattern is 1979. The designs on the vest are timeless.  Miss J likes kitties so that was my plan.

Finished kitty
I cut the vest out of the leftover parts of the skirt. There is still a little leftover. . .maybe there is enough for a a purse or a hat. However, that is a project for a future day!

I had a piece of thin polyester batting in the batting box that was almost the right size so I used it. Miss J likes blue, purple and orange. Well, she likes all the colors; but she often uses blue, purple and orange first when she is coloring one of her drawings! I decided to use a bright orange and yellow batik as the lining. For the applique pieces, I went to my scrap drawer and selected some pieces that Miss J would like.
Appliquéd heart

Stitching the vest went along okay. I tried to match the thread color to the fabric that I was stitching. The directions suggested that I glue the applique pieces to the background and to satin stitch with two layers of notebook paper on the wrong side of the background! Stabilizer types have improved since 1979!

I ironed a stabilizer to the back of the background fabric and I used a sheet of tear away stabilizer when I satin stitched around the cat block. I did use a little Elmer's glue to hold the cat pieces in place. The toe nails and bell are my favorite parts of the cat.

I stitched with a 40 wt. polyester thread made by Floriani with a 100 wt. polyester thread made by Wonderfil in the bobbin on the appliqués. I found a .5 width and .5 length zig zag made for a good looking satin stitch.

Binding in process
I had planned to put a narrow strip of dark blue on either side of the cat; but, that fabric choice was too dark. I cut a couple inch and a half strips out of the cat background batik fabric and liked that combination better. I decided that there was enough going on in the block so didn't use the rick rack that was suggested to go around the cat block.

Finished back
The main body of the vest was too poofy, so I stitched vertical lines in regular intervals on either side of the applique section. I liked the results much better.

Then the plain blue blocks were calling me to decorate them with a little quilting. So I used a purple thread and played a little. After all, Miss J needs to wear just a little of her Gran's free motion quilting!

I cut out two pairs of hearts. This time, I backed the fabrics with Steam a Seam Lite stabilizer. This particular product was sticky backed on both sides so it was easy to position in just the spot that I wanted. Then I appliquéd the hearts in place. Had I been thinking more about the hearts and where they were placed, I could have made them into pockets.

Finished front
I added the lining and then made the bias tape. I wasn't all that happy with the application of the tape. Another time, I might choose to make the binding double like is often done on a quilt or I might make the bias tape narrower.

I did hand stitch the binding. I like how it looked.
I like the end results. I've shared a photo of the completed front and the back. It is cute and I hope Miss J will have fun wearing it.

I used one and one-eighth yard of fabric from my stash. I have now used 25 5/8 yards of fabric from my stash and have 24 3/8yards left to meet my goal of using 50 yards of fabric from my stash this year. This was goal number nine on my third quarter Finish-A-Long list. It is my eighth finish for the quarter!

Now, can I keep it under wraps until either her birthday in November or Christmas? Time will tell!


Wednesday, August 22, 2018

Quilting the Truck-post 3 of 3--Seventh Finish for 3rd Quarter Finish-A-Long 2018

Layered, basted and ready to quilt
I was able to press three sides of the organza; but, one corner just wouldn't cooperate. I decided to leave it and quilt it as it was! I stitched the facing, which looks like an additional border, to the truck.

Next I pieced a back. I had a leftover piece of chicken print fabric. It wasn't quite wide enough so I added a bit of the facing fabric. I knew the piecing wouldn't show. I even considered leaving that part without batting. However, batting is a bit sticky and having it as the bottom layer on the project would have made quilting more challenging because the fabric wouldn't slide. In the end, I was glad I had pieced the back!

I layered the backing with a piece of wool batting and placed the top on the batting. This time when I pin basted, I laid out rulers to be sure that I kept the borders straight. I chose not to pin in the organza as I was concerned that the pins might leave too large a hole.

Quilting the dark lines
Next, I stitched in the ditch around the various borders. I used 100 wt. silk thread. I like silk because it easily blends/buries into the fabric. I was curious how the organza would quilt. It was challenging to quilt the borders because the organza is slick so I needed to adapt how I used my hands to move the quilt. I thought that using gloves would make it easier to control; however, I found that my bare hands worked the best.

I decided to use 50 wt. 2 ply cotton thread to quilt the organza. I wanted the matte of the cotton thread to balance the sheen of the organza. I used a 70 microtex needle. I decided to outline the black lines of the truck first. Sometimes, I used a black thread and sometimes, I used a dark brown thread.  I probably could have also used a dark navy thread.
View of the quilting
It was easier to quilt the interior lines because I could place my hands on the outer borders so the slickness of the organza wasn't a factor.

Because I painted the truck, I thought a densely quilted stipple background stitch would replicate the feeling of paint. I've looked at many paintings and would note the lines/cracks left behind in the layers of the paint.

I did leave a few areas of the truck as well as the clouds unquilted to give the piece a little dimension. I used a cotton thread that matched the value of the background as closely as what was available in my stash. I used four blues, two oranges, four browns, two grays, three golds. This time, I used the same thread in the bobbin.

View of the various quilting textures
It does save time when you don't have to change the bobbin with each thread color; but, you do have to check to see the tension on the back! Most of the time, it was good or  it was okay.  A few times, I got to remove the stitches!

I did make tension adjustments. The thread I used was all from the same company and the same weight. You might not think that adjustments would need to be made! Sometimes, I unstitched a few stitches because the value of the thread I had chosen had too much contrast or the tension was not okay. I didn't want the thread to sing a solo in this piece!

'Ole Truck label
It took about 24 hours to quilt the painted areas of the truck. In the first border, I stitched a couple straight lines using the walking foot. In the second border, I free motion stitched an organic version of a feather which I call a weed. I chose the weed background fill because there were weeds around the truck when I took the photo! In the third border, I straight line quilted with the walking foot.

In each border, I matched silk thread to the value of the fabric. My goal again was that the thread would provide texture and compliment the truck!  It took about 24 hours to quilt the piece to the last border. All that stippling, because I used it all over the quilt, kept the density of the quilting consistent throughout the piece. Maintaining that consistency through the borders was important too!

It took about 18 hours to quilt all those pebbles in the facing which looks like the outer border! I wanted them because if someone looks at the back of my quilt, I want them to wonder how I managed to have a different quilting pattern along the edge on the front than I do on the back!
Finished back

My goal was that the quilting enhances the piece. I believe what I chose to quilt enhances the painted truck.

The piece did get a bit wonky. I was concerned about pressing on that organza as well as getting it wet an losing all that paint. I e-mailed Esterita Austin as she was the teacher who taught this method. She replied to use parchment paper front and back and that steam was okay. I appreciated that she returned my e-mail so quickly--it was the same day! I did follow her instructions and the quilt blocked beautifully.

I used the same technique for the facing as I did with my "Circling the Sun" piece. This time, I added the edge finish before I turned and stitched the corners. This change sure made it easier to apply! I'm glad that I documented the process as I needed to review it! The second time actually went well and I'm happy with the results.

This project was expensive to make. The cost of the class was the majority of the class. I spent $260 to make the project. I'm so glad that it is finished and can be enjoyed now!!! I LOVE this piece. I am already enjoying it hanging in my home.

Did you recognize the fabric on the back? I thought it fit the feel of the truck. I had almost enough of the chicken fabric that I used on the back of my chicken wall hanging for the back and the sleeve of this project. (I pieced the sleeve with some of the facing fabric.) I picked up the label from the guild's free table. I ink/create a label for each of my quilts. The label is so important because it provides information about it straight from the maker! All quilts should have a label with the maker's name, date and why the quilt was made.
Finished front of "Ole Truck"
I used about two yards of fabric from my stash. I have now used 24 1/2 yards of fabric from my stash and have 25 1/2 yards left to meet my goal of using 50 yards of fabric from my stash this year. This was goal number six on my third quarter Finish-A-Long list. It is my seventh finish for the quarter!

I started this piece in a class with Esterita Austin last September at the NW Quilt Expo show. It was accepted to hang in the NW Quilt Expo show which will be held September 25-27, 2018. The other posts about this piece are listed below:
Painting the Truck--post 1
Adding the Borders--post 2


Sunday, August 19, 2018

Borders on the Truck 2 of 3

Too much blue
After completing the potholders, I was ready to work on the truck project. I cut the pieces for the border and then spent the rest of the day picking up in the studio. The next day, I came down with a fever and a nasty headache. No wonder I didn't make much progress on the truck project the previous day!
Auditioning other fabrics for border

Three days later and when my headache had gone from an eight to a four on the pain scale, I started to stitch the border fabrics together. The blue batik that I had found in my stash for the outer border sure wasn't "it." I was so happy that I had only stitched one border so I didn't have too much to rip!

This brown fabric is the one
It is a good idea to audition the fabrics, which I did when the fabrics were in pieces; but I should have auditioned the strips as that would have shown me that the blue was too light!

Next, I searched through the stash to see if I had a better fabric for the outer border. I found a piece that was too red (right side of photo), a piece that was too dark/dull (bottom of photo) and a piece that seemed just right.

I cut some strips and then auditioned the strips. I liked what I saw. I stitched the three strips or one border together; then I placed it on the project. It would work! So I completed the other three borders.

Appliqué to the rescue
It was time to miter the corners. Rather than try to stitch each miter using my sewing machine, I opted to applique the miter in place. I used silk thread and a few pins. This was a great method. It only took about 20 minutes for me to complete all four miters.

The frame adds to the project and I'm happy that I waited to continue until the fabrics "felt" right. The next step is to layer and baste this project which I will do once I figure out how to press the organza. I used a warm iron and had some success. I turned up the iron and took off some of the paint off the seam allowance and yet, in both cases, the seam allowance doesn't lie flat. I may leave it that way and quilt it the way the seam is positioned.
Old truck--framed

Wednesday, August 15, 2018

Potholders--Sixth Finish for 3rd Quarter Finish-A-Long 2018

Packets ready for potholders
Returning to Oregon time from Hawaii time was more challenging than I had thought! To keep my mind off of the jet lag, I decided to pull out an old project--one that included a pattern and one that didn't involve much decision making!!

Goal number ten on my 3rd Quarter Finish-A-Long list was to make four potholders. Years ago, I boxed these fabric packets thinking that I make potholders and use some scraps. As a bonus, I'd have a few gifts on hand.

When my oldest daughter was in high school, she selected the fabrics and the block pattern. She wrote a legend for the fabric grouping and placed it in the plastic bag with the fabric. She was great about encouraging me to stitch up my scraps! I stitched about half a dozen and then forgot about the box. As you know from my last post, she has been married for 11 years so high school was years ago!

Gold and red fabric from the stash via Miss K.
Last quarter, I put the potholders on my list thinking that there was enough fabric for four potholders in one bag.  The bag I picked was for block 44.

I made one block and then decided that I needed to supplement the fabrics as there was plenty of backing and blue fabric; but, only enough red fabric for one pot holder.

Miss K helped me choose fabric for the next two pot holders. Then, she helped me sew the parts for the blocks. This was what her blocked looked like before she went home.

I sure liked her low volume fabric choices! I chose one fabric combination on my own. I stitched the block which was about 8 1/2 inches before quilting.

Next, I layered the backing, batting and block to quilt it. In the box, I had two layers of batting cut as well as one layer of heat resistant batting. I had enough of these units cut to stitch five pot holders!
Layered ready to quilt

As I quilted, I thought it might be fun to quilt each of the four pot holders differently. The first potholder, I heavily quilted. It is quilted so much that it is more of a hot pad than a potholder!

I discovered that I wasn't all that excited about using the focus fabric as the center pinwheel. The pinwheel print fabric is the fabric that I used for the backing and the binding for all of the potholders.

For the second potholder, I quilted in the ditch and then added a continuous curve in the pinwheel design. For the first and second pot holder, I free motion quilted the pieces. I wasn't that excited about the low volume fabrics in the second and third potholder.

For the third potholder, I got out the walking foot. After I had quilted a majority of the ditches, I quilted an overall design of straight lines. I really liked this approach.

Finished potholders
For the fourth potholder, I quilted only in the ditch. I liked the contrast of these fabrics the best. I might teach another machine quilting class and these potholders might come in handy as samples.

I hand stitched the binding and what you can't see is a loop so the potholder could be hung. While it didn't take long to stitch the blocks, it did take some time to get these to the finish. Still, I plan to keep stitching a few potholders each quarter until I have used all the packages of scraps!

There is enough backing and blue fabric remaining to make several more potholders!!!! This was a good project to work on while I recovered from "Hawaii" time!

I used a half yard of fabric. I have now used 22 1/2 yards from my stash and I have 27 1/2 yards to go to achieve my goal of a net loss of 50 yards from my stash this year.

Sunday, August 12, 2018

Hawaii Day 13-14

Catching the spray while sitting on the turtle
Day 13 was Amanda and James' 11th wedding anniversary. We started the day with a Starbucks coffee, bagels and cream cheese. Amanda found a type of cream cheese that was made from almond milk that I could eat too. It was great. I will try to find that same kind at home.

Making beaded bracelets 
Then we walked to the beach. This time, we walked the other direction. The older kids took a swim in the ocean. The younger ones stayed close to shore and the in-between kids did some body surfing! The swells were big enough that I opted to stay close to
the shore. Nicole spotted a turtle from the shore so that was cool for all of us to see. While snorkeling, Nicole saw fish and an eel.  The water at this beach wasn't as clear as at the previous beaches where we did snorkel.

Potato crusted fish entreé
After our beach experience, we went to the pool. The older kids went down the slide numerous times.  James took a couple runs too! Miss K and I hung out at the dive pool. She practiced a kneeling dive; she practiced lots of pencil dives and feet first surface dives. Her front crawl with side breathing has improved a lot! She even has a foundation for elementary backstroke.

Heke cooked in a casserole
Miss J would only practice what she already knew. I wasn't popular at all when I "encouraged" her to be like a cork screw and swim front/back/side or a deep sea diver to be on the bottom of the pool. She wouldn't do more than a couple deep water bobs or a couple bob for safety. She wouldn't try getting a breath on her own. Why bother when there will be a hand there to lift her up to the surface when she needs a breath. I sure get how she thinks!

Herb encrusted fish and scampi/shrimp fettuccine
Penne pasta with butter and parmesan 
For lunch we had salami sandwiches and most of the girls made a bracelet for an activity. Nicole and I made one too! We had an afternoon pool session too and then we came in to shower and get ready for our first and last dinner at the resort.

We went to the Humble Kitchen for dinner. We started with calamari, roasted cauliflower and broccoli and the steamed dumplings as appetizers. With a large group, it is fun to order several appetizers and have a taste of each! Miss K had a cheese quesadilla and Miss J had an avocado quesadilla.

Chicken wings
For the main entree, we all had something different. James had the ribeye steak. Bob had the shrimp and scampi fettuccine. Amanda ate the potato encrusted fish. Nicole ate the terrine cooked fish. I ate the herb encrusted fish. Miss J ordered the chicken wings and Miss K ordered the penne pasta with butter and parmesan cheese.

For dessert we ordered the chocolate soufflé and the pineapple upside down cake. The restaurant gifted us the chocolate cheesecake and a chocolate fudge cake because four of us were celebrating our anniversaries! (Amanda and James celebrating 11 years. Bob and I celebrating 38 years.)

Miss K ordered the ice cream cookie sundae and Miss K ordered the raspberry sherbet. They enjoyed their desserts!
Cheesecake and pineapple upside down cake
It was all good. I thought that the chocolate soufflé was the best! We even had a front row seat to watching a beautiful sunset.

After dinner, we went to the movie. Lilo and Stitch was playing which the girls thought was a big deal and they enjoyed seeing it.
Raspberry sorbet
Fudge cake topped with berries and chocolate 
Chocolate soufflé 
We spent day 14 with one more romp in the ocean.  We did have a turtle sighting on our walk to the ocean.

We had one last slide at the pool and then we packed.

At the pool, Bob actually was able to stay in a flat position coming out of the slide and touched his toes on the rock wall on the other side of the pool. He did it two times in a row! All the staff gave him a thumbs up! They also told him that they had only seen one other person do the same touch! He made the best splashes of all of us although Nicole and Amanda had some great rooster tails too!
Ice cream cookie sundae

We had a late check out on of the rooms and then we enjoyed the grounds for a few more hours. Miss K played more chess and Miss J watched the koi swim in the pond in between sessions on the swing.
Last time playing in the ocean

Catching a few more zzzzs between flights
We flew from Maui at 9:30 in the evening. We arrived in San Francisco about 6 in the morning. Both the kids slept on the plane. Miss K was asleep before the passengers were seated on the plane! Luckily, we had long layover in San Francisco and there was a bench that was perfect for some extra nap time! After about three hours, they both woke up and it was time to board the plane for our final leg of the journey.

Off to board the airplane for the last time
The girls were well rested. The adults. . .well, we could have used some sleep like they had! We returned to Portland a few minutes ahead of schedule. The two week vacation was over quickly!  The memories will last forever!

Bye until our next trip


Friday, August 10, 2018

Hawaii--Day 11-12

Pork nachos and bacon brussel sprouts
We started day 11 with a breakfast of bananas and a little bread; then, we went to the pool. Amanda, James and Nicole went to the Maui Winery to go wine tasting. The girls, Papa and I had a great time figuring out the kid slides and playing on the turtles, the whale and the dolphin in the kid part of the active pool. After about an hour of play, we got out for a water and snack break.  Then we took a walk to the ocean and walked in the water. When we returned, we needed more of a snack, so we picked up a slushy. Those were expensive but great! The food prices at the resort are expensive--about double what I would pay at home. We planned for that by purchasing items at a couple   grocery stores for lunches, breakfasts and one dinner. But, let's get back to the events of the day!
Sweet and spicy lettuce wraps

Miss K's Mac-n-cheese
James' choices for dinner
We read a couple chapters in the second Rabbits of London book. Then Miss J fell asleep before she could eat lunch. We had almond butter and guava pineapple jam sandwiches. After she woke up and ate, we went back to the pool for a few more hours. Amanda, James and Nicole had returned from the winery tour which they enjoyed. They also went to the pool.

We went to dinner at Three's Bar and Grill. Amanda saw this restaurant featured on Guy Fieri's show Diners, Drive ins and Dives. The food choices were varied and amazing.

Playing chess
The wok fried Brussel sprouts with bacon, the kalua pork nachos and sweet and spicy lettuce wraps appetizers were
delicious. Amanda had the Three's traditional ramen--the broth was delicious. Bob and I had fish (mahi-mahi ) and chips, Miss J and Miss K had a burger and Mac-n-cheese respectively. Nicole had flat bread salad and James had a variety of starters. Wow! it was all delicious!

Nicole's hand after she passed to her partner
The girls played a little lawn chess after we returned to the resort. Bob, Amanda, Nicole and I played one game of pinochle. No wonder Amanda and I had a hard time getting a marriage after seeing Nicole's hand after a pass back!

Day 12 started with a trip to Starbucks. Nicole and Bob picked up drinks for everyone. Miss J and Miss K wanted to start in the pool so after a breakfast of pull apart bread, bananas and an assortment of vegan banana type breads, Bob, Nicole and I went to the pool. Amanda and James went to the beach. Amanda did a little body surfing. She said body surfing was fun and that there was sand everywhere in her suit! We all swam in the Nalu "activity" pool. The kids love the turtles, the whale and the kid slides. I'm partial to the big slide--the Wailea Wipeout and have been many times. (I think that Bob and I are some of the oldest "kids" to take the slide!)

Bob and Nicole returned our car rental. The rest of us hung out some more at the pool. The girls had a snack--a smoothie and a slushy. Miss K and her dad decided to take a break. Miss J, Amanda and I applied a fresh application of sunscreen and we returned to the pool. We hung out in the dive pool for a while until our stomachs were ready for lunch! We ate almond butter sandwiches, chips, salsa, carrots and hummus. After lunch, Bob and Nicole returned form their errand--they also made a Costco run so we had supplies for dinner and another lunch.

Bob, Nicole and I went to the other five pools and swam in each one. We also sat in one of the hot tubs. The other pools had beautiful views of the ocean; but, we all decided the Nalu pool was the most fun. Maybe part of the reason it is the best pool is that our room is about 50 steps from it! Dinner was salami sandwiches. We watched the entertainment for the hotel luau which the kids enjoyed. There was also a performance of fire dancing which seen at nightfall looks amazing.

Nicole opened a special bottle of champagne that she had purchased at the winery in honor of Bob and my 38th wedding anniversary. It was delicious. The girls entertained us with some dancing. Not to be outdone by a four and a six year old, Bob and I busted a few moves. . .until I wiped out into the bed. . .must have been the champagne. . . .!!!!!

My sunburn is peeling; but, I'm tanning too. . .my legs are one shade darker than sheet white!


Tuesday, August 7, 2018

Hawaii--day 10-


Welcome sign at the resort
We arrived at the Wailea Beach Resort at about one in the afternoon on day 10 of our adventure.

It was too early to check in. So we toured the grounds and plotted our strategy as to what pool we were going to swim in first! Miss K found a huge Jenga game. She, Auntie and her mama played a couple of games. Once a room was ready, Nicole had all our luggage delivered to it. Then, it was time for us to head out to dinner.
View on our walk about


Miss K contemplating her next move

Mill House pond


View of the hills where the cattle graze
We ate at the Mill House restaurant. It is a farm to table sort of restaurant. The grounds are beautiful and the food was delicious!


Squash pizza, Farm salad and Taro leaf risotto

Ceviche and sweet potato chips

Bacon cheese burger, roasted broccolini and squash pizza

Hamburger, fries and catsup for Miss K

Chocolate pie is a great finish

I was most impressed with our waiter, Jared. Miss J has a dairy allergy and he was great about answering questions and filling us in on some of the history of the place. He provided great insight to how the dishes were prepared and made some suggestions that I'm glad we took.

While taking our orders for dessert, he fashioned a decoration out of a napkin and used
Napkin folded decoration
"Auntie's" glasses as the perfect accessory. We were all awed by his ability to remember what we ordered while entertaining us at the same time!

Best of all, he encouraged both girls to take a tour of the kitchen. Miss J liked watching the staff cook. When he asked Miss K her opinion, she said she liked it and that she was a cook too. Then she proceeded to tell him about her pasta and tomato soup recipe. After she finished her story, he replied that perhaps, they should add it to their menu to which she replied that the kids would like it!!!
Miss K striking a fashion pose in her mama's hat

We returned to the resort and our second room was ready. Miss K and Miss J wanted to go swimming so Auntie found which of the five pools were available to swim after seven in the evening. Amanda went too and lots of fun was had.