Showing posts with label Martha. Show all posts

Sunday, April 13, 2025

Strings From A Scrap Bag--post 1

Bag of scraps
Goal number six on my April list was to sort a bag of scraps. Chantal, At the Corner of Scraps and Quilts, often posts about scrap bags that have shown up on her doorstep. Cynthia, Quilting Is More Fun Than Housework, is the queen of turning scraps into amazing quilts. They inspire me with every post. My challenge is that I ALWAYS have way too many projects in process to stop and play. I tell my little inner squirrel, Gertie, to wait until I FINISH a project.

When I wrote the goal, I had envisioned tackling one of my large bags that came from my friend Martha. I thought I could get started on sorting the bits into what were strings, strips and bits as well as by color. This is not what happened.

Laying out the chances
Instead, I came across a bag that was left from a string project that I finished in 2022. The pros to the the bag was that it was a small and came from a project. A small bag wouldn't overwhelm my efforts to empty it. Because it was project leftovers, the pieces would go together.

I opened it. Of course, there were a few pieces that didn't belong so those were put where they can be used in another
project. There were also some string strips of various widths. I thought that these might work as a border and as blocks. There were a lot of HSTs of varying sizes so I started piecing those together.  

Auditioning background fabrics
Once I had a few pieces together, I started laying out the project. I kept going until the only remaining scraps were small triangles from the neutral fabric. My goal is to make a piece about 40 inches by 60 inches. Right away, I realized I needed a filler fabric or fabrics.

I went to my stash of solid fabrics and chose a purple. I liked it; but, knew that the yard of fabric wouldn't be enough. So I selected a blue fabric which is okay; but the value is a little too dark. I did have a little leftover piece of orange that I decided would work great as an accent. I decided that this might be my book project for "The Dressmaker of Khair Khana" by Gayle Tzemach Lemmon instead of the panel that I had identified last month.

In the book, Kamila is about to complete her studies to become a teacher. Unfortunately. she has to abandon that career option because the Taliban take over and women lose their freedom. Kamila ends up helping many other women and families in the process. The strings represent all the people she touched. The various patterns the leftovers became represent the girls she trained. It is interesting how projects present themselves and the journey they take!

It's been quite the week. I took Old Town to the quilter on Tuesday. Friday, I received word it was finished and I picked it up. I have it to bind as well as my 2021 Temperature quilt so I will be working on being able to report on a couple finishes soon! 

Tuesday, I wanted to sew the ruffle to the Santa Tree skirt. My Bernina 790plus acted like it was possessed. I had it on straight stitch; yet it was trying to vary the width of the stitch. The stitch length and width dials stopped working. It is back at the repair shop. I hope it will be repairable and that the repair is affordable.

Linking to Frédérique at Patchwork and Quilts and Cynthia at Oh Scrap.

Sunday, December 15, 2024

Rainbow Scrap Challenge Quilting--2021 Project Finished

Block ditch quilted
Goal number one on my December list was to finish the quilting on this Rainbow Scrap Challenge (RSC) that I started in 2021. One day when my oldest granddaughter was visiting, she saw the string blocks on the sewing table. Miss K asked if she could make some blocks with strings. 

She liked piecing the blocks. Then she asked if she could have the blocks. She laid out the blocks and stitched them into a top. She pieced a back. We pin basted it  In July, she started ditch quilting it. Although she hasn't said a negative word about quilting, I could tell it was difficult for her. I could also tell she wasn't confident with quilting in the ditch. Stitching in the ditch is hard!

Circle template from Sue Nickles
Last month, I decided that I would quilt it for her. I spent parts of three weeks completing quilting in the ditch. Originally, I thought that would be enough quilting. 

When I finished the ditch quilting, the quilt asked for more. I pondered the request for a few days. I decided to quilt a few circles on the blocks. I used two rulers from Sue Nickle's circle wedge set. For the inner circle, I used my two inch circle ruler from Westalee's starter sampler set.

Circle motif addition
I chose a yellow 40 weight polyester thread produced by Superior Threads for two reasons. First, yellow is Miss K's favorite color. Second, she likes a little glitz and the
polyester has a bit of a sheen.

I did have some thread shredding. When I switched from a size 80 topstitch needle to a size 90 topstitch needle, the shredding disappeared. There were a lot of starts and stops. In the end, the effort was worth it! The quilting provides texture and a little "specialness." Even though I spent parts of another two weeks on circle quilting, I'm glad the quilt talked to me. I'm also glad that I listened!

Quilting rulers used in the project
In the black area, I quilted straight-ish lines. Once the quilt is washed and the quilt takes on that rumpled look, the straightness or lack of straightness isn't going to show.

When I free motion quilt, I don't see much of the quilt as it is scrunched and mushed so that I can access a particular area. Honestly, it feels like eternity quilting because it doesn't feel like I'm getting anywhere!!! 

Adding some stitching to the sashing areas
To ensure that I give my body good breaks, I set the timer on my phone or watch for 30 minutes. Once it goes off, I get up and walk around for 5-10 minutes. Then, I return to quilting. When my knee is too tired for more, I stop. Sometimes that can be after a couple sessions and sometimes that can be after many sessions. I take a break to stretch and heat my knee and leg. Sometimes, I can return to quilting and sometimes I can't. 

When I finished quilting, I cut, prepared and attached the binding. The last two times that I have machine applied the binding has been successful. I found the best set up for me is to use the number 34D foot; set the needle position at 2, place the foot on the fabric edge so it s scant of the 3/8 inch
marking and carefully stitch the binding to the quilt. When I topstitched the binding to the quilt front, I found this combination worked the best.

Binding front view
Miss K wanted a hanging sleeve so I attached it. She selected an extra block as a label. I will let her fill out the label. I will help her attach it to the back of the quilt. Once the label is in place, the quilt is truly finished!

Binding back view
This quilt measures 77 x 93 inches. Many of the strings came from my friend Martha's stash. The link will take you to the projects that I have made with her strings and bits. We purchased no fabric for this project.

Back

I sure hope that she is okay with my finishing her project and my choice of designs for the quilting. Time will tell! 

My favorite memories of this project are: *When she was curious about the string piecing and making blocks in a specific color. *The expression on her face when saw the blocks in that color way on the design wall.

*The time she took to layout the blocks exactly to her liking, *The way she measured the project to ensure it was going to be large enough for her. (She laid down next to the blocks. If her body was outside of the blocks, the project needed to be bigger!) 

*How she checked every seam I pinned to be sure she was sewing the blocks as per her layout. (I pinned them in the wrong order multiple times until she took over quality control!) 

Front
*The absolute joy she had on her face when she completed piecing the top and the back! Her insistence that her quilt had a "hangy thingy." ("Hangy thingy is otherwise known as a quilt sleeve!) She was so fun to sew with!!! I hope we can do it many more times.

This project used 16.5 yards of fabric from my stash, bringing the total used 24.5 yards this year. While my total is paltry, I am thankful that I have a net loss! Next year, I'm planning to document how much fabric I purchase as well as how much I use. This year, as I purchased, I deducted that amount from what I used.

I was intrigued to begin this project because Allison over at New Every Morning had posted about making a string quilt. Her project didn't have the constant black fabric. I asked if I could copy her idea and she said yes! Quilters are generous people! Thank you Allison!!

Previous posts: Yellow Strings; Green Strings; Blue Strings; Red Strings; Purple Strings; Blue or Brown; Aqua; Orange; Lime Green; Granddaughter Time; Quilting w/two Granddaughters; Sleepover; Pinning Strings;

Linking to: Alycia at Finished or Not Friday; Frédérique at Patchwork and Quilts; Angela at Scrap Happy; Cynthia at Oh Scrap.


Sunday, October 22, 2023

Second Boy Quilt Finished

The pile of scraps
Last fall, I finished a baby quilt for a Starbucks employee. For the second boy quilt, that I planned to make for another Starbucks mom's son, I pulled all the scraps form that first baby quilt. 

The "trimmings" from a previous project
I placed the pieced leftover sections on the design wall. The grand daughters were over. I asked them to help me fill in the spaces. I thought that they would build designs. Interestingly, they would put pieces next to other pieces and create chains! 

Sewing some sections
As a first step, I decided to fill in the areas that were open to right angles. This meant I did a little ripping; but, it wasn't much. The oldest granddaughter, Miss K, stitched some of the pieces together. 

Growing the sections
Once, I had a partial section together, Miss K understood what I was doing. She then thought the process was interesting! We spent some time talking about how to "sprinkle" in some of the small pieces so the overall design would be pleasing to the eye.

More sections pieced together
I asked Miss K if she could see a kid playing with a car, truck or airplane using the yellow sections as runways and the white sections as roadways. She thought I was funny.

Adding some "water"
I had a chunk of blue. I thought that would make a good ocean. There are other smaller pieces of this fabric in the blocks that could represent rivers or lakes.

More auditioning of bit placement
I was careful to make this quilt the same size as the previous quilt. We auditioned adding other fabric to the mix to "grow" the top. In the end, we only added the navy blue flannel. I had purchased a couple fat quarters last summer of it. I used about half of a fat quarter. We decided that the checked fabric would make a good binding.

Finished top
Sometimes, I turned a section a quarter turn because I needed the length of it rather than the width. As I worked, the pile of scraps slowly dwindled. When I had the top pieced, I had so few scraps left! 

The leftover scraps
For the backing, I selected some yardage I purchased at the beginning of the summer. I layered and pin basted the project. I quilted in the ditch with Superior's monopoly thread.

View of the walking foot quilting
 For the remaining quilting, I used the same red thread that I had with the other boy quilt.
A few free motion stars
Then I quilted with a combination of serpentine stitch rows and straight stitch rows in the long sections of the quilt. I free motioned quilted around the words in one print and around the dinosaurs in the other print. I stitched on the printed lines of the lined fabrics. In the small sections, I free motioned some stars.

Another view of the quilting
I added the binding and the label. I had another finish! Cynthia over at Oh Scrap/Quilting Is More Fun Than Housework definitely inspired me as I was stitching scraps together. It was also a good practice for improv quilting. 
View of the back
I used three yards of fabric in this project which brings the total of fabric used from my stash to 20 and one quarter yards! 
Label
Finishing this quilt was goal number one on my October list.

Finished front
I photographed both boy quilts together. I can picture two boys on the quilts watching a movie or playing a game. These will be gifted next month. That mama is going to be so surprised!
The two quilts together


Sunday, October 15, 2023

First Boy Quilt Finished

The quilt block
Last fall, I made a quilt for the barista at the local Starbucks who made my Carmel macchiato just like I like it every time. She was expecting a baby boy. 

Little did I know at the time, another employee had had a baby boy a few months before my husband gifted the quilt. Fast forward to the end of September, I learned, through my husband, that Rachel, had had another boy. She had lamented to my husband that her first baby didn't get a quilt and now her second one didn't have one either.

Auditioning the layout 
Well. . . . I can make a couple kid quilts. Last summer, I spent a dollar at the Mt. Hood guild parking lot bazaar and filled a small bag of flannel scraps. About half of the blocks, half of the backing and all of the binding came from that bag. Note: There are enough scraps to at least two more projects!

Finished top 
The other half of the blocks either came from scraps of mine from my past projects or from my fried Martha. She would be pleased with this finish. She likely would be shocked at how quickly I stitched this project together!

A while ago, Linda at Flourishing Palms, shared a quilt block that was perfect for using scraps. I cut the sashing 1 1/2 inches by 3 1/2 inches and 1 1/2 inches by 4 1/2 inches. I made all the center 1 1/2 squares white. I sorted through my scraps cutting 3 1/2 by 4 1/2 inch rectangles into little kits. 

Template design
I made my top to contain five blocks across and six blocks down. It finished 35 inches by 54 inches. When I make this pattern again, I'll make it a little bigger . . .six blocks by seven blocks. (Linda made her project  six blocks by seven blocks.) The finished block reminds me of a package.
Pebbles stitched in the blue velour block

All of the packages are different fabrics. If there was enough scraps from the packages to become "ribbons," I cut and stitched them.

As I was coming to the last few blocks, I didn't have enough flannel to make three more "different" blocks. I wasn't planning to buy any fabric so I inserted a corduroy block that was a leftover from stitching a little girls skirt. The remaining two blocks were made out of a velour that was leftover from stitching sweatshirts.

In the finished top photo, the orange corduroy block is in the fourth row second from the right. The blue velour block is in the fifth row first block on the left. The green velour block in in the sixth row, first block on the right.

To make it easier to sew the blocks together, I pressed the seams towards the sashing on one block and away from the sashing on the block that was its neighbor. It wasn't long and I had made enough blocks for the top.

I webbed the blocks together. I did encounter a block that should have been pressed differently so I played with the layout until all the seams nested. Then I stitched the horizontal rows together. I pieced the back and pin basted the layers together. I used an 80/20 Pellon batting. The back is flannel too!

Next, I stitched in the ditch using my walking foot. My original quilting plan was to stitch diagonally through the blocks with the walking foot. I need to play more with the walking foot to increase what I like to do with it. I couldn't do it. I couldn't quilt vertical lines or horizontal lines either! 

Honestly, I could have; but, I wasn't "feeling" the walking foot. Instead, I free motion quilted the blocks. I used a red polyester thread in the needle and in the bobbin. Sometimes, I used templates and my ruler foot to stitch a pattern. Sometimes, I followed the print in the fabric. Sometimes, I stitched a filler design. The spider web design came from Christina Camelli at her A Few Scraps instagram account.

While it took me days to quilt the top, I was happy with the results. This baby can find different quilting designs, as well as different colors and motifs in the fabric prints. I didn't quilt in the sashing because I wanted another tactile feel in the quilt.

Parallel lines above and stars below
I free motioned stars, hearts, loops and leaves. The leaves are my favorite block.

Stipple top left, follow the fabric print right
and various fills bottom left examples
For the binding, I stitched together the longest 2 1/2 inch strips that I had collected from the bazaar until I had enough to go around the outer edge of the quilt. 

Spider web filler
I added the label and I had a finish! 
Hearts and leaves filler stitches

I figure I used about three yards of fabric in this project. This brings the total yardage used from my stash to 17 and one quarter yards of fabric. Finishing this project was half of goal number one on my October list. I'll finish boy quilt number 2 soon!

Label
This is one project finish for WIPs-B-Gone 2023 sponsored by Devoted Quilter. 

Back
I'm also linking to Cynthia at Oh Scrap/Quilting Is More Fun Than Housework. In addition to Martha, she is the inspiration from my scrappy projects. 

Finished front


Sunday, September 17, 2023

Progress on House Blocks

9/8 A starting point of the blocks 
Goal number ten on my September list was to work on the top for my next book club quilt. I'm using house blocks that my friend Martha had in her stash. The reveal is at the end of the month. I am so behind in the quilting part of the process; but, I thought I might be able to make the top by the end of the month. 

Turning the blocks on point into squares evening of 9/8
Inspiration behind this project is the book, "Strangers in the Night" by Pat Rushford. The main character in the book is contemplating purchasing an abandoned town and turning it into an artist colony. There is a murder, several secrets and a love interest. It was a fun read. 

Playing with the layout. Adding more "parts" morning 9/10
Cynthia Brunz from Quilting Is More Fun Than Housework, spoke at the Mt. Hood Quilt Guild on September 7. Her lecture inspired me to make more of an effort to use my strips and squares that I've cut from the leftovers as I've finished projects. 

Close up of the string piecing mid day 9/10

Finally, Alvera from Project Linus shared a challenge she gave the volunteers. She gave them some orphan blocks and asked participants to make a quilt using the Wanderer's Wife quilt by Jen Kingwell as inspiration for the layout. I pulled "parts" or leftover blocks from the parts department. I auditioned these parts next to some of the house blocks. Martha loved purple. The purple pinwheels are bonus blocks made around 2000. I decided using the parts was better than storing them!

Progress by the end of the day 9/10
Members of one of my small groups made the house blocks for Martha, when she turned 70 in 2013. Five of the twelve blocks contain the maker's name. I shared the blocks at our monthly Zoom quilt day; but, no one remembered if they had contributed blocks or not! No two blocks measured the same size. There was no color parameters either. All Martha requested was that the house be wonky!

Progress beginning 9/11
I started with turning the blocks on point into squares. Next, I concentrated on building the left side of the top. Each day I spent on the project, I tried to at least take one photo of my progress each day. Some days, I took more photos!

Progress at the end of 9/11
I found it helpful to lay the strips in place and to stand back to view the values and contrast. Sometimes, I moved blocks into different areas on the design board. Sometimes, I didn't have quite enough fabric to use in the space I needed to fill. I either chose a different fabric or I changed the size of the space. 

Completing the second "column" 9/15
It's been enjoyable putting these blocks together. Martha would be happy with me finishing her blocks. She would be applauding me for all the scraps I have used. She also would be laughing because when we sewed together, I lacked the skills and the confidence to use scraps. The more I do it, the easier it becomes.

Progress at the end of 9/16
Perhaps, by the end of today, I'll be closer to a finished top! Linking up to Oh Scrap!

Sunday, August 13, 2023

Sleepover Number One

Putting the finishing touches on the blueberry pie
Miss J arrived for an overnight or sleepover. This was part one of goal number two on my August list. At nine, we are already at a time in her life where her schedule is full with activities. To have her for uninterrupted time is a treasure. She gets to plan the majority of our activities and menus. 

Adding ice water to the hummus
Dinner request Sunday evening was Papa's spaghetti. He makes a great sauce augmented from canned spaghetti sauce from the market and provides sausage as the meat. He pairs the sauce with lots of pasta. He has the kid palette down! Plus, there are leftovers which is real bonus when it comes to lunch the following day!

Finished hummus (photo Miss J)
I asked for design help. Miss J has a terrific eye for color and shape. She has a particular idea about how particular pieces interact and she has a wonderful sense of color. We made a plan for the following day which would begin with sourdough pancakes and bacon. We had planned to visit the sew day with my Mystery Maven group; even though we were packed and ready to go, we didn't.

Doodling more square in a square designs
My wallet had been stolen the previous day while I was teaching a course, The time it took to cancel a credit card, to order replacement health cards, to order a replacement driving license was about three hours. Then, I spent some time updating all the automatic pay accounts that were associated with the credit card. 

Miss J's doodle of square in a square
My husband, took the lead on the credit card. It was a Chase credit card. He had to go in person to request a new card and had he not had a power of attorney, he wouldn't have been able to replace my card because I had to be present to request a new card. Goodness. . .times and rules change!

Miss J's drawing of a larger size of her doodle
Replacing the key fob for the car was the most expensive. Again, my husband took on this replacement. He called the car dealership and made an appointment for the replacement. He was quoted an hour to wait for the programming; but, it took closer to two hours. While the wallet experience was painful, no one was injured. It will take about a month for the various replacement cards to arrive in my post office box. 

More square in a square doodles
While I'm sorry that I didn't get to introduce Miss J to my small group, my creative juices were shot. We decided a short walk with the dog and lunch would be our next steps. After lunch, she helped me with my square in a square challenge. Playing with more layouts was goal number six on my August list.

Drawing a larger size of a doodle
She looked at my doodles. She drew a couple doodles to add to my pile. I was stuck coming up with a design; but, seeing her take on the challenge had me augmenting a previous design. Actually, I drew in quilting lines. While I liked the "new" take on the design, the design wasn't the "one." She asked me questions about the challenge. I said I wanted to try a modern design. She didn't know what a modern design was, so we looked at examples on Pinterest.

Auditioning a red center
Miss J suggested I blow up a doodle that I thought had potential and to color it in. I did. As I worked, I felt like this design could be the one. When I finished, she gave me the affirmative. I thought that perhaps, the yellow was too strong. She suggested I switch the block to red. I liked that option. This is the design that I plan to make into a top. As of publishing this post, I'm undecided on the color of the center square. Playing with layouts for the challenge was goal number six on my August list. With Miss J's help, I exceeded that goal!

Miss j and her inchies
We had Papa burgers and tater tots for dinner. Earlier in the day, we made a fresh blueberry pie. This recipe has you place fresh berries in a baked pie shell. You cover the berries with a mixture of sugar, mashed berries, water and cornstarch that has boiled for a minute and cooled. Last, you place a few fresh berries on top of the mixture. The whole pie is refrigerated and is ready to eat in about three hours. It tasted great!

My inchies
We also made hummus so we had a "dip" for our vegetables. My hummus recipe makes a large batch so we split it so she could take some home!

Inchies I created this week
After dinner, we made our plan for the following day and I told a few bedtime stories. She likes to hear mama and auntie stories! The next morning, we made blueberry muffins and then played a bit with the inchie challenge that Rachel at Mindful Art Studio is doing for the next week. She supplies a prompt each day and you draw what comes to mind on a two inch square piece of watercolor paper.
 
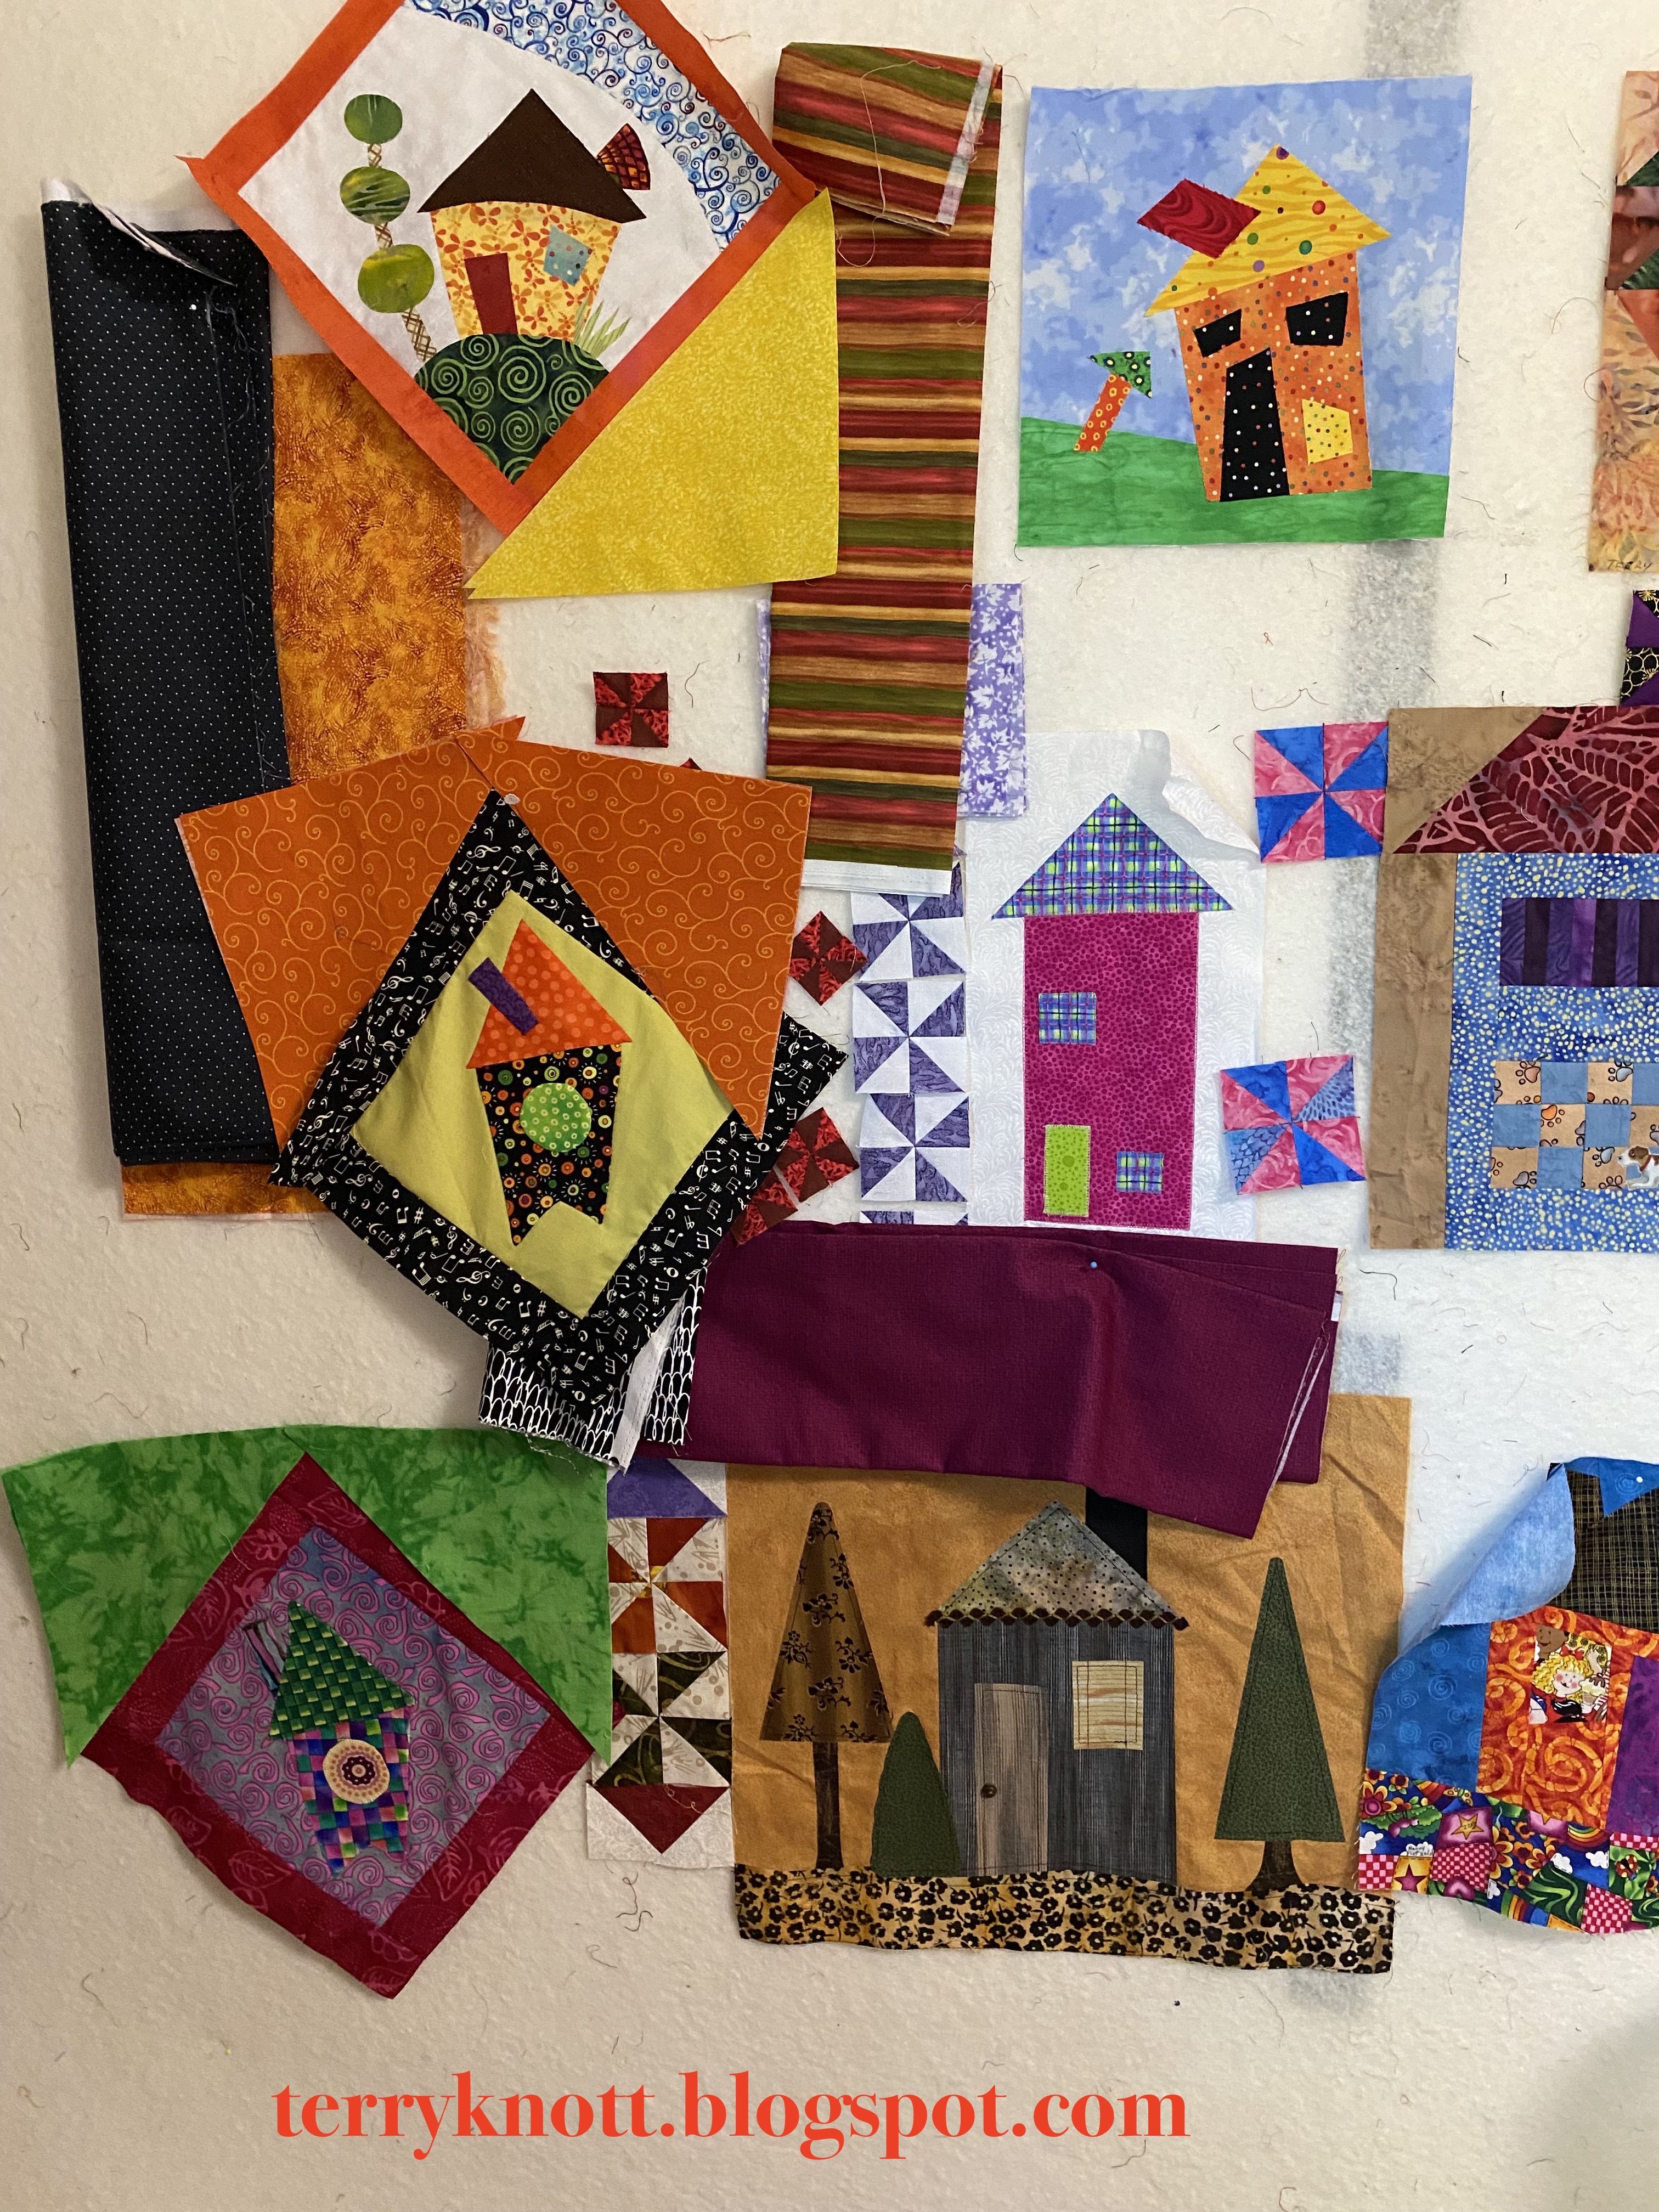
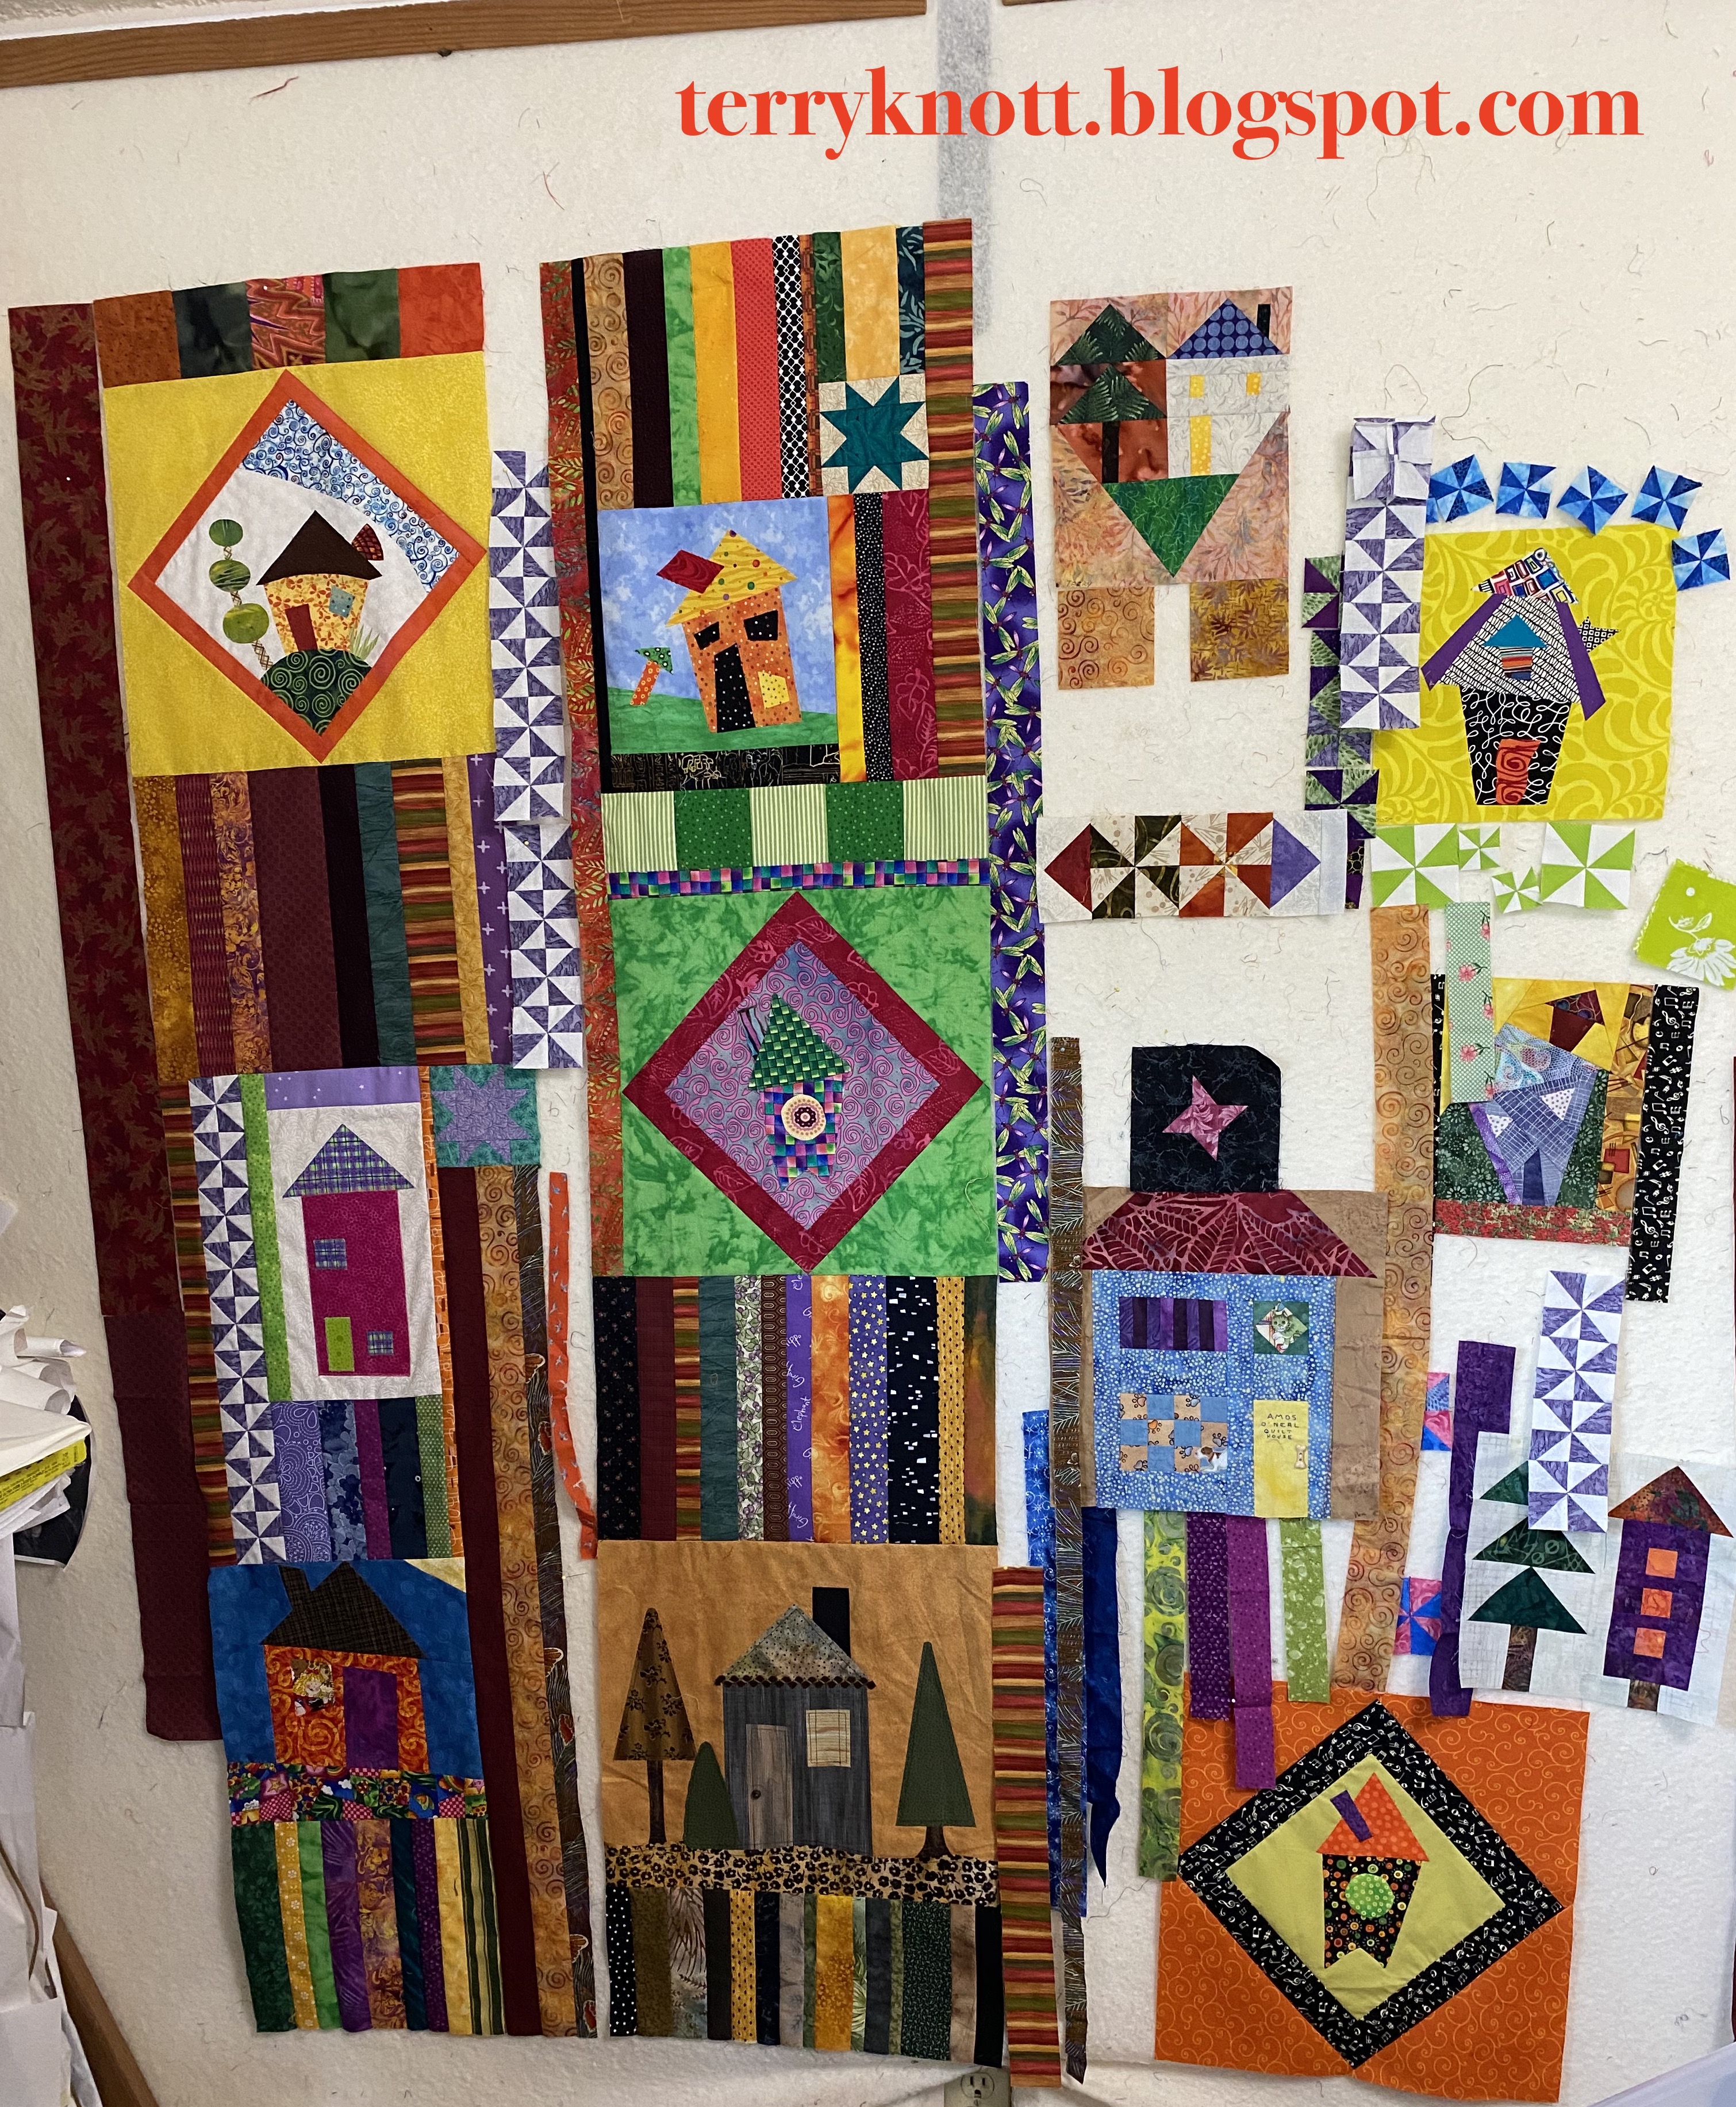
House block layout with some "parts"
Rachel's prompts were frothy and woven. We made a second of those prompts. Then Miss J suggested that we each choose a prompt. She chose vibrate and I chose lace. After we drew, we added color with watercolor paints. Miss J was interested in continuing with the challenge. Each day I have forwarded the e-mail with the prompt to her mama. I have seen what she drew. I wish I had a photo as she interpreted each prompt in an interesting way. We both said that we will likely add some color to our examples. 

For a long time, I tried to draw a few minutes each day. For the last several years, I haven't. I've missed the play. Perhaps, I'll figure out how to add it back into my routine.

Auditioning fabrics for sashing/coping strips
After we drew, she helped me with layout options with my friend Martha's house blocks. The inspiration for using these blocks came from reading the book, "Strangers in the Night" by Pat Rushford. Pat is a member of our Thread Tales book club, the leader of the book choice this month and the author! I so enjoyed listening to Pat talk about how she developed the characters as well as telling the group about her writing journey. 

In the book, one of the characters is deciding to buy a property that used to be a town. The character is considering turning the site into an artist's colony. I thought of my friend Martha's blocks. When she turned 70, she asked our small group, WIPs (Works In Progress), to make her a house block. That was 2013! After she died, my friend, Pat, thought that she would make a quilt from the blocks; but, decided it was not a project she wanted to prioritize. She gave the blocks to me. Coming up with a design/layout was goal number seven on my August list.

Backing and binding fabrics
for Positively Grows
Finally, she helped me pick backing fabrics for the Positively Grows quilt which was goal number eight on my August list. I like the choices we made. Having Miss J say yay or nay to various options was great. It was also a quick process! I had a fabulous time and I hope she did too. All too soon our time together was over and she was off to soccer practice with her mom. I'm already looking forward to our next sleepover!!!

The fabrics shown in this post are either scraps or stash. I'm linking to Cynthia at Oh Scrap/Quilting Is More Fun Than Housework. Pour yourself a cuppa and see what other people are making out of their scraps!