Showing posts with label fixes. Show all posts

Sunday, September 24, 2023

Christmas Stocking Repair, a Backing and a Finished Top

Supplies and the project
Soon after our daughters' births, my husband's grandmother (Doris McIntyre) knitted each of them a stocking which included their name. Now that our youngest daughter has a daughter of her own, it's time she hung her stocking in her own home. It's been waiting for a repair of the embellishments since last Christmas. She and her family are headed to our house for Thanksgiving so I no longer could procrastinate on making the repairs!

An area in need of repair
When I looked closely at the spaces in need of repair. I noted that every several beads, Doris had knotted the thread. The thread was ordinary sewing thread. To hold the sequins in place, she had inserted a bead in the center of each sequin. First, I searched YouTube for a tutorial on how to repair sequins on a knitted stocking. I found a helpful tutorial. In my stash, I have some Doris' beads. I even have a few of my friend Martha's sequins.

Another area in need of repair
In Martha's stash, I was able to select enough sequins. Unfortunately, I needed to buy beads. The match isn't perfect; but, it is close enough. The stocking is almost 39 years old! That I had any supplies which worked was miraculous! 

Repaired front
I spent a long evening making the repairs. accessing the beads in the beard area was tough. I marveled at how my husband's grandmother added all those sequins and beads as there are no side seams in the sock! Perhaps, she beaded as she knitted. 

Repaired back
Now the sock is ready for many more holidays. This was goal number one on my September list. It wasn't an awful a task as I had anticipated. I spent almost nine dollars on the beads! I enjoyed beading. Perhaps, I'll add them to future projects.

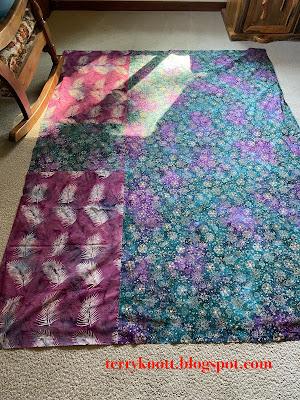
Completed back for Positively Grows top
I also stitched together the back for the Positively Grows quilt. I had also thought that I would prepare the binding; but, decided that I would wait until after it was quilted before I picked the binding. Making the back was goal number two on my September list. The two fabrics had been in my stash a long time. . .like at least a decade! I'm happy to have found a use for both of them! 

Finished top started last week
The house top that I blogged about last week, I finished. Thanks to Melisa over at Pinker n Punkin Quilting and Stitching, this project will be called Happy Homes. She said I had some Happy Homes in a comment, Happy Homes sounded liked a terrific name for the project! The top measurers about 67 inches by 70 inches. After I quilt about three projects, I'll figure out a backing.

I put away the scraps that littered every surface. The blue, black and yellow quart zip lock bags are overflowing; but, all the other bags are flat and ready for filling! I can close the lid of my "pre cuts" container without having to compress the contents! 

No yardage was cut in making this top. Martha who made many scrappy tops, would be impressed. If she were here, she would have liked the addition of the purple bonus pinwheels since purple was her favorite color. I like that I was able to sneak in three star blocks from the parts department.

Paper piecing stars for a Christmas stocking
Friday evening I began paper piecing blocks for a Christmas stocking. Again, I used scraps. The large star is three inches finished. The small stars are two inches finished. I plan to finish the stocking later today. I'm linking to Cynthia and Oh Scrap/Quilting Is More Fun Than Housework. Next week, I want to make even more progress on my September list as I did this week!

Wednesday, May 25, 2022

Gold--

Finished quilt after blocking
Our book club read "Tales of the Yukon" by Robert Service. It is a book of poetry. I'm not excited about reading poetry. I've tried several times to enjoy poetry. . .it is not for me! The person who lead the discussions for this book also tasked us to write a poem. For me, writing poetry ranks even less on the scale than reading it does! Sigh. . .

Belonging to the group and participating in the activities has pushed me outside of my comfortable "box" more times than I can recount. In the end, there was one poem in the book that inspired me. It was a poem about the landscape which made me think of stars in the sky against a backdrop of snow. I've considered stars as bits of gold and those thoughts were the inspiration behind this project.

Auditioning the "coverage" strip
I did write a poem:

White snow glows

on a moonlight night.

Beautiful!

The entire project came from scraps. The design was from "Little Lone Star Quilts" by Lorraine Olson. The star was paper pieced. The diamond border, which is also paper pieced, took forever!

I quilted a grid design in the background fabric. The piece
was a little wonky so I soaked it to block it. The red fabric that I used as the star points bled on the background. I tried a variety of methods to remove the bleeding. While the bleeding was less definite, it was still evident.

Finished front
I considered my options and decided I could put a sashing around the star. I auditioned a variety of fabrics; but, went with a gold fabric. While I would have preferred no strip or a narrower strip, the wider strip covered the majority of the bleeding evidence.

To secure the strip, I hand sewed it in place. I liked how the yellow added to the effect of the star actually glowing. Additionally, the yellow/gold colored strip went well with the gold theme in the book. It was a fix that worked! 

It still was a little wonky; but, I decided a little wonky was better than any more bleeding! The piece measures 13 inches by 13 inches. I finished it in March of 2015. 

Label
I'd always thought that I would make another miniature quilt; but, I haven't! Miniature projects, while taking less fabric than larger projects, still take a lot of time! Accuracy of cutting strips, sewing seam allowances becomes even more important as the pieces become smaller.

I did enter this piece is several quilt shows. It won a blue ribbon (first place) at one show. I share this information because in none of the judges' comments was there a mention of the fabric bleeding. 

Hanging at a show
The judges' did comment that the yellow strip while unexpected added to the overall appearance of the piece. The comments included that the edges should be straight. There was a couple comments that there should have been more space between the gold strip and the diamond border and there were a couple comments that the spacing was good. 

There were no comments about fabric bleeding. It all worked out! 

This is my fourth post this month documenting past book club quilts. If you missed a post you can click the links and read the posts: Old Sames; Reflections; More Than Black and White. Documenting four posts was goal number two in my May list.

Because this project is all from scraps, I'm linking to Cynthia's blog at Oh Scrap/Quilting Is More Fun Than Housework.


Wednesday, August 11, 2021

Making Lemonade. . .A Tree Skirt Update

Stitching around the outer edge
In my last post about this project, I was ready to assemble and attach the ruffle to the tree skirt. There was a lot of fabric to gather so that process took some time. I pinned and machine basted the ruffle to the edge of the tree skirt. Then it was time to layer the fabrics and stitch around the edge leaving a space to turn the project. I had hand basted the edge because if there is fullness, the hand basting helps to have less opportunities to stitch tucks into the seam. 

When I turned the project, I learned that I had incorrectly layered the batting. I should have had it on the top of the sandwich instead of in the middle. . .What was I thinking??? Now my batting was on the outside of the project..

Because I had trimmed away the batting and trimmed all the seams, ripping the stitching around the edge and starting over would not work well. I now had a lemon on my hands. I've made at least four of these tree skirts and I'm not a rookie stitcher so I beat myself up for making that error. 

Gertie, my inner squirrel, hollered at me to stop berating myself. She suggested that I press the top and to pin another backing to the project. She thought that I could hand stitch the back to the top. I decided that I would give that process a try.

View of hand stitching ahead of me.
I trimmed away the initial backing that was now a layer in the center of project so that the piece wouldn't be so heavy. I also decided that I would turn under a scant quarter
of an inch on the sides of the backing so I had a solid edge to pin to the backing and so that I had a solid edge to stitch to the front! My plan is to hand stitch the backing during evening visits with my daughter. 

I made progress on this project which was goal number nine on my August list. I'm pleased that I didn't abandon the project. This is one time that I had to thank Gertie for keeping me on track with this project because I sure derailed myself! Gertie told me that I owe her one now! Oh Boy!! I can't imagine what adventure she will be up to next! 

The majority of my basting pins are in my challenge quilt. Yesterday, I spent some time ditch quilting that project. I freed enough pins to baste this tree skirt project. Today, I'll pin baste the layers to ensure less shifting of the layers as I stitch the backing. It will all work out. I'm happy to have taken the lemons that I created for myself and made lemonade!


Sunday, August 18, 2019

Miss K's Mermaid Post 3

Mermaid with border
We had a sleepover so that Miss K could make progress on her quilt project. She cut one more yellow flower for her mermaid. It was the perfect pick for the remaining space!

Next she stitched the border to her piece. This fabric was in Martha's scrap bag. We chatted about how to join the border to allow the pattern to continue. She decided she wanted the green on the outer edge. I liked her choice.

At the condo where we stayed in Maui, Hawaii, we saw orchids flowering in trees and in border plantings. We also were given flower leis when we went to a luau so I understood why using that border fabric was so important to her!

There wasn't enough of the fabric for the entire border. I showed her how to piece the upper right corner so that there was enough for the sides. We had a discussion about options for the bottom border. She decided that she wanted a cream colored patch so she had space to write her piece's name which is "Mermaid Vacation." I thought that was great problem solving!
Writing the first draft of her story

For the backing, in my stash was a triangle from a fat quarter that featured ice cream cones on a pink background. She wanted to use that fabric because we had a shave ice one day on our vacation. She was disappointed that there wasn't enough fabric for the entire back.

I encouraged her to write a short story about her vacation on a separate piece of fabric that we would add to the ice cream cone fabric. I showed her some pieced backs of my projects. She liked that idea and she wrote a draft of her story.

The pieced back with story
Next, she ironed a piece of freezer paper to a chunk of muslin from Martha's stash. Miss K wasn't sure about "paper" being part of her project. She thought that it was cool the shiny side of the freezer paper stuck to her fabric!

I drew some lines on the freezer paper and held the fabric to the light. Miss K saw how she was going to be able to write her story! When I laid the fabric on the table, Miss K immediately asked how could she see the lines. I introduced her to the light box. She thought the light box was an amazing tool.

She finished writing her story to the fabric and she wanted to know how the writing would stay. She asks the BEST questions! I asked her to remove the freezer paper. She wanted to know how and I said to pull it carefully from the back of the fabric. The look on her face was priceless. She expected a residue to be left and she expected the paper to tear! She decided freezer paper was a cool product to use for quilting!

Regarding her question, I told her that we would heat set the words with the iron which would make the ink permanent. . .as long as it wasn't washed a bunch of times. To which she replied it shouldn't need washing if it hung on a wall!

Her written story was: "We went on a snorkeling vacation in Hawaii. I had a mission to find a mermaid. We had breakfast on the ship and mango juice drink. Our family got in our snorkeling suits. We went in. I did not find a mermaid. My sister found a turtle and won a prize. My tummy hurt. I threw up. I had a hot dog for lunch on the ship. I had fun. The End."

I thought that she might want to play and take a break; but, she was ready for the next step. So I showed her some of my projects with different types of batting. She chose a wool batting because she wanted "fluffy!" We layered the back, the batting and the top. We pin basted the layers together. She didn't have much success with putting in the pins; but, she sure nailed how to close them with the quick clip tool!
Close up of tail quilting

We pulled different threads and looked at each spooled across the fabric. We talked about how some threads were shiny and some were thin. We looked at how those threads looked in a finished project. I sure thought Miss K would use different colors and weights of threads for added texture. She decided to use a monofilament thread so we wouldn't need to spend time rethreading the machine!

We free motion quilted around a flower in her mermaid's tail. Miss K looked to see if we were on the right track. She liked what she saw so we continued. In a few places, we have some long stitches and we have some places where we missed the edge of the fabric. I was okay with leaving it as she is learning.  She free motioned quilted all of the appliqué to the background on her piece. Miss K has no idea that some quilters find free motion quilting difficult! She wrote the name of her quilt and signed her work in that triangle square on the front.

Miss K spent about eight hours over two days moving her project from the designing stage to the quilting stage. She loves stitching.  She is thinking about how she wants to quilt the border and background. I look forward to our next session and watching this project develop!

Sunday, September 23, 2018

Fly Home--Tenth Finish of 3rd Quarter Finish-A-Long 2018

Auditioning threads
After I had the ditch quilting completed, I needed inspiration as to where to quilt what next. I thought about my dad who was a private pilot and how he mapped his routes using his various flight charts. I remember looking at the different airport maps and their runways wondering how one could keep them straight! I can see him sitting at the kitchen table, plotting his route using a slide rule, compass and a protractor. These were the days before hand held calculators.

I decided to use rulers for much of the quilting. My friend, JoJo, gave me some thread that she purchased from Martha's stash. While I liked the thread, I decided I would need to do bobbin work to use it, so I dug through my thread and came up with a sulky metallic thread that quilted nicely.

Straight line quilting design in right corner
I began stitching the red lines in the propeller. I free motioned quilted these lines with red cotton thread. Using the rulers, I started with a straight line design in one of the triangles.

Next, I divided the space around the propeller. First, I placed a box about half an inch outside of the propeller and then I extended the space using the prairie points as the edges of the section. I thought of my dad's compass as I quilted circles. Sometimes, the circles were on top of the one next to it and sometimes, the circles were behind the one next to it. I liked both quilting designs.
Circles around the propeller 


To decide what to do in the bottom two sections, I decided that I would continue the circle motif in the lower section. It is good to have repetition in the quilting. Then, I thought about longitude and latitude lines on a map and decided to put a few in the second triangle space. It was a little tricky quilting the arcs when the space to quilt was larger than my ruler; but, I managed.

That left just the top corners to quilt. I decided that I would go with a repetition of straight lines as that would be a good contrast to the circles.

Texture before adding shadow
As I looked at the quilting, I decided that it was even and that I liked the motifs that I had chosen. The quilting, however, seemed too heavy on the sunshine and too light on the shadow. I spent some time adding some shadow to the open spaces in the lower right triangle and the lines at the top of the propeller. I found it was easier to free motion the shadow lines than to use the ruler. I liked the results.

This is the sort of piece that I hope the viewer will be attracted to visit because it is so graphic with the striped fabric. I hope that the quilting will draw the viewer closer to the piece. It makes me smile when I see people nose close to one of my projects!!!

Sunshine and shadow are terms that Cindy Needham uses. She describes sunshine as the more open areas of the quilting and the shadow as the denser areas of the quilting. She says to have a balance of both so that your eye is drawn more into the project. She is so wise!

With a little shadow added


Detail of the shadow quilting 


Piece with the added shadow quilting

As for thread, I thought that I would use the silver polyester thread to create some shadow. However, It was too light and would draw too much attention away from the stripe design. I also thought I might use the black thread; but, it proved too dark! I even tried red cotton and red silk threads but those didn't show enough. I'm glad that I had that multi color metallic black thread as that worked great!

After I had quilted the piece, I squared the piece, added the edge finish for the facing and pressed the facing into position. Three of the corners turned perfectly. The fourth. . .well, it didn't work. I didn't realize that I hadn't aligned the edges of the corner correctly until I was turning the corner. Of course, I had trimmed the corner so there was no going back!!!

Additional design element--back
After several hours of thinking how to fix my goof, I added some trim fabric in that area. Now, I have an additional design element and love what happened as a result of that problem!

In fact, after the fix, it would have looked even better had I made the slash bigger. As it is, that little peak of red in the corner makes me want to lift the corner to see what is behind. I wonder if others will want to do the same, or, if, they will even notice?

A few years ago, I might have cut the quilt and bound that edge or I might have left it in the unfinished state! I sure liked my "easier" solution! Live and learn!
Additional design element--front

Project label


I attached a photo of my label. It was fun to challenge myself to use a large leftover HST! (Half Square Triangle)
Had I had more writing room, I would have included that the strips represent runways/taxi ways and the center applique represent the moving propeller. I would have mentioned the quilting designs were inspired by watching my dad plot his trips when he was a private pilot. BUT . . .there I didn't have enough space to share that much of the story!

It took me about 42 hours of actual work on this piece. Miss J helped me with the final press. She LOVES working with tools and pressing the button for a burst of steam was so much fun for her! (I try to involve the grands as much as possible in my projects. When I look back at the finished piece, I have so many special memories!) I spent many more hours thinking about possibilities though! I envisioned those prairie points with a bead, a button or something fun. I like them as they are so I'm calling this project finished!

The striped fabric was left from a previous project, the black background and backing fabric came to 2 and 1/8 yards. I have now used 28 1/4 yards of fabric from my stash and have 21 3/4 yards left to meet my goal of using 50 yards of fabric from my stash this year. This was goal number one on my 3rd Quarter Finish A Long list.

Finished back with added interest corner
A photo of the back shows the fabric I used to trim the striped strips. I didn't know how much I would like the texture that print provided!

Last a photo of the front. I see the speck of red on the lower left corner. We know the story behind it! Who knew that such a small project would take so long or stretch my design capabilities? It was fun and that is how quilting should be!
Finished front


Sunday, October 8, 2017

When A Good Idea Sort Of Works--Yet Another Chicken Post

Evidence that a batik bled
When a fabric bleeds, it generally isn't good. Honestly, the best way to handle fabric bleeds is to prewash or test every fabric before you use it. This chicken project was a kit and some of the fabrics--the red that bled in particular--were so small that to have washed them and they shrank, I might not have had enough to cut the piece for the appliqué.

This was the first time that I purchased a kit. I liked the variety in the fabrics and the $20 each month I spent was less than I would have spent had I bought the individual fabrics on my own. Had I purchased yardage, I would have tested it. A fabric that bled would have been treated and retested. If it bled after a second treatment, I would have tossed it. In retrospect, I should have tested and treated each fabric. I should have substituted a fabric that I had rather than trying to stay true to the fabrics I was given in the kit.

The bleed after Tsukeno ink applications
Knowing what I do now, I will prewash or test all fabrics in the future! Yes, it made me sad that a black ran onto the cream background, a purple ran on the cream background, a green ran on a wood background and a red ran onto a cream background.

Even though I had rinsed the blocks after I had appliquéd them, I still had a few spots where the dye ran. Ugly!!! I tried a synthropol treatment; but it didn't help and I tried Dawn. . .it helped a little.

I've been asked why I didn't use Retayne instead of Synthropol. You can get a little information here.

I felt that the Synthropol would remove the dye particles that were affixing themselves to areas that I didn't want. The Retayne would affix the dye to the quilt which was a process that I didn't want!
The bleed after the acrylic paint applications

I've been trying to figure out why the colors ran this time when they didn't run before. I think, that over time, our water has changed. I know that there is more chlorine in it now than there was a decade ago. I forgot all about that change. I should have used filtered water. Maybe I can remember that for the next time I wash or get a quilt wet!

After the Dawn detergent trial, my next idea was to paint over the areas. Hey, paint covers lots of issues. I used Tsukneko white all purpose ink to cover that fabric bleed. Three coats helped; but, the fabric bleed was too evident for me.

Sample of where a black fabric bled
Next, I tried white acrylic paint. I have about three layers of paint here too! The acrylic paint changed the hand of the fabric a bit; but, not enough for it to bother me more than the fabric that bled! It took some time because I had to wait after each paint application for the fabric to dry which generally meant waiting overnight!

In the other areas where the fabrics bled, I tried the same applications. Unfortunately, I didn't have as much success. On line, I purchased several rubber stamps of chicken or bird tracks and considered inking images on the front of the quilt to "cover" the problems. My thought that a few chicken tracks could camouflage that ink bleed.
Chicken tracks stamped on practice
sample

I used an archival ink pad. My first test was on my practice/test sample. I was surprised that the ink bled into the cotton fabric as much as it did. The edges just weren't clear on the stamped image. Next, I wondered what it would look like if I stamped a bunch of images in an area. I decided it looked liked a mess.
Chicken sample--to much bleeding
I even stamped the ink on the project.  No, I didn't stamp on the front of the project because I may be crazy; but, I didn't want to be committed if I didn't like what was happening!
Stamping a bunch of images in an area
sample


Unfortunately, the stamping test on the back of the quilt netted the same results as it did stamping on my practice sample.


I stepped a foot back from the quilt and looked. Yes, I can see that the fabric bled because I know it is there; but, I also think that there is enough quilting, pattern and fabrics to take your eye other places in the quilt. I decided. . . .the chicken wall hanging was good enough as is. So I didn't add any chicken tracks, although it was a great idea!

The bleed is just above the feather with the
bottom black square
 My "stamping experiment" will be covered with the hanging sleeve. I have about half of the sleeve left to hand stitch.  Perhaps, the finished wall hanging will be the subject of my next post. . . .keep your fingers crossed!

Sunday, November 6, 2016

Oops--and a fix!

K stitching her skirt
Last week, while K and I were stitching her skirt, J, happened into the studio.

Now J is a total bundle of energy and joy. She is constantly in motion. (If she is still for more than a couple of minutes, she will go to sleep!) She LOVES tools. When K was the same age, she liked putting fabric pieces on the design wall and creating different looks. K has an excellent sense of design and value. She helps me often arrange blocks and her way IS better!

 J, on the other hand, is all about how tools work. These tools include but are not limited to: marking pencils, spools of thread, wound bobbins, pins, rulers, scissors, fabric and of course sewing machines.

When she has been in the studio, I might find spools inserted into other spools. I might find marking tools in a different place from where I put them. I might find scissors arranged differently. I might find material--loose on the term material--under the sewing machine foot. I've used these instances to tell her how the tool is used and its importance to a particular project.

How my scissors are stored--the Kai scissors are stored
in a drawer. . .most of the time!
Last week, her job was to help me put away my quilts from the Featured Artist Show and to pick out a quilt to hang on a special rack in the bedroom. Choosing the quilt is a big deal and this month it was J's turn to choose. She went through the options and instantly made her choice. K will look at several options several times in making her choice; but, not J! J sees it; that's the one and she's on to her next task. She waited until I hung it and nodded her approval.

What the machine looks like after a J visit
I picked up the stories that were hung with the quilts at the Featured Artist Show to file. When I walked the ten steps into the studio,  J was sitting in the sewing chair working away. She had taken the scissors out of the protective cover and was using them to cut fabric. The problem was her fabric choice. . .it was the quilt that I had just quilted the first line of quilting not two hours earlier!

My heart rate accelerated, my inner voice was screaming STOP!!! In a calm voice, I said, "Whoa, J. Stop." She continued to saw and close those scissors. In a loud voice, I said, "JOSETTE, STOP." She did stop. She dropped the scissors and looked at me with wide eyes. The scissors were entangled in the quilt.


Top: The sliced quilt. Bottom: J's fabric choice

I got in front of her and said, look in my eyes. She immediately started to cry. K was out the door telling Papa that Gran used a loud voice. My response to crying is, "Are you bleeding?" The next sentences I ask are, "Show me where the bleeding is. " If you aren't bleeding, use your words. I can't understand crying."

Instead, I said. "J, is this your fabric?" J was startled because I didn't ask about bleeding. She stopped crying and she shook her head no. "Are these your scissors?" She shook her head no. "Did I give you the scissors and this fabric to cut?" Again, she shook her head no. "This might look like fabric; but, now the fabric is stitched to become a quilt."  "This quilt is going on a bed and it can't have a hole in it."

She is starting to cry again at this point. I said, "No crying--there is no bleeding. You can cut your fabric. You don't cut my fabric unless I said you could. You don't get to use my scissors unless I said you could. So do you know what this means?" She shook her head no.

"It means, I can see how much you want to sew and I love that you do. It means, you need your own fabric and your own scissors. When you have your own scissors and your own fabric, you can cut what you want when you want. Let me think about some fabric choices for you. We will need to go to the store to get you a pair of scissors though. How about that?" She nodded her head yes. K immediately stepped up and said that she "needed" scissors too!

But, back to J. Our conversation continued. "So, can you cut my fabric?" She shook her head no. "Can you use my scissors to cut by yourself?" She shook her head no. At this point, Papa came into the room to survey the situation. I said, "Would you like to play with Papa and come back in a bit to pick out your fabric? She nodded yes and she was off.

The slices in the back of the quilt
I untangled the scissors. Luckily, she cut the back of the quilt and not the front. (Whew!) The back can have another patch which is no problem. The cuts are two small slices and are hardly visible. (Good!) I placed a little bonash on top of a scrap of the same fabric and slid this under the cuts. I ironed the section, melting the bonash. The cut is sealed. (Great!) The best news of all is that the repair will be under the sleeve so it won't even be seen! (Terrific!)

In reality, I've cut the top of a project. I've ripped a hole in the top of a quilt. I've snipped a hole in the back of a project. All done. .  not on purpose! I survived; the quilt survived. I learned a different solution in each case.

I hope J learned too. I hope I was calm enough and hugged her enough so that she still wants to stitch! After all, she's young. In about three weeks, she is going to be three years old! She did choose her fabric and she also chose how much she wanted. I got a kick out of where she wanted to "store" it.  She immediately put it on the design wall! I think I've a quilter in the making! How much more joyful could one be?

I hadn't named this quilt. . .but, now I'm thinking "MBJ--Marked by Josette" might be an option!  :)