Sunday, September 29, 2019

Secondary Blocks for Good Fortune Mystery post 4

Parts and half of the finished blocks
One of my goals was to stitch the secondary blocks for the Good Fortune Mystery quilt. To complete this block, I pulled the orange strips that I had string pieced along with the four patches and the 16 patch centers. Before I went to one of my sew group get togethers to stitch and catch up on the news, I sewed one block. Stitching a "test" block helps me learn how the block goes together. It is good to have a sample! For this block, it is important that the light colored part of the four patch is on the outer corner!

Stitching a test block also allows me to ensure that I've packed the correct "parts" and tools to make more. The blocks weren't difficult to stitch. I was surprised at how quickly these went together! I chain pieced and worked on two blocks at a time. I also took along my leader/ender block parts. Interestingly, I sewed a few leaders and enders. . .some days are like that! I do imagine that there will be more opportunities to make progress on those blocks too!
All the secondary blocks

As I neared the end of the block making, I found that I was two string sections short of the orange "sashing" so I stitched two more "strings." I hope that was the only counting error that I made! I had saved the leftovers from this step in a little baggie so stitching the strips wasn't difficult. I save all the parts and leftovers of a quilt until I finish it. Sometimes, I need those little bits!

With all the pieces to this block, I was pleasantly surprised again that each block was a thread or two from being eight and a half inches square! Seeing how nicely the red and the orange colors played together was great! It took me nine hours to make the 24 secondary blocks. I spent another hour pressing the blocks.
Three completed leader/ender blocks

Miss K was over and laid out all of the blocks to see what they looked like together. She oohed as she laid out the pieces. These blocks looked great together! She commented that I just needed one more to finish the pattern. I explained she needed to see the next step to see how I had just the right amount of blocks!

 My next step is to stitch these blocks to the spinning blocks. I look forward to seeing this step of the process complete! Miss K is ready to do the block layout.

After I have stitched the blocks together, there are several borders to complete and apply. This project won't be a top soon; but I do love the progress that I'm making!

As for those leader/ender blocks, with Miss K's help, I've stitched three so far. Truly, Miss K and I have sewn the parts as we've been piecing other projects as leader/enders. Miss K says that this  concept is a great idea. For those that have inquired, there are 48 pieces in each block. The block finishes to 12 inches. I'm thinking 35 blocks would make a quilt about 60 inches wide and 84 inches long. . .I've a long way to go before I contemplate what the blocks will become!

Wednesday, September 25, 2019

K's Skirt--Twelfth Finish 3rd Quarter FAL 2019

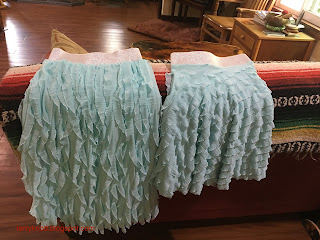
Finished skirt
This was supposed to be a project that Miss K and I stitched together.  When we had sew dates together she chose to work on her mermaid quilt instead. She makes good decisions!

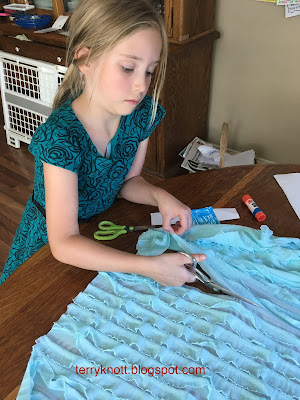
Miss K cutting a slit for ease of movement
I decided that if I continued to wait for a good time for the two of us to stitch this skirt, she may have grown out of the pattern!!! I reviewed the directions for cutting out the skirt many times. I pinned cutting lines many times before I actually did any cutting!!! For this project, there was no paper pattern. Had Miss K been part of this project, this reviewing and pinning lines would have been way too boring!!

One would think that stitching two seams for the skirt, the waistband seam and attaching the waistband would take a few hours at most. . . .I
must be direction challenged because it took me most of a day to get the skirt finished. If I were making this pattern again, I would enlarge the waist because it was a bit too small; but, since the fabric was a knit, it worked. Miss K liked it!

The beauty of this being an extra wide piece of fabric was that I was able to cut a second skirt for Miss J! We made the skirt almost floor length and Miss K thought Miss J would like the skirt more if there was an opening for running. I like the way Miss K thinks and Miss J who was feeling neglected because she didn't have a skirt too was much happier with the project!

Two finished skirts
My dear husband, Bob, provided a third hand for me so that I could stretch the elastic to its maximum as I zig zagged the elastic to the skirt top. Without his help, it would have taken me much longer to finish the skirt. The elastic is a decorative--it has a metallic silver finish which Miss K appreciated since she loves sparkle! I snapped a photo of the two skirts when finished.

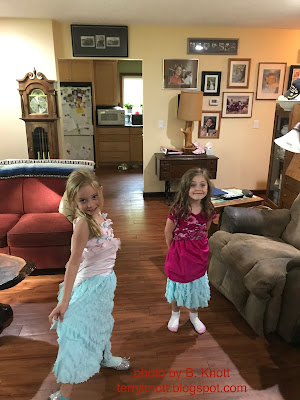
The girls were over one evening for dinner so their dad could attend curriculum night at school. Their mama had her own curriculum night to attend. Their papa snapped a photo of them in their skirts. I noted that Miss K decided the longer skirt was to her liking while Miss J was happiest with the shorter skirt. I told them that since the skirts were the same size, they might wear each other's skirts sometimes. . .that is IF all parties agreed to that sort of exchange!
Skirts in motion

I used three quarters of a yard of fabric for this project. My friend, Pat, gifted me the fabric and the pattern more than a year ago! Thanks Pat!

I'm glad to see have this project out of the project box and into a wearable item! This brings the total fabric I've sewn to 72 1/4 yards. This was goal number 11 on my 3rd quarter FAL list. It is my twelfth finish for the quarter!

Sunday, September 22, 2019

Quilting New Beginnings post 4--Eleventh Finish 3rd Quarter FAL 2019

Overall view of center quilting
Deciding what to quilt where is a part of the process that I often enjoy. It is also a part of the process that sometimes stumps me! For this project, I decided to emphasize the appliqué design which meant that the quilting would compliment the appliqué shapes.

I began quilting the center circle of the project. To create sunshine, I echoed the shape of the petals using a polyester thread in the same hue as the background fabric. I stitched a quarter of an inch around most of the design although I extended the lines around the dark pink petals to give the motif more depth.

To create more interest, I added a swirl in each of the appliquéd circles located in the center of the design.  Using silk thread, I added some shadow with some small stippling.  I spent about three hours in this small section! To see the quilting, you need to be nose close to the work.
Example of 
Sometimes, it can be challenging to determine which fill will best support the quilt piecing or applique without overpowering the design. I thought about how to stitch the next section of quilt. My goal was to like the results at least as much as I liked the center!

Quilting the next section was fun. I free motioned stitched lines to support the shape of the floral like motifs in a thread that was the same value as the fabric. I stitched a small circle design in the blue polka dot background fabric. I left a space between the quilting and the motifs. That space represents a cushion which allows my eye to focus more on the shape of the motif.

From the beginning, I planned to quilt circles in either the gold or the pink border. In selecting quilting motifs, I often look for clues in the fabric or the design of the top. This top has a lot of circles and repeating the circular design in various places makes the quilting appear more planned.
Wavy line in pink and circles

I found spacing the circles challenging because I either had too large or too small a circle for the design to fit the space. In the end, I decided to use different size circles to fill the space. I used a plastic pasta measure as my template for the circles. Long ago, that measure came in the mail as a freebie; but, it has become a piece of my quilting equipment instead!

In the pink border, I quilted a diamond shape using the intersection of the circles as my guide for starting the angles. When I was finished, I didn't like the way the quilting looked. In fact, that section of the quilt bothered me so much that I spent four hours removing all of the stitches!
View of the quilting from the back

I replaced the diamond shape with a simple wavy line. I liked that result better. In the outer border, I quilted large circles. I did use the Westalee circle ruler to create the circles in the outer border.

I'm still working on becoming more accurate when machine stitching the binding. I realize that I need more practice; but, the rate at which I finish quilts is too slow!!!!

An unexpected surprise was how nicely the quilting shows on the backing fabric. I didn't realize how great the quilting would show up on that background! I used a light purple 100 weight polyester thread made by Wonderfil in the bobbin. I used a 40 weight polyester threads made by Floriani and Superior for most of the quilting on the top of the project. I used silk threads made by Superior and YLI to quilt around the appliqué pieces and for some of the backgrounds. I also used that 100 weight polyester thread to quilt the circles on the outer border.

Label
For the label, Martha hadn't used one that she had received at a retreat. I had used mine years ago. Hers was perfect for this project! Again, I documented how many hours I spent which is an estimate. I also documented the cost of the project. Most of the project cost was the two day class and the kit fee for the course. The reason that I document the time and the cost is that so few people understand the time and materials involved in making a quilt!

You can read the previous posts to this project by clicking the links below:
A New Beginning--post 1
New Beginnings--post 2
Quilting New Beginnings--post 3
Finished back

Our book club read "Garden Spells" by Sarah Addison Allen book in 2007. The book was the inspiration behind this quilt. It is hard to believe that I've been noodling the idea for this quilt for so many years! As I looked at this finished piece, I realized that it fits the dots and spots show theme category for the Clark County Quilters quilt show in April 2020. I have a finished entry already!

I used 6 1/2 yards of fabric which brings my total usage from my stash to 71 1/2 yards! This was goal number one on my 3rd Quarter FAL list.

Finished front


Wednesday, September 18, 2019

A-B-C Crib Quilt post 1 of 2

Beginning layout
Those juvenile print flannel bits of Martha's were calling to me to make a quilt with them. Our book club read "Little Women" by Louisa May Alcott.  I read "Little Women" once as a middle schooler and once in high school which was a long time ago!

As I read the book for the third time, I was inspired--
to use the letters I had embroidered to symbolize the writing of Jo,
to make it a baby quilt to symbolize Beth,
Auditioning scraps for the center section
to add color to symbolize Amy and to make the design symmetrical to symbolize Meg's organizational skills.

I looked at the sizes of the leftover flannels from Martha's fabrics. It looked like I the largest chunks I could cut were some 12 1/2 inch x 6 1/2 inch rectangles and 6 1/2 inch squares from the scraps. With those sizes in mind, I sketched a layout. My goal was to make a crib quilt that was about 36 inches wide by 52 inches high.

I began cutting the pieces and arranging them on the design wall. I decided cornerstones would be a nice addition. A couple strips of a print scrap became the 2 1/2 inch corner stones. JoJo gave me the yellow flannel for the sashing.

I've sewn flannel nightgowns and pajamas. A couple of years ago, the grands and I made a crib quilt with minkee. Earlier this year, I stitched flannel potholders. I haven't made a flannel quilt because I was concerned with how much the flannel would stretch. It did stretch. Pinning the intersections helped. Some intersections are "in the neighborhood" and I'm okay with that!
Finished top

For this project, I chained stitched the vertical rows. Once the section was "webbed," I stitched the horizontal rows. This process worked great. Once I had the top and bottom sections stitched, it was time to figure out how to incorporate the embroidery into the design.

The 3 1/4 inch polka dot strip was about the right length to border the embroidery. I cut it in half and stitched it on the embroidery. The next step was to decide what to use to fill in the space on either side of the embroidery. I decided to use more of the striped fabric. At this point, the quilt measured about 34 inches wide by 52 inches high.

To my eye, it was too narrow! I didn't want to add a border on the sides that looked like I added it because I wanted the quilt to be wider. For a while, I was stuck about what to do. When that happens, I let the parts marinate and wait for inspiration.
Pieced back

Eventually, the cornerstones gave me a clue. I decided to add another row of yellow sashing with the corner stones at the mid-point of the previous sashing strips. Unfortunately, I was short three cornerstones. The leftovers contained a print similar to the cornerstones; but, in a purple color way. Our quilting ancestors would have figured out a way to make do.

I made do. I cut three cornerstones from the purple color way. I sprinkled those blocks into the mix, sashed the blocks and added the strip to the side of the quilt. I'm glad the quilt wanted that border as I liked the interest it provided.

I decided the quilt needed an outside border. What I REALLY wanted to do was to buy a piece of
fabric for the border and for the binding.  I've been on a "use what I have" so I forced myself to come up with a plan with fabrics I already had. I kept telling myself I could do it.
Beginning the pin basting

I auditioned various chunks of the scraps and decided that I could use the purple print with the green swirl and the green plaid fabrics for the border.
With some careful piecing, I was able to cut the borders at three and one quarter inches. I had almost no purple left and a small amount of green left. I like the interest the two borders added to the top. The size was now about 44 inches wide by 61 inches high.

Figuring out a back was the next project. I decided that I didn't want a flannel backing because it would make quilting too hard to push and pull fabric with the flannel next to the machine bed. I picked a green cotton print and red cotton print fabric that have been in my stash for a long time. I was short about six inches in width so I found a chunk to add to the back. I used about two yards of fabric for the back.

I basted the layers together so this project is ready to quilt.

August Embroidery Lesson


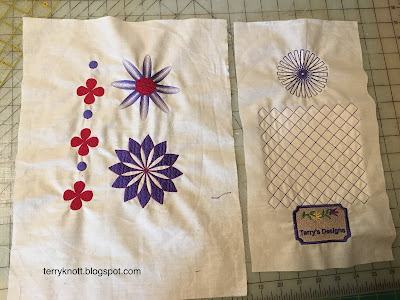
Six of the examples of the lesson
This week, I learned that a dear friend will be moving far away. I am excited for her to begin new adventures. I am going to miss our little get togethers and brainstorming sessions.

I've always said change is the constant in life and the more flexible one can be with change the easier the transitions. Perhaps, I will eventually be able to conquer the embroidery software without her insight. For sure, I need to keep doing the lessons!

The August software embroidery lessons was about having fun with repeats. Stitching out the examples of the lesson took a long time stitch as there were a lot of parts to the lesson!

In the first exercise, I made a sheet of patches. I practiced how to make repeats, how to add some words and how to add a little design. I decided to stitch one example. Another time, I would put this project on water soluble stabilizer and I would change the lettering as the letter e is a bit difficult to read. I don't know how I would use this or how I would use a whole sheet!

Color blending and pebble exercise samples
In the second exercise, I made a bunch of blocks to use as a stitch sampler. The exercise was to create the blocks. From the written directions, I couldn't understand how to play with the color blending so I used the file provided so I could see what the result of color blending was. The set up was for a jumbo hoop. I decreased the size of the squares and I reduced the squares to three in a row so I could stitch the sample in one setting in my hoop. It took about an hour and a half to stitch that one sample! I was amazed at how flexible the stitches are and I love the shading.

The third exercise was to do some grid quilting on point. After I stitched it and the spoked pattern (the fourth exercise) out, I realized that if I really wanted to test it I should have set up a quilt sandwich. That was how I stitched out the pebble quilting which was the fifth exercise.

While I find the pebbles and grid designs cool; I don't know that I would use them. I could see using the spoked pattern. I do wonder how I would hold the remaining part of the quilt while it stitched and I do wonder how challenging hooping would be.

The sixth exercise was about how to repeat and move objects into a border. The seventh exercise was how to create a flower using the weld feature and the ripple fill. The eighth exercise was how to create a kaleidoscope flower. I was able to follow the directions without too much trouble. Over all, I enjoyed this lesson!

Sunday, September 15, 2019

Machine Embroidered T-Shirt #2--Tenth Finish 3rd Quarter FAL2019

Initial stitch outs of embroidery possibilities for the t-shirt
After finishing Miss J's t-shirt, I decided that I had better finish Miss K's shirt! When I stitched the sample, I liked the "frilly" look to the butterfly embroidery because Miss K is all about glitz, ruffles and "frilly." The design was a little too small for the front of the t-shirt. My embroidery software makes it easy to enlarge or reduce an embroidery design. In this case, I enlarged it about an inch.

When I shared the possible design with my friend, JoJo, she suggested that the center of the the flowers would be a great place to add a little sparkle. She knows Miss K so well! In the software portion of the design I deleted the stitching in the center of the flowers so I could add some bling there instead. I used a knit stabilizer on the back of the fabric along with a tear away.
Embroidery design for second t-shirt

Again, I carefully hooped the design. I rehooped the design several times, working to position the fabric in the hoop "just right." I found that not having to incorporate the neck edge made it a lot easier to hoop the fabric. I started stitching the design. I had a hiccup with the thread path which caused the stitching to distort. I got to rip the stitches out and try again. Ripping wasn't easy because the stitch is like a triple stitch. Fortunately, the hiccup happened within the first two inches of the design. Unfortunately, that area just didn't stitch as well as the rest of the design.

I also created an embellishment for the sleeve.  I think I spent about as much time carefully picking out as much of the stabilizer as possible as I did selecting, hooping and stitching the design! I'm learning and I still have a lot to learn. I am more confident with placing designs. This is my tenth finish for the quarter and goal number 16 on my 3rd Quarter FAL list.

Wednesday, September 11, 2019

Machine Embroidered T-Shirt #1--Ninth Finish 3rd Quarter FAL 2019

Pink pre-washed t-shirt
Before I embroidered a design on the t-shirt, I first washed it to preshrink it. I had two shirts so rather than measure the shirt before and after, I washed one and compared it to the unwashed shirt. These are a Jerzees brand of shirt and I sure thought that there would be a lot of shrinkage. Was I ever WRONG!

I was so surprised when I layered the washed shirt on top of the unwashed shirt and found almost no difference. . . .well, perhaps, there was a half inch difference overall.

My husband donated one of his t-shirts to me so that I could practice machine embroidery on a t-shirt before I actually stitched the design. For several reasons, I found it is good to make a practice run.

Embroidery samples
First, if there are some areas in the design that need a little adjustment, the sample is a great place to spot them. Second, it is a good time to check to see if the threads chosen work well together. Once the design is stitched, there might be better thread choice so the design is more more pleasing to the eye! Third, it is a way to see if the stabilizer chosen works well with the design.

I've stitched designs multiple times tweaking as I go before I stitch the ONE! This is the first time that I've embroidered on a clothing item and the first time that I embroidered a design on a knit fabric. Hooping the design was a challenge. I'm glad that I had the old shirt to practice on first!

Threads lined up for stitching
The three designs, that I chose to be my first samples, came with the software. It is fun to use motifs that I already have! I experimented with the larger butterfly. I used a variegated thread to stitch it. Although I liked the added interest the thread created, I decided it wasn't the right feel for the granddaughter. I decided the smaller butterfly was too "frilly"; but, decided the kitty was just right!

Hooping to get the motif to stitch as I wanted made me sweat with nervousness. In the end, I got it close enough for my eye. I added a little embellishment to the sleeve. I wouldn't have thought about adding embellishment; however, my friend JoJo suggested it. I think Miss J will notice right away. I like the little bit of "extra
Finished embroidery 
special" the sleeve embellishment added to the garment. Hooping such a small area was challenging; but, in the end it was worth the extra effort. Thanks JoJo for your suggestion!

This was goal number 14 on my FAL list. No fabric was used in this project. It will be a gift for Miss J. It is my ninth finish for the quarter!


Sunday, September 8, 2019

Quilting New Beginnings--post 3

Oops--missing seam allowance
Backing fabric
This quilt top has been waiting to be layered and basted for months. My last post was in December!
Pin basted ready for quilting

I was stumped about what to do for a back. Often, I piece the back using leftover bits from the front. This time, piecing a back wasn't what the quilt wanted. In Martha's stash from that last day at her house, I had picked up a piece of fabric that was a print of pastel plaids. I don't think it is 100 percent cotton; but, it worked for this project. There was enough for the back and the sleeve.

Before I layered the top, I added another border as I didn't want the binding to infringe on the pattern. Turns out I forgot to leave a seam allowance in that area. I've been quilting long enough to know better. Obviously, I missed that step in the pattern. I'm not concerned though. It is still a great project. I look forward to finishing it!

After I had pin pasted the layers, I made the sleeve and I prepared the binding. The binding will be the same as the outer border fabric. I'll be thinking of what I want to include on the label. It will take awhile to quilt this piece so I've plenty of time to think about what I will write!
Thread selection used for the anchor quilting
In the meantime, I began the quilting as I generally do by stitching in the ditch and around all the applique pieces. The pieced border was all the ditch quilting so I finished ditch quilting quickly!

I auditioned and selected some silk threads to start. For this anchoring part of the quilting, I tend to choose threads that will blend. As I quilt, I will add even more! I like silk threads because the fine thread almost disappears as I stitch around the appliqué pieces. I used a 100 weight polyester in the bobbin.

It took me about four hours to complete the anchor quilting. I didn't love quilting with the stabilizer in place. The needle made a popping sound as it entered and exited the fabric. The loft of the quilting is a bit flatter than when I've quilted without stabilizer. I set it aside as I pondered how I was going to quilt the center of the piece.


Wednesday, September 4, 2019

Welcome Aboard to Bust Your Stash Challenge

Welcome aboard to the Bust Your Stash challenge!!! 
The outer border fabric said "stitch me"

If you are new to the challenge or don’t know what I’m talking about, you will find the rules here. Read the rules and think about what you want to create.

When it comes to designing, it can be daunting of where or how to start! Inspiration is behind every quilt. For me, inspiration could come from:
—a particular piece of fabric that says stitch me
—an event like a wedding, a birth or a graduation is on the horizon
—nature, the colors of a blooming plant, a sunrise or a landscape
Stitched to celebrate a special birthday
—exploring a technique, a concept, a shape or a pattern (If you’ve a pattern that you purchased, you’re on your way!)
—reading a blog, Bonnie Hunter’s for instance, you might want to try a pattern, tip or technique. You can find Bonnie’s blog here.  

If you are concerned that you won’t have the time to create a quilt, consider a leader/ender project. As you piece your projects, have a stack of parts ready to stitch as the beginning and ending to your pieced sections. It is a way to keep continuously stitching and a way to efficiently use more of your thread! Last year, Bonnie introduced a leader/ender project that used two inch squares. You can access the pattern here.
Preserving a view; exploring techniques

I created a Pinterest board to store some ideas. I might sketch a few ideas with a pencil. I often will make a number of small sketches on a page. Later, I will pick a couple to draw larger. I might even use color pencils to enhance the sketch. 


Believe in yourself and your ideas. Most important. . .have fun!!! Since we are a community, please leave a comment regarding what inspires you to create. I plan to post an article the first Wednesday of the month along with a few examples of past work. You can also check out #2020bustyourstashchallenge on instagram. Next month, our topic will be where to find scraps. 

Sunday, September 1, 2019

August Recap

Miss J seeing her quilt at the fair
The best part of August was receiving the photo of Miss J seeing her quilt hang in the Clackamas County Fair. She won a blue ribbon (1st in her class); a purple ribbon (best in her division); a pink ribbon (Judge's choice) and $14 in premium money! She was tickled!!!

Although Miss K didn't enter in the textiles division, she did earn ribbons with her card, floral and herb entries. She made great progress on her mermaid quilt in August.

Miss K with her herb entries
I earned one purple ribbon, 14 blue ribbons, eight red ribbons and two white ribbons with my fair entries. Most of the items will be gifted. Some will end up in the guild boutique sale and others will be gifted to family and friends. When I unfolded my entries I found the stitches on the sides and lower edge of the sleeve of my Star Patch entry ripped. I wondered if the sleeve wasn't four inches wide; but, it was. I wondered if someone thought that I had sewn the sleeve on the wrong side of the quilt because the back is pieced. A friend wondered if someone tried to steal the entry. I've entered items in the Clackamas County Fair for many of the 27 years that I've lived in Clackamas County. My entries have returned home just as I had sent them. I contacted the chair of the department. She was appalled and is on the case to find out why someone removed the stitches! In the end, the quilt wasn't damaged and restitching the sleeve will just take some time.

Sleeve pinned in place for restitching
With my friend Theresa, I co-taught six participants in a lifeguard instructor review course and we taught seven participants in a lifeguard instructor course. I taught swim lessons to 14 participants and trained 40 participants in
Basic Life Support CPR for a total of 67 participants.

My dad's brother died August 10; he was 87 years old. His family did a great job organizing their dad's send off. My uncle restored old cars and was particularly gifted at engine restoration. Members of his old car club formed a processional. They drove their restored cars--think models of the 30's--from the funeral home to the graveside service. My uncle, in his casket, arrived in one of the first vehicles that he restored. My brother provided the remarks at the graveside. My brother captured milestones of my uncle's life. Had I closed my eyes, I could've heard my uncle relating the information! After the service, we went to a bakery where my uncle met friends for breakfast. We shared stories about him. It was great to catch up with my cousins.
Monthly thumbnail drawings
On August 28, my friend, Theresa, celebrated her birthday with three of her friends. We went to a paint party. This was a first time experience for me and it was a fun couple of hours! We giggled, laughed and even put some paint on a canvas!!

I have continued drawing thumbnail sketches in my journal. I can see an improvement with practice. If I hadn't been drawing, sketching and coloring, I think I wouldn't have had as much fun at the paint party as I did.

Theresa, Trisha, Ashley and me with our masterpieces
I met 14 of the 17 goals on my August list. My plan is to complete those goals as soon as possible! Today, my plan is to finish the August embroidery lesson. I have finished the software part of the lesson and am about an hour and a half away from finishing the stitch out of the lesson.

Perhaps, I'll feel comfortable enough to embroider two t-shirts too! In August, I refined my designs in the software. I'm ready to start the stitch out process. I've also a skirt to stitch for Miss K. I've been thinking about what I want to accomplish for September. This evening, I'll refine my list. I have found it is helpful to have a written list of goals!