Showing posts with label stars. Show all posts

Wednesday, September 24, 2025

Retreat Prize and Rainbow Scrap Challenge 2025 Blocks--post 18

Retreat blocks
Goal number ten on my September list was to document the blocks and prize that I won at the Clark County Quilters Virtual Retreat. I like retreating for the camaraderie and inspiration of my fellow retreaters. Virtual retreats have spoiled me.

I have dietary issues which make eating at functions challenging. If I do eat a restricted food, it won't kill me; but, I sure won't feel well! Packing up my supplies, unpacking them, hoping that I've packed what I've needed, repacking them at the end of the retreat and unpacking them at home isn't fun. With a virtual retreat, I don't have concerns about meals and projects! Plus, I don't have to drive anywhere. There is the downside of not being able to shop hop on the way to and from the retreat though!

The prize
The charity blocks for this retreat will be stitched into a QoV. This was a Buggy Barn pattern from long ago. We were to use red, white and blue fabrics to make three stars. The fabrics were cut all at the same time so it was a matter of mixing and matching when stitching them.

I like how the stars float. Even with the directions, I found
putting the block together challenging! I do like the end result so I may try this block again. 

Then there were the games and the prizes. I liked that the prizes were notions and supplies like batting instead of fabrics. I was a winner of one game which was bobbin chicken. 

The prize
We were supposed to take a photo of the bobbin with the thread on it and then a photo with the thread measured. Four times I lost at the game because I used all of the bobbin thread. Finally, with a couple hours left in the contest, I was successful. My remaining thread was 2 3/8 inches. Second place was three inches and third places was 3 1/2 inches so it close. We didn't share our results, we sent a photo to one of the retreat chairs.

The prize was a box of Aurifil thread! I like the combination! Winning a prize was cool as it is rare that I win and thread . . .well, it couldn't have been more perfect prize for me!

String selvages made into squares
The retreat ended with fond farewells and yes, I made some new friends and caught up with friends I hadn't seen in awhile. I even made progress on my quilting project! It was a total win!

Two more blocks
Regarding the Rainbow Scrap Challenge color this month, Angela said to go back to the light and bright colors--blue and green! I went with green and orange! Why orange? I laid out the finished blocks and with the ones that I will finish next month, I needed two more blocks for the layout. I'll share the layout next month.

I started pulling selvages and with the projects that I finished this year, I had enough new orange and green selvages to piece the two blocks! It wasn't long until I had sewn the two blocks that I needed!

This was goal number seven on my September list. Linking to Finished or Not FridayPatchwork and Quilts and Scrap Happy.


Wednesday, November 27, 2024

Stars like Spaghetti Is Complete (Quilt of Valor post 4)

Trimmed top
Goal number one on my November list was to trim, bind, label and place a sleeve on the Quilt of Valor (QOV)  that I started in August. Marie of Marie's Custom Quilting, finished quilting it in October; but, it was weeks before I attempted standing long enough to trim it. I chose a star pattern that contained gentle loops and a subtle variegated thread in blues. The quilting provides just the right amount of texture.

Last week, I trimmed it. I'm glad that I had practiced standing with baking the previous week. Still I had to take breaks because my newest knee wasn't up to the task. In the end, I persevered. After a couple restarts, I was even able to machine stitch one side of the binding to the quilt.

Last Friday, my intention was to start clue number one on the new Bonnie Hunter mystery, The Old Village. A pool session followed by a PT session made sitting for the remainder of the day impossible. 

View of the quilting pattern
Fortunately, this project was ready for hand stitching so I stitched the binding. I haven't hand stitched a binding in a long time. I watched football games while I stitched. Next I added the sleeve. Finally it was time for the label. This will be going to a veteran. In Oregon, the QOV coordinator embroiders a special label with the recipient's information. I will also place my label so the quilt pattern as well as other pertinent information will be available.

Label
Alycia (AKA Quiltygirl.com) offered the pattern during a free mystery quilt along last winter. If you want to stitch this top, you can purchase the pattern on her Etsy shop. Proceeds of the pattern support her QOV group. I enjoyed making it. I stitched it in August long after the mystery finished; but, LOVED using scraps from my stash to make the top. I did purchase the backing and binding fabric.

I used 13yards of fabric for the project. To date, I have used 13 yards from my stash. This year, I seem to have purchased as I have used. Using as I've purchased is better than purchasing more than I have used; but, this tact doesn't get me closer to actually pairing down my stash! 

I figure it took me 22 hours to get this project to the finish. I spent $248 in materials and the quilting.  I do have a number of projects waiting to be quilted. Perhaps next year, I'll make a bigger effort to finish some of these. I don't count fabric used until the project is totally finished.

Finished front

This is the view from the front! If you want to read the previous posts, check out the links: Beginning post one, in progress post 2 and it's a top post 3

Linking to Alycia at Finished or Not Friday and Frédérique at Patchwork and Quilts.


Sunday, November 7, 2021

Lone Star with borders. . .It's a Top (post 3)

The first group of geese ready for stitching
Gertie, my inner squirrel, and I brainstormed a bit about designs for a border that would be on the top and bottom of the lone star. I wanted the top to fit on a bed. Hence, the need to add borders for length. 

Gertie, liked my idea of adding flying geese that floated above the star. I started cutting the pieces for the flying geese. Once I had a group cut, I stitched the units together. I used the philosophy of cut a little and sew a little!

I used Bonnie Hunter's method for this step. I cut strips. Next, I used her essential triangle tool to cut triangles out of the strips. I dislike methods that include drawing a line and cutting the waste triangle away. (I did cut a HST at the beginning of the strip and sometimes at the end of the strip so I have some pinwheels in the making. I, however, digress.) After I had sewn a few more geese, I did a little math to ensure I cut enough for variety but not enough for another project!

Auditioning the stripe fabric
Once I had pieced the geese fabrics, I auditioned them next to the lone star. Gertie said the geese needed striped sashing. When I auditioned the geese with the striped fabric, I agreed with her. Gertie responded with much tail flicking and chattering. I used the design wall to layout the geese in a sort of random organized pattern. 

Once I liked the pattern on the design wall, I stitched the blocks together into two long rows. I added the striped fabric to each side of the block. I also added a background strip of fabric to each side of the striped fabric.

After each step, I did lay the in progress border next to the quilt top to see if I liked what I was creating. I, however, failed to take photos past the point of the final
Beginning the row layout of the geese
 geese arrangement on the design wall!

After I had stitched the border to the top, I added another strip of background fabric to each side of the top. I had a finished top! Gertie likes the simplicity and interest that border added to the top. She claims the striped sashing is the key to the success of the border. I like floating the
Finished top
star and the border. I also like the size as it is about 78 inches wide by 98 inches long which is a good size to lay on top of a bed.

Next, I'll piece a back using the leftover red and green fabrics. I hope that there is enough! I plan to bind the quilt in the background fabric. Yesterday, I purchased more of it so that I can! This was goal number two on my October list.

I'm linking to Cynthia and Oh Scrap/Quilting Is More Fun Than House Work

Also, Gertie wanted me to mention the winners of the hanging towels from her post. The random generator selected Debbie, Pat, Kathleen and Nicole as winners. I hand delivered packages to Debbie and Pat. I mailed a package to Kathleen. While I was curious how much it would cost to mail a package overseas, Nicole has planned a trip to the states in a few weeks, so I'll catch up with her when she is in town.

Regarding COVID:

Worldwide: 250M cases; 5.04M deaths
United States: 46.4M cases; 754 deaths
Oregon: 372K cases; 4,562 deaths

In the United States, the Pfizer vaccine is being shipped to all parts of the country so that kids in the five to 11 year old range can be vaccinated. My granddaughters are planning to be vaccinated.


Sunday, August 15, 2021

Lone Star--Out of Time Out (post 2)

Pinning the intersections
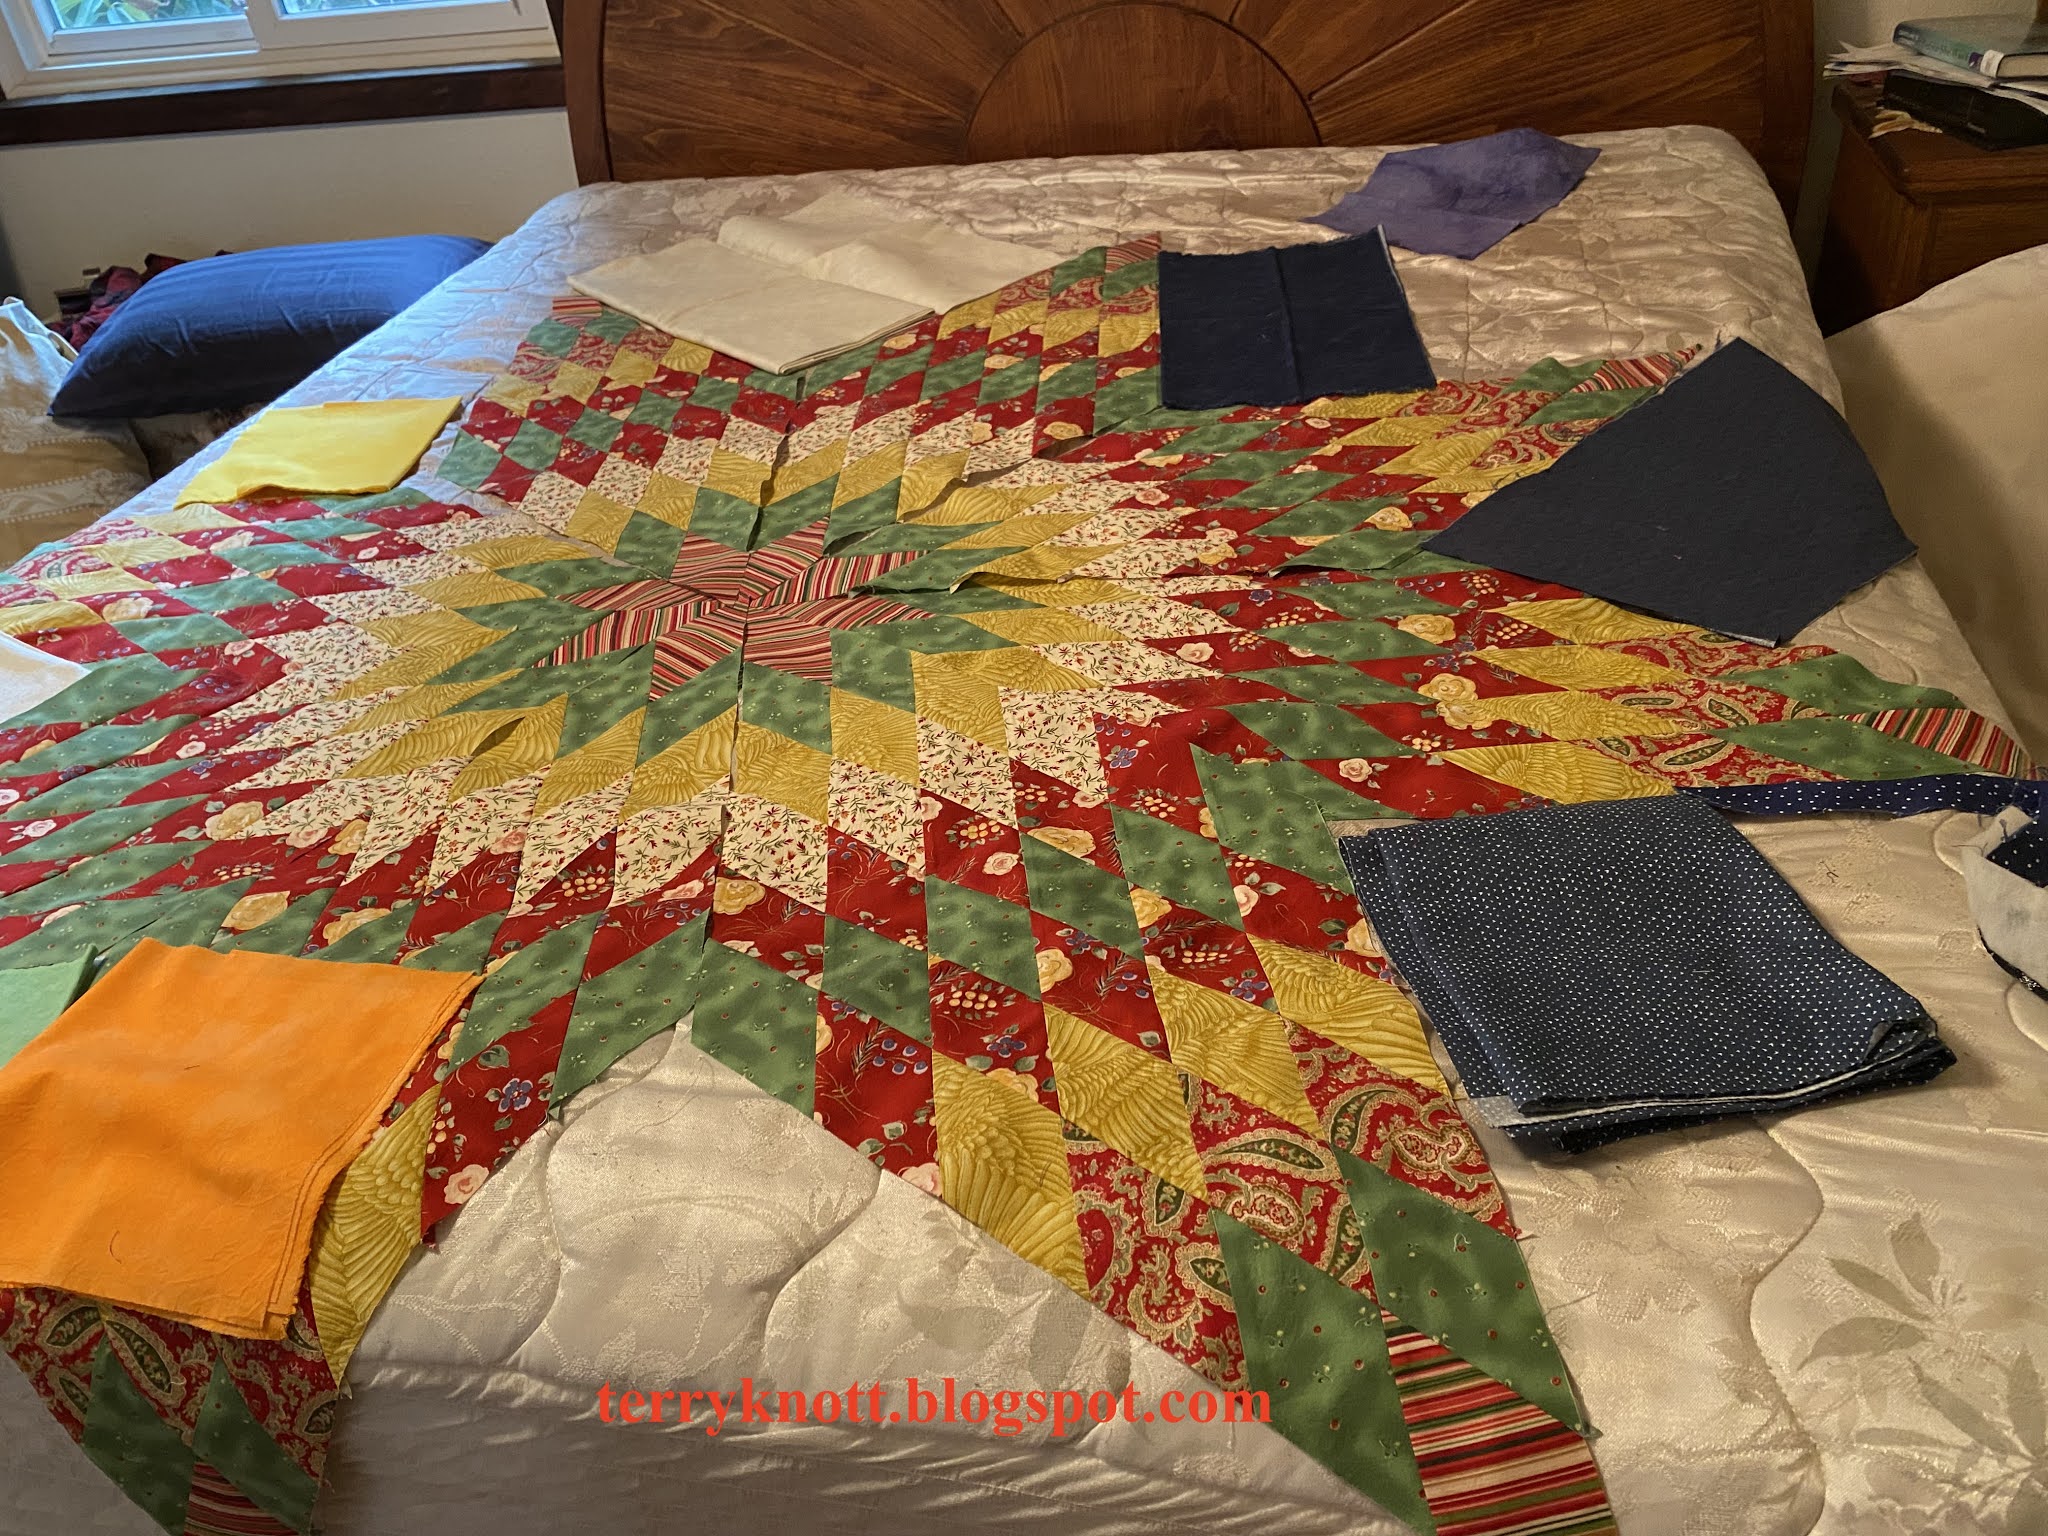
I had planned to begin piecing the Santa tree skirt that I cut out months ago. I wanted to use all of my ironing station to layout the block sections. This Lone Star project, however, was in the way because it was resting on the half of the station. 

I started this Lone Star project in a Saturday Workshop last January. I posted about my progress at the end of April. I could put it away which would mean out of sight, out of mind. Or, I could finish piecing the strips together. I decided to finish piecing the strips.

Why I stopped working on the Lone Star was that I was having difficulty matching the intersections. All the ripping and restitching was painful so I put the project in time out! I figured three months was a long enough break.

Auditioning  a variety of colors and tones
This time, I again placed a tic mark on the quarter inch mark at the seams. I pinned the seams together. Then I basted each intersection. If I needed to readjust the fabric, I had six to ten stitches to remove. When I had basted all of the intersections in a strip, I stitched it. This process, while taking some time, worked better for me. Along the way, I did manage to flip a few pairs and sew the wrong edges together. I did get to rip a bunch of long seams. Sigh. . .

The good news was that I did get myself back on track. It was nice to see the pairs of strips come together to reveal a whole star leg! When I pulled the fabrics from my stash for this project, I planned a cream fabric for the setting squares and triangles. The teacher commented that it would work. I thought cream because I could do some fun pattern with the quilting. Other class participants set their lone stars into bold prints while others used fabrics that read as a solid in purples, grays and blues. Perhaps, cream was boring and perhaps, choosing a fabric with color would make this project feel more modern. 

Half of the design
Since my goal is to use from stash, I looked through what I have on hand. Sometimes, I'll audition a fabric that isn't enough.That fabric will be a color I like which is helpful when I go to shop for the fabric. In my head, I thought a bluish purple or an orange. . .well, neither of those were the "one." I went to the local quilt shop and found a blue that seemed to want to be "the one." I bought it!

Picking the fabric for setting squares and triangles was goal number eight on my July goal list. I reviewed YouTube videos about figuring the math for the triangles and squares as well as setting the triangles and squares into the star legs. I cut the setting triangles; but, I didn't have enough fabric to cut all of the setting squares. I needed about 23 inches to cut each square so I wasn't able to cut two squares out of each width of fabric. I was short two squares of fabric. I'll purchase more fabric next week to finish setting the squares. 

When I laid out the star legs, I discovered that the striped center configuration was not pleasing to my eye. I hadn't considered how not fussy cutting the stripes would alter the look of the project. I rotated the legs until I could see a swirl in the center of the star. The movement, draws my eye to the center of the quilt. That center, by the way, went together perfectly! 
Set in corner

I was curious how the blue would look as the background fabric. I was also curious about how well I could set in those triangles and squares. Sometimes Y seams can be "fiddly!" Regarding the latter, the videos helped with the setting in process. I had no issues with those often dreaded Y seams. It does lie flat although it doesn't look like it from the photo! 

Please leave me a comment to let me know what you think of my background fabric choice. It sure is bold! I love the joyful feeling the blue gives to the project.

I'm linking to Oh Scrap/Quilting Is More Fun Than Housework. Please visit and enjoy all the scrappy projects!

Regarding COVID: 
Worldwide: 207M cases; 4.36M deaths
United States: 36.7M cases; 621K deaths
Oregon: 238K cases; 2,958 deaths

In Oregon, the COVID cases and hospitalizations are rising at such an alarming rate that the governor mandated mask wearing indoors again. The southern portion of the state has exceeded hospital capacity. Elective surgeries are once again being canceled. The national guard is setting up field hospitals to handle the case loads. The cases are more than 90% unvaccinated people. Sixty-two percent of the population has received at least one dose of the vaccine. Fifty-seven percent of the population is fully vaccinated. 

Two more squares to piece
When I was at the library earlier this week, there were two maskless ladies manning a table in the foyer. They were available to answer questions about the vaccine and to share locations where to receive the vaccine. Because I was masked, they assumed I was unvaccinated. When I explained that I had been fully vaccinated since January, I watched them sit straighter in their chairs. When I explained that I worked in a hospital, their eyes widened. 

One asked, why are you wearing a mask and why are you standing six feet away from us? I replied, because people not wearing a mask are either vaccinated or not. I continued, "While the adults in my immediate family are fully vaccinated, my grandchildren are not old enough to be vaccinated. I wouldn't want to inadvertently pass COVID to them nor would I want to inadvertently pass the virus to any of my co-workers." (I watched their eyebrows shoot up toward their hairlines at the conclusion of my comment.)

One perfect center

There are more and more cases of vaccinated people testing positive for COVID. Yes, they are sick; but, thankfully they are generally not sick enough to need hospital care. Some people have been carriers of the virus. In other words, they have been infected with the virus but not shown any symptoms of it. They didn't get sick; but, passed it to members in their household/pod who did get sick and have symptoms. 

The college aged son of a police officer came down with the virus. All in the family were fully vaccinated. Through testing, the police officer dad had the virus; but showed no symptoms. The other two family members never tested positive. 

The fully vaccinated daughter of a quilting friend came down with the delta variant. She works in an outdoor environment and has no idea where she contracted it. Two days later, her dad who has a number of underlying health issues, exhibited symptoms and tested positive for the variant. Two days after her dad's symptoms, her mom exhibited symptoms and tested positive for the variant. All were sick. The dad exhibited the most severe symptoms. So far, her unvaccinated children are not exhibiting COVID symptoms. After two weeks, all are feeling better. Thanks to the vaccine, none in that multi-generational household needed hospital care. 

Wearing a mask, especially on hot days, is uncomfortable; but, it is preferable to not contracting the virus. I'll continue to avoid groups and if I choose to attend an activity, I will be wearing a mask.

Wednesday, April 21, 2021

Lone Star--post one

Fabrics for the Lone Star project
The final Saturday workshop last January was a Lone Star class. I've made two lone star quilts. The first one I made in a class through a local quilt shop around 1990. I might have been taking classes through that shop for about a year. I chose some of the fabrics; but, the staff helped me pick fabrics that would net a pleasing result. It was so long ago that I remember little about the actual process.

One possible layout
A few years ago, I made a mini lone star quilt. I used leftover fabrics for that project. I paper pieced that mini lone star.

Regarding this class, I wasn't interested in starting a new project; but, I had taken all the other classes. I had enjoyed each one so I registered.

A lot of prep work involved when making a Lone Star quilt. Choosing the fabrics is the most daunting one for me. Since I am continuing on my quest for using my stash to reduce the volume of it, I spent time in my stash grouping fabrics together. 

The directions were to choose six fabrics with a couple fabrics to be the WOW as the person teaching the course described. She also said that she would be happy to review fabric choices.

I did prewash my fabrics. The teacher's directions were not to prewash; but, I'm using red on a possible cream background which to me is an invitation for bleeding if I didn't prewash. I'm glad I prewashed. That red print with the gold flowers bled a lot! After the prewash, I heavily starched the fabrics. Crisp fabrics will be easier to work with. Because there are bias edges, the less handling of the fabrics the less opportunity for the fabrics to distort.

These fabrics have been in my stash for more than a decade. Most of of these I purchased at a quilter's garage sale when she was downsizing her stash! I'm glad to be using these fabrics before they have spent another decade waiting for the "right" project!

The chosen layout

I e-mailed the teacher a photo of my fabrics and she suggested that I move the stripe to a different position and to switch it up with the green. Later, she e-mailed me a You Tube link of Lone Star design tips. During the video, the presenter made a mock up of the design to determine the layout. I had done this when I made my mini Lone Star.

I cut a one inch strip of fabric which I then cut pieces on the 45 degree angle. I drew a Lone Star layout and laid the diamond pieces on the chart. I used a hinged mirror to view the layout. Sadly, the striped fabric that I thought would be my "wow" fabric didn't wow me. The cream fabric at the end of the star points would be lost against the cream background. So, I had some playing to do.

Once I determined the layout, I glued the pieces to my mock up chart. I determined the number of strips that I needed to cut. I listed the order that the strips would be sewn. I did manage to slip in that striped fabric in the project.

The mock up chart has proved to be a valuable reference. I listed the number of strips I needed to cut of the fabrics as well as labeled each row. This organization helped me sew my strips in the correct order and to not create an alternate design! I was prepared for my Saturday workshop!

In class, I had a heck of a time matching seam lines. Consequently, I did not progress to the point of setting in the background squares and triangles. I didn't even get one star leg together! I put the project in time out. It has been looking at me as I've quilted the flannel quilts. Perhaps in June, I'll get the project out of time out. Perhaps, I'll do better at matching the seam lines, although I'm not overly optimistic!


Wednesday, January 2, 2019

Star Patch post 1

Fabrics for the project
I was reading a post in Amber's blog last October. I liked the pattern she shared. Her post was about stitching the pattern during a quilt along that she was hosting. The project started October 29 and ended December 22. I decided to join in on the fun. I bought the pattern and registered for the quilt along.

While I waited for the pattern to arrive, I started perusing my overflowing fabric stash. For several years, I have fondled a tray of two inch squares that would work as the colorful squares in the nine patches. I spied a piece of yellow/gold check fabric, which came from Martha's stash, that would work for the center star. I had a bag of cream scraps to use as background. The gold fabric made me think of fall. I thought a fall quilt would be nice to have. Other participants may be making a Christmas quilt.

Miss J sorting the colors
The assignment for the first week was to cut the pieces for the project. Not having to cut 320 two inch colorful squares was awesome! (There is still at least that many squares left in the tray though!) My squares, for the most part are dark rather than bright. I hope that the dark will make a good sparkle behind the star!

Miss J helped me sort the best squares for the project. I watched her decide if a square was blue or black or pink and then followed her logic. She is good at making a decision. She is also good about keeping her decisions consistent!
Project pieces cut and ready for stitching 

Cutting the 240 background two inch squares took some time; but, I used up a bunch of the cream scraps that were crammed in the drawer! I did sort through fat quarters to find one that I could cut a few five inch squares.  I also had to scrounge to find some other cream background fabrics to cut 80 five inch squares and some other parts to the quilt.

I like scrappy quilts; but, I'm not all that confident about my fabric choices. As we stitch through the project, I'll see how well my scrap choices work!
15 nine patches--goal for the second week

For this quilt along, we post to Instagram. I'm not much into social media. I rarely post more than a happy birthday on Facebook; I've tweeted once and I didn't have an Instagram account. I wanted to see the other people's progresses so I opened an Instagram account.  Let's see how that goes!

For the second week, we were tasked with stitching 15 nine patches. Stitching 15 nine patches of 60 was a doable assignment. I stitched slowly, pressed carefully and in not too long a time, the blocks were complete.
Flying geese ready to become star legs

The third, fourth and fifth weeks had the same stitching assignment. Since my project was
organized, I'd spend a few minutes stitching blocks each day until I'd stitched the assignment for that week.

Week six, we were tasked with making the checkerboard for the center of the star and the flying geese blocks that make the star legs. Amber's technique for the geese is to cut a square, draw a diagonal line corner to corner, stitch on the line and trim a quarter inch from the stitching line.

What is nice about this technique is that having four edges helps to keep the orientation of the sewing line truly on the diagonal. I found it helpful to baste the stitching line at the intersection of the nine patches to be sure that I didn't cut off any nine patch corners.
Finished Star Patch top

The downside to her technique is that there are two huge half square triangles remaining. I stitched it, sewed four together and made two large pinwheel blocks which I plan to use on the back of the quilt.

The other change I made was to use the technique of spinning the intersections on the nine patches so the seams alternate being pressed to the dark and to the light. The blocks are flat.

Arranging the leftover chunks
Week seven, I constructed the top. I did need to clip a few seams so I could press away from the nine patch blocks. It wasn't difficult to press. I didn't allow myself much "thought" time in arranging the nine patches or the darker cream plain blocks. I did get to "unsew" a couple of sections because I had stitched the section incorrectly. I will trim the edge after I stabilize it. I like how it turned out so much that I may make another! I rarely make a second of any quilt pattern.

Week eight I constructed the back. I like pieced backs. Piecing the back is a way to use some or most of the left over fabrics. Sometimes, I like the back better than the front!
Pieced back

Amber provided a tutorial for incorporating the extra nine patches that we pieced. I wanted to use the huge HSTs that remained after making the flying geese blocks in week six. She pieced her blocks in one long row; I pieced mine five in one row and four in another. If I had made more nine patches, I would have used them!

I needed to break into my stash for a chunk of fabric so that I could piece a 65" x 65". back. I used about a yard and a half and I also made the sleeve.

Now to layer it, baste it and quilt it! Perhaps, I will get a start on the quilting in this quarter!


Sunday, July 2, 2017

And the Winners Are. . .

....Luann and Barbara L! I've notified each by e-mail.
Stars for Luann and Barbara L
I could get those stars off in the mail as early as tomorrow! Thank you to my 17 followers! (Did you know that some of my followers aren't quilters?) Thank you to those who have subscribed to my blog and to those who follow the posts via e-mail. An extra special thank you to those of you that reply to my posts. Some of you e-mail me directly, some of you text me with a response, some of you call me with a comment and some of you post on "The Quilt Show" forum. Most of you respond directly to the post which is extra nice because other people can read the replies too! I appreciate each and every response--even the ones from my youngest daughter who is so COLD!! :) Your responses have touched my heart. Your responses have encouraged me to try again as well as helped me celebrate a finish. Thank you so much for taking time to respond!

As for next year, I'll continue to post entries twice a week. I plan to sprinkle a little about the grands throughout the year. I appreciate that you like reading about my process. Finally, I do plan to FINISH more projects. We will celebrate those finishes!!

Continue stitching pebbles in the background of the chicken blocks!
Today, my plan is to:
1.  Pebble a bit on the background of a chicken. It is going to be close if I finish and have any thread left! I do have a thread that will work well for the border. Because the pebbles are such a dense fill, to slip in this other thread--even though it is quite close to the shade of the color I had been using--well, it would be obvious that I had run out of thread! Time will tell if I have enough thread or not! If I don't have enough I'll be ordering another mini cone from Superior!

HH Hall Building Fabrics
2. Get going on the HH Hall building project. Today really is the day to start cutting and placing the fabrics. I ought to have more confidence than I do. Perhaps, I'm tentative because the thought of my piece matching up to the person on either side of me is SCARRY!!! I'll let you know how it goes!

Friday, June 2, 2017

Retreat Stars--Finish #1 for 2nd Quarter 2017 FAL

Fabrics cut and ready for pressing!
I was planning to attend our guild's fall retreat in September 2017 and I even signed up to go; but, then I realized that the retreat was the same weekend as when our alma mater college football team had a home game. I knew then I wouldn't be going to retreat; but, earlier, I had said that I would make a little something for each retreater. I decided I would make these folded stars

Even though, I haven't been to a retreat in about three years. I remember how much fun and inspiring the event was. I made new friends, learned alternate techniques and giggled until my sides ached. I like to support an event that provides so much fellow fellowship. Following through on my commitment is important to me too. I'll share the story about that in another blog.

The stars folded and ready for the hanger!
Making 45 folded stars was number 10 on my 2nd quarter goals for FAL. You can see my list here.  I've been concentrating on that darn chicken project for weeks now; but, when June 1 came and went, I realized I had finished NOTHING for this quarter yet! I decided that I'd better get a project finished before June was gone too!!!!

The quote printed on a tag.


I have been pressing and folding fabrics since the beginning of the quarter so this has been an ongoing project. I know that it is good for me to take a break from working on that chicken!!!! Thursday, I finished folding the final star. (I realized that my math is poor. . .I ended up with 49 stars!) I like the variety and these fabrics are pieces that have been leftovers from previous projects or a couple fat quarters that have been in my stash for more years than I want to admit! I needed to stop petting the fabrics and USE them in a project or recycle them!

Black and gold trim ready for gluing.
The theme for the retreat is "Where The Wild Things Are." I asked the retreat chair if she had a favorite quote or two from the book because perhaps that would make a nice tie in to the theme. She sent me a list. I chose, "Let the rumpus start." She also told me that because of the space at the retreat, just 40 retreaters would be attending.

Of course, I'm thinking in my head that I'll have a few leftover to use as little gifts or package tags for Christmas next year!

But, I digress!!! Back to the process. I printed the quote on a return address label, mounted the label on card stock and punched a hole in the card stock. Next, I glued the hanger which was a from a roll of trim that I purchased years ago. On some of the stars, I used some different ribbons; but, I liked the black and gold trim too! I inserted the quote on the trim and I had a finished star!

I stacked up the stars into piles of five and took a photo of all the twinkling stars.  I hope that these are well received at retreat. The recipient could also hang the star in their studio to remind them of the fun that they had.
Finished Stars


I think the quote, "Let the rumpus start!" fits me as I work in my studio. Goodness, I create some crazy messes and have some wild times before I arrive at the finish point!

Oh, I used six and a quarter yards of "bits" from my stash which brings the total yardage I've used from my stash to 27! My goal is to use 50 yards from my stash in 2017.

By the way, these stars are fun to make. If you decide to make a few, realize that that you probably won't be able to stop at a few!!!!


Sunday, December 18, 2016

A Bit of a Detour

J learning how to fold a strip in half.
There was a folded star tutorial on "The Quilt Show" a bit ago. Those folded stars looked interesting and would use some of my smaller scrap stash. So I made one.

These are addictive. I couldn't stop at one. Although, it took me quite awhile to make that first one! I think these would make a good give away at a retreat. They would be a good give away to cheer someone or thank someone too. They are small enough that they could be tucked into a card.

So far I've made 15 and used about 2 yards of scraps! Each one takes a 12" x 3 1/2" strip of fabric. The tutorial says to use a 3 1/4" strip; but, I save 3 1/2" strips so that was what I used. It takes four strips of fabric. I suppose that you could repeat two of the strips; but, I liked the scrappy nature of four different strips.


K's favorite step of the process. . .spraying the Best Press!
When I was folding the strips, the oldest granddaughter was really interested in making one. So I walked her through the process. She did some strip pressing and is just about at the point where she could use the iron on her own. . .except that she sometimes forgets where her left hand is. I wouldn't want her to burn herself!

After we put her star together, her sister decided she needed to make one too. So she took a stint at the ironing station with her Miss K supervising each step!


Some of the stars. . . Look out. Making these is like eating candy. You can't stop at one!


If you want to make one, or two, or more, check the link for a tutorial. It was fun to take a little detour from my quilting process. Next time, I'll share my progress on that project.

Wednesday, November 23, 2016

Thankful

With Thanksgiving tomorrow, hubby and I will be in the kitchen cooking dinner for the family. This is the time of year that I reflect on being thankful.

Dad with his 80 star quilt
 First, I'm thankful to report that my dad whose doctors told him he had one to six months to live as he had a terminal lung disease in February 2015, has beat that timeline. Although his health continues to fail, his brain is still sharp and we continue to visit each evening about what happened in each of our days!


Daughter "A" and me at a fall football game


The "grands" "J" and "K" with Papa 
Second, as I've written, I had two arthroscopic knee surgeries to repair meniscus tears. The first was in December on my right knee and the second was in April on the left knee. Unfortunately, I had too much arthritis under my knee caps for the surgery to be successful. Yesterday, I had my third gel injection in each knee. I hope that the injections will provide enough space under the knee cap so that I can extend my leg without my knee catching. I hope that I will be able to return to my daily two mile morning walks which I have greatly missed! I am thankful that I was a candidate for the gel therapy and I am thankful that physical therapy has helped me regain some function. I am hopeful that I will be able to kneel again. I am a candidate for knee replacement; but, I hope to delay those surgeries for as long as possible!

Third, I'm thankful for my family. My husband has supported me through the knee challenges and continues to support my quilting habit. Our daughters are two terrific women. Getting to spend time with them is so precious to us both. 

"N" and Dad at a London Market
Our oldest daughter and her husband live about half an hour from us. They are extra special because they are the parents of the two granddaughters who play with us on Mondays and Wednesdays. I often blog about their antics and how I'm doing my best to inflict them with the quilting bug!

Our youngest daughter currently lives in London, England. We visited her there last summer and I blogged about our trip. I'm planning to visit her next year. . .not sure when; but, although we FaceTime each other at least once a week, I really appreciate those in the flesh visits which don't happen but a couple times a year.

Finally, I'm thankful for my quilting friends. Thanks for reading my blog. A special thank you to all of you who leave a comment! Thank you to those I get together with to stitch or who offer suggestions about a project or who encourage me to try something new or different. 

So as we dine tomorrow with family and friends, let us all take a moment to at least be thankful for getting together to share a meal and great conversation!

Monday, July 13, 2015

Special Request

March 30, 2015 my dad asked me to make him a quilt for his 80th birthday which was April 9. My dad is a two time survivor of kidney and bladder cancer. He has COPD and a heart ailment. His request HAD to be honored. So, I walked into the studio to figure out some fabric and my eye lit on those sawtooth stars.

My dad's favorite color is blue so those were definitely in. I was doing the happy dance because I had a bunch already sewn from retreat. Because I was making it, I decided it had to have my favorite color which is red. 


Red, white and blue. . .Hey, I won some BOM blocks at guild the previous year that were red, white and blue. This is a good combination! Then, I had this thought. . .why not have 80 stars for 80 years? Course, that means that I needed to make twice as many more!

This was a time sensitive quilt and quick, I am definitely NOT! I did work steadily on the piecing for about a month. 


These were the blocks that I had won.
I made about 13 more. They were 12 inch blocks so the sawtooth stars made the perfect addition to the design.


 Adding a whole row of stars to the top of the quilt was a great to add a dozen stars. But, I was four short. . .How was I going to get to 80? 


Take the six inch center out of those nine patch blocks and insert a sawtooth star was the solution!!!


Dad asked to have a few more stars in the quilt. So I pieced a few into the back.  During the whole process, I would chat with him and tell him how I was progressing. He really had no idea how long it takes to make a quilt!!


 This is the label.


 I quilted it on a friend's longarm. I am so thankful that she let me use her machine as I would still be quilting it on my domestic!! As it was, it took me a couple days. . .with her help!! The end of May, I gave it to him in a coordinating pillow case. He loved it! 


And it FIT!!! -- There's plenty of room for his white dog to snuggle too!