Sunday, July 30, 2017

Pebbles. . .COMPLETE!!!!

Pebbled background. . .COMPLETE!

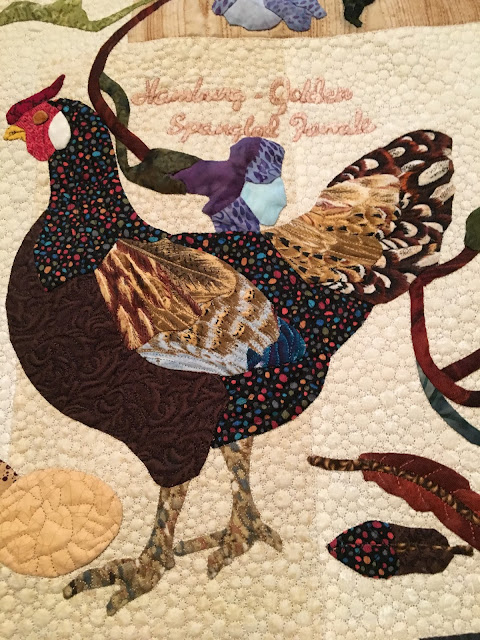
Approximately 60 hours later, I did it! I've quilted the background of this chicken wallhanging with pebbles. Yes, it felt like a forever project! I'm glad I listened to the quilt telling me that it wanted all those pebbles because those pebbles do put the emphasis on the chickens!

Fifth chicken quilted
I also have completed quilting all the chicken bodies! In the chicken above, I used a metallic thread in the darker part of the print on her leg and thigh. I like how I was able to mimic the line from her neck to her tail.
Sixth and final chicken quilted
I used a light blue thread on the above chickens wing and generally used the print of the fabric to guide my quilting. I especially liked how the quilting on the brown fabric worked. Time to quilt all these chicken bodies and the center rooster--Approximately 18!

I was asked in the last chicken post if I had any tips of working with metallic thread. I'm going to share what works for me here:
--The brand seems to matter. Superior metallic, Floriani metallic and Sulky Gold metallic on a stacked spool cause me fewer challenges than Fil-Tec Glisten metallic, Sulky sliver or other Sulky metallic threads. (I'll explain about a stacked spool in a couple lines!) The more rough or wiry the thread feels to the touch, the more temperamental it is for me.
--I use a 90 top stitch needle. If the thread wants to shred, I will try an 80 or 90 metallic needle. I also start with a new needle.
--I pay attention to how the thread is feeding. If it is a cross wound spool, I use the horizontal thread holder; if it is a stacked spool, I use the vertical thread holder. Click the link to learn more about cross wound and stacked threads. The less the thread twists, the happier you will be! I've even used a thread stand which allows the metallic thread to relax.
--I stitch slowly and watch to see if the thread is trying to shred. If it is, I stitch shorter passes.
--I may lower the top tension and I stitch a bit on my practice sample to ensure I am going to have success.
If you use metallic threads, what tip would you share?

French knots to give texture to the grapes
What is left with this project? Plenty!  
--stitching veins in a few leaves
--stitching the brown vine where the leaves attach
--the flowers need quilting
--a few buds and irregular leaves need quilting
--grapes need texture
--the border needs quilting

I tried my hand at stitching French knots on the grapes. I like the texture the hand stitching provides. I like using a perle cotton thread that was gifted to me years ago. I just about have figured out how to hide my knot and to travel so my stitching shows little on the back of the project.

Then it will be on to applying the facing and the sleeve.
More to come; but, progress feels TERRIFIC!!!

Wednesday, July 26, 2017

Little Helpers and Pebbles


J watching the needle move. She, of course, asked to go
faster. . .so we did!!!
The neck/back issue is improving. Ugh. . .it has been painful. I haven't slept well. I've used my ice bag LOADS! BUT, the pain is a bit less and so I'm forging ahead with the chicken quilting. I asked for help and of course, the grands complied! It has been way too long for me since they wanted to do any stitching. So when J asked to sew, I was ecstatic!

My goal is to quilt a couple of hours in a day. Some days, I can do an extra hour and some days, I only last about half an hour! Ahh. . .the trials and tribulations of an injured body rebelling!!


K focused on the needle to ensure we were making
"round" pebbles!
When it was K's turn to stitch, she asked questions about how the thread "tied." Good question for a five year old! My answer seemed to satisfy her curiosity! As we formed pebble after pebble, she said, "This is a lot of pebbles! You are getting good at making them!" Ahh, her comment made me smile! I asked her if she wanted to go faster and she said, she liked the speed we were going!

From the photo, you can see that my reorganization is in process. I've sorted some like items and have been taking a little time to sort a pile or at least reduce the height of it!

Threads used to quilt one chicken
Before I tackled the HH Hall Building project, I wrote about choosing a thread that was the same value of the spot I wanted to quilt if I didn't have the exact color of the thread. In the photo, you can see that the spots that I'm quilting are gray; however, I didn't have the "right" shade of gray to blend so, I used a thread that was comparable in value. I now know that I can get away with quilting a blue, green and a cream thread on a gray fabric with positive results!

Adding feather texture following the
print in the fabric
I also wanted to share just how much texture the quilting does provide on those chicken bodies. In the photo above I've just quilted one part of the texture. It amazed me at how much definition a few stitches gave to that part of the bird!
Almost finished chicken
I did use the ruler to quilt the straight lines and I did use a blue water soluble pen to mark the curve lines for the breast. I like how the metallic silver thread on the feet gave this chicken a little "bling!"

Metallic thread outlines the metallic line that was printed in the fabric
Speaking of metallic thread, I used some gold and stitched around the fabric print to quilt part of this chicken.
Sixth chicken quilted
I like the overall result! At this point, I have two more backgrounds to quilt and about one and a half chickens to quilt. Then it will be on to quilting the border, adding seeds to the grapes, finishing any flowers, leaves, vines that I hadn't quilted. So. . .I'm still not finished; but, I am making progress!!!

Sunday, July 23, 2017

Crib Quilt--1st finish for 3rd quarter Finish A Long(FAL) 2017

Goal #11 on 3rd quarter FAL list
This project was goal #11 on my Finish A Long list for this quarter. The reason I finished it was because the grands spent a Thursday from 12:30PM to Sunday at 11AM retreat with Papa and me! Their mom and their dad were celebrating their 10th wedding anniversary and asked if the grands could come for an extended weekend. It was a win for all involved!

This little kit was on the free table at the last guild meeting. JoJo thought it would be a fun project for the grands so she snagged it for me.

J was up most mornings at 5AM. K was up most mornings by 6AM. It is good that I am an early riser! What we did in the morning was sew! Thursday evening, I shared the crib project with them. They thought it was a good idea so when they were up early on Friday, we cut out the squares and pieced the top before breakfast! They chose the location for each square and I didn't change their design.

Finished top with J
The kit came with seven different  Minky fabrics that were roughly 14 inch squares.  Thirty squares that finished to 6 inches were needed to make the project. That meant the kit was short fabric for two 6 1/2 inch squares! (Perhaps, this was the reason the kit was on the free table!) The tag said that there were eight fabrics so that fabric probably has a story to tell somewhere!

We pieced one square; but, there wasn't enough to piece two squares! At the last guild meeting, someone left a cat embroidery on the free table. J saw it pinned to the wall and  thought it would be a good choice. So we auditioned the cat embroidery. The cat was the "purrrfect" addition!


J learning pin basting
I wasn't able to take the time to toss the squares into the dryer to see if the Minky fabric would "shed" less.  When the grands are interested in stitching, I wanted to be stitching!

I didn't find that there was too much shedding though. Stitching the Minky was challenging. In one direction, the Minky doesn't stretch which is great. The other direction, however, it stretches a lot! We had a hard time matching our seams and in the end we decided the baby wouldn't care!

After breakfast, we looked through my stash for a backing fabric. K was surprised in all my fabrics, there wasn't one that would do! K said we needed yellow. So we took a trip to Fabric Depot. We found the perfect piece of flannel! Yes, she was correct that yellow was the perfect choice! We bought the yard that the directions stated.
We came home and washed it. We also bought a thin cotton batting (Quilter's Dream Select).
K could almost close the pins.
Saturday morning, J and I pieced the back. The flannel shrunk enough that we wouldn't have enough left for the binding too.  Luckily, I had a piece of flannel in my stash left from when their mama was a baby. J thought that the bunny motif would be just right! I like pieced backs so in a way, I was glad we didn't have enough fabric!

Then, we stretched the back on the kitchen table. J's eyes were so big when I used blue tape to hold it in place along with plastic "Ds." The Ds (J's word) are what one would use to keep an outdoor tablecloth from blowing off the table. J's eyes were even bigger when we started pinning the layers. K got in on the pinning. She could almost close the pins herself.

J picked the bunnies to piece the back

Saturday during their quiet time, I stitched in the ditch so the piece was ready for quilting. It was more challenging to feed the fabric with free motion quilting; but, it was not as difficult as I had anticipated. I attached the walking foot and used a longer stitch length--4--on the Bernina. I made a few passes to test the process.

In the afternoon, they took turns sitting in my lap steering to quilt the piece. Sorry, taking photos while they stitched didn't cross my mind! We used yellow cotton thread for most of the quilting. Quilting this way was fun and it was easy. I like the texture they made!

Custom fill job as per the grands request


The grands got to the last row and decided that they had stitched enough. K said that I could finish; BUT, could I please not use yellow thread around the cat? I used white and stitched different background fills. J liked that the cat "puffed" now!"


Close up of the grands' quilting


Sunday morning, we cut the binding, pieced it and stitched it. . .again before breakfast. Our corners could have been better. . .but, they were happy with the project and I am too. For sitting on my lap as we stitched, the binding turned out well! It is the first time that I have sewn with Minky and flannel! K likes the designing best and J likes the quilting best.

Now we just need a baby to gift it to!
K showing off the finished crib quilt (30"x 36")


Wednesday, July 19, 2017

Quilting Lines Among the Pebbles

Pebbles filling the background
I'm progressing with the pebbles. I've quilted some lines in the bodies of the chickens to take a break from going around and around. I had a question about why I decided to use silk thread to quilt the majority of this piece. For this project, I wanted the emphasis to be on the appliqué. To me, this means that the thread choices in the quilting will be subtle and the quilting motifs will provide texture in such a manner that is also subtle. Silk thread is great for providing texture. It is light weight and the little bit of sheen that reflects from the light heightens the effect of the quilting texture.

Silk thread is expensive. I have spent about $27 just quilting these pebbles! Wonderfil 100 weight polyester called InvisaFil and Superior 100 weight polyester called MicroQuilter would probably work too although, I haven't used those threads that way. . .yet!

Threads that blend, quilting that provides texture
Most of the time for this project, I've chosen a thread color that blends with the fabric. Consequently, the quilting isn't seen right away. If I don't have a thread that is close to the background color, I will use one that has a similar value. Sometimes, if I don't have a thread that seems to work at all, I'll audition a metallic thread.
Third chicken quilted!


Another question I've had, is how do I decide how to quilt a section. I spend a lot of time thinking about that!! Sometimes, I use the curve of the shape to put in a stitching line. (This was how I quilted most of this chicken's body!) Sometimes, I use the design in the fabric to stitch. (This was how I quilted the feet!) Sometimes, I want to convey a feeling of a shape. In this case, I wanted these chickens to have definite feathers. Sometimes, I test my thought of a shape by drawing chalk lines and then stepping back to see if what I envisioned in my head is going to work. See the lines in the photo of the close up of the third chicken?

Notice in the photo above, I quilted a different line than what I had envisioned and chalked in the  close up photo. Sometimes, what I envision in my head doesn't work on the project! Did you see the metallic thread that I used to give some of the feathers around his head a little bling? I did make some progress with quilting the background too! Below is a close up of the head.
Metallic thread usage
I did quilt another chicken. I neglected to snap a "before" photo. My favorite parts of this block are the comb, the space under the beak and the feet. I've used a thread with similar value for the comb to create that textured effect. I used the fabric design to quilt the space below the beak and the feet.
Fourth chicken quilted
I used a metallic thread to set off the feet. I now have four chickens left to quilt.  Hey. . .I'm half way! Of course, there is that pebbling to be done too!
Metallic thread use on the feet.
The stitch work is slow going as I'm still working through that darn painful neck and back issue!


Sunday, July 16, 2017

Quilting the HH Hall Building Project

Threads used during the machine appliqué process
I've been living and breathing this building project for sometime now.  I'm supposed to deliver it to the person applying the binding by August 1. In my last post, I wondered how long it would take me to stitch down all those pieces.


Zig zag around the fused pieces

It took about five hours for me to stitch around all the fused pieces. I thought that it would take more time than that; but, then again, it is a smallish piece! I'm sharing a photo of most of the threads I used. Isn't it amazing how many different colors I used?
Pin basted and ready to quilt

Now, it is on to the quilting stage. I used those threads to quilt this piece. Once those threads are out of their storage area, I keep them out until I've finished the project. I'll also use some silk threads. The batting is White and Warm. One of the group quilted her piece in this and offered the rest of us pieces so that we all used the same batting. It wasn't a "rule" to use the same batting; but, I decided that I would take her up on her offer!


As is my practice, I begin the quilting by stabilizing the piece which means I stitched around all the shapes. This does take some time; but, this step helps keep the fullness--if there is some--evenly distributed.
Stitched around the shapes and then added a few more lines
Once I've stitched around all the shapes, I start to play! The chalk line you see below is the finished edge of the piece. The quilting took me about five hours. Remember, I quilt 15-20 minutes and then take a little break and then repeat!

To achieve the shading that you see around the sidewalk, I used a marker. Gosh, I've been using those quite a bit!!!
Evidence of a little thread play


Photo of my section
 It isn't stitched quilted as densely as I would have quilted it had it been my own project. Since each piece is supposed to match the next piece, others may have decided just what I did! Thanks Lynn C. for letting me know that I was on the right track! I have seen one other project in the fused phase.

I have taken this piece to the person who will bind it along with all the others. I have seen a couple other projects. Knowing what I know now, I would have quilted it more.

It will, however, be great to see the building "assembled" with all eight pieces in October at the Featured Artist Show. I'll share photos at the end of the show. I'm pleased with this almost finish!
Reading for the facing and the sleeve
Now it is back to that "pesky" chicken project!

Wednesday, July 12, 2017

HH Hall Building . . .FUSED!

Funny. . .well, actually, it wasn't funny. . .but, now that I'm this far it is funny. . .
Incorrectly placed windows and gutter

Guess, I'd better explain!

Working on the HH Hall Building project, the first piece of fabric that I cut wasn't quite right for the alignment of the windows and gutter. I didn't realize this until I tried to attach this piece to the rest of the building! Of course, this was it on the fabric so I couldn't recut!

I took it apart and started again. I thought it was spot on. The following day, I realized it was still wrong so I took it apart and started for the third time. Next, I removed the window from the other side of the building and repositioned it. THEN, it was correctly placed.

Building progress

It was still correctly placed the following morning when I checked too! While I was reworking that section, I wasn't laughing though!

By the end of that day, I had placed the landscaping, curb/street and tree fabrics. The fabric for those large trees was cut from the same piece of batik! I couldn't believe how the trees brought the piece to life!


Fused oversized section next to copy
The follow morning, I worked on the roof. Gosh, there were some tiny pieces in that section! In case you were wondering, the decision was made to remove the street light and community signage so you aren't seeing those parts in my piece!!

Also, my piece is at least two inches bigger than the copy. Making it bigger was one of the "rules." It is a wise rule so that there will be some wiggle room when the pieces are readied for the facing and sleeve!

I'm pleased with how closely my work resembles the photo copy. I'm also pleased that the fabric colors resemble the colors in the photo. I'll add the color photo for you to compare. (Another rule was to match the colors in the photo as closely as possible.)
Color photo

Most of all, I'm RELIEVED that my piece accurately matches the photo copy!

Next up is stitching all those pieces. I'm planning to use cotton thread that matches the fabric and I'll be using a tiny zig zag. Hm. . m. . m. . any guesses on how many hours this step will take??


Sunday, July 9, 2017

Slow Going. . .HH Hall Building Project

Defining the design lines on the photo copy
For this project, I was given a photo copy of my piece of the project and a color photo. The rules were to:
--extend the design so that the raw piece would be two inches larger than the photo copy pattern. This "extra" would be wiggle room for quilting and for trimming the quilt for the facing later.
--use fabrics that replicated the colors in the photograph.
--finish the piece to the facing/sleeve stage and deliver it to the person stitching the facing by August 1. We are also to return the photo copy pattern.

I started with tracing the copy of the photograph. I used a fine tip sharpie and marked the highlights. This marking makes it easier to see the design lines when the transfer material is on top of the copy.

Painter's drop cloth trial
Second, I needed to mark my transfer material. I tried to use a cheap painter's drop cloth as my transfer material. My thought was that I would be able to easily see the design as I built the pieces. It didn't work because there were some tiny fold lines that I wasn't able to smooth out. These folds could have contributed to making the piece larger than it should have been so that was why I didn't use this material. It was a good try!

Design transferred to tissue paper
I have another project that is waiting for my attention that uses this same technique. For that one, I purchased a piece of plastic film that was expensive for something I would use one time.

This time, I didn't want to purchase plastic film.  I had a roll of tissue paper that came from the guild free table a long time ago. It was probably the last of what was used in a physician's office. I used a window and traced the tissue paper over the photo copy. I used an extra fine tip sharpie for this step!

Following the colors in the photograph
The unused portion of this tissue paper became the pattern material for transferring the shapes. Of course, at first, I thought I could skip this step and just draw directly on the stabilizer. I used Soft Fuse as the stabilizer. Guess what? That didn't work because now the fusible was on the wrong side of my fabric and all my pieces were going the wrong way.

Each time I added a section, I carefully checked the color with the color photo I was given as well as used the tracing paper to make sure I was placing the piece in the correct position.


Fusible is on the incorrect side of the fabric!
Yes, the transfer of the design took some time. Yes, sometimes I thought that I had copied the design on the wrong side and I was incorrect. These little pieces will be used when the grands come to create cards and "stuff."


Top floor
Slowly the design grew. This piece will finish to about 7 inches by 39 inches. It surprised me how much time it took to prep, trim and place each piece.

I thought it would be easiest to work from the top down--ah. . .not so much!

Brick portion of the building
Next I tried working on the bigger part--the bricks and the windows. That was okay.

I used the same fabric in all but the darkest window in the above photos. I used the markers to shade all the window fabrics so that the value was closer to what was in the photograph. The hard part was waiting overnight for the marker ink to dry!

Adding a 'curb' line

I found it easier to work from the bottom up! I used a marker to place the "curb" line.  I'll share my progress once I figure out the trees. It took me about a week to get to this point! Isn't that crazy?? It takes a lot of time to cut those little pieces and fidget them into the correct spot!


Wednesday, July 5, 2017

3rd Quarter Finish Along Goals 2017

First the good news. . .I completed one goal from last quarter and that was the folded star project. It is time to get serious about what I think I can accomplish in the third quarter of the year!

1. Finish these chickens. Will this be the quarter?
1. Finish the chickens! I KNOW!!!! This has been an ongoing project for over 10 and a half years! I have posted about it often and I am deep into the quilting stage so perhaps THIS is the quarter I will call it FINISHED!!!!!


2. Mt. Hood project fabrics
2.-4. Are three projects in JoJo's passport--Oregon, Canada and England. Visit her at Through My Hands to learn more. I did finish the Hawaii project in the first quarter!

2. This is the Oregon project. I see Mt. Hood out my window on a clear day and love the view. Using her pattern, my project will include a lake in the view which is fine! There will be several firsts achieved when I finish this project. I've been working on this project and have had fun; but, I didn't finish it last quarter. I will finish it this quarter! 

Nope, I haven't posted about it. . .well, I've shared some photos; but, haven't shared the whole project yet! For now, I'll just tell you the reveal is coming!


3. Canada hot pad fabrics


3. Canada hot pad project. I'll get to play with hexagons on this project and it is small. It contains some tiny details!


4. Tea room fabrics


4. London tea room project. There is a lot of appliqué in this project and the opportunity to embroider those words with my machine instead of appliquéing them!
Turn a section of this photo into a quilt
Fabrics for the HH Hall project


5. Work on the group quilt HH Hall project.  I have the photo and I posted about starting a couple weeks ago. It is due August first because someone else will be putting on the facing and the sleeve so that all the pieces hang well together. The actual finish will happen in October when the eight individual pieces hang together at the featured artist show. I'm leaving it on my list for now. We were given a part of this photograph to recreate into a quilted section.  Finished photos will be taken when it is hung at the show!!! Being accurate in the size will be extremely important! I haven't done this before so I'll be expanding my box which is goal number 2 for the year!!!!
6. Figure out what to do with these parts!


6. Figure out what to do with those hexagons made using different techniques and get them into a finished wallhanging!
7. Finish this top--perhaps a little
"Jean Wells" technique for added interest?


7. Finish that project that I appliquéd some leftover pieces to a sparkly background. I think I want to go a little "Jean Wells" to create an interesting background on part of that sparkly black!
8. Finish this BOM Mystery from last year


8. Finish this BOM mystery quilt I worked on last month with an online group. I have the last clue to piece.
9. Mend one shirt and shorten the hem in
two pairs of pants


9. Shorten the hem on two pairs of jeans and shorten the sleeves on a white t-shirt. I have had these jeans and the shirt two and a half years. Can you tell that I dislike mending and alterations? 

I'm at the point though where I could use the jeans. The shirt, I loved.  I wore it twice and left it in the bathroom drying on the towel bar where our sweet Bailey as a baby promptly proceeded to "decorate" it her way with a few teeth marks. Perhaps, owning up to it here will get me to actually do the alterations!!
10. Make two pillow cases


10. Stitch two pillow cases that coordinate with the chicken wall hanging.


11. Crib quilt


11. Make this little crib quilt. At our June guild meeting this little project was on the free table. JoJo nabbed it for me thinking that it would be a good project for the grands. I agree. I haven't stitched with minky before so I don't know how that will go and of course, I don't have fabric for the back. . . .well, it will all come together in due time!


I2.  Embroidered butterfly
12. Create a butterfly for someone who needs to know people are thinking of her as she enters into another round of fighting breast cancer. I'm thinking that I'll embroider one as I haven't used that part of my machine in months. Although, I haven't thought through the whole project yet so it might end up being one created in fabric instead! I'm not even sure if I'll keep these colors or if I'll go brighter.

So, there you have it. . .last quarter, I listed 11 projects and finished one. This quarter, I'm listing 12 projects. I plan to have more success in the finishing department than last quarter. Don't get me wrong, I'm still allowing myself to start new projects too!