Showing posts with label Painting. Show all posts

Sunday, June 27, 2021

Miss K's Mermaid Is Finished--Post 6

Applying the glue to the binding
On our next sew day which was early March 2020, Miss K finished her binding. She liked cutting the 45 degree angle on the binding tails. 

I showed her how to glue her binding in place instead of using pins. She was skeptical about the glue; but, she gave the process a try. It worked well for her. She liked using the iron to make "the glue melt." I liked her description of the process. We spent about an hour finishing the binding.

Finally, we were at the stage to add beads for the fish eyes and to add the hair to the mermaid. I've wanted to see the mermaid have hair since Miss K first described her vision of the mermaid's hair. As we have worked on the project, the conversation about the mermaid's hair has evolved. Miss K has auditioned "hair" so that I would understand what the hair should resemble!

We had planned to spend Spring vacation working on her project. COVID restrictions sure curtailed progress on that plan! We didn't get together to discuss the project until the beginning of April 2021. Miss K auditioned beads for the fish eyes. She decided that she would rather stitch the eyes with thread--she was concerned with how the back would look. She did pick some beads to put in
Painting the fish
the hair.

When we finally got together to work on her project last week, she decided that she wanted to do something to make the fish more visible. She practiced making marks of various colors on a scrap of the background fabric. She used tsukineko inks and a brush applicator to apply the ink to the quilt surface. I purchased the inks and applicator brushes when I attended a class at the International Quilt Festival in Houston, Texas a lot of years ago. I haven't used the paints since.

Detail of fish
Miss K liked the effect of the paint. She was surprised how the color changed depending on the part of the fabric she was painting. She marveled that she could see the fish from a distance after painting them. She used a micron pen to make the dot for the eye. She also used the pen for line work to add a little detail to the tails. She liked that the inks left the hand of the fabric intact and that there was no stitching or knots on the back of her piece. 

Mermaid with yarn hair
Next, she added the hair to her mermaid. Originally, we had cut thin strips of fabric to make dreadlocks. From the free table at guild in 2019, I picked up a package of doll hair. It was curly yellow yarn. Miss K laid out pieces of the yarn in a pleasing layout to her eye. She liked the yarn better than the fabric strips. She wanted the yarn or hair to be "pouffy." 
Sewing the sleeve

With my help, she free motioned stitched/tacked the hair in place. To achieve the pouffy look, she left sections of the yarn unstitched. She also stitched the yarn with a metallic thread so that it would look like there was a net of sparkle in the hair. She had to stop and readjust the yarn as she adhered it to the quilt top. She loved the effect the hair added to her piece!

 She made an effort to not entirely cover up the fish on the top left. As she worked, she developed a story about the fish and the mermaid! It was fun to listen to her process. Throughout this process, it was challenging for me to figure out how she could achieve the look that was in her head!! 

I showed her how to position and hand stitch the hanging sleeve. She was NOT a fan of hand stitching. I didn't have a thimble that was small enough to fit her finger nor did I have any finger savers. She poked herself which hurt! She was NOT a fan of stitching the corners of the binding closed either. 
Using pliers to pull the thread

I thought that she would be excited because I thought she was finished. Nope, she wasn't finished. She said the mermaid needed a necklace, a nose and there was too much of a white space in the middle of the mermaid's face. Then she decided that the eyes needed paint to be more "real." She let me know her thoughts had "matured" since she drew her picture when she was seven. She had her ninth birthday last month!

She auditioned ribbon, beads and paint for the necklace. She wasn't excited about the options available. I suggested she audition a piece of red pearl cotton. She liked the color; but, she explained to me that it wasn't thick enough to be a necklace for a mermaid. We made a sample of a strand with colonial knots couched on the strand. She liked the texture. 
Necklace and nose

She laid the thread and pinned the center in
place so that it would remain in the position that she wanted it. She found it challenging to hold the wraps on her needle and impossible to hold it all in place to pull the thread to the back of her quilt. 

She found she was almost strong enough to pull the needle through all the layers with needle nosed pliers. She had me hold the threads on the top side of the project while she pulled. She wasn't happy that the embroidery covered a word of her story. BUT, she loved the effect. I loved the effect too!

She used color pencils to blend the color of the face better and she used a micron pencil to add a nose. We got out the acrylic paints and she gave the eyes more dimension. Now she was truly finished. (She decided her mermaid didn't need a crown after all!) She was excited! It measurers 15 inches wide by 25 inches high. It is constructed of scraps. Many of the scraps came from my friend Martha's string bin.
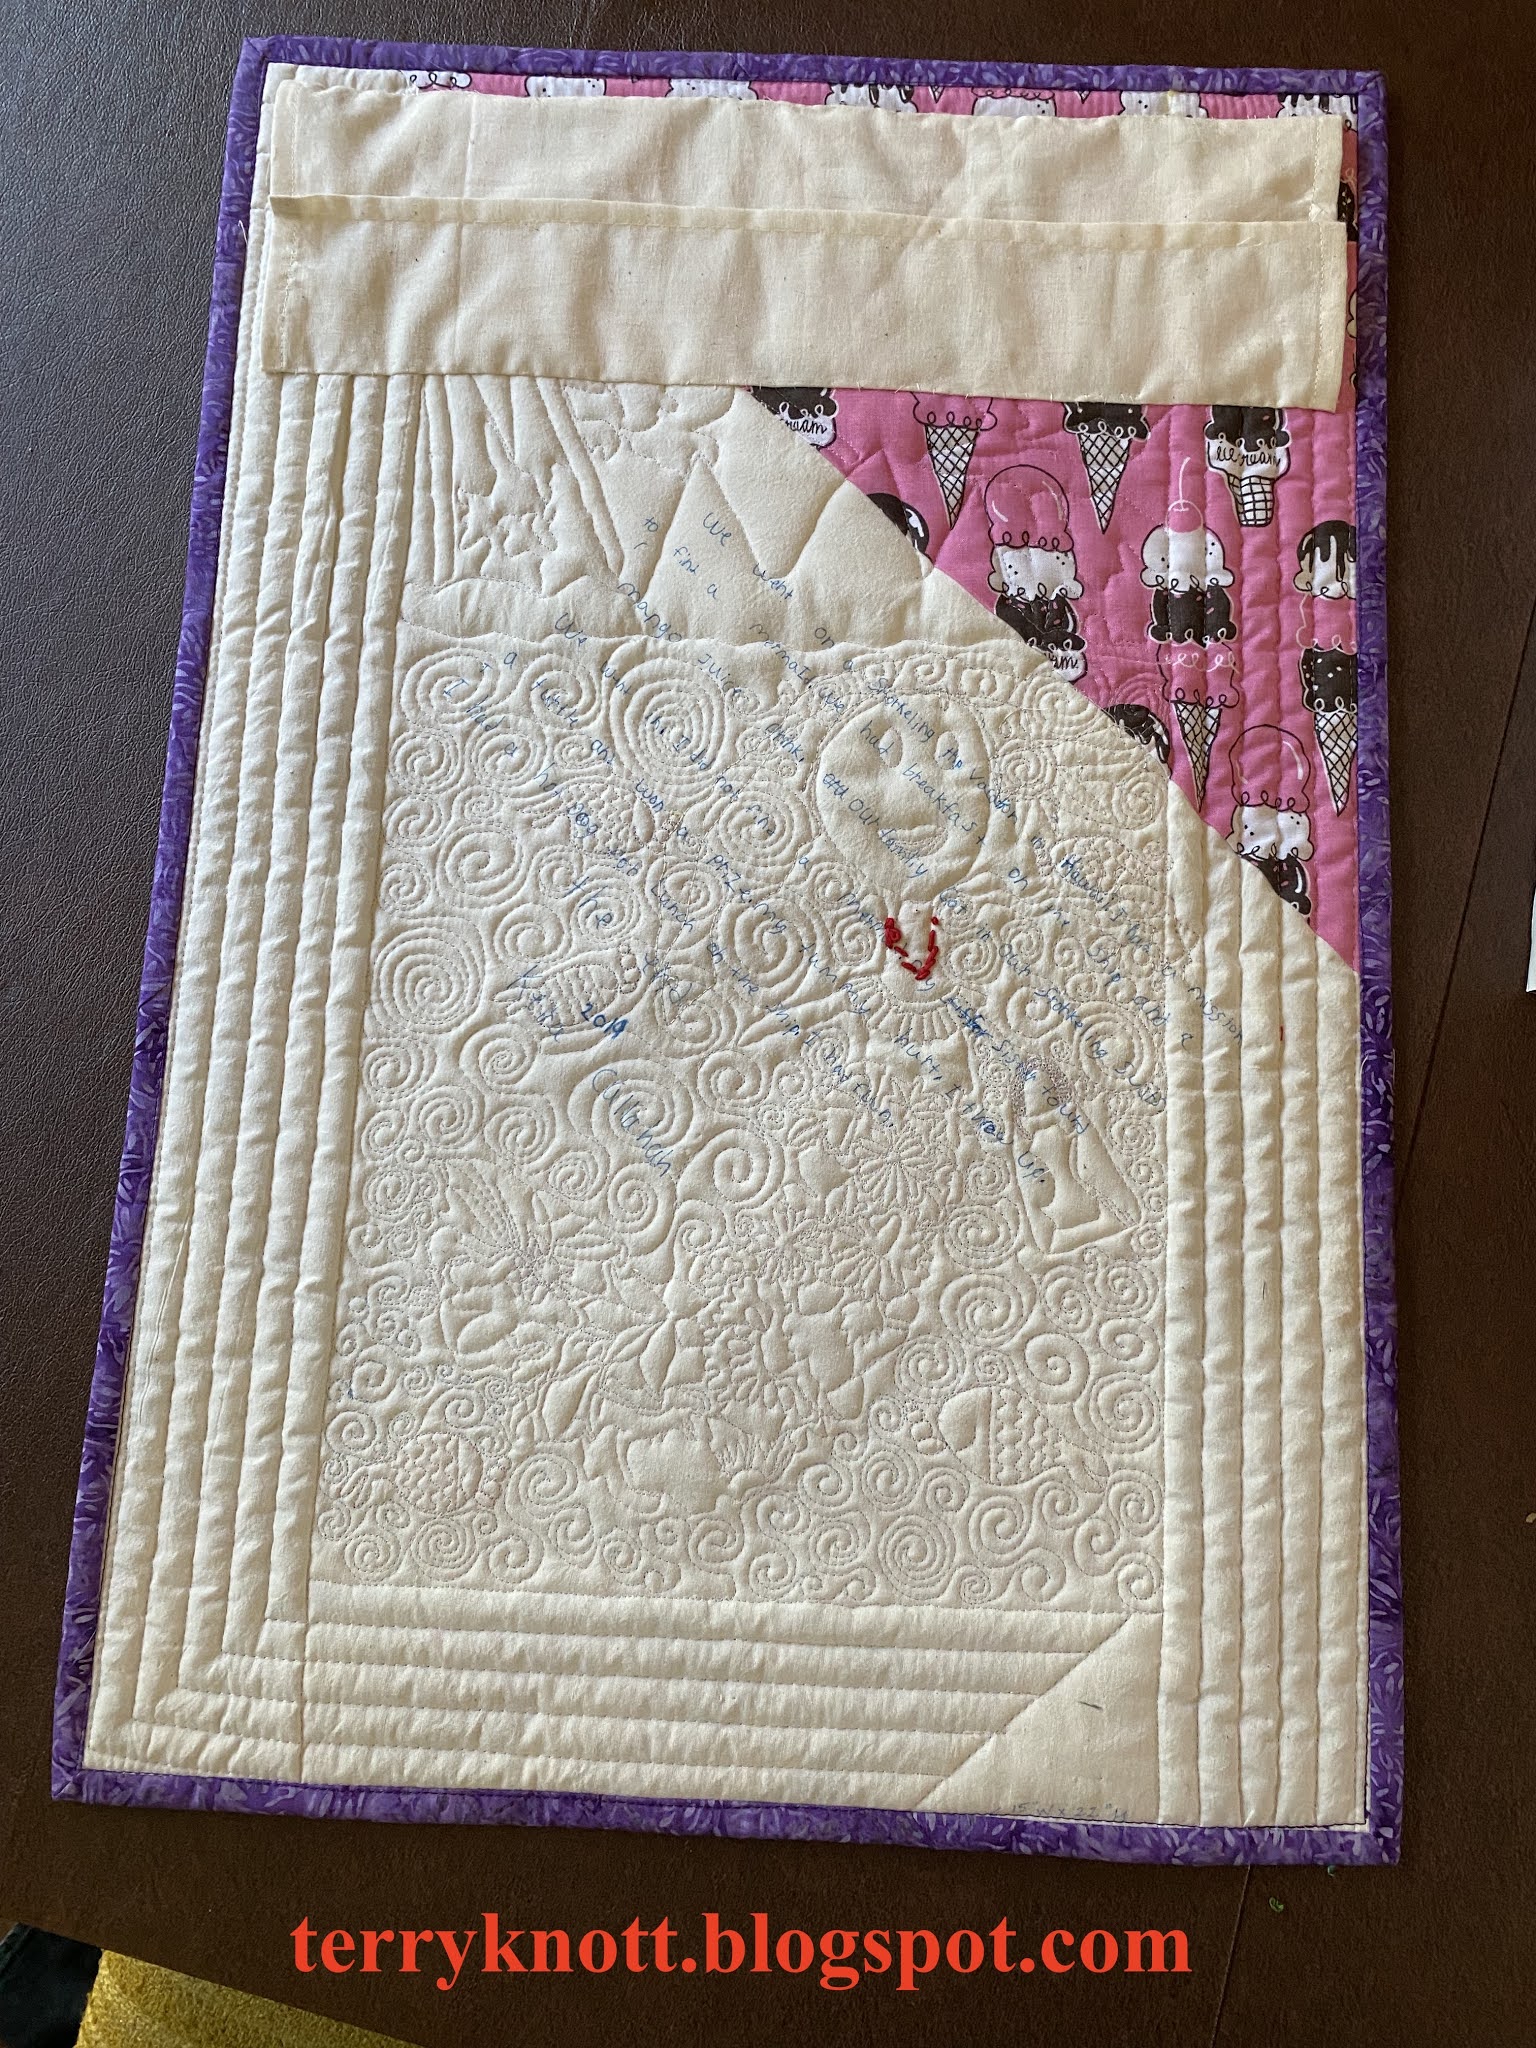
Finished back

Miss K began her journey with this project September 2019. Throughout the entire project, she built her quilt in her own vision. She chose the colors, fabrics and threads that worked the best for her design. She is letting me keep her quilt to enter in a quilt show or two should the shows be held.

You can read the previous posts of her journey by clicking the links below:
Miss K is Stitching--post 1
Miss K's Mermaid--post 2
Miss K's Mermaid--post 3
Miss K's Mermaid--post 4
Miss K's Mermaid--post 5

This was goal number five on my June list. We used about a yard of scraps so 5 3/4 yard of stash/scraps has been used this year. We have already decided what our next project will be.  Now, if we can find the time to get together! I'm also linking to Oh Scrap--Quilting Is More Fun Than Housework.
Finished front

Regarding COVID:
Worldwide: 181M cases; 3.92M deaths
United States: 33.6M cases; 604K deaths
Oregon: 208K cases; 2,704 deaths

The Oregon governor has announced that the state will open to "normal" on June 30. While I'm happy about the prospect of wearing a mask much less, I imagine that I still will  wear a mask because the people who aren't are either vaccinated or not. It's the unvaccinated group that concerns me. It seems odd that the magic number to open was 70% vaccinated. The state is 51% totally vaccinated and 57% of the population has received at least one dose of the vaccine.

On another note, we are having a heat wave. Yesterday, it was 104 degrees Fahrenheit as the high and 67 degrees as the low. Today, the forecast is for it to be 111 as the high and 72 as the low. I can't remember a time that the upper temperature was that high. It will be an indoor day for me. I'm thankful for air conditioning! Restrictions on the number of people in a swimming pool have been reduced as have the restrictions for number of people in a cooling center.

Wednesday, December 12, 2018

Trio of Sisters--drawing and coloring Post 2

Vignette of the sisters
Supplies used to colorize the figures
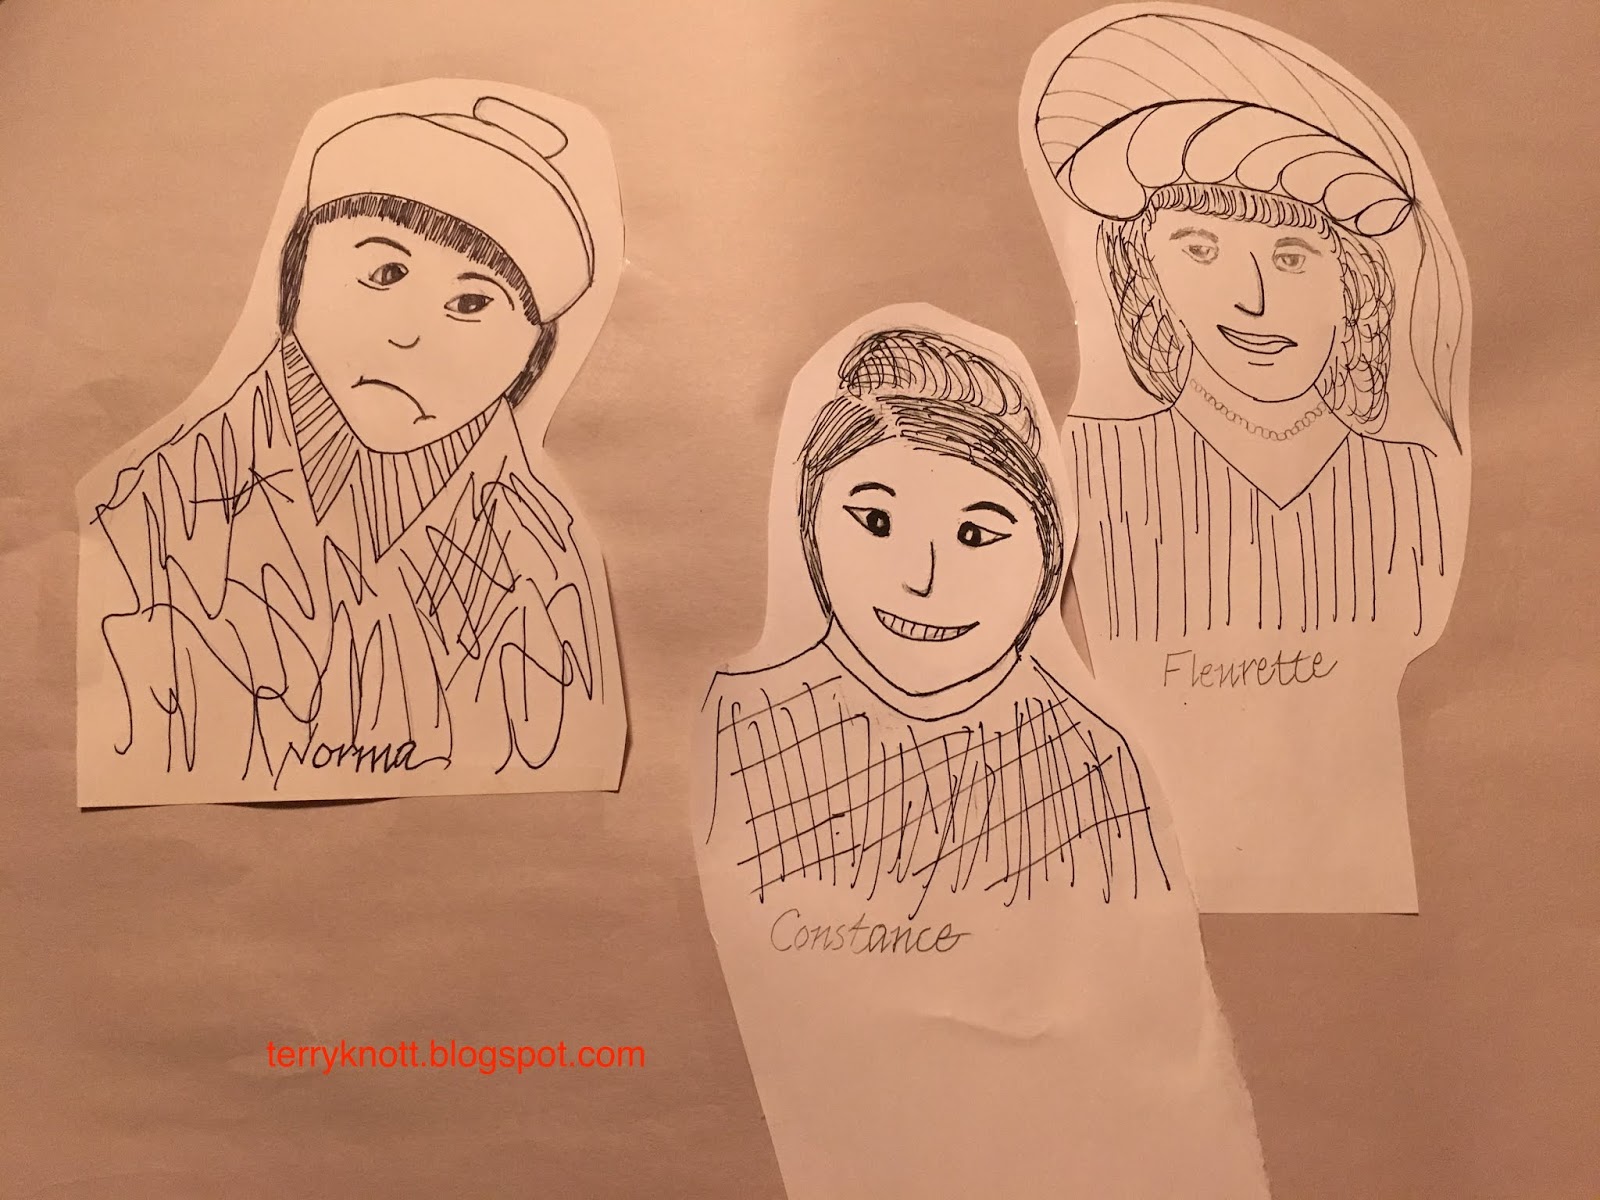
This post is the second one regarding the project I'm stitching after reading the book, "Girl Waits With Gun." When Miss J and I completed our initial drawing, I figured that I needed to draw one more figure which I did. When I laid the drawings next to one another, I found that "Norma" was too small; "Fleurette" was too large and "Constance" was too small. I redrew "Norma." My friend, JoJo, reduced the size of the copy for Fleurette and she increased the size for Constance. Then I played with an arrangement of the three together. I was thinking of a vignette that would eventually be enclosed in an oval frame.

Colorizing the figures
I left Norma a bit outside the grouping because she was opinionated and often looked down on the others' decisions. I gave Fleurette a big hat and some emeralds as she loved being ostentatious and bling. I put Constance in the green dress the author described. I left her a little smaller than she was. In the book,  she didn't give herself credit for her skills and passed herself off as less than she really was. In life, she was six feet tall and Fleurette was just over five feet tall. What a pair the two of them must have been!

Once I had the figures arranged, I pulled a piece of muslin from my stash and lightly penciled the figures in place. Then it was time to colorize the figures.

I used color pencils, inktense pencils, acrylic paints and jacquard paints. This was my first experience with adding color. It was scary to start; but, I did! After getting past the fear of making a mistake, I had fun playing with various supplies. I liked the results.

I used a Clover type iron to set the color as I worked. For example, I set the purple lines in Fleurette's hat first. Then, I worked on filling in the color. I used aloe vera gel as a medium with the dye based paints. I found the medium helped me apply the color more evenly. As I completed a section, I heat set it with a small Clover brand iron.
All three figures colorized

It was fun to shade each figure's hair. I really had planned to make Norma's clothing red; but, decided that the orange went better with the clothing on the other figures! The lines on Constance's dress were supposed to represent her sleeping in her clothing at the jail. The lines in Norma's clothing, were drawn to represent what her coat might be like after wearing it day after day doing her outside chores.

I've been thinking about stamping a background around the figures. I've been thinking about adding machine embroidered words which would mean I MUST learn the ins and outs of that process. It isn't as simple as typing the words, selecting the font and pushing stitch!

On a side note, at the end of September when our Thread Tales group met for the reveal of quilts which were inspired by the book, the author, Amy Stewart joined us. Turns out, she moved from California and lives in the Portland area now. She had dinner with us and then we walked over to Powell's Books and listened to her speak about her latest book. It was a fun evening. She was impressed with the quilts that our group had completed.

There will be more posts to come with this project!


Wednesday, August 22, 2018

Quilting the Truck-post 3 of 3--Seventh Finish for 3rd Quarter Finish-A-Long 2018

Layered, basted and ready to quilt
I was able to press three sides of the organza; but, one corner just wouldn't cooperate. I decided to leave it and quilt it as it was! I stitched the facing, which looks like an additional border, to the truck.

Next I pieced a back. I had a leftover piece of chicken print fabric. It wasn't quite wide enough so I added a bit of the facing fabric. I knew the piecing wouldn't show. I even considered leaving that part without batting. However, batting is a bit sticky and having it as the bottom layer on the project would have made quilting more challenging because the fabric wouldn't slide. In the end, I was glad I had pieced the back!

I layered the backing with a piece of wool batting and placed the top on the batting. This time when I pin basted, I laid out rulers to be sure that I kept the borders straight. I chose not to pin in the organza as I was concerned that the pins might leave too large a hole.

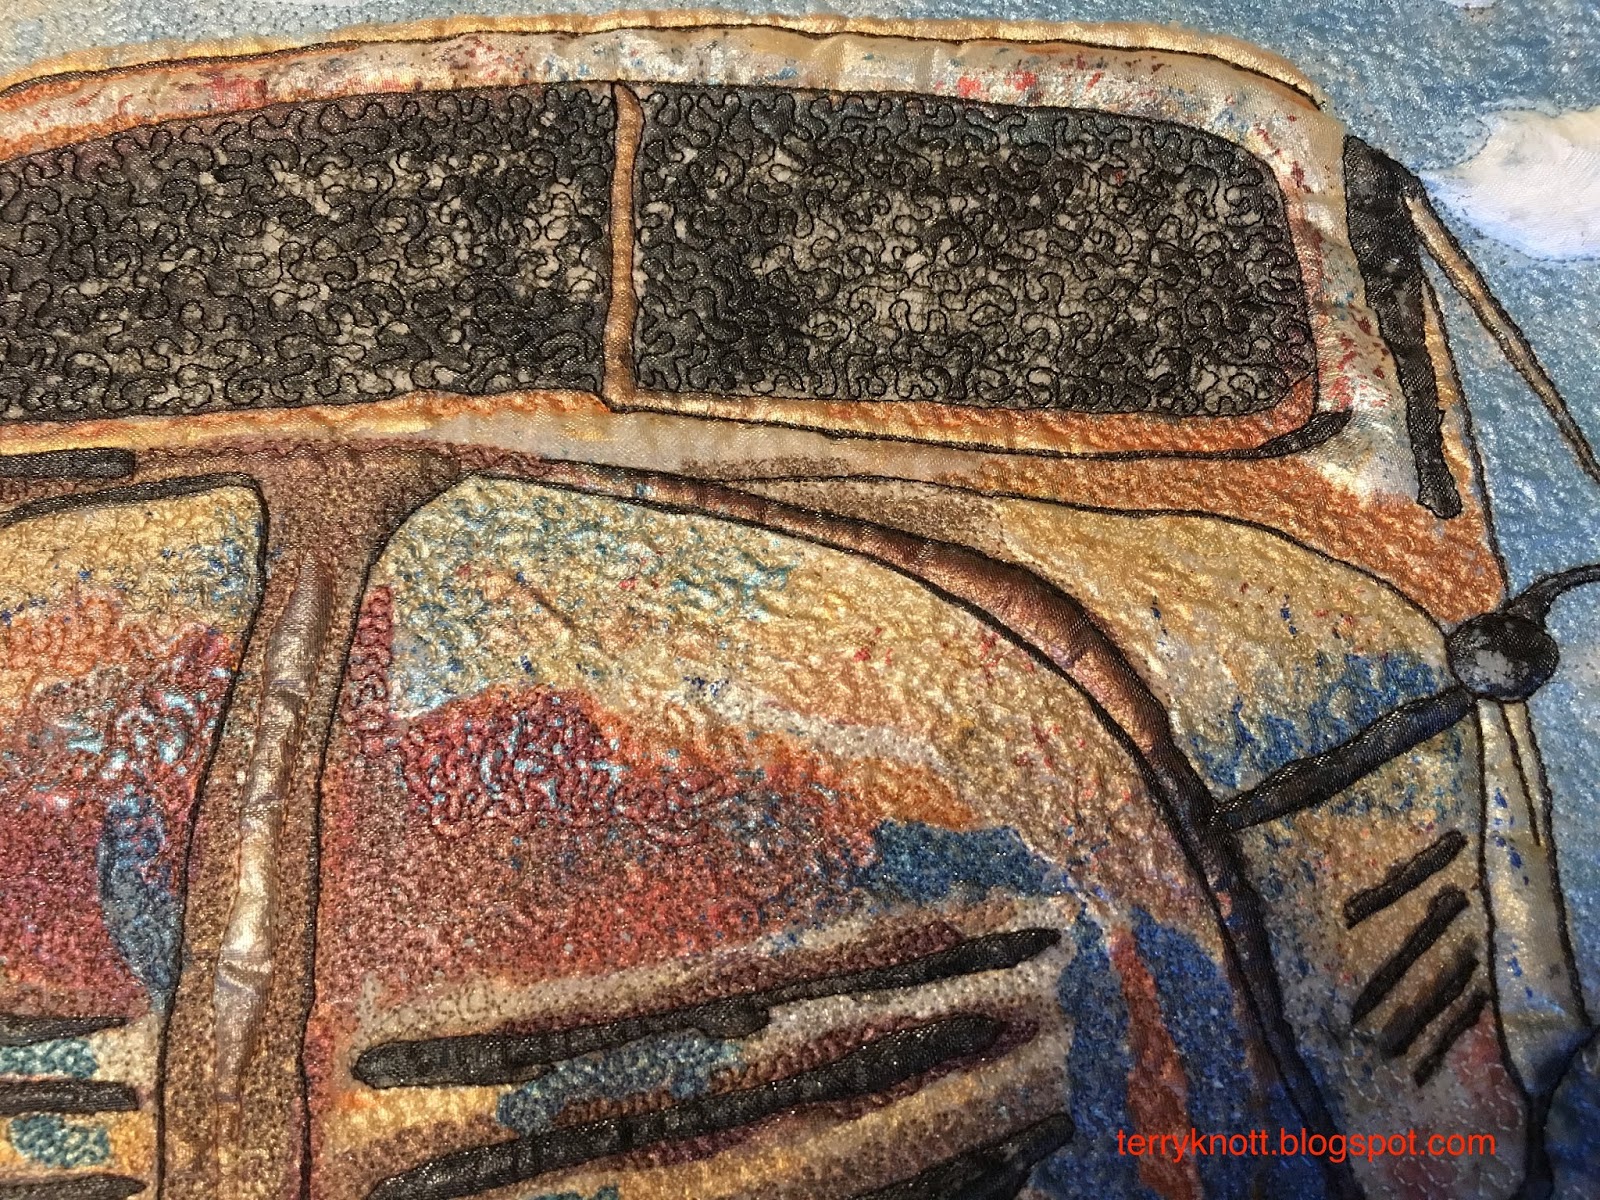
Quilting the dark lines
Next, I stitched in the ditch around the various borders. I used 100 wt. silk thread. I like silk because it easily blends/buries into the fabric. I was curious how the organza would quilt. It was challenging to quilt the borders because the organza is slick so I needed to adapt how I used my hands to move the quilt. I thought that using gloves would make it easier to control; however, I found that my bare hands worked the best.

I decided to use 50 wt. 2 ply cotton thread to quilt the organza. I wanted the matte of the cotton thread to balance the sheen of the organza. I used a 70 microtex needle. I decided to outline the black lines of the truck first. Sometimes, I used a black thread and sometimes, I used a dark brown thread.  I probably could have also used a dark navy thread.
View of the quilting
It was easier to quilt the interior lines because I could place my hands on the outer borders so the slickness of the organza wasn't a factor.

Because I painted the truck, I thought a densely quilted stipple background stitch would replicate the feeling of paint. I've looked at many paintings and would note the lines/cracks left behind in the layers of the paint.

I did leave a few areas of the truck as well as the clouds unquilted to give the piece a little dimension. I used a cotton thread that matched the value of the background as closely as what was available in my stash. I used four blues, two oranges, four browns, two grays, three golds. This time, I used the same thread in the bobbin.

View of the various quilting textures
It does save time when you don't have to change the bobbin with each thread color; but, you do have to check to see the tension on the back! Most of the time, it was good or  it was okay.  A few times, I got to remove the stitches!

I did make tension adjustments. The thread I used was all from the same company and the same weight. You might not think that adjustments would need to be made! Sometimes, I unstitched a few stitches because the value of the thread I had chosen had too much contrast or the tension was not okay. I didn't want the thread to sing a solo in this piece!

'Ole Truck label
It took about 24 hours to quilt the painted areas of the truck. In the first border, I stitched a couple straight lines using the walking foot. In the second border, I free motion stitched an organic version of a feather which I call a weed. I chose the weed background fill because there were weeds around the truck when I took the photo! In the third border, I straight line quilted with the walking foot.

In each border, I matched silk thread to the value of the fabric. My goal again was that the thread would provide texture and compliment the truck!  It took about 24 hours to quilt the piece to the last border. All that stippling, because I used it all over the quilt, kept the density of the quilting consistent throughout the piece. Maintaining that consistency through the borders was important too!

It took about 18 hours to quilt all those pebbles in the facing which looks like the outer border! I wanted them because if someone looks at the back of my quilt, I want them to wonder how I managed to have a different quilting pattern along the edge on the front than I do on the back!
Finished back

My goal was that the quilting enhances the piece. I believe what I chose to quilt enhances the painted truck.

The piece did get a bit wonky. I was concerned about pressing on that organza as well as getting it wet an losing all that paint. I e-mailed Esterita Austin as she was the teacher who taught this method. She replied to use parchment paper front and back and that steam was okay. I appreciated that she returned my e-mail so quickly--it was the same day! I did follow her instructions and the quilt blocked beautifully.

I used the same technique for the facing as I did with my "Circling the Sun" piece. This time, I added the edge finish before I turned and stitched the corners. This change sure made it easier to apply! I'm glad that I documented the process as I needed to review it! The second time actually went well and I'm happy with the results.

This project was expensive to make. The cost of the class was the majority of the class. I spent $260 to make the project. I'm so glad that it is finished and can be enjoyed now!!! I LOVE this piece. I am already enjoying it hanging in my home.

Did you recognize the fabric on the back? I thought it fit the feel of the truck. I had almost enough of the chicken fabric that I used on the back of my chicken wall hanging for the back and the sleeve of this project. (I pieced the sleeve with some of the facing fabric.) I picked up the label from the guild's free table. I ink/create a label for each of my quilts. The label is so important because it provides information about it straight from the maker! All quilts should have a label with the maker's name, date and why the quilt was made.
Finished front of "Ole Truck"
I used about two yards of fabric from my stash. I have now used 24 1/2 yards of fabric from my stash and have 25 1/2 yards left to meet my goal of using 50 yards of fabric from my stash this year. This was goal number six on my third quarter Finish-A-Long list. It is my seventh finish for the quarter!

I started this piece in a class with Esterita Austin last September at the NW Quilt Expo show. It was accepted to hang in the NW Quilt Expo show which will be held September 25-27, 2018. The other posts about this piece are listed below:
Painting the Truck--post 1
Adding the Borders--post 2


Sunday, August 19, 2018

Borders on the Truck 2 of 3

Too much blue
After completing the potholders, I was ready to work on the truck project. I cut the pieces for the border and then spent the rest of the day picking up in the studio. The next day, I came down with a fever and a nasty headache. No wonder I didn't make much progress on the truck project the previous day!
Auditioning other fabrics for border

Three days later and when my headache had gone from an eight to a four on the pain scale, I started to stitch the border fabrics together. The blue batik that I had found in my stash for the outer border sure wasn't "it." I was so happy that I had only stitched one border so I didn't have too much to rip!

This brown fabric is the one
It is a good idea to audition the fabrics, which I did when the fabrics were in pieces; but I should have auditioned the strips as that would have shown me that the blue was too light!

Next, I searched through the stash to see if I had a better fabric for the outer border. I found a piece that was too red (right side of photo), a piece that was too dark/dull (bottom of photo) and a piece that seemed just right.

I cut some strips and then auditioned the strips. I liked what I saw. I stitched the three strips or one border together; then I placed it on the project. It would work! So I completed the other three borders.

Appliqué to the rescue
It was time to miter the corners. Rather than try to stitch each miter using my sewing machine, I opted to applique the miter in place. I used silk thread and a few pins. This was a great method. It only took about 20 minutes for me to complete all four miters.

The frame adds to the project and I'm happy that I waited to continue until the fabrics "felt" right. The next step is to layer and baste this project which I will do once I figure out how to press the organza. I used a warm iron and had some success. I turned up the iron and took off some of the paint off the seam allowance and yet, in both cases, the seam allowance doesn't lie flat. I may leave it that way and quilt it the way the seam is positioned.
Old truck--framed

Sunday, March 18, 2018

Painting the Truck--post 1 of 3

Painting an old truck
Last September, I took a two day class, Luminous Painted Illusions, from Esterita Austin. The class was at the NW Quilting Expo in Portland, Oregon. In writing this blog, I learned that this truck is featured in her student gallery. I am honored!

Near where I live, this old truck has been parked in a field  promoting a plant nursery for years. Each year, it has become a little more rusted which has added to its character. Last year, the property was sold for development. The time it will be spent parked alongside a busy road, must be short. Of the photos, I submitted, this was the one that Estertia picked. I'm so glad she did!

This was the second class I took with her as an instructor. I have no artistic background. I grew up in a small farming community. There were less than 80 students in my high school. When I was in elementary school, art projects were basic. I can remember using chalk on black construction paper thinking what a cool process that was. I only remember using water color paints once.  In high school, the closest program to art was either home economics or shop classes!

Esterita explaining the process of fusing 
Esterita is a retired middle school art teacher. She is an entrepreneur who developed the product Misty Fuse as well as painting techniques for people like me! I could follow her directions and had fun creating this piece of "art!" She empowered me to keep playing. She made me feel like I am artful! If she is teaching in your area, sign up for her class. You will learn a lot and have fun too!

The process was to come to class with a full size photo. I took an 11x16 inch size; but, next time I will make it larger like at least 16x20 inches. We made a line drawing of the photo on a piece of medium weight vinyl with a black sharpie pen. From there, we used the line drawing underneath a piece of parchment paper. We painted in the details with metallic paints. I was shocked that I actually finished the painting before class had ended! With help from Esterita, I was surprised that I could actually blend paint colors to come up with rustic colors that fit my project!
Possible border fabrics

Once the painting was finished, the parchment paper was layered with misty fuse and transparent organza.  Using a warm iron and taking care to keep the iron moving, she fused the misty fuse to the organza and the design transferred to the organza. The metallic paints worked so well! Unfortunately, I was so into the process and experimenting that I forgot to take photos while I was working on my truck. I do look forward to playing with her technique again.

Esterita layered and quilted her projects at this point. I wanted to add borders so that my piece resembled a framed painting. Last October, I purchased a piece of gold/rust Grunge fabric by Moda that I just knew would be right for one of the three borders that I had planned. As I auditioned the pieces for the borders, I found that maybe that piece was too strong. I pulled other fabrics from my stash. In the photo you can see the variety of possibilities.

In the last photo, you can see my edited fabrics. Although it took me along time to pull the fabrics and to audition them, I was able to narrow my choices. Even better, I like the choices that remained! I'm planning to make three borders--a narrow black, followed by a wider orange, followed by a blue. I haven't gone further with this project because I have an idea of how I want to finish the edge. It is a variation of a facing, but since the idea is in my head, I haven't tried it. I will test my idea on another project before I add the borders to this project.

Edited border fabrics


Sunday, February 25, 2018

Printing on Fabric Class

Debby sharing how to achieve the prints in her samples
Explaining about a glue resist
Yesterday, I had so much pure fun painting on three pieces of 12 inches by 12 inches of white on white fabric! The class was part of Saturday Workshops which the Clark County Quilters guild puts on each year. The classes are reasonable--$10 for a half day/$20 for a full day. The teachers volunteer their time so the class cost goes to the rental of the facility. The teachers may have a supply kit fee for materials that they provide. My kit fee for the painting class was $8. Besides learning new techniques and improving your skills, you get to meet new friends and catch up with friends you haven't seen in a while. The Linus group puts on a lunch for $8 so you don't even have to pack that!

Paint pallet, some tools for texture
The example
My sample
Debby taught the painting class. She spent 35 years teaching art to high school students. She has taught at Saturday Workshop for a number of years. In past years when I popped in to see what was going on, people were having fun and they were creating wonderful artful pieces. This was the first year that I was able to take her class as I was involved in the organization of the workshops which precluded me from participating. Debby made it easy to follow along and provided the perfect amount of encouragement. I strive to make my classes as organized, welcoming, thoughtful and fun as she makes hers.

Sponging paint
I LOVED every moment of class. This is about my fourth experience with fabric painting. I see lots more paint playing in my future! I like that she showed samples and talked about how to achieve the results. I LOVED that we used simple inexpensive tools--like a sponge, parts of a cereal box, a paint brush, a meat tray, a paint brush handle end, an unsharpened pencil to create texture.  We also used PVC pipe, masking tape, crayons, rubber stamps, rubber bands, unvalidated credit cards, plastic forks and Dollar Tree store hair gel!

Some of the techniques went quickly. Some took more time. To dry our fabric, we used a hair dryer and once the fabric was damp, we finished the drying process with the iron.

My second sample
We mixed the acrylic paint with the hair gel and then brushed it on the fabric. While the paint was still wet, we pulled the fork and/or the cardboard scraper though the paint. We achieved the skinny lines by pulling the edge of a credit card through the paint, then stamping it on the fabric.

The unsharpened end of a pencil become the round dots and the end of a paintbrush handle became the tiny dots in my sample. I must try this technique with the grands as they would have fun creating the swoosh of color and following up with the scraping and dotting!

To set the color, we ironed the fabric between a couple sheets of parchment paper. The fabric has a nice hand to it and isn't stiff. I LOVED seeing everybody's work. Each piece was totally unique and absolutely wonderful.

We added water to the paint so that it was fluid and painted that on the fabric. We used a hair dryer and then an iron to dry the fabric. Next, we tore strips of masking tape and placed that on the background. This took some time to place and then ensure  that all the edges were securely on the fabric. The next step was to sponge paint around the tape.

Shibori piece drying
I liked how Debby encouraged us to use a variety of colors. My background was red, orange and yellow as I used the same paint palette. I sponged with teal, medium green and dark green. We dried it with the hair dryer. We stamped images on the piece. We removed the tape and stamped more images on the piece using metallic paints. We placed the fabric over a textured and used a crayon to rub on the stamp which added texture.  Finally, we used puff metallic paints and added a little more dimension. My piece looked batik-like!

Block printing example
Stamp made from a meat tray
For our third sample, we created faux shibori using a piece of PVC pipe and rubber bands. I wanted to try to make a primarily orange fabric with brown spots. I used that same red, yellow, orange palette; but added in some purple because when you use colors across the color wheel from each other you will get brown. I had a hard time getting the paint into the folds of the fabric so I won't be at all surprised that when this is dry, there will be large spots of white. Debby says with this technique, you get what you get! I also think the grands would have fun drenching the fabric with color for this technique.

For our final sample, we created a printing block from a meat tray. We etched textures into the styrofoam with a ball point pen or pencil. Using double stick tape, we placed several of these on a piece of cardboard and used that as our stamp. I created the stamp; but, I didn't stamp with it. We did all these techniques in three hours and it was totally FUN! Thanks Debby for the great day!

If you happen to be in the Vancouver, Washington area April 7, 2018, Debby is teaching a class "3-D Whimsical Cottages.  Class fee is $60; supply fee is $7. Class supply list is here. Contact Wilma Scott here to register.


Wednesday, November 1, 2017

Mt. Hood


On a clear day, I can see Mt. Hood from my home. When I was a kid, I lived in the central part of Oregon. I would watch the sun set on several mountains in the Central Cascade Mountain Range every evening. It was spectacular. Now, I live in the western part of the state and I get to watch the sun rise on one mountain. Sunrise is my favorite part of the day. JoJo over at Through My Hands, had a Mt. Hood project.

Mt. Hood ready for stitching
Some day, I might not be able to view the mountain so I thought, why not make this wall hanging? Selecting fabrics is the most challenging part of the process for me! Over a few weeks, I chose fabrics from my stash. A friend and I spent a session together and we cut out our pieces. 

I was surprised at how painless it was to cut and prepare the fabrics for stitching. I had all the fabrics but the snow reflection in my stash. My friend, Pat, gave me her piece when she decided her snow reflection was too light. It was the perfect choice here! Thank you Pat!


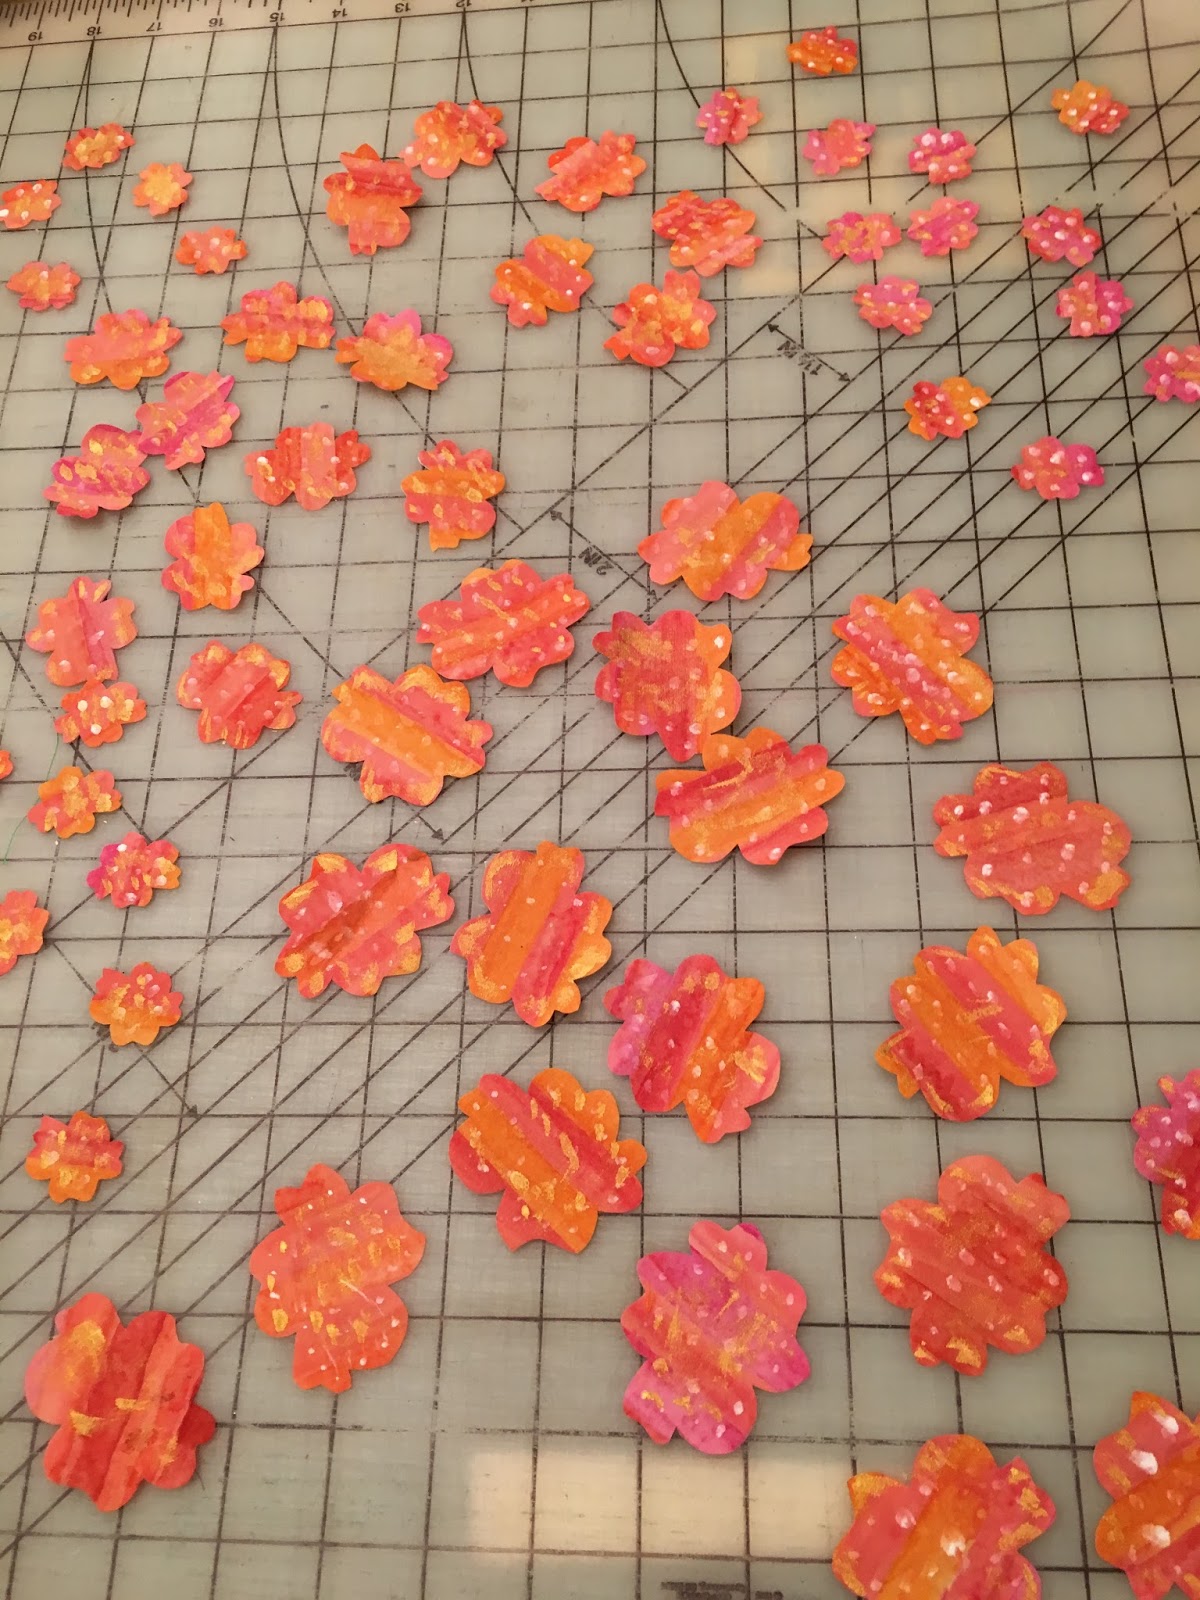
Blossoms auditioned
The "snow", tree line and tree line reflection are fused. The mountain and mountain reflection have a turned edge. I appliquéd the pieces, as JoJo suggested, with a narrow zigzag. She used a stabilizer. I found that I didn't need a stabilizer. That part of the process was painless too!

Next, it was time to figure out what fabrics I would be using for the blooming tree branch and what thread I would be using for the tree bark. This was a challenge. I'm trying to use what I have. I first thought that I'd broderie prerse the blossoms; but, I either didn't have appropriate sized flowers or I didn't have a print that had enough flowers in the same colors.

I settled on a batik fabric that I fused to some stabilizer. If it looks familiar, it is because I used that same fabric in my QAYG project that I've blogged while it was a BOM (Block of the Month). Cutting more than 50 blossoms took some time!

Cutting the shapes
JoJo used paint and embroidery to add more depth to her blossoms. I tried paint and embroidery too! I was disappointed at first that the white paint didn't show as much as I had hoped; but, it did give the illusion of depth which was the effect that I wanted.

In the end, I found the white paint to have added just the right effect. Next, I added some gold metallic paint which I applied a little differently on each flower. Sometimes, I added a lot and sometimes I added a little. I liked how painting different amounts of paint and painting in different areas of the blossoms added so much depth to the blossoms.
Shapes painted and drying


Auditioning the flowering branches
Then, like JoJo, I added some hand embroidery stitches. The first day, I completed seven. At that pace it took me a little over a week to complete that step. I used some floss that has been in my floss box since I was in college! Okay. . . that was in the late 70's! I'll report that the "preserved" floss worked great!

For layout purposes, I used a bit of ribbon so I could get an idea of the shape of the branch. Next, I laid out the finished shapes until I found a pleasing design. I'm happy that I stepped outside my box and tried JoJo's technique with these flowers. That paint made them just sparkle! I also learned that I like painting!

Next, I fused the shapes to the background. Then I added a heavy chain embroidery stitch to represent the tree branches. I'm a big fan of Mary Corbet's Needle and Thread blog. Mary is generous about sharing designs and tutorials.
Paint for the mountain top

Painted mountain top
I used a JP Coats crosheen type embroidery thread for the branches which came from my grandmother's stash.

I visited JoJo as she offered me use of her paint stash. The photo represents the paint I used on my project. The Setacolor paints left the hand of the fabric just as soft as when I started so those were my favorite. At the time I was doing the painting, local sources of the colors that I wanted were out and even the couple companies I checked out for an online order had these on backorder.

Branches with a little stem stitch accent
JoJo also provided moral support and helpful hints as I painted details on the mountain and mountain reflection. Isn't it amazing how much the paint added to the mountain? I'm liking those stems. I decided to add some light to the branches.

This is the branch after adding a stem stitch with a gold sparkle embroidery thread made in Japan. This thread stitches beautifully. A special friend gave me this to me. I liked it so well that I have my eye out to purchase more locally!

Now, I'm thinking that I need more blossoms. I struggled for days trying to figure out where to put them! Then JoJo came over and gave me some feedback.

Using a zig zag to stitch the blossoms
I fused the blossoms and then began the process to stitch each blossom to the background. I decided I needed a little bling so I added metallic thread to the blossoms. I also decided to pad the blossoms with wool batting. The appliqué and trapunto happened in one step.

I hope that the trapunto effect will give the blossoms a little "pop" and make them appear closer when I finish the piece.

The metallic thread wasn't easy to use on this project.

Places where I had layers of fusible, were spots where the metallic thread shredded. In the end, I had a few more starts and stops in those areas! 😀

Batting trimmed
I trimmed away the batting so that the trapunto effect would be maximized as much as possible. Yes, this step took time and no, I didn't cut the front while I was trimming. . . .WHEW!


Ready for layering


As I was clearing a mini pile off my work table, I found a few more blossoms. I decided that the blossoms should be part of the project so I added them to the top.
Now, to layer and baste the top for quilting. I do have a back fabric selected and I am planning to face this wall hanging too and I think I will have enough back fabric for the facing. I will need a different fabric for the sleeve which I am thinking about. As for the quilting, I'm planning my stitching will be enough to provide definition for the sky, mountain and water. I'm not planning to quilt it as densely as I'm quilting the chicken! Surely, I can quilt this project faster than I have quilted the last three quilts that I've finished!