Sunday, April 29, 2018

Diamond Girl post 3 of--4

Notes in process of burning away the organza
The quilting blends into the background providing
texture
After I had trimmed the organza away from the notes, there was still a bit of the fabric around the edge. My friend suggested that I use a wood burning tool and burn the fabric away. Unfortunately, a wood burning tool was not among my quilting tools so I used a Joann fabrics coupon and purchased one! I did a test on the fabric before I did the embroidery to see how it burned. For the test, I lit a match and burned an edge of the fabric. It burned fine.

To protect from burning my fingers, I used tweezers to hold each note. Slowly and carefully, I touched the tool to the organza. It was a process; but, I'm happy with the results. I found that wiping the hot tool against a dry towel helped remove some of the "goo" from the melting/burning process. I also found that rubbing the hot tool on a piece of sandpaper helped too. The reason for removing the goo was that I didn't want black goo on my silver notes. I appreciated that my friend shared her tips and encouragement with this process.

I layered and pin basted the top to that pieced back. I used a piece of wool batting. I used wool batting because I wanted as much loft as I could get for the figure. I also thought that the wool batting would be lighter and it might give my quilting on that denim more definition that if I had used a different batting.

Circle and texture of the top of project
To begin quilting, I stitched in the ditch. Because the seams of the pieced part of the background were pressed open, I chose to stitch next to the white top stitched line that came with the jeans! I wanted the quilting to add texture; but, not compete with the figure. To see the quilting, one will need to get up close and personal with the wall hanging!

Top trimmed and ready fro the facing
I quilted a circle in the center of each of the pieced blocks and followed up with straight lines. Straight lines were my original intention; but, after I stitched one, I thought differently. I tried stitching rays off the circles and radiating lines; but, ripped those out and went back to my original plan. In the end, I was happy with the with the straight lines lines because the lines complimented the weave of pieced section of the jeans.

At the top and bottom, I free motioned quilted gentle curved lines. I liked the texture the quilting provided and I liked how the quilting brought the figure more into the foreground. For the letters, I quilted straight lines which helped accentuate the embroidery. I used the same cotton blue/gray thread for quilting the entire top and the same cotton olive green thread for the back.

In my stash, I located a six inch piece of turquoise fabric that coordinated with the back fabrics. It was just enough to become the facing! I cut three 2 inch strips. To cover the bottom edge, because I wanted the raw edge of the denim to be exposed, I blind stitched the facing to the edge.
Facing ready for hand stitching; auditioning
the label

Check back on Wednesday for the finish post!


Wednesday, April 25, 2018

Diamond Girl--post 2 of 4

Design 1
I decided that the space underneath her bell bottoms needed some words. I had help with the font and the notes. There are literally tons of different fonts. Some are digitized and some are not. Digitized fonts often look better when they are stitched than the other fonts which are called true type.

What  design 1 looked like on the top
Embroidering the words was a whole other journey.  I made a sample of the words, "Diamond Girl," of several fonts that were in my embroidery software. (I have the Bernina V-8 software.) I shared my options with a friend and she sent me back a font and some notes that she thought I might like! I LOVED it.

With any design, I generally print the pdf page of the design because it helps me pick and organize my thread colors. It also helps me place my design in the hoop. I also do a stitch out or sample of the design as a test.

Often, I complete a number of stitch outs because I might see ways to change the design so it stitches more cleanly or I might determine to change some thread colors so the design shows better. I like to use the same fabric that I will be stitching the design on so I can see if I need to make needle or thread changes.

White stitching showed up better
More sample designs. . .this wasn't it
I LOVED how this design stitched. The letters were so beautiful. I asked my friend about the font because it was even better than what was in my software. Then she said that she had made it just for this purpose! Boy, did I feel special! It took an hour and a half to stitch the design. As it stitched, I realized some of my thread choices didn't show up well against the denim so made a note to change those colors. The stitch out measured about 3 inches tall by 14 inches wide. I took it out of the hoop and pinned it to the lower section of the top.

Was I ever disappointed! That rich magenta, while a 70s color, sure didn't work for this piece. Those wonderful notes were lost from a distance. The words looked wonky.

What to do? I played with the letters in the word. I spread them apart. I changed the angle. After each update, I printed a paper copy of the design and put it on the top to see what I thought.

From my thread stash, I pulled out a gold, a black, a silver and a white thread. I found the gold fought with the gold in the bell bottoms. The silver  fought with the gold. The black was too dark and stark. The white was right! No way would I have thought it would be the choice; but, my friend suggested it!

Embroidering the letters separately
Unfortunately, the letters still didn't have enough contrast. I considered using the notes to fill the white space. I made a paper pattern of the bottom section and played with the letters some more. My friend suggested that I stitch the letters individually on the darker jean fabric and appliqué the letters into the space.
Funny, I was thinking of embroidering the letters separately; but, was considering painting the background. Although, I could fit all the letters in the hoop for one stitch out, I didn't have enough dark jean fabric for the stitch out!

I laid the fabric in place and after a section was stitched, I laid more fabric on the hoop and folded the previous fabric out of the way. It took a little fudging to be sure that there was plenty of fabric between the letters.
Letters cut and ready for placement

The darkest jean fabric came from the back of the recycled jeans. The next darkest came from a side of the jeans and  the upper part of one front. I needed just a bit more fabric, so I used the fabric that was under the front pocket!

I liked the contrast between the stitching and the dark jean fabric.

Soon, it was time to cut out the letters. I chalked the first one  to be sure that my printed pattern had enough space. It did! It was a bit "scary" to cut because as we know, you can trim more; but, you can't put it back on!

Letters appliquéd into place
Next came more playing with the arrangement. The darker background was a winner. I hand appliquéd the letters to the background. I loved how much the words added to the design now!
Black notes weren't enough contrast

I liked the idea of notes so much that I printed some on paper and played with where those notes might want to call home.

Embroidered silver metallic thread notes 
I also liked the idea of the figure being surrounded by the musical notes falling off a piece of sheet music--like confetti and onto her.

I embroidered some on organza. I used a wash away as well as a tear away stabilizer. I've used this black thread in the past; but, for some reason the thread wanted to shred. I put in a new needle; I put in a larger needle. . .I still had the same results which made stitching these take longer than necessary!

What I learned from this first attempt was that I should not have used the tear away stabilizer as it showed a bit from the back. The black thread that I just knew would show up on the top, didn't.

I got out the Fil-tec product silver metallic thread that I purchased at a quilt show. I filled two bobbins. One with a silver gray polyester thread and one with the silver metallic thread.  I threaded the machine with the metallic thread with the polyester thread in the bobbin. I hooped the wash away stabilizer and the organza together. I slowed the machine to stitch at the slowest speed possible. I inserted a new 90 top stitch needle. I took a deep breath. I pushed start. I watched the machine stitch the first note perfectly. I looked at the back. I looked at the front. The polyester thread took away some of the sheen of the metallic. I changed the bobbin to the metallic thread. I took another deep breath. I pushed start. I watched a beautifully formed note appear and then another. In the three hours it took to stitch 36 notes, I had three glitches where the thread jammed.

I loved the metallic notes. They looked great against the denim background. My friend suggested that after I had trimmed the organza to use a wood burning tool to remove the remaining organza. I was dubious; but, I tried it. I purchased a wood burning tool at Joann Fabrics with a 40% off coupon. It worked great! The notes looked so good, that I decided that I would add them after the quilting phase. I even decided that the notes would be three dimensional.

Come back on Sunday to see more progress on this project!


Sunday, April 22, 2018

Diamond Girl--post 1 of 4

Jeans saved for the project.
The guild challenge this year was to up cycle denim jeans into a quilt. The challenge had a cute name . . .inJEANious  Up-cycling. The rules were that the top of the quilt had to be made from 100 percent recycled denim fabric and preferably blue denim. Beads, buttons, ribbons and lace could be used. Any fabric could be the backing and the binding. It had to be three layers and quilted.

The drawing that became the doll pattern
I had a few pairs of jeans on hand. One pair has been my "parts" when I've needed to make repairs in other jeans or to patch other clothing. Although it was the lightest pair, it had the least amount of available fabric!

After several months, I came up with an idea. Paper dolls, the TV show the Mod Squad and the song Diamond Girl were all part of the inspiration! I drew a quick sketch. Then later, I drew two more detailed sketches. Finally, I drew a full size sketch. I probably spent six hours in this drawing phase.

To be honest, I googled figures from the posterior. Looking at different artist's drawings helped me with the proportions on my drawing. I decided my girl would be featured from the rear because I thought facial features would be too hard! With each drawing, the girl took on more realistic features. I even decided that the arms I drew were okay!
Bell bottom embellishment
After I had my drawing, it was time to work on the background. I happened to have in my jean fabric stash a rectangle that was left over from a pair of my brother's pants back in the 70s. This pair of jeans was pieced denim fabric.

I added a dark piece of denim at the top because I planned to make the blue jeans out of dark fabric. The dark blue in the background would balance the design. I used the leg of the lightest pair of jeans to anchor the bottom of the background. I had in mind to make the background irregular and when I had the design on the wall, it reminded me of a skirt! Back in the day, jean skirts were popular. I liked the irregular shape at the bottom of the background. I decided I would keep the shape as well as save the raw exposed seam.

Lace top for the figure


Once I had the background stitched, I cut the main piece of the jeans because I wanted to be sure that I would be able to get them out of one piece of fabric. My "fabric" jeans were well worn; the fabric was thin and the fabric was faded. Finding an area large enough for the main jeans was a challenge! The fabric was thin enough to be able to hand applique to the background. I decided that I would construct the girl and then applique her to the background.

Figure appliquéd to the background
I pieced the bell bottoms next and then couched metallic cording to the seams and followed with a decorative machine stitch. I liked the effect. I did make a parchment paper pattern from my drawing; but, found that freezer paper worked much better! With all the decorative stitching and cording, you wouldn't know that the bottom of the bell bottoms were pieced in five or six sections!

For the body of the girl, I used the wrong side of the lightest denim fabric. I painted a thin base coat of white acrylic paint. I have a few metallic paints so I applied a coat of champagne followed by a mixture of brown, red, gold and more champagne! Again, I used a light hand as I didn't want her to be hard and crispy when she was dry! I was excited that I was able to achieve a "skin" shade with all that paint mixing! . . .Better yet, I had FUN playing with the paint!

Fabrics selected for the backing
During the next sewing session, I concentrated on adding the details to the jeans. The pockets were tough because they are small and trying to topstitch a piece that small wasn't easy either! As I worked, I refined the lace top. I decided that I liked the look of less skin showing approach. The lace was what was leftover from altering the hem of Miss J's dress. It was just the right amount!

I did heat set the painted skin area. I pinned the figure to the background so I could applique it. Stitching the painted fabric was difficult. I was glad that I hadn't painted in the seam allowance on most of the outer edge as it was easier to stitch where it was paint free.

The space at the lower edge of the project seemed to want something. . .maybe a phrase. . .while I thought about options, I picked fabrics from the stash for the back. Yes, I planned to piece the back even though it was a small project. There was  enough of the rose fabric for the sleeve. Life was good! These pieces represent about a 1/2 yard of fabric used from my stash. I chose these colors because I remember one of my favorite outfits from the 70s was a lime green polyester jacket with navy trim. I also remember big prints were part of that era too!


Wednesday, April 18, 2018

2018 CCQ Quilt Show Results

Mt. Hood--My View

The first weekend in April was the guild quilt show. I entered four projects and an entry in the block challenge.

I already posted about my challenge block. Today, I'm sharing the results as well as the judges comments.

I entered "Mt. Hood--My View." Wow, it won a 3rd place ribbon! The judges comments were:
Visual Impact: Excellent--Reflections well handled
Design: Excellent--Perspective achieved
Construction: Very Good--
Quilting: Good--Multitude of quilting motifs adds to the flavor
Finishing: Good--Take care to make corners square or slightly curved.

I entered it in the appliqué category. 
Me seeing the ribbon hanging on Rue!

I also entered Rue. Was I ever surprised that it won a blue ribbon! This was my first time to make a modern style quilt. I had started this quilt years ago. 
The judges comments were:
Visual Impact: Excellent--Positive negative effect is well accomplished. 
Design: Excellent--Diagonal lines create great movement
Construction: Good--some satin stitches could be neater
Quilting: Excellent--Variety and changes in scale of quilting designs as well as big stitch and machine quilting add to complexity
Finishing: Good--Corners should be square or slightly rounded

I entered it in the modern category.


My final judged entry was  "The Chickens." Seeing the blue ribbon really made me smile and reading the comments made me smile even more because there was no mention about any fabric bleeding!

Judges comments were:
Visual Impact:Very Good--Center Rooster could use greater contrast of value
Design: Excellent--Applique flowers move the eye about the quilt
Construction: Very Good--Some curves could be more smoothly curved
Quilting: Very Good--Change of scale in quilted areas adds dimension
My favorite quilt in the showFinishing: Very Good

I entered it in the appliqué     category. 

I will post about my challenge entry soon. All in all, I'm humbled that my pieces placed so well. I don't enter to win a ribbon; but, rather to share my work. 

I have to confess though, seeing my work hang makes it look so special! Winning a ribbon is just icing on the cake!

There were many beautiful and amazing quilts at the show. The talent of our guild members  never fails to blow me away.  There were over 300 quilts at the show so there was a lot to see. Joanne over at "She Quilts It" posted many of my favorites. Please go visit and read her post about the show here. Joanne is an amazing quilter and innovative designer so adding her blog to your reading list will just bring more eye candy to your day!

Quilt information
My favorite quilt of the show was this one! My friend, Nancy Tubbs, made it. All those triangles are needleturned appliqué! I loved all the filler designs that she used to quilt her piece.  The lavender and navy lines are beads. What a great way to add visual impact!

I worked a white glove shift on the last day of the show. I look forward to the show next year as there will be even more amazing quilts entered!

Sunday, April 15, 2018

Challenge Block--revealed

Original pattern for the block
The Clark County Quilter's quilt show has been held so I'll share the block that I created back on a snow day last February. By the time that I drew this pattern, I had had quite a bit of practice with the compass as well as practice drafting the geese. This part of the process didn't take long at all!

Some of the fabrics auditioned for the block
I also took a little time to determine the Kaffe fabrics that I wanted to use. I was given two Kaffe fabrics as inspiration and I purchased the required square of the pink Moda Grunge fabric. I also had picked up a couple small pieces of Kaffe fabric from the guild free table. I had hoped that this combination would work into the block. Unfortunately, my color palette was too low volume for my eye. So I dug into my stash. I located a darkish purple print Kaffe fabric!

Finished block
I started paper piecing the geese. I was able to cut just enough geese from the stripe and pink Grunge fabrics. I had wanted just Grunge geese; but, I didn't have enough fabric. I like that the stripe adds some whimsey to the block. (Perhaps, I needed that stripe fabric all along!)

I also fussy cut the floral print chunk so that the flower would be easily recognizable.

I like how the purple wings for the geese made the geese appear to float in the block. A happy accident is that I didn't realize that I had a yin and yang design until I was finished! Another time, I might choose to make the curves more gentle so that it would have been easier to piece together. I also might graduate the geese so they were smaller at one end.

For this project, I wanted the geese to be able to "fly" horizontally or vertically in either direction so I kept the geese size similar. I definitely plan to use this technique again!
Entries

All of the block entries were amazing! First place was top row third from the left which was MINE!!!! I was shocked! In addition to a first place ribbon and a small cash award, this block will be made into the pin for members to purchase. A number of members collect the pins.

I look forward to seeing how these blocks end up in a quilt. The quilt will be stitched and quilted during the next year. The year after that or the third year, the quilt will be revealed and will become the opportunity quilt for the guild. Members will have selected a charity and will sell tickets for chances to win the quilt in a drawing. The drawing is held during the last day of the guild quilt show. All the monies raised will go to the selected charity. The quilt is awarded to the winner of the drawing.


Wednesday, April 11, 2018

Projects: Second Quarter Goals--2018 Finish-A-Long

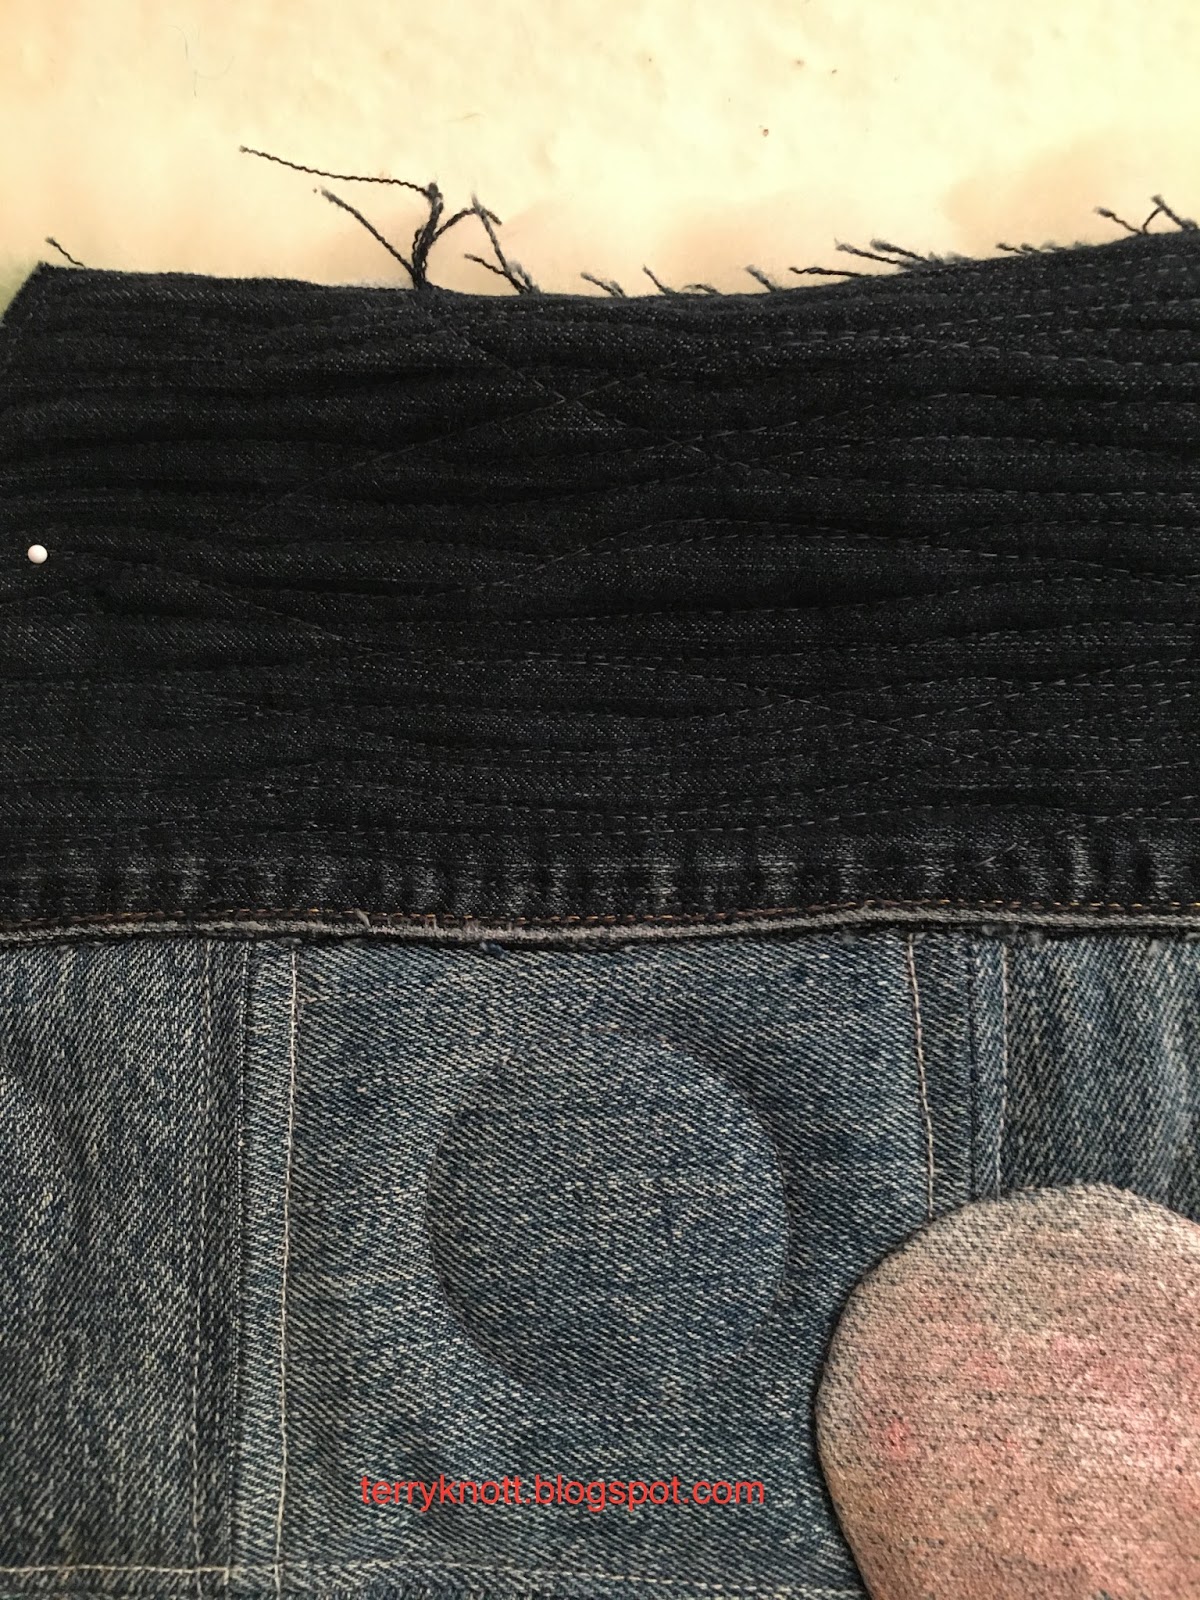
#1. Use these jeans for the guild challenge
I'm excited. Of the 12 projects that I listed for the first quarter, I completed nine!! I'm excited that nine photos will not be carried over into the list this quarter!

#2-#3. Embroider and embellish these aprons
Last quarter, as I thought about starting a new project, I would gather the pattern and the supplies. These items I would place in my "project" tub. I've found that I make better progress when I have the supplies for that project together. I also found that I make better progress when I have a selection of projects to choose from when I'm ready to move to the next one or when I need to take a creative break from a project. That tub is filled with plenty of projects to stitch over this next quarter!

Sandwiching simple, short term projects between projects that take more time and effort also works well for me. I have found that changing up projects helps detour potential quilter's block. Also, since I am using supplies rather than adding to my supplies, I'm beginning to have more space in my studio. Space is freeing!

This quarter, I'm planning to finish these projects:
#4. Finish this wall hanging
#1.-- Stitch the jeans into a wall hanging for the guild challenge. The challenge is to use only recycled denim in the top. I had some ideas and started this project last quarter.

#2-#3.-- Embroider and embellish these two aprons for the grands. I worked on each last quarter; but, didn't quite make it to the finish.

#4.--  Finish this little wall hanging of practicing insetting circles. Perhaps, this would be a good place to try out the idea that I want to use for my truck project!

#5. Quilt this truck
#5.--Add borders, layer and quilt this truck. I've selected some fabrics for the borders. I have an idea of finishing the quilt differently and have been thinking about how to accomplish my idea. I plan to practice the idea on goal #4!
#6.-#7.  Make two activity bags for the grands

#6 and #7.--Make two activity bags for the grands.   I joined a bag of the month club--I figured if I joined the club; I actually might get some bags sewn. After all, there is a monthly meeting that is a lecture class of tips and techniques to make the process more fun. I figure it is also a great way to reduce the number of fat quarters I have on hand! Although, after buying zippers and special batting and a pattern, it is costing me quite a bit to use the fat quarter! That's okay. Perhaps, I'll have a bunch of gifts completed for Christmas . . .early!
#8. Make a skirt out of this denim fabric

#8.-- Stitch this denim skirt for the grand that likes butterflies so much. If I don't get to this project this quarter, she will have grown too tall for the skirt! The other day, I saw a gored skirt pattern online that might be a better pattern choice because I could use some recycled denim to stitch some of the panels and the skirt has an elastic waistline which would be better for the grand that hasn't developed much of a waist yet!
#9. Stitch a dress with this fabric 

#9.-- Stitch a dress out of this gingham fabric for the grand that likes dress that you can twirl and swish the skirt! I found a dress pattern. I imagine there will be some piecing needed. I picked the fabrics up from the free table at a guild meeting last Spring thinking that I would play with some chicken scratch. Then, I decided, sewing a garment would be a faster use of the fabric!
#10. Get this piece to the finish line

#10.--- Finish this small piece. I'm still thinking about adding some piecing a la Jean Wells. Since my class with Joen Wolfrom regarding color, I feel like I may have enough tools in my tool chest to choose some corresponding fabrics that will work with the applique that I started! I want to use fabrics from my stash. My fingers are crossed that what I have will work since I'm trying to have a net loss of 50 yards from my stash this year!
#11. Make potholders

#12. Finish the crayon doodle
#11.-- Make a few pot holders. . . .years ago, the oldest daughter kitted some fabrics together in a shoe box for this project. It's time to get that box out and start stitching!!! I plan to make four pot holders and then reassess as to how many more pot holders could be stitched!

#13. Three pillow cases to be stitched
#13. One pillow case
#12.-- Finish the crayon doodle. This is artwork from the youngest grand that I decided to preserve. We started it last quarter. I plan to add some embroidery to the piece.

#14.  Make four tea towels
#13.-- Stitch 4 pillowcases. The photo with the three pillow cases will be used to store quilts. The photo with the one pillow case will be donated. I think I need to find a little more fabric to be able to get the donated pillow case stitched!

#14.-- Last fall, I picked up some fabrics, embellishments and tea towels to turn into gifts for Christmas. This quarter I want to make four of them!

#15.-#16-- I'm thinking the grands might want a dress or top for summer and this pattern would be fun to stitch. Maybe they will help sew their garments?

#15 and #16 Clothing for the grands
#17. --For Christmas, I received this placemat kit. The chicken pattern is cute. It is time to stitch it up!!

#17. Chicken placemat kit
#18. Stitch a second selvage tote
#18.--Last quarter, I made a tote with these fabrics and selvages. I had planned to add a pocket to the back of the tote; but, didn't because I would have sewn over my inside pockets. I'd like to make another tote and put that pocket to good use! I'm not sure that I have enough of the rust. . . .but, I guess that is part of the journey to choose a fabric that will mix or another one all together!! Perhaps, I can use the lining fabric from the last tote to make the pockets. I will need to select a coordinating fabric for the lining.

#19.--Stitch this panel "Artist Smock" for an apron for a grand to wear while visiting.

#20.--Stitch this hot pad and get back on track with playing along with JoJo at Through My Hands.

#19. Artist smock project
#21.--Stitch two black swimsuits. The one that I stitched at the end of the fourth quarter in 2017 is ready for retirement. I have a number of fun suits in the drawer; but, for teaching lessons, the instructor uniform is a black swim suit.

#22. Play with a mosaic design that Cheryl Lynch shared on a recent episode of The Quilt Show.

This is an extensive and exuberant list. I know:
I won't finish all the projects.
I may get sidetracked along the way and start a new project. I'm okay with taking an off road adventure as part of my quilting journey.
It is important to always enjoy the ride!
#20. Stitch this hot pad


#21. Stitch two swimsuits


#22. Play with this bicycle pattern


.


Sunday, April 8, 2018

Cotswold Bound--day six of the London adventure 2018

Castle Comb Church
We were up early this morning with a walk to the tube station and a ride to the Marble Arch where Nicole rented a car. When we were in Scotland, Bob, my husband, drove. On this day, Nicole drove and Jérôme was the navigator. Driving on the left side of the road feels so strange!

We set out for a leisurely drive through the countryside. It was forecasted for a lot of rain. Lucky for us, the rain mostly held off. As we came to small towns, we stopped to see what was of interest. My favorite stop of the day was Castle Comb. It seemed familiar and when I googled it later, learned that parts of the "War Horse" were filmed there. It is a beautiful village. It was great to see houses with the thatched roofs as we drove through the various villages.

Bristol bear
We still had a few hours before we could check in at our hotel so we drove to Bristol. Bristol is a modern city; but, we did visit the suspension bridge while we were there. The bridge opened in 1864 and has been entirely supported by tolls.

Nicole and Jérôme on the suspension bridge
We are staying at The Close Hotel. The little garden attached to the hotel is beautiful. The food at dinner was delicious. Jérôme had sole, Nicole had duck and I had pork. Every dish was delicious. I'm sure our two nights here are going to go extremely fast!

I walked four miles today.