Wednesday, July 29, 2020

Licensed to Cut Loose--post 3

Project at the start of July
I started this project in a Susan Carlson workshop in Sisters, Oregon in 2018. The butterfly is one of her pattern shapes. I've admired Susan's applique technique and have followed her blog posts for years. I decided this quarter it was time to put that project back to the design wall. 

I learned a lot in Susan's class. In preparing for the class, I  reread her book. I rewatched her show on TQS. I reread her various blog posts that she recommended. I packed supplies for her class paying close attention to her list. I thought I was prepared. I wasn't. 

Susan had refined her technique since she had been on the TQS show. My fabrics didn't translate well. The pieces that I brought were too small to practice her technique. My pieces were also without a pattern that I could use to trim shapes.You can read my first post on the project here.

Over the last couple of years, I've 
Project at the end of the first week
thought about this project; but, thinking about it wasn't enough for me to make progress on it. Last quarter, I asked myself why I had stopped working on it. The bottom line was that I wasn't excited about the fabrics. A close second reason was that trying to create a mirror image was impossible given my small scraps of fabrics. I had (and continue to have) few fabrics that could be cut into shapes following the print. 

For Susan's method, one has better success if one has chunks of fabrics to cut. I've been working to tame my scraps into Bonnie Hunter's scrap saving systems of squares and strips. The two methods don't work well together! 
Project at the end of the second week

To make progress, I decided that I would spend an hour a day on this project. If I had a good day of making progress, I certainly could spend more time. If I had a bad day of making progress, I would move on to another project! I do enjoy cutting the shapes that might get to live on the butterfly. In class, I was hung up creating mirror images of the butterfly wings. I decided instead that if I could achieve each side looking "related," I was successful.

I did have bad days where there was no change in the project. I told myself that I had discovered many options that weren't viable. I told myself that the next piece would be the start of many pieces filling the spaces. Some days, I celebrated that the timer rang at the end of hour!

At the end of the first week, I was stuck. I put on a lot of shapes, moved them around and took them off again. Progress was close to nil! I had FaceTime consults with the granddaughters. Miss J suggested that I needed to add blue fabrics to make it beautiful. Miss K suggested that I add yellow so it would glow. She also said I needed more darks to go with the yellow. Her final comment was that I should consider having the butterfly go from light to dark shades! I was trying to go this route; but, my fabrics are too much in the medium range!

Progress at the end of the third week
All of their suggestions were great. Miss J, who is six, could see that I needed darker fabrics to contrast my work. I do plan to collage a variety of blue fabrics as the background around the butterfly. 

Miss K, who is eight, had a valid point that butterfly wings are translucent and include a variety of light to dark shades. I pulled yellow fabrics. I cut more shapes. I placed fabrics on and pulled them off again.


I had a FaceTime consult with my friend, JoJo. She echoed the thoughts of my granddaughters. We talked about other possibilities. All the chats helped me forge ahead.

Close up of the applique shapes
I still have stuck times. Last week, my body was in rebel mode. I've not been able to use my left arm much because using it causes me to have back spasms. Of course, I am left handed. I can do some tasks right handed, although it takes me longer and the results aren't as precise as I would like. 

From time to time my body rebels. Usually, I can pinpoint what I did to cause the discomfort. Unfortunately, I don't know what I did to cause the discomfort this time.  The original cause of my neck and back issues are from a 2009 car accident. In that one accident, I was rear ended twice and pushed into the car in front of me twice. 

I've more chiropractic appointments ahead to help me over the pain and mobility issues. Currently, stretching, ice, meditation and Aleeve are helping me manage the pain. 
Progress at the end of the fourth week

I have tacked some applique shapes in place with glue as I was running out of pins! Tacking the shapes with glue is Susan's technique. She leaves the edges free so she can tuck other fabrics underneath. It is also a task that I can do right handed!

Some of my overlaps are tiny. This happened when I had a curved edge on top of another curved edge. I wonder if I will be able to cover the base fabric when it comes to quilting the pieces. I imagine I will figure out a way to make the spaces a design element if that happens! 

My studio flat spaces are covered with bits of possible options to add to this piece. Susan is right about there being a messy stage to the project, although I doubt that she was referring to the studio space!

I'm planning to use black fabrics around the outer edge of the butterfly and to bisect the top wings from the bottom wings. Originally, I planned to use one fabric. I had leftover triangles from a previous project that I placed around the bottom of the butterfly. Now, I'm planning several fabrics printed on a black background that alternate with a solid black
CPR station
fabric. I'm finding that having another part of the project to work on helps when I'm stuck in another section!

While I'm not "over the moon" with this project, I don't dislike either. I'm neutral or middle of the road, which is not unlike the medium value range of my fabrics! I would like to use this process in other projects so my desire to learn what works for me in this process drives me to continue. My granddaughter used this technique to applique the tail of the mermaid in her small wall hanging. She hasn't been able to come and stitch her project because of Covid. We have been social distancing since the end of March. I sure miss the hugs from the granddaughters!

Since it is the end of the month, I'll share that I helped 62 staff at the hospital earn their Healthcare Provider BLS CPR certification. I've been using the CPR cart primarily for the skill sessions. Participants like the updated program and format.


Sunday, July 26, 2020

Unity--Post 9

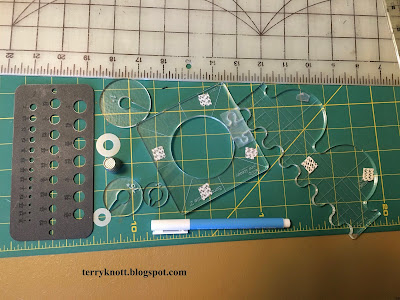
Circle template tools
When I first pieced the skinny borders around the center block, I thought that circles would be a good motif to quilt in that space. I pulled out my circle templates.

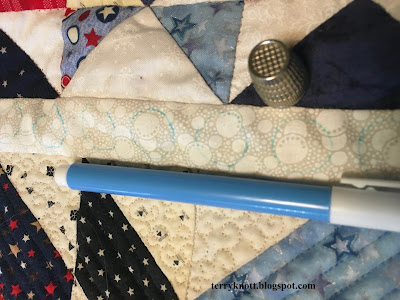
As for why I thought circles was the motif--perhaps, the fabric suggested the circles! The white on white print features lots of circles.  At any rate, I auditioned various sizes of circles. I decided that I would "eyeball" the distance between the circles.

Interestingly, the template that worked the best for me was the thimble! I placed the thimble in the border and drew around it with the blue soluble marking pen. Sometimes, I needed to redraw a few of the circles because my eye noticed a difference in the spacing. Then, I free motioned quilted each circle. I filled the spaces around the circles with pebbles. 

Circles ready to free motion quilt
I've quilted a lot of pebbles. I find it easier to see where I have quilted when I use a thread that is slightly lighter or darker than than the background.

Pebbles, while creating a wonderful texture, take a long time to stitch. I probably spent a couple hours on each side of the border to quilt this motif.

I used an aurifil 50 weight thread. It is the same thread that I used to quilt the swirly motif. It looks different because the fabric is lighter than the backgrounds of most of the center block.
Circles with the pebbled background

 In the end, I was pleased with the result. I plan to quilt more circles in other parts of the quilt. There are several more of these borders. I plan to repeat the circles with pebbles that I quilted in this section in those other like borders. It will take time; but, it also takes time to figure out what to quilt in spaces!

My next step will be to quilt the next round or next border. I have some ideas of what I will try since I had time to ponder while I was quilting all those pebbles!

I sure thought that I would have most of the quilting finished on this quilt at the end of a month; but, at the rate I'm going it may be September before I finish this project. I'm not on a deadline so I can enjoy the journey!

Covid update:
Worldwide:16.1M confirmed cases; 9.27M recovered; 645K deaths
United States: 4.5M confirmed cases; 1.28M recovered; 149K deaths
Oregon: 16,104 confirmed cases; 282 deaths

The number of positive Covid cases continues to rise in the state. The governor this week made it mandatory for kids five and older and for people working out in gyms to wear masks as well. Many businesses had already been asking customers to wear a mask while shopping.There is talk that there will be more tightening of restrictions. There are still a lot of people who applied for unemployment back in March; but, have yet to have received any money. One of my aquatic friends was laid off on Monday because the pool can't open. Another of my aquatic friends received notice that she will be furloughed after July 31.

Finished circles and pebbles border
It appears that Oregon schools will start on time in the Fall; but using either an online program or distance learning program until it is safe enough for kids to meet in the classroom. 

The city of Portland has weathered eight weeks of violent protests. Some of the destruction has been televised nightly on national news.  A judge refused a request to bring a lawsuit against federal agents for arresting the violent protestors. The local news stated that since the protests began local police arrested 60 protestors. Reports of how many protestors the federal agents have arrested are not available. 

Wednesday, July 22, 2020

A Bag of Flannel Scraps--This Project Starts With A Rectangle

The assortment of fabrics
I decided to tackle a second pile of scraps to see what I could make using improvisational piecing. The pansy fabric was leftover end cuts from one of Martha's projects that I cut into four inch by ten inch pieces. There was a strip of light blue flannel that I also cut into the same size rectangles. I also uncovered a couple three inch by ten inch rectangles of a different flannel print fabric that I decided would be part of this project. I had 12 rectangles as my base.

Next, I cut the remaining chunks into strips ranging in size from one inch wide to two and half inches wide. My idea was to piece the strips into sections that I would piece above and below the  rectangles.
Strips ready to piece together

There was an additional quarter yard piece of light blue flannel that I thought might become setting strips to frame the pansy piecing. The hot pink fabric was so bright that I decided I would cut it in mostly inch segments and use it as a pop of color for interest.

As I stitched the strips together, I realized that my original plan wasn't going to work. I played with the arrangement of the rectangles. I thought about the subway tile in my kitchen. I decided to stitch the blue flannel at the top and bottom edge of the rectangles. I saved the green print strips to use them as sashings or borders.

I pushed the block sections closer together and auditioned the strip blocks as a border for the top and bottom of the "tiles." I filled in the blank spaces with a chunk of dark green flannel.
The leftover bits

The remaining green print fabric became sashing. I stitched a navy strip to balance the dark green strip. Next, I stitched the string blocks to the bottom the panel. I didn't have enough string blocks left for the top edge.

I cut the remaining string border into two pieces. The narrower strip allowed me to use most of the leftover pieces from the first strips. The remaining bits grew the string sections to become design elements!  I like the interest that the string border added to the top and to the lower edge of the panel. As far as leftovers from the starter pile, there weren't many!

I think that the purple areas will be the perfect place to play with some ruler designs. . .or I could repeat the subway tile pattern.

Currently, this top 34 inches wide by 60 inches long. I had planned to purchase enough flannel once the social distancing ended to make the top into a size that is 40 inches wide by 60 inches high. This morning, our guild held an by appointment only sale that included stashes from several quilters who have passed away. 

I thought that I might be able to find flannel that was more in the vintage of the scraps that I had pieced at the sale. I made an appointment for the beginning of the day. The sale was set up at a guild member's home. She had a covered porch that ran the length of her home. The "goods" were neatly arranged for viewing.

We wore masks and practiced social distancing. Prices were what you felt was owed and no charge if you were sewing for charity which was me. I didn't look closely at the fabrics. Instead, I picked up a few scraps, chunks and a little yardage of some pieces that I thought would work for the projects that I had stitched with Martha's flannel scraps. 

I haven't been out much since March and I will admit, I felt uncomfortable. Before Covid, I would have searched the box to pull all the like bits together. I would have visited with the people managing the sale as well as visited with the people shopping the sale.

Instead, I said hello and thanked the sale managers for the shopping opportunity. I picked out my items and left! I was at the sale less than 10 minutes.

Once I finish quilting Unity I will work on finishing this project and the other flannel project I posted about here
 

Sunday, July 19, 2020

Unity--Post 8

Stitching in the ditch
Quilting has been hard on my body. When I started this quilting project, I decided to not quilt more than two hours in a day.  I have worked on "Dad's Ties," practiced drawing and noodled about other projects. I've decided it takes me about the same amount of time to quilt a project as it does to piece a project. I've also noted that sticking to that two hour limit causes me less pain.

I spent a few weeks stitching in the ditch. I used a monofilament thread produced by Superior Threads in the needle and a polyester red thread in the bobbin. I reduced the tension setting from number two to number one on my machine. That change stopped the bobbin thread pulling to the top of the quilt and leaving a line of little red dots. I'm using polyester thread because the cone was gifted to me years ago. I'm into using what is on hand and it is time to use this huge cone!
View of the back after stitching in the ditch

When I finished stitching in the ditch, I took a photo of the back of the quilt. That red polyester thread is a great contrast to the light blue and dark blue fabrics. It blends well with the red and firework print fabrics. 
I estimate that it took me about 40 hours to complete the ditch quilting.

Quilting the center block of the quilt excited me. I wanted to quilt a circle in the center of the block. Unfortunately, after three tries which included lowering the pressure of the foot to -5, I was unable to quilt a round shape because the seams made the area too uneven to navigate with the template. 

I choose a different approach. I quilted straight lines in the blue and red diagonal shapes. I quilted a gentle curve in the center pinwheel. I used a
quilting ruler to quilt the lines; but, I free motion quilted the continuous curves in the pinwheels.

Lines and background filler

I added a few straight lines in the red triangle shapes. For the background filler, I used the same thread in the bobbin as I did in the needle so that the thread build up would be less. A long time ago, I took a machine quilting Saturday Workshop class from Barbara Shapel

She is a contemporary thread artist who does amazing work! In her class, she said she was inspired to create a 
View of the quilting from the quilt back
filler stitch from the wall paper in a hotel where she was staying. She shared the little filler stitch. This is the filler stitch I decided to use in the background. 

Barbara is a wonderful teacher. If you have the chance, don't hesitate to enroll in any class that she teaches. You will learn a lot and have fun too! My filler stitch resembles her filler stitch; but, it isn't exactly like hers. 

I think of free motion quilting as cursive writing.  We all have our own style. For example, the way I form the letter "a" will look different from the way you form your "a." Although, we both would recognize each form as an "a." This personalization is what I enjoy the most about free motion quilting. No one else is going to quilt like me!
 More lines and background quilting

It took me a week to quilt the center block. I thought that I would finish quilting this project this month. To do so, I would need to be much further on the quilting that I am. I will settle for making continued progress! Next, I'm planning to quilt the narrow sashing. Stay tuned for an update!

On the covid front:
Worldwide: 14.3M confirmed cases; 8.04M recovered; 603K deaths
U.S.: 3.78M confirmed cases; 1.11M recovered; 142K deaths
Oregon: 13,802 confirmed cases; 254 deaths

This week the governor imposed mask restrictions on outdoor activities when social distancing cannot be maintained. The reason she widened the mask wearing requirements was because the number of positive cases and covid deaths is trending sharply upward. Every day, we have had more than 300 new cases reported.

School officials are planning to reopen in the fall. In some districts, masks are optional; in other districts, masks are required. On-line learning will be in place some days of the week with students in classrooms on the other days of the week for in class learning experiences. Home schooling is an option many parents are reviewing. 

Being a teacher during this time is concerning. Contracting the virus and bringing it home to that teacher's family is a big concern. Our medical community and grocery supply community have been at this process for five months. I consider each and every one of these front line workers heroes.  Teachers are
Center finish
also front line heroes. 

Speaking of front line heroes, I learned on Friday that the temporarily laid off staff person that I so enjoyed working with will be permanently laid off as of August 7. She and I joined the company the same year. We've worked at that hospital for 27 years! I am sad and will continue to miss her and her no problem unsolvable presence. Covid affects the healthy too.
 
The looting and violence during nightly downtown protests continues. It has been seven weeks. Protests are held during the day too. A federal officer seriously injured a protester in the head with a less than lethal munition. News venues around the U.S. covered this incident. In contrast, I haven't read how the police officer, who sustained a traumatic head injury from objects protesters hurled at the officer, is doing.  

The mayor and governor want the federal officers removed. Although, it would appear that there is less damage to the federal property since their arrival. 

I value our right to free speech. Using free speech as a back drop to employ violence, however, is wrong. A number of
Maui, Hawaii anniversary dinner 2018
business will not recover from the one-two punch of Covid shut down coupled with the property destruction  during the protests.

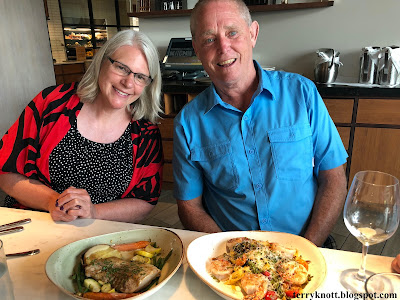
To end on a positive note, today is our 40th wedding anniversary. We had planned to watch a Mariner baseball game in Seattle, Washington to celebrate. Unfortunately, the game was canceled. Canceling was a wise decision. Neither of us would have wanted to be around that many people right now! Instead, the two of us will have a quiet celebration at home.

My husband continues to be the best life partner ever. He makes the hard days work and the easy days even more fun. I am the fortunate one. 


Wednesday, July 15, 2020

Pillow

Auditioning the hour glass pieced border
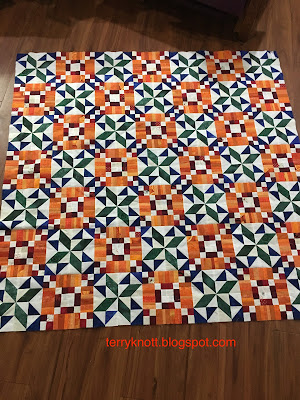
I created this embroidery in 2014 as a block for the quilt project, "Bitter Sweet Memories." This was my test block. I thought that I would make a pillow out of it. I put aside a piece of red fabric from my stash that I thought would make a ruffle and a back. You can see that piece of read fabric in my third quarter goals post.

The only problem was that I couldn't get enthused about the project. The project has been on my FAL list for a couple years. I'd pull the embroidery out from time to time; but, that was as far as I went in working on the project! 

I've wanted to document the quilts I've made prior to starting my On Going Projects blog. I haven't made a lot of progress to that end. In posting about "The Village" last month, I thought about Sharyn Craig's class. She said she would make "parts" when she was stuck and sometimes the act of sewing parts helped her move forward with a project.

Remembering her talking about the parts got me to thinking about some leftover parts from a book club quilt, "Remember Me." I had pieced more hour glass units than I used and I thought that the units would the beginning of a good frame for the embroidery. 

 Although there were a number of units, there
Adding the splash of yellow
weren't enough for the entire border. I decided not to make more. Instead, I filled in the spaces with neutral inch and a half squares.

As the border began to take shape, the embroidery no longer felt like a pillow; but, like a small wall hanging. I love it when a piece speaks to me. I only wish I had "heard" it talking years ago!  While, I liked the idea of little splash of yellow, the yellow batik fabric wasn't "it."  

In the end, I selected a package of yellow bias tape that was a good width and a good color. I used the number 10 foot to stitch a narrow zigzag along the edge of the embroidered block. I liked the result so much that I used yellow fabrics for the backing, the sleeve and the binding. 

It is ready to machine quilt. Although, I think I hear a whisper that it wants to have a word embroidered on it too!

I'm planning it to be a book club quilt even though the embroidery isn't a peony flower. In one of our book club books, the female character likes to garden. Peony flowers are a favorite and the male character gives some to the female character. I'm thinking that this project will cover that book. The hour glass blocks have significance to the story line.

Pin basted and ready to quilt
 The book was "The Vinegar Girl," written by Anne Tyler. In high school, my English teacher opened my eyes to Shakespeare. In college, the Shakespeare classes that I took were among my favorite classes. For "the Vinegar Girl," Tyler reworked the story line of "The Taming of the Shrew." 

If you are not familiar with "The Taming of the Shrew," Tyler's book is still a good read. In fact, a reader might not make the connection between Tyler's book and Shakespeare's "Taming of the Shrew."Having studied "The Taming of the Shrew" in college, it was a hoot to read Tyler's version. 

I'm planning to finish this piece this quarter and I plan that it will be the next piece that I quilt. Currently, I'm quilting the Bonnie Hunter Unity project. I started Unity in March and want to actually finish one of her projects that I've started over the years!

Sunday, July 12, 2020

Pinwheel Crumbs--A 2013 Completion

Close up of crumb block and feathers
Our book club read "The Last Runaway," by Tracy Chevalier. In the story, the main character comes from England to the United States on a ship. She is seasick for so long that the hexagons she brought with her . . .well, she threw them over the side because she thought they smelled of vomit. Later, she wished she still had the hexagons. She liked piecing, the family she became a part of liked applique. 

I was inspired to use the color green to represent how she felt on her trip across the ocean. I challenged myself to use small scraps or crumbs, to free motion quilt leaves and feathers. 

I pieced the small bits together and then I added strings until I had a large enough piece of fabric that I squared and then sliced on the diagonal. I don't remember the size of my squares. I do remember how surprised I was at how many little bits I used!

I played around with the crumb triangles until I found an arrangement that seemed pleasing to my eye. As you look at the blocks you can see how two of the legs relate. Each pinwheel used two crumb squares.

Full block
Once I added the green fabric and stitched the pinwheels, I had to decide how to set them. As I laid out the blocks, I thought about corner stones in the sashing. Plain cornerstones weren't interesting enough.

I had a little pile of leftover pinwheels which I had stored in my "parts" box. These finished to about two inches. From time to time, I make blocks from bits while I'm pondering solutions to a challenge. Sometimes, mindless sewing opens my mind to interesting solutions! It is also fun to incorporate parts sewn during those mindless sewing sessions into a project. I also use those ready made parts to audition design elements. Some parts are petted and auditioned many times!

These pinwheels started as trimmed triangles. Rather than throw the bits away, I stitched them into HSTs. I stitched four HSTs into a pinwheel. I decided repeating the pinwheel shape was the best option for cornerstones.  

Choosing the sashing took me a long time. In the end, I decided a dark purple would make the green triangles pop the best and also play nicely with all the fabrics in the
Pinwheel cornerstone
crumb part of the larger pinwheels. To preserve the pinwheel points from getting covered with the binding, I added a narrow border of the purple fabric.


For the backing, I used a single pink print fabric. Often, I piece the back; but, not this time. I layered the pieces and pin basted. I completed the ditch quilting and was ready to practice feather quilting. I drew a lot of feathers on paper to practice the shape. To keep my feathers somewhat consistent, I used a chalk pencil and drew the center spine. Then I quilted the feathers. With practice, my feather shapes improved which was one of my goals! I used a green Highlights polyester thread made by Superior Threads for the quilting.

Soon enough it was time to practice quilting leaves. My goal was to be able to quilt a leaf shape in any direction and in a variety of sizes. I wanted the leaves to be background texture so I chose a polyester Floriani thread that was a similar color to the purple sashing fabric.

It took a long time to quilt all those small leaves. However, I am now comfortable quilting leaves of various sizes and
View of the binding and leaf quilting
shapes as a background filler! The time I spent quilting the background while long was worth the effort!

Once I had blocked the quilt, I had planned to bind the quilt in the dark purple fabric that I had used as sashing. I auditioned the binding. While it was a suitable choice, it didn't speak to me. I inserted a strip of the lime green fabric between the border and the binding and liked what I saw. 

I added the green strip to be part of the binding and then I machine stitched it to the quilt. I added the label to the back of the quilt. I pulled the binding to the quilt front and topstitched the binding to complete the binding process. I like the bit of pop that the tiny strip of green adds to the feeling of the quilt.

I finished this project in April of 2013. I noted on the label that it took me eight hours to piece and 21 hours to quilt! I note that I didn't include the inspiration behind the quilt so this blog post will provide the prominence regarding why I made it.  I've enjoyed seeing it hang in my living room this month. At some point, it will be a baby quilt. For now, it is in my personal collection!

The label
Regarding the Covid pandemic:
Worldwide:
12.5M confirmed cases; 6.89M recovered; 560K deaths
U.S.:
3.92M confirmed cases; 970M recovered; 137K deaths
Oregon:
11,454 confirmed cases; 275,316 negative tests; 232 deaths

We are hearing information that the virus can be spread airborne indoors because the droplets stay suspended. Recommendations include opening windows, employing air purifying systems and wearing a mask to be safer. 

The Oregon numbers represent a 51% increase in covid cases since last week. The media reports the cause of the increase as work related and community exposures.

At the hospital where I've been testing the physical CPR skills, I've learned that many of the workers have socially isolated themselves to include their work pods since mid-March. They have limited their contact with friends and family so that limit an outside exposure to contracting covid. Their goal is to continue providing healthcare to our community.

My supervisor said that she had read a story from the University of Washington regarding mask wearing. The statistic in the story was that if 95% of the U.S. population wore masks in public, the death rate would fall to less than 150,000. Seems like wearing a mask would be a no brainer. Unfortunately, people are not wearing a mask nor are they social distancing.

Finished quilt
I am wearing my mask in public. I continue to social distance. I continue to miss my grandkids and members of my quilting community. Phone calls, e-mails, FaceBook, FaceTime and Zoom are good; but, I miss actual interactions.

Protestors have protested for 44 consecutive nights. The Federal Government has been employed to protect the federal buildings, federal property and federal employees on order from President Trump. An employee tried to stop a protestor from causing damage to the Federal building with a sledge hammer. The protestor assaulted the employee with the sledge hammer. Other employees suffered injuries from protestors hurling objects at the employees. 

There were reports that protestors have thrown "milkshakes" at officers. The "milkshakes" contained a quick drying cement type product. Police have been pepper sprayed, punched and one officer suffered head injuries when hit in the head with a projectile.

This week the head of the police union issued a vote of no confidence saying the Portland mayor and city council does not support the police department. The mayor responded saying it was the police department's job to restore order and that he had supported their efforts. The city council responded similarly. 


Wednesday, July 8, 2020

Third Quarter Goals 2020

Photos like this will be seldom used
I've been at this plan of finishing projects for the last ten years. For the first five of those years, I also started projects as soon as one struck a chord with me. Because there were so many projects, I didn't make much progress when it came to finishing! Once I realized I had few finishes for all my starts, I made a list of Works In Process that I wanted to finish in a year. I tried working with that list for a couple of years; but, I didn't use it like I had envisioned. More importantly, the number of finishes that I had envisioned didn't materialize. 

Some people, list ALL of their started projects, their projects that they have purchased the fabrics and their projects that they want to make. This is not me. I don't want to "own" how many projects are actually in my studio. As to what I want to make, my brain is always thinking about the next project!

Before I started this blog, I wrote a blog through "The Quilt Show" website. The blog was a way to document what I was doing. I enjoyed every "finish" post I wrote! At this stage, I still started a lot of projects. Unfortunately, when the website was updated, I lost access to those posts. It took me a few years to start this blog!

"Frolic" will be off the list this quarter
While reading another person's blog, I learned about the Finish-A-Long project which has been around since 2012. In 2018, I joined the group. What I liked about it was that you listed your intentions and that there weren't penalties if you didn't finish what was on your list. I made progress and was side tracked (in a good way) seeing other people's projects. For 2020, the group now posts their lists and finishes on Instagram. With two quarters behind me, I will admit, I liked posting finishes to a link up rather than using Instagram. I stumbled upon new to me projects and blogs. I don't look as often or as in depth at the Instagram posts.

With the FAL, each quarter, I would have a huge list of projects. Every quarter, I would finish way less than what I thought that I could finish. I started using my bullet journal as a way to help me set interim goals which helped. Still, my finishes were few! 

This quarter, I looked at my list. I again noted that I've several projects that have been on my list for years. So far, my projects continue to be ones that I want to complete. Should I encounter a project that has completed its lifecycle with me, I have no problem dispensing it to the donate pile or tossing it. I also realized that is hard to make progress when you don't work on a project during the quarter. 

"Good Fortune" is off the list for now too
My purpose in participating in FAL is to finish projects that I've started. I also want to use stash and reduce my fabric inventory. I've found it helpful to vary my projects. To be more successful with finishes and stash reduction, I'm changing my list. 

Projects that are months away from the quilt stage will mostly be removed the list. I do plan to continue piecing and working on those projects so those projects don't end up being UFOs. (UnFinished Objects) I plan to keep Good Fortune and Frolic, to name two projects, out where I see them every day to remind me, I've more work to do!

I'll list some clothing sewing projects. I will even list a cross stitch project because I have a whole bunch of cross stitch kits from Martha's stash. I don't know that I ever saw her work on a cross stitch project. I wonder if she gave these little kits away as gifts. I wonder if she was drawn to the kits because they were small and she thought the project could be finished fairly quickly. She was all about fast!

This quarter, I am planning to make another bunch of masks. I'm using a different pattern that incorporates elastic because I've found the fabric ties to be a little challenging to easily get on and off when we have our social distancing dinners with our daughter and family. 

#1-#4. Flannel scraps tops started from Martha's scraps
I've already made four masks. My plan is to make a couple as I'm piecing using the leader/ender style of sewing. I'll choose the fabric when I'm ready to make each mask. This project won't be on my list because I'm not planning the fabrics and because I'm not planning to stitch all the masks as one project.

This quarter, I'm grouping my projects together. Last quarter, I shot a group photo of a number of my projects. I was surprised at how much space the unfinished projects occupied. Last quarter, I listed 27 projects. I finished 11 projects. I had 12 total finishes. That means, I averaged one finish a week for three months. 

With my new plan in mind, I'm listing 16 projects. Projects one through four, are flannel tops that I made from Martha's leftover "adult" scraps. (I haven't started tops with her leftover "kid" flannel scraps!) I stopped because I ran out of fabric to get the tops to the desired 40 inch x 60 inch size. In a couple weeks,
#5-#12 projects
I'll be attending a sale of several quilters' fabric stashes. I hope that the fabrics available will coordinate with the vintage fabrics in these tops! I plan to develop my walking foot quilting skills when quilting the tops. 

Projects #5-#12 are listed below:
#5 is to finish quilting Unity. I'm nearing completion of quilting in the ditch! #6 is to stitch the hand dyed black fabric into a modern styled wall hanging with the red corduroy applique and other red accents. #7 is to make a summer dress for the youngest granddaughter. #8 is to stitch myself a dress. Last quarter, I planned to stitch a wrap dress. . .now, I'm not sure on the style.
#13-#16 projects
I'm thinking now about an empire waistline dress. I need to purchase a pattern! #9 is cross stitching six Santa ornaments. #10 is stitching the leftover tie fabrics from the tuffet project into a wall hanging. My plan is to machine piece the strings together into strip and to hand piece hexagon stars together out of the larger pieces. #11 is to stitch three camel back carry all bags. #12 is to stitch one and maybe two flounce leggings for the granddaughters.

Projects #13-#16 are below:
#13 is to quilt this top. It was one of the last tops my friend Martha made. I know of a high school graduate that would like it as a finished quilt. I need to make the back, baste and quilt it! #14 is that little piece of embroidery that I thought wanted to be a pillow. It wanted to be a wall hanging so it is at the quilting stage. #15 is Miss K's mermaid. I hope that we will be able to finish this project. Covid keeps us from working on it. #16 is the applique butterfly that I started September 2018 in a Susan Carlson class. 

Time will tell if this approach helps me find more success at finishing projects and reducing my stash!!!


Sunday, July 5, 2020

Who's That--A 2010 Completion

Current Lexi
This post is about documenting a past book club quilt project. We read "Remember Me" a book by Sophia Kinsella. The main character Lexi wakes up in a hospital bed after a car accident. She doesn't recognize herself. Turns out she is missing about three years of her memory. It was the author's description of the character looking at herself in the mirror viewing coiffed hair, plucked eyebrows, svelte body and straight teeth that she doesn't recognize that was the inspiration for this quilt. 

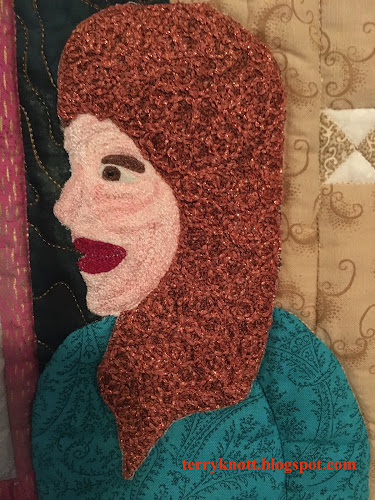
I created the scene with the character looking at her reflection. I had to cheat on the reflection because I would only be showing the back of the Lexi my character's brain remembered and I wanted to show more of the character. My friend Martha gave me the metallic "mirror" fabric. I thread painted myself in the mirror. This was my first trial at thread painting. I had tried a sample figure where I had used a typical threads--green hair for example to create the figure because I wanted to play with the technique.

A photo of myself helped me with work through the shading of the face and hair color. It was a challenge to make the mouth and the nose! The rouged cheeks weren't as subtle as I had imagined; but, the spirit of the svelte women is visible!

The Lexi the character remembers
I had fun creating the overweight, wild red haired gal that Lexi remembered herself being. I used layers batting to create the figure. I had the most fun creating the hair. I used about six different types of threads to build a base. What makes the hair special is the Razzle Dazzle Superior thread that I used in the bobbin to create the curls.

Over her shoulder you can see the tiny hour glass blocks that I interspersed in the background. In the story, time to figure out the issues was limited. You will have to read the book to determine if she was successful!

Sunflowers also figured into the story line. I had several pieces of sunflower fabrics; but, the fat quarter piece of the one I wanted to use was too small for the border so I used the batik fabric instead. I quilted around the sunflower print in the batik which worked well for me! The other piece of sunflower fabric became a part of the back.

My friend Martha helped me audition lots of fabrics for the mirror frame. None of the ones I auditioned next to the mirror were "it." One day when we were stitching together, she shared that pink fabric with metallic thread. It was a fabric that would be in my stash as I'm not into pink and gold thread isn't too exciting to me either.
Label

I had to admit that the fabric was "it." What I didn't take into consideration was that the additional batting to "trapunto" the figure would cause the piece to hang wonky. 

In spite of the lumps and bumps, I still like this quilt. The grandkids thought it was so funny that I used past photos of myself to draw myself. They showed me how easily they drew themselves and encouraged me to do the same!

I sure wish that I had that same confidence in my abilities; but, I don't. I am practicing drawing figures and I can see improvement. I do like drawing and sketching. I didn't draw as a kid though!

Regarding Covid--
Worldwide: 11.2M confirmed; 6.03M  recovered; 528K deaths
U. S.: 2.89M confirmed; 872K recovered;  132K deaths
Oregon: 9,930 confirmed; 213 deaths

This week there were so many more cases of Covid. One child care center in Milwaukie had 28 positive cases. Statewide, there were many
Finished quilt
more cases. The last three days in a row 300 or more cases of covid were reported. The governor froze moving to a new recovery phase for 60 days and she made an executive order that throughout the state we all must wear a face covering in a public place.

Regarding the protests:
They still are happening nightly. This week a faction broke the windows of the justice center building in downtown Portland. Police had to use tear gas to disperse the crowd. The previous day, the city council had voted to ban police from using tear gas unless officer safety was at risk. There was a lot of discussion regarding whether or not the police had not followed the new protocol. 

Yesterday, Amanda and family came for a social distance barbecue. They brought drinks, dessert and buns. We provided the burgers, deviled eggs, potato salad, baked beans and chips. Bob smoked bacon basting it with maple sugar and brown sugar. He made guacamole for the corn chips; but, mostly for the burgers. 

Miss J loves bacon. Traeger smoked bacon is my favorite method of cooking bacon now. It was delicious as was the apple cake the girls
New mask styles
made for dessert! I liked my beer--Amanda selected it specifically for our tastes. She selected another that fit James and Bob's taste better. 

We watched the granddaughters kick soccer balls all over the property. We could tell that they have been practicing their footwork skills. I enjoy hearing their laughter. K told us about opening her restaurant--Keira's Restaurant. She served her favorite foods. She cooked the foods, made actual menus, took the orders, served the entrees, provided entertainment and cleared the table. She was open for lunch and for dinner. Lunch was steamed broccoli, salad and drinks. The sides cost a $1 and the drinks cost $2 with free refills. Drink options included pinot noir and Chardonnay wines with one wine coming from Johan winery. (Her mom's favorite Oregon vineyard) Dinner was pizza with toppings of pepperoni, olives, kalamata olives and a couple other items I couldn't remember. Dessert was ice cream; but everyone was too full after pizza to eat dessert. Pricing for dinner was higher.

She said she had to pay the sous chef (her dad); but, not the dishwasher (her mom) and that she needed to pay her supplier for the foods that she ordered for her restaurant. She felt that she
Modeling the Ithinksew mask
made some money on her venture. Kudos to her parents for indulging her in her restaurant trial. What a great way to practice science skills, math skills and writing skills in addition to all the planning and organizing!

I made some new to me patterns for face masks. Friday, I went to Quilting Delights and picked up a few yards of 1/4 inch elastic. The pattern I made for the granddaughters came from a Leah Day YouTube tutorial. The pattern I made for the adult masks came from the Ithinksew website. Adjusting the elastic is the key. I'm still working out that detail. 

The patterns are free. I liked that the kids' mask had a place for a removable filter. I liked the coverage of the adult mask. I also liked the wide area to slide in an additional filter if wanted. It was easier to make casings for the nose wire in both of the patterns. Both patterns took less time to make than the ones that I made using the Craft Passion pattern. The Craft Passion author has updated the mask pattern to include a vinyl area for the mouth for people who communicate through lip reading.

I plan to make another couple dozen masks for friends and family. This time, I'm sewing a few as I sew other projects. I used 3/4 yard of stash fabric for these masks which brings my total fabric stash use to 50 1/2 yards.


Wednesday, July 1, 2020

Dad's Ties--Post 4 Eleventh Finish 2nd Quarter FAL 2020

Viewing the panel groups
I enjoyed stitching each panel. . .actually, it was fun. I laid the panels side by side to get an idea of what they would look like when stitched. I liked what I saw.

Carefully, I pinned two sections together ensuring that my pins connected the stitching lines on each panel. When I stitched the line, I found that I wasn't accurate. Fortunately, I had only stitched about 12 inches so there wasn't as much ripping as there could have been!

Hmmm. . .when this happened as I was learning to sew, my grandmother would encourage me to hand baste the pieces together. Yes, it was time consuming; but, necessary for accuracy as these stitched panels need to fit over a form.

Once I had the panels together, I chuckled. The piece reminded me of a circus tent! The upholstery thread from my Joann order arrived; but, not the upholstery needles. In fact, I received an e-mail message that the needles were no longer available. When I had placed my original order, I skipped the pick it up in the store option because I had a coupon for free shipping. Since I'm limiting my public outings, the free shipping option was best for me.

Label
ARGH!!! I was almost to the point to use the needle!!! I went back on line to shop Joann and saw the item was available at a store about 18 miles from me. I ordered it. In about an hour, I received the e-mail the item was ready for curbside pick up. I drove there and back which was about an hour round trip. There, I waited about five minutes and the staff person brought my order to my car window. It was great first time curbside pick up experience! 

Once home, I finished the label and added it to the back of the circle which finishes the underneath portion of the tuffet. I had about half of the the raw edge turned under when I decided I needed to incorporate a piece of batting underneath the fabric because it was too flat. 
Quilted backing and trim

I laughed at myself because while this part of the tuffet isn't going to be seen, I decide the area needed batting, quilting and trim!

With my walking foot, I quilted the backing in inch increments. I also quilted a few diagonal lines for added interest. In my stash, I had some leftover trim from the princess cape I made my granddaughter. This trim will cover the edge between the tie fabrics and the backing. In higher end furniture, the upholstery is finished in this manner.

The owner of the Tuffet Source, Sharyn Cole, appeared on an episode of "The Quilt Show" (TQS) which aired September 13, 2017. I enjoyed that episode. I decided making a tuffet would be on my bucket list. The ties provided the material and making a memory tuffet was the perfect project.

Last July, I ordered a kit. When it came, I was too chicken to start the project; but, I was impressed with the kit. The products were high quality. I supplied the ties, stabilizer, a small piece of batting, trim, label, thread and upholstery needle. The rest of supplies came in the kit. The kit was well packed and organized. The feet I had chosen were beautiful.
Finished bottom of tuffet

I watched the TQS segment many times. In one of those viewings, I noticed that she too finished the underside of her tuffet as I did. Perhaps, my subconscious brain remembered before my conscious brain did!

I appreciated seeing how Sharyn fitted the circus tent over the tuffet form. It is a little like putting on pantyhose after a shower! Her tips about button placement were great. 

I was intrigued with how Sharyn achieved the
deep dimple in her tuffets. She demonstrated her technique using a toilet flange. Yesterday, my husband picked up a three inch dryer vent that worked. The stores he shopped this week didn't have a toilet flange. It cost three dollars! I can't imagine getting a deep dimple under my own power. My husband pushed and I tied. I loved the result.

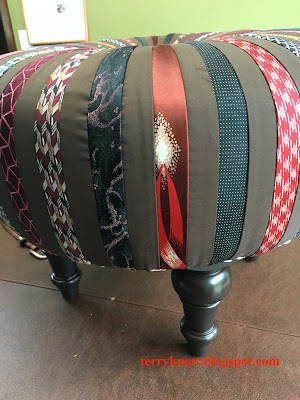
Finished side view
Yes, there was an adjustment of the gathers and smoothing of the fabric over the curve of the form. The next step was to staple the tie fabric to the base. My husband manned the stapler. We found that a scalpel was the best tool to cut the holes into the fabric to attach the feet to the base. I positioned the backing and my husband stapled it in place. I used a glue gun to lay a thin bead of glue around the edge of the backing and applied the trim.

The feet were easy to attach. I love the shape of these feet! From the time I maneuvered the circus tent over the form to the last turn of the feet was about half an hour. I LOVE it. My mom is going to be so surprised! Her favorite color is brown so she is going to key in on that fabric right away.

If you missed one of the previous posts, I've listed them below:

Top view of the tuffet
In addition to my granddad's ties and those from my special friends--Laura's dad, Julie's husband and Heidi's husband and my husband, Bob--I used three yards of fabric from my stash. (1 1/2 yards was the brown fabric and the remaining fabric was the stabilizer.) I have now used 49 3/4 yards of fabric from my stash since the beginning of the year.

It took me about 42 hours to complete this project and the cost of the project was $262.

This is my eleventh Finish A Long (FAL) this quarter and my twelfth finish over all. This was goal number 14 on my list. I've posted this finish on Instagram #2020falq2finish 

I'm actually a little sad that I've finished the project. It was fun and I look forward to sewing another tuffet using a kit from the Tuffet Source. Next time, I won't wait a year before I start the project!

Today is the first day of the third quarter for 2020. It is time to make the plan of projects I want to make progress on and the plan of projects that I want to finish! Of the 27 projects I listed in the second quarter, I finished eleven of them. I made progress on three other projects.  I needed additional supplies for five of the projects. Since I am limiting my public outings, I refrained from doing an in person shop. I may decide to try an in person shop in the next quarter. I didn't work on seven of the projects. The other project is my granddaughter's mermaid project. I look forward to stitching again with her to finish her mermaid. Although, we may not be sewing together again until there is a vaccine for Covid 19.