Showing posts with label line. Show all posts

Sunday, December 5, 2021

String-A-Long--Post 3

Selection of strings for 2 1/2 inch strips
I continued to paper piece the strings together. I was curious how many units would come from that gallon bag. I was also curious how long it took to piece a section of "string" fabric. It took me about an hour to piece two 11 inch squares and two 3 1/2 inch by 20 inch strips. As for the number of strings. . .I pieced enough to make nine 3 1/2 inch by 40 inch strips. From there, I've pieced 72 blocks. (I have two 11 inch squares and 3 1/2  partial strip leftover from stitching the strips to the background fabric. I estimate that I will be able to stitch another 18 blocks.)

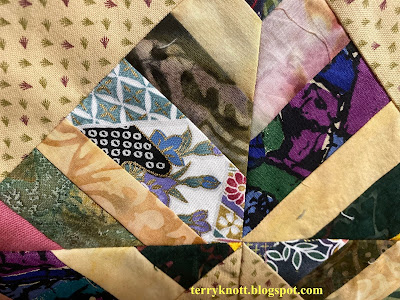
Selection of fabrics
That gallon bag also contained strings that were 2 1/2 inches long. I pieced those into strips too. I pieced four 40 inch strips. My friend, Martha, liked to make Chinese coin quilts. I cut the remaining chunks into squares for my scrap savers system in 2 1/2  inch or 2 inch or 1 1/2 inch squares. Those strips will be the border. Any leftovers will go into another project.

There were also a lot of triangles and six reject curved pieced blocks in the bag. I put the triangles in a separate bag. I have a plan for those triangles later. The reject blocks I made into a mini quilt I named "Joyful."  

In October, when the date of a virtual quilt retreat approached, I decided this was one of the projects that I wanted to move forward. During the retreat, I pieced more blocks. I ended up with 104 blocks. I thought that I would take some time and play with different ways to layout the blocks. 

When I was piecing the strings, I had planned an asymmetrical layout. As I began laying out the blocks, Gertie, my inner squirrel, was whispering in my ear that she liked this lightening design better. She had a point. 

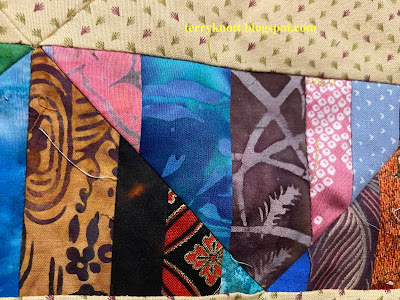
Such a variety of colors and prints in these strings
We get along so much better these days now that we are working together! She suggested a few names for the quilt which was also helpful. "Strings of Lightening" was my favorite of her options.

When we were on a family trip to Australia, I happened upon an art exhibit that was lines. It was so beautiful. Until that point, I hadn't thought of a line much more than wonky, curved or straight! I explored a little bit with line and made several quilts. I had planned to add other projects to that series.  Instead, I got side tracked and played with other techniques. This project will be added to that series though because Gertie insists! 
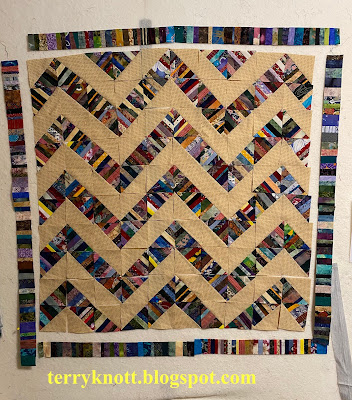
Quilt layout
In November, I pieced the blocks together. I pressed the horizontal seams open because there was too much bulk at the points of the design. 

The gallon bag netted enough strings to piece 104 blocks. It also produced some "thought" blocks that I used to audition my ideas at the beginning of the process. I made some of the "thought" blocks using a different method of constructing half square triangles. 

There are hour glass blocks that came about from cutting the first angle of the strip. Likely, the hour glass blocks and other HST blocks will become their own project simply because of the bulk a bunch of them would provide on the back of the quilt. It was my intent to use them on the back.


Auditioning borders and binding options
That gallon bag also produced more than enough 2 1/2 inch fabric for a border. Those strings came from the leftovers of making the string fabric. I'll have some "seed stock" for a future coin quilt.Truly, it all is getting used! Gertie told me that the border contributes positively to the design. I agreed and added it to the top.

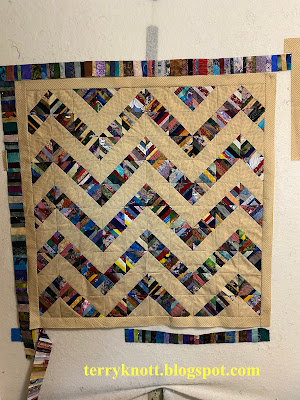
Last week, when it came time to sew the string border, I decided to miter the corners so that the corners weren't where vertical lines nested next to horizontal lines. 

Mitering is a fiddly process; but, not a difficult process. With the uneven widths of strings, you get what you get in the corners. There is no matching of the lines in the border fabric. I liked the border best with the mitered corners. I did need to add a few inches so I had enough fabric to stitch the miters; but, that didn't take long!

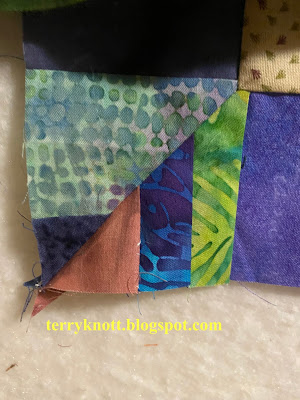
Detail of mitered corner

The neutral fabric will also become the binding. This top measurers 47 x 47 inches. I found some bits in my stash to audition for backing. 

It is terrific to make a useable item from bits that would have ended up in a landfill. It feels great to have made some progress on this project since it's been sitting in a bag in my line of sight for almost a year! 

I'm linking to Cynthia and Oh Scrap/Quilting Is More Fun Than Housework. Be sure to check that link as those who link provide me so much inspiration on how they've used scraps! 

Finished top
Regarding COVID:

Worldwide: 265M cases; 5.25M deaths

United States: 49M cases; 787K deaths

Oregon: 392K cases; 5,186 deaths

Omicron is a new variant from South Africa that is being touted as more contagious than previous strains. It is already spreading through the United States. Travel restrictions are increasing. Those with connections trying to stop the spread of COVID, continue to plea for eligible people to become fully vaccinated and to get their booster.

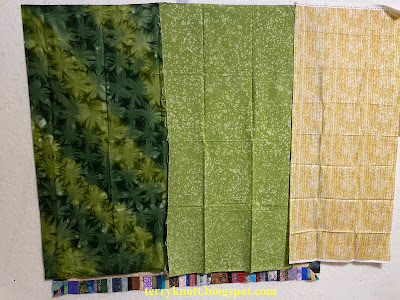
Selection of chunks to become a back. . .maybe
Monday, I received my Moderna booster through the hospital where I work. It was half of the dose of the same vaccine I had received earlier. The first day, I had a sore arm. The second day, I had a sore arm which became hot around the injection site. I also felt tired. The third day, the soreness of my arm lessened. The hotness increased and an itching sensation appeared. On the fourth day, I added a headache to my symptoms. By the sixth day, the symptoms had greatly lessened. Truly, I had fewer symptoms than with my second dose. I am glad to be current.

I will continue to be careful and to wear my mask. Being vaccinated doesn't mean that I can't come down with COVID.


Sunday, February 21, 2016

First "Official" Finish of 2016

My label is composed, written and stitched to "Tinkling the Ivories" which I blogged about here. This is what it looks like. To me, a quilt isn't finished until it has the sleeve and label on it!

Cost of this project was minimal. The main fabric cost $5.38. 


The piano key block came from leftovers from my "to be cut into use able pieces pile a la Bonnie Hunter." The thread came from my growing thread stash. I used a couple needles. The batting was pieced together leftovers. 


The buttons came from my grandmother's button jar. It is a small jar; but, when 90 more buttons were in it, it was about 3/4 full!

Time to make the project is another story! It took about 45 minutes to select fabric, cut and stitch the piano key block. I spent about four hours testing stitches before I stitched on my quilt sandwich for the decorative machine stitches. Of course, the one stitch I didn't test. . . .I should have! Then I filled in with the background fill stitches which took about six hours. I used my machine which is a Bernina and the number 18 foot to sew on all the buttons. It took about two hours to sew them on and about four hours to bury all of the threads! Sewing the binding on by machine took about an hour which included cutting and preparing it. Sewing the sleeve and hand stitching the corners took another hour as did the label construction process. For a skinny quilt, I shouldn't have been surprised that it took me 20 hours to complete this process!

I pin basted my block of the month hexagon quilt so it is ready for stitch in the ditch quilting(SID). 


I usually SID every stinking seam (ESS) which is a term coined from Cindy Needhamto encourage the layers to not shift while I add the additional quilting. I still get distortion; but, not as much had I not completed this step!


I also made a block for the guild's challenge contest. It is supposed to be a secret so I won't share it here until after the quilt show in April. The block is due next month. 

I turned in entry forms for five of my quilts to be in the show. My goal was four quilts so for once I exceeded my goal! I usually have all of my entries judged; but, this year I decided not to have any of them judged. It costs $10 to receive the feedback from the judges. Generally, I concur with the judges comments and this year, I just decided that I would live on the edge! :) Plus, I saved myself $50!

I entered:
Blueberry/Lime


Ripples


Window Boxes


Paths


Tickling the Ivories


Now, I'm working on the river quilt. I've decided that the sky fabric is too close in value to the canyon background fabric and that I need my water to flow in a different direction. I hope I figure out a pleasing arrangement soon as I'd like this project to end up in the finished pile sooner rather than later!

Friday, December 11, 2015

Closer. . .

When I posted last week, I really thought that a day later, I would be quilting. You know what is coming, don't you?? The "but" statement is in the next line!!! 

But, I didn't see this:


Do you see it??? I don't know how it happened. I stitched the border in two different fonts! I didn't see it until AFTER I had photographed the step and was looking at the photo!


So. . .I restitched the borders. This took another day. It takes a long time to carefully trim all the stabilizer away from the letters! The extra "practice" wasn't bad. I understand now that I can change the spacing of the letters with just a click of a button in my embroidery software.

This is the second wall package wall hanging. It too is a gift. The recipient has different likes from the first recipient. I decided to break out the background stencils I purchased last summer from Cindy Needham. You can read about them here. I also purchased some rulers too; but, haven't tested them much. 
Using Cindy's papa stencils, I had the background marked in no time at all. I marked each package background with a different papa stencil.


I stitched in the ditch and used white silk thread by YLI. I was surprised how much the silk disappeared into the background. In the previous wall hanging, I used 50 wt. Aurifil. I also stitched around each an every letter. What a lot of stops and starts!!!


To get in some ruler practice, I marked a few lines. My thinking here was that if I had an actual line, I could use the ruler to gain an understanding of how to set it up to allow me to stitch on that line.

Here is a photo of my practice of lining up the ruler. When I used the ruler previously, I had a hard time keeping it flat because the tray table to my machine has a curve on the front side. I found using a shorter ruler helped. Also, working with the ruler to the front of the foot makes me use my brain differently. To learn more about the fine line in designs rulers I bought, click here.

I hope to finish the quilting in a couple more days! More too come next week!

Wednesday, September 23, 2015

A "Wild" Start and Finish

Yesterday, I started and almost finished my quilt for the book "Wild." Yes, you read that correctly!!! I finished stitching the label and sleeve today!

Rules of the group are. . . pretty much there aren't rules; but, you are encouraged to make at least one quilt a year. One or more members sign up to choose the book. They lead the discussions and determine where we reveal. Often we rent a meeting space for a couple hours and have a potluck; but, we have had high teas, met at restaurants that served dishes that went with the book too.

We started meeting in September of 2007 and we call ourselves, "Thread Tales." We number about 40 with 12-20 people producing something for each reveal. We have our book discussions at a Barnes and Noble. I haven't made quilts for all of the books we have read; but, I have made quite a few! If you would like me to share past book club quilts, let me know by leaving a comment! By the way, Ripples was a book club quilt!

The book we discussed in July was "Wild" by Cheryl Strayed. In August, we shared the imagery that might work for a reveal project. The project produced isn't always a quilt! It could be a pillow, a bag, a game, a coat, a . . .well, you get the idea!!! The reveal is the last Wednesday of September. We are having a potluck and I'm READY!! (I also made something else. . .but, will save that for another blog!!!)

I have too much green in my scrap drawer to close it easily so that became the source of my fabric. Well, I still can't close the green drawer; but, I'm three pieces of fabric lighter! My quilt measures 4 1/2" x 13 5/8". It is this size because that was the size of the left over polyester piece of batting I wanted to use! 


It has no piecing. Rather, I used Carol Ann Waugh's technique of using machine decorative stitches. It is a technique that I've wanted to try for years; but, haven't. She is the Stupendous Stitching teacher.

I picked threads that contrasted with the background fabric and selected some other fibers I might use. 

Then it was stitch using a few of the many machine decorative stitches that are on my machine. It was hard to not go back and free motion quilt!!!!


It was fun and I'm sorry that I limited myself to such a small size. . .although finished feels GREAT!!! I did chicken out and didn't use the fibers to try my hand at stab stitching. I'll save that experience for another project.

The back of the piece uses another green fabric. I picked up this 9x30 inch strip from the free table at our guild. It was luscious. I wanted the back to be the same fabric so I used smaller pieces to stitch a facing which finished the edge. I watched Vikki Pignatelli on episode 102 of "The Quilt Show"  where she demonstrated how to make a curved facing. I used a third fabric (left over from my package wall hanging) for the sleeve.
This is the label. I'm curious, how do you label your projects? I name each of my projects and then include a little information. Sometimes it is the time it took, what inspired the project, what materials I used and who received it. I also include the size. This year, I started a different numbering system. #920159 stands for: The first nine means I made it in September. 2015 is the year and the last 9 is the projects I completed this year. "Paths" is the ninth! Previously, I listed the date. I found people would ask me what I completed recently when I exhibited an older work. I've noticed that painters sign their work; but, it isn't dated so I've decided to follow suit! Also, it is the third in a series of "line" pieces I felt I needed to create. I've had fun exploring line in quilts. 

Thanks for dropping by for a visit. If you want me to share some other book quilts, let me know so in the comments! 

Friday, August 21, 2015

Ripples

As I've written before, I've taken Bonnie Hunter's cue of using all available fabric. For this project, I used the triangles I use to toss when I trimmed them from the star points for Dad's Stars. She also is all about having a leader/ender project in mind and then sewing the small parts one would generally chain piece while piecing the main project. 
It is like having two projects going at the same time! That was how the Ripple project started. The photo on the left shows all the triangles sewn into half square triangles or HSTs.

I was inspired to make this because I belong to a quilting book club. We call ourselves "Thread Tales." We read a book, discuss it, make a quilt and then have a reveal. It is so cool to see what portions of the book inspired people and then how they translated their inspiration to fabric.

In the book, "The Husband's Secret," there were different story lines that were underlying at times. Sometimes, the story lines crossed paths; but, what struck me was that one act caused such an event of ripples. So I knew what I wanted to sew.
I made #344 units of four half
square triangles sewn together. 


This is a one unit pictured on the right. They are small!


Then, I tried the design out on the design wall.


Of course, I was curious about "What If?" This is a phrase I learned from Sharyn Craig. In a class, she showed each of us that whatever blocks we brought, we could ask a few questions, try a few layouts and have success with the blocks living together!


I actually decided the box design would be the one so I began to stitch a couple rows together. Oops, there are "holes" in the boxes!! The design could have worked for this project; but, it wasn't what I was thinking. Perhaps, I'll use it another time. It was a challenge matching all those intersections!


I also like to challenge myself to doing something different in a project. This time, I wanted to use reclaimed materials. I did plan to use new thread! I stitch small pieces of left over batting together into larger pieces. This piece is ready for a placemat or a bag.
My second challenge was to purchase a ruler that I could use to quilt free motion circles without marking and do it!


My second challenge was to purchase a ruler that I could use to quilt free motion circles without marking and do it!


The fabric for the back of the quilt was in a bundle I picked up from the free table at our guild meeting. It had seams in it and a few stains. . .perhaps, it was a table cloth? There was a large enough piece for the whole back! I also used it for the binding. The batting was pieces of wool and pieces of 80/20 that were left from another project. Yes, there are two layers of batting in this project and yes, each layer is pieced!


 I even used the  few left over HSTs to decorate the label! 

So this is my "free" quilt with only the thread as new!