Wednesday, October 30, 2019

Hawaiian Vacation--post 1

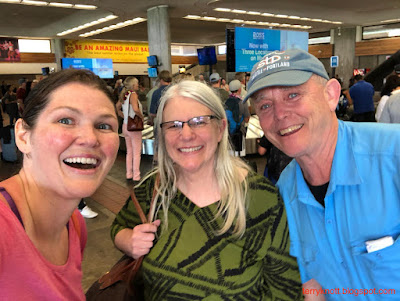
Daughter N surprised me at baggage claim. Husband Bob was in on it.
The food truck we chose for lunch

This month, my husband and I traveled to Maui, Hawaii to spend about nine days. Miss B, our dog went to the spa--Nature's Acres. She went on walks with different people and played with new friends.

I did not know that my husband was holding out on me. When we arrived at baggage claim, there was our youngest daughter, N! I was SHOCKED! I think you could have driven a freight train, several school buses and a Mac truck or two in and out of my open mouth!!! She filmed me and my husband took some still photos. They got me! Generally, my husband lets something slip; but, not this time!
Delicious pizza with macadamia nut pesto

After our reunion at baggage claim, we went to our hotel. I had planned that we would play a few hands of cribbage and have some lunch while we waited to check into our room. Since N had arrived the day before, we went straight to our rooms.

We did have some lunch. We tried out the food trucks that were a two minute walk from the hotel. I had pork ribs and Bob had chicken noodles. It was tasty; but, not over the top great. After lunch, we swam in the pool. If I came to Maui again, I would do the same routine. It is so nice to be able to swim in the pool and float around after a day of traveling!
N's pan seared fish

Fish curry
For dinner, we walked to Dah Kitchen and had a wonderful meal. Hubby had chicken fettuccine and we had steaks.

An interesting take on a boarding platform
The following morning which was Tuesday, we had a Starbucks coffee and a muffin from the Down to Earth market. Then, we picked up our rental car and made a Costco run.  We bought as many supplies as we thought that we would eat while on the island. It is cheaper to purchase from Costco than from the grocery store for most items!

Since it was about lunchtime when we finished, we made the drive to the Mill House. This was my favorite place to eat when we were here with the whole family a year ago in July.

Turtle on the beach
I think that Bob's pizza--a macadamia nut pesto with olive oil and tomato was beyond amazing. My fish curry was okay and N's fish was beautifully prepared. I took the photo of the chicken on the boarding platform sign because seeing the chicken there made me chuckle!

After we checked into the condo, we made one more trip to the little market. . .it is good to see what is there and decide what else we might need. . .like salad dressing and an onion! We snorkeled and saw a lot of different varieties of fish and we saw several turtles too! N and I hung out in the pool after snorkeling for a bit.

Dinner was salmon, asparagus and green salad. Bob cooked the salmon on the shared grills and watched a turtle beach itself for a rest. It was amazing to watch it.

Sunday, October 27, 2019

Miss K's Mermaid--post 4

Doodling quilting designs
Miss K had a sew date with me mid August. She had planned to arrive at 7:30 in the morning. She talked her mom into coming earlier. . .I don't know whether the "special" French toast that she requested for breakfast, or making progress on her mermaid quilt was what drew her to arriving earlier! Our plan was to work for a couple of hours. Actually, we turned our two hour block of time into five hours!

We started the session ditch quilting the blue background. It was a challenge for her to pull and push the fabric while keeping the stitching in the ditch. I told her that it is a challenge for me too which she thought was funny since I have made so many quilts! I thought our next step would be to quilt water like filler stitches in the blue background around the mermaid. I pulled out a piece of paper and a pencil and asked her to draw lines to represent water. She looked at me like I was crazy.

Two finished fish
I showed her some lines that could be water in some of my finished quilts. I drew some lines on a paper as an example. She drew some lines; but, she wasn't excited about those filler stitches. I tried to think of another approach to this section of the quilt that would meet with her approval.

Checking to ensure there are no tucks on the back
Miss K came up with her own solution. She told me that she wanted to stitch three fish in the background around the mermaid using gold thread for a little pop! I had to chuckle at her use of gold and pop in the same sentence. At seven years old, she knows what she wants! She drew a fish on a piece of paper. We talked about what made a good motif for quilting. She made an adjustment so the lines connected. Then we both traced the image with our finger so our brain would remember how to stitch it. I asked her how big she wanted each one and where she planned to place it. I also asked which direction the fish head would be. I'm glad I asked because she had a definite plan of where each fish would be!

Written reminders posted
She liked stitching the three fish so much that she "found" places for two more! Sometimes, she outlined the fish an extra time so it would be "more brilliant!" As she stitched, she talked about her quilt story. . .that the fish were visiting the mermaid and that a party would be involved. After she finished quilting the fish, we talked about quilting the outer border.

She was adamant that the print of the fabric remain intact. I sure thought that she would have used a variety of threads and followed the pattern in the fabric. Her solution was to use the monofilament thread and quilt lines around the border that were spaced the width of the pressure foot. I introduced her to the walking foot and she was intrigued with how it moved!

She stitched with the mantra "slow and steady wins the race." Every five inches, she would stop and check to be sure the border was smooth and that there were no tucks on the back.
Left to do list
Next time we are together, our plan is to stitch the edge of the outer border and then work on quilting the blue background. She asked what steps were remaining because she is so into having a finish! We talked about the binding the label, adding the beads and the hair.

When we finished stitching for the day, she carefully placed her project on the design wall. I went to the kitchen to make her lunch. We took her home after lunch.  When I came home, I looked at her project. I found her notes carefully pinned near her work. I applaud her plan!

Her "Left To Do" list contained:
Do the Border
Label
Sleeve (She calls it the hanging thing)
Waves
Hair
She even included a box to check when she finished. I especially liked the celebration she drew at the bottom of the page. Her planning and organization skills remind me so much of her mama! For me, next time can't come soon enough!

Thank you Carol H. for reading and sharing your comments with our friend Gail G. I thought of you the whole time I was writing this post!

Wednesday, October 23, 2019

Good Fortune Borders--Post Six

First border in place
The first border for the Good Fortune mystery quilt incorporated sections of the blue and white half square triangles stitched together in a beginning step. I was short a couple HSTs. Obviously, I can't count!!! I liked using the string sections because of the added interest all those neutrals brought to the project.

Preparing the second border
I stitched what I needed and soon after I had four borders ready to attach to the quilt top. I did pay attention to the orientation of the half square triangles in the corners!  I laid the border next to the quilt edge and it fit perfectly. I love it when this happens! I stitched the borders to the top.

The second border incorporated the waste triangles from stitching the blades for the spinning pinwheels. I love it when "created parts" are used in the design!

I did lay out the HSTs (half square triangles) to ensure that I didn't end up with a bunch of the same fabrics all together in one section of the border. I stitched the appropriate number together and laid them on the quilt. . .it fit! I stitched the border to the quilt and I was excited the borders were going on without a hitch. . . .
Second and third border in place

Then I looked at the photo of the border. . .there were places where the points matched a point in the previous border. My border did not look like Bonnie's. I could either leave the border as it was or I could rip and restitch so it looked like the photo. I decided I would be happier if I ripped and restitched.

It took some doing; but, in the end I managed to get the "joined" areas "in the neighborhood." Actually on two of the sides, I had no issues. It is a square quilt so I don't know why the other two sides had issues. I loved the interest those tiny half square triangles added to the top. Mostly, I saved the points too.

Last border in process
The third border used the narrower strings that we made as one of the steps. I did measure through the middle of the quilt with my strips to ensure I wasn't letting my project grow. It didn't take long to stitch this border in place. As per Bonnie's instructions, I did have a few pieces remaining from those string strips. I added a plain cornerstone on the corner.

Then it was on to the fourth and final border. Again, I laid out the blocks in each border so that I could sprinkle the various orange fabrics. I found matching the points to be a challenge because the seams were pressed in the same direction. I don't know if that was the direction or if I pressed incorrectly. Again, it took some time; but, I managed to get the intersections to mostly kiss each other.
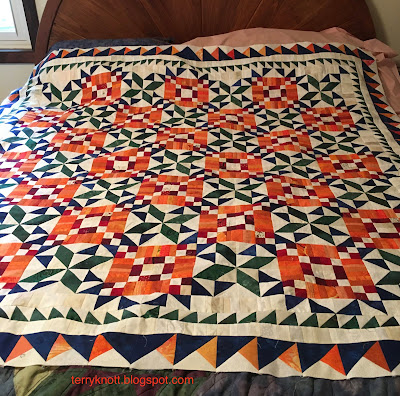
Finished top

These borders also fit without any issues. I was so impressed with how all of these pieces FIT! It measures 73 3/8 inches x 73 3/8 inches. As I looked at the top, it felt too small to be of service on a bed. Sigh. . .I really had planned that this border would be the last piecing I would do!


Sunday, October 20, 2019

Stitching the Good Fortune Blocks Together--post 5

Viewing the blocks
When Miss K was over, we laid out the blocks so she could see what the design would look like when I had stitched the blocks together. She was sure that I was short an orange block; but, she was surprised at how it worked out when she combined the orange blocks with the spinning blocks!

She oohed over how the blocks looked together. I did too! In fact, I was pleasantly shocked at how vibrant the top was! Miss K wanted to know what my next step was so I told her that I would show her how to pick up the blocks so that I could stitch them in the exact order they were laid out now.
Labeling the stack rows

She was curious how I was going to know what block went where. So I showed her how to pick up a row and label it. Then she figured out how I could sew the rows together!
First border stitched into place

It took me about a day to sew the rows together. The sewing wasn't hard. There were a lot of areas to match and a lot of points to try to not cut off; but, I mostly managed!

Viewing the photos of before I stitched the blocks and after I stitched the blocks aren't much different. So, I'm including a photo of the first border stitched into place instead! I was pleasantly surprised to find the border easily fit the quilt top and the seams that were supposed to match did! I sure like the neutral string pieced sections.

Next up are three more borders. One is a small half square triangle border of green and white which is followed by a string border of neutrals. The last border contains orange, blue and neutral fabrics. Perhaps, this month, I will make the borders and stitch the borders to complete the top.


Wednesday, October 16, 2019

A-B-C Crib Quilt post 2 of 2 First Finish 4th Quarter FAL 2019

Serpentine quilting stitch in process
One of the rules to participate in the "Bust Your Stash Two Inches at a Time" challenge is to quilt your project. Often, people prefer to quilt by checkbook. They don't think that they can quilt their own work. I thought that if I shared a sample of a less involved quilting process, I might have more participation in the challenge. If you missed the post about the challenge, you can read about it here.

I prefer free motion quilting; but this time I decided to quilt this project using the walking foot! A lot of people use the walking foot when quilting their quilts. To do the ditch quilting, I used a cotton thread and the walking foot!

Close up view of the pebble quilting background
When it was time to quilt the blocks, I chose a 40 weight variegated polyester thread by Superior and a cotton thread in the bobbin to stitch a serpentine stitch. On my machine, serpentine is a zig zag stitch that I left the width as it was; but, I lengthened the stitch to 2.75. I used the edge of the walking foot as the guide along seam lines. I used the seam guide attached to the walking foot to quilt the six inch wide blocks.

I was pleasantly surprised at how fast I quilted this section of the quilt. I had planned to quilt diagonal lines; but, after finishing the vertical lines and taking a step back to view the piece, I decided more quilting would detract from the vertical structure of the design.

Label and sleeve ready for hand stitching
From the beginning, I had planned to quilt pebbles around the letters since the sashing was a dot print. I used a cotton thread on top and a yellow cotton thread in the bobbin. It took hours. . .about six to quilt this little space; but, I liked the results.

When I stitched the binding to the quilt I found myself to be about ten inches short! I cut another strip from the yellow flannel that JoJo gifted me and then I had enough. I practiced my machine binding skills. I still have a ways to go; but, the process is getting easier for me! I still am not sure how I stray a bit from the edge with my top stitching though!
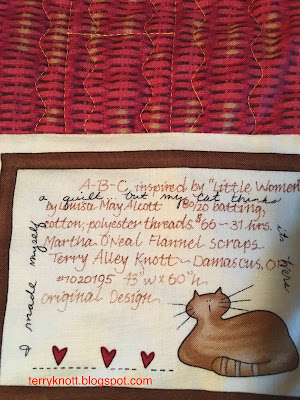
A-B-C label

I used 5 1/4 yards of fabric for this project. I have now stitched 77 1/2 yards of fabric from my stash this year. Had I purchased the fabrics, threads, batting and needles for this project, I would have spent about 66 dollars. It took me about 24 hours to design, cut and stitch this project.

This project was goal number nine on my 4th Quarter FAL list. It is my first finish for the quarter! I made it because I was inspired by the novel, "Little Women" by Louisa May Alcott. If you missed the first post, click here to read it.
Finished front

My friend, Martha, would be tickled that I used her fabric scraps to make a quilt for a kid! She loved making quilts for kids and donating them to various organizations. Had she stitched this project, she would have said that is was bright and happy!

Wednesday, October 9, 2019

4th Quarter Goals FAL 2019

#1. Complete trio of sisters
I plan to continue my journey of finishing projects that I began; but, haven't finished. . . yet! Each month, I try to use some of Martha's fabrics and "bits" in a project. I also added a Martha's project to each quarter.

I will start new projects and continue to have fun along the way. I anticipate trying a new technique or two. Perhaps this year, my "cold" daughter will finally be warmer!

Last quarter, I finished 12 of the 20 projects that I listed. Twelve finishes was great progress. It works out to one finish a week during the quarter! I made progress on four other projects.

 Every quarter, my goal was to list fewer projects. I rolled the unfinished goals from the third quarter forward. I planned to add a couple projects. Then I dug around the studio and "found" a few more. I'm trying to move projects that have been bagged for a long time to the useable stage. What generally happens is that I manage to have about the same number of projects as the previous quarter!
#2. Get this project out of the fabric phase

Therefore, I've decided 20ish projects is a good number to list for a quarter! I loved viewing my quarterly list and saying to myself. . .finished or made progress! I also liked creating a list with new projects!!

Will I complete the list? Honestly, my answer is a resounding NO! I have found that I make more progress when there is a lot of variety in the projects. I also have several projects going at a time so that when I'm stumped, I can play with another set of fabrics while I think about options for the other project! If I can complete ten projects this quarter, I will call that SUCCESS!!

I've listed 21 goals for the fourth quarter of the year.

#1. Finish the trio of sisters that I started more than a year ago. This is a book club quilt. It is the first time that I've drawn a figure and then painted the details on cloth. I had great help from my five year old grand to draw the faces. Last quarter, I completed the border and began the quilting process.
#3. Bonnie Hunter Mystery

#4. Raw edge applique
#2. Make some progress on this project. It's been in the fabric stage for over two years. It is a book club quilt will need to be finished late December or early January.

#5. Maybe a pillow using this embroidery
#6. Stitch these materials into a project
#3. Finish Bonnie Hunter's Good Fortune Mystery. This is the first year that I have participated. I enjoyed the process! Last quarter, I finished the blocks and stitched the center together. This quarter, I want to add the borders and get the top pin basted for quilting.

#4. Continue progress on the butterfly piece began in September 2018 in a Susan Carlson class.

I have at least three other quilts with a butterfly theme that need to be finished. Perhaps, I can make some progress this quarter on this project!

#7. Help Miss K finish her original design
#5. Maybe make a pillow out of this embroidery. Maybe it will be a small wallhanging. I completed this embroidery in 2014 and slipped it into a box. Time to stitch it up!!!

#8. Make a few more Christmas ornaments
#6. Use this leftover corduroy zigzag and this hand painted fabric to create a small wall hanging with a river as my inspiration. I had a brainstorming session and now have a plan of how to proceed!
#9. Finish this flannel crib quilt

#7. Work with Miss K to finish this original design. She is almost at the quilting stage.

#8. Finish the star Christmas ornaments. I think that there are enough supplies to make three more Christmas stars.
#10. Six burp cloths

#9. Finish the crib quilt. It is a book club quilt inspired by the novel "Little Women." I used flannels from Martha's scraps and yellow fat quarters from JoJo for the original top design. It needs a binding, sleeve and label for the finish!

#10. Make six burp cloths. I made six for my daughter. . .now that "baby" is seven years old! I put these away and forgot about them. . .now if I can remember how I did it!!
#11. Make three potholders

#11. Sew three potholders from the shoebox. I cut the fabrics for one pot holder; but, seeing what remains, I might be able to sew two more pot holders. I will have to find a different neutral fabric for the other two potholders; but, that is okay!

My daughter picked the fabrics and the pattern for the potholders long ago. . .I think she was in middle school . . .today, she is in her tenth year as a special education teacher, wife and mom to a five  and a seven year old daughters. That fabric has aged enough! Note: there are two more "packages in the box. Perhaps, another quarter, I'll stitch another ""package."
#12. A long sleeved shirt

#12. Make a long sleeved shirt for a granddaughter. This was a Martha fabric. It is a soft velour like polyester.
#13. Stitch a skirt for a granddaughter

#14.-15. Stitch two tops out of this fabric
#13. This green and black print was also in Martha's stash. If I run the print so the lines run vertically, I think that I can sew a skirt for a granddaughter out of it. It is about 20 inches wide so I need to be thinking about adding some lace for length and maybe purchasing a black elastic that will function as the waistband as well.

#16. Stitch a summer dress
#14.-#15. Stitch a couple tops out of this velour type knit fabric for a granddaughter. I think that there is enough fabric for two tops. If I stitch two, I'll need to be thinking about how to make them different. It is another fabric from Martha's stash. She probably planned to make a robe out of it.

#16. My mom gave me this fabric more than a year ago. It isn't a color that draws me to it; but, the feel of the cotton interlock is nice. I'm thinking it would make up well in this summer dress pattern. I have a granddaughter who would like wearing it. I'll be thinking of ways to embellish the dress.

#17. Flannel bits left from pot holders--a potential top
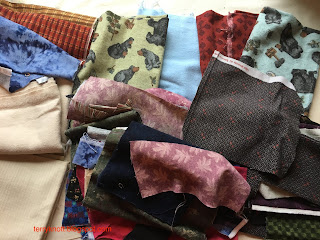
 #17. These are the flannel bits left from the potholders along with some other flannels that were in Martha's stash. JoJo contributed a couple fat quarters too. In Martha's stash were a few cotton prints--also fat quarter size that might work into this project. My goal is to make a useful quilt somehow!!!

#18. I posted once about a project using my grandfather's ties. JoJo made a wonderful tuffet and so I purchased the pattern and form. I don't have quite enough ties. . .I need about a dozen more. . .perhaps, I will snag one from my husband and perhaps, a few of my quilting
#18. Tie tuffet
buddies will contribute one. Of course, I could find a few on my own; but, I'd rather be making a memory tuffet!

#19. Needle turn appliqué border project
 #19. I started this applique project before I started The Chickens. The Chickens took me more than 10 years to finish to this is an even older project!

#20. Stitch these fabrics into a bed sized quilt
I've a center of nine patch and hour glass blocks waiting for borders. I plan to make this my take along project for stitching. It is time to make progress.

#20. Work these fabrics into a quilt for my freezing daughter. I collected them years ago. . .like ten. . .but, wasn't able to come up with a plan for what to do with them! I've an idea and a BQ pattern gave me the inspiration.

#21. Sew a couple black swimsuits. I'm wearing my back up black swimsuit so I need a couple more ready and waiting! A black swimsuit is the uniform a swim instructor has to wear when teaching lessons.
#21. Black swimsuits to be stitched


I believe that there is a enough variety to keep me busy if I'm stumped on another project. The list includes, clothing items. I've been "gifted" clothing fabrics that I need to use as I just don't have space to store those fabrics. I also have no desire to store those fabrics either! Finding a use for these fabrics terrific!
Sunday, October 6, 2019

September Embroidery Lesson--End of the month recap

Lesson stitch out
The software lesson for September was again lettering focused. The title of the lesson was "Lettering Artwork Canvas Style." Either this was an easier lesson or I'm finally getting the hang of the software because I didn't have to start over too many times and my letter mostly resembled the sample! It is time consuming to complete the lesson using the software. Stitching it out ALWAYS takes more time than I think!

Some flannel bits destined to become a quilt top
I chose to work with letters that are in my granddaughters' names. When they visit, they check my studio to see what I have been doing. The embroidery is a favorite of theirs. They wanted to do know what I do with the samples. I chuckled. At this stage of their life, determining the item needs a purpose and that sample isn't a purpose! They think it is silly for me to do all this effort to see what happens!

Of the 15 goals/projects that I listed for myself to complete in September, I finished 11 of them. Of the remaining four goals, I worked on three of the items so it was a great month!

I've continued using my bullet journal. I've also participated a number of months in Amy Ellis' #onethingwithamy. It is a place on instagram where you state your intention on Monday and by the following Sunday if you meet your goal you post to #onethingwithamyfinish. Staying focused on the goals, has helped me finish items that have been in process for a long time! Success is wonderful no matter how I achieve it.

I've also discovered that I enjoy working turning the bits and leftover chunks from a project into another useful item. I like piecing without a pattern and have found that having a few less intensive projects on my list helps me make progress on more intensive projects!

In September, I trained 30 participants in healthcare provider CPR and five lifeguard instructors for a total of 35 participants.


Wednesday, October 2, 2019

Becoming a User--Bust Your Stash post 2

Scraps from Martha's floor sorted into like sizes
In September, I listed some ideas about inspiration behind a design. I hope you have an idea of what you want to create or at least have narrowed your options for the Bust Your Stash challenge! This month, our topic is where to procure our scraps. 

The easiest resource is from past projects! For many years, I purchased my fabrics according to the pattern that I was making. I had one background, one medium, one dark and one light fabric. These days, I may choose a range of fabrics that represent medium, dark and light values. I find the various fabrics make the finished quilts sparkle and these quilts are an ode to the quilts our ancestors created from the scrap basket.
Sorted and bagged into the scrap saving system

The hardest fabrics to collect are the darks. The ones I’m low on the most are the lights! When I started quilting, I was determined not to have leftover bits. As I finished projects, I tossed the leftovers less than 1/4 of a yard or less than a fat quarter size.

Then I got to thinking. . .those smaller bits cost just as much as the bigger bits. I wondered how many possible quilts I had thrown away over the years. So, I started saving smaller bits using Bonnie Hunter’s scrap user’s system. When I’ve finished a project and before I work on the next project, I sort all the remaining bits. I cut the bits into useable sizes and store the pieces into like sizes by color. For example, I have ziplock bags of 2” squares and 2” strips in a variety of colors.
One block cut and ready to sew from the precuts
When the bag gets full, I try to use the fabrics in a project. Our challenge came about because I had many two inch squares. I wondered if others were in my position! Over the years, I’ve been pleasantly surprised when a pattern would call for cutting strips of a certain size and I’d go to my scrap saver system and pull those fabrics needed.  I love it when this works because I’m that much closer to stitching!

When I first started the scrap saving system, I went through past bags of leftovers. I had shoved the fabrics into a plastic bag and crammed the bags into a drawer or a container never to see the light of day. It took some time and it was nostalgic cutting fabrics from previous finished projects.  It was great to have like fabrics together. I was surprised at how much more space I had once I done the cutting and sorting!

If I want to try a specific color combination or I want to stitch a practice block, I’ll go to my “pre-cuts” looking for the sizes of fabrics that I need. As I’ve played with my pre-cuts, I’ve also noticed I’m making better fabric choices regarding value. 

If you are new to quilting, haven’t accumulated scraps, and belong to a quilt guild, check the free table. Often, there are some bits that might fill in the holes in your scrap system. Sometimes, friends will “gift” you chunks that you can use. You can also cut into your yardage that you have stashed. The point is, we all have enough fabrics stashed in our sewing spaces to create lots of projects. So stop petting and start cutting! Using, in this sense, is GOOD! Next month, our topic will be fabric choices.

Remember, comments are welcomed here as well as on instagram at #2020bustyourstashchallenge