Sunday, March 31, 2024

Secret Agent Mystery--post 2

Color code/key
This modern mystery quilt along began in January through Bill Kerr and Weeks Ringle. Kerr and Ringle are the creatives behind Modern Quilt Studio. I was intrigued to join because transparency was the method we would explore as secret agents. The reveal happened February 16. The pattern is available for purchase. Because I was working on the Improv classes with Irene Roderick and Cindy Grisdela, I didn't get beyond making the color code/key until this week. The finished quilt is about 51 inches by 51 inches. 

Clue number 1
I did purchase the fat quarter bundle from Modern Quilt Studio to make this project. Since I purchased a small amount of fabric, I don't have room for errors! I carefully cut the fabrics for clue one and stitched the pieces following the directions.

Pocket made to collect spy clues

We also stitched a pocket to hold specific items. I put a piece of interfacing in my pocket to give it a little bit of stability. I was supposed to come up with a secret agent name. Gertie, my inner squirrel, has been uncharacteristically silent on the subject. Rosanne from my Friday Sit and Sew group suggested 00Q like 007 and sort of like my e-mail which includes two zeros!

Last Sunday afternoon, I finished stitching clue number one. Clue one had me stitch a singular block as well as a set of four blocks of another design.

Part A of clue 2
Working through clue number two took longer because there were more steps. The first instruction was to make a square in a square block. My secret agent persona got to make a choice of jumping out of an airplane or running through fire. While I don't know that I would do either in real life, I chose jumping out of an airplane. Making that choice meant choosing a specific fabric to place in the center of the blocks.

Part B of clue 2
This second instruction contained some curved piecing! That curve is fairly tight. I pinned the heck out of the curve and sewed slowly. Whew! I didn't have any tucks. I call that a win! I will share that improv curves are easier to piece!

Part C of clue 2
The third instruction had me make two more blocks. I like how the fabrics play with each other. I hadn't considered transparency as a method to drawn the viewer's eye to the project. I'm curious as to when I'll begin seeing the transparency effect.

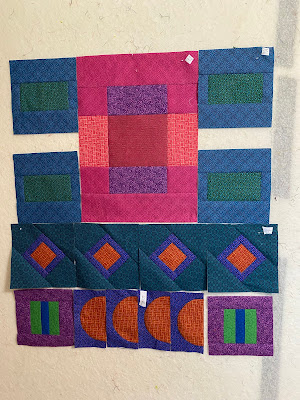
Blocks stitched before beginning clue three
The fourth and final instruction of clue two, had me make a much larger block. Each block or sets of blocks have a code name. It's a fun way to participate in a mystery!

Small blocks sections
For the remainder of the week, I've continued stitching through the clues. There are six clues. I am currently working my way through clue five. I'm beginning to see how transparency is achieved.  

Most of clues 1-4
Making progress on this project was goal number six on my March list. I'm linking to Cynthia at Oh Scrap/Quilting Is More Fun Than Housework. I always enjoy sipping a cuppa as I catch up on projects that my fellow bloggers are stitching. Happy Easter! Enjoy the day with friends and family.


Wednesday, March 27, 2024

Purple Selvages for Rainbow Scrap Challenge

Purple selvages
Angela at So Scrappy chose the color purple as the Rainbow Scrap Challenge for March. I've sewn with purple often so I was extra surprised as I dug through the selvages to find few options! I was concerned that I wouldn't have enough to make squares for three blocks!

Range of purples--first set of squares

I began the process. Purple can come in a huge range of colors from blue/purple to red/purple and then add grey or white to make even more colors! For the first set of squares, Gertie, my inner squirrel, challenged me to use as many different purples as possible. I really wasn't excited with the muddy purple in the middle of the square. Gertie told me to go for it. I did. She has been vacationing so when she put in an appearance, I wanted to acknowledge her thoughts.

Second set of squares
Of course, because I followed her idea, she was ready with ideas for the second set. She challenged me to incorporate a red purple selvage in the middle of the square. While I wasn't "all in" for that red purple, I again acknowledged her idea. She was surprised that she was two for two!

Third set of squares
For the third set, Gertie wanted to use selvages that were the same purple tone. I was definitely on board. Unfortunately, I didn't have enough selvages to make it work. Gertie swished her tail. She said to use some of the plain selvages. I balked because I would miss the white edge. Gertie's responses were: So what? It won't matter. Try it. 

Close up of thread options

I did try it. I liked the results. Gertie was chirping happiness. . .she was three for three with me taking her suggestions! For the non white selvages, I did stitch close to the edge with a matching thread. Making these squares was goal number four on my March list.

Sunday, March 24, 2024

Lime Sprinkle Is Finished--post 4

Back of the quilt
In my previous post, I had finished quilting this project and had blocked the quilt. I trimmed the edges and cut the strips for the facing. This time, I cut the strips two and half inches wide by the length of the sides. I pressed the strips in half and clipped them to the sides of the quilt. 

Facing clipped to quilt; ready for stitching
I cut the strips for the width one inch shorter than the width of the quilt. Again, I pressed the strips in half and clipped them to the quilt top. I stitched around the perimeter of the quilt using a quarter inch seam. I trimmed the bulk from the corners, pressed the seam to the outside of the quilt. Next I pushed the corners out and pressed the facing to the back of the quilt. I pinned the facing to the back of the quilt and hand stitched it in place.

Trimmings and thread used
Next, I created the label and the sleeve. This time, I cut my sleeve 11 inches wide instead of my usual nine inches, I constructed it a bit differently too. After I had pressed the sleeve in half, I opened it up and pressed the edges to the fold line. I hemmed the ends, turning in a quarter inch twice. So far, these are the steps I usually use. What I changed was I top stitched about an eighth of an inch from each long edge. Then, I stitched wrong sides together to complete the sleeve. It was easier to hand stitch the sleeve in place. One of our book club members shared a You Tube video tutorial that shows the steps I used. I will use this technique again!

Label
I shared photos of my finish with my instructor, Irene Roderick. She wrote back, "Thx for this email!! I needed the reminder to keep going! Great piece!" What a terrific response from an amazing artist and instructor!
Finished quilt before second blocking
I blocked it again because after I hand stitched the facing, the edges didn't lie flat. I'm pleased with the finish. I used about six yards of fabric in this project. This brings the amount of stash I have used this year to negative half a yard. Again, my goal this year is to use what I have and to not buy fabric. . .the buying part is so easy and fun though! Soon, however, I'll really be reducing my stash! 

After the second blocking

I'm linking to Cynthia at Oh Scrap/Quilting Is More Fun Than Housework. Finishing this quilt was goal number one on my March list. It's my first quilt finish this year!

Wednesday, March 20, 2024

Kitchen Towels--Two More


Parts for two towels
Goal number seven on my March list was to make at least one kitchen towel. I made two! I found it was easy to make two at the same time. 

Stitching the top of the towel
My original plan was to use the tree fabric for the main fabric; but, I ended up using the fabric for the decorative band instead. The holly fabric was a scrap that I was able to cut two main fabrics and one band. There were some leftovers.  . .like a two inch strip and some smaller pieces that will work for strings.

Ready to stitch the sides
I figure I've used a quarter yard of fabric. This brings my use of stash this year to negative six and a half yards. I will need to purchase more Dunroven towels to make more decorative towels. 

Finished towels


Sunday, March 17, 2024

Moving Closer to a Finish (Lime Sprinkle)--post 3

Quilting detail lower right section
This week, I finished quilting Lime Sprinkle. I thought that I would have it finished in time to post about it today; but, I didn't finish. Instead, I'm sharing photos of my quilting. 

In process quilting view top left 
First, I used a monofilament thread to stitch in the ditch to anchor all of the piecing, Because creating texture was my goal, I quilted the pieces using a combination of curved and straight lines. 

The first time I quilted an around an X shape

The lines are about a quarter inch apart. I used the same color thread as the fabric. Sometimes, I used a ruler to stitch the lines and sometimes I eyeballed the space as I stitched.

In process view quilting upper right.
Second time to quilt around the X shape.
If I was stuck with how to quilt one area, I moved to an area where I had an idea of how I wanted it to look. If I still was stuck, I considered repeating a quilting design. I used the shape below at least three times!

Quilting detail lower left of the project.
Third time to quilt an X shape.
Most of the top is quilted with straight lines going in different directions. I did a little planning to alternate horizontal vertical, and diagonal lines. The quilting felt right. It takes time to quilt the lines about a quarter inch apart! 

Quilting detail upper middle left
My friend JoJo often hand stitched small areas on her quilts to leave behind her hand in the project. I decided to include a little hand stitching in this project to leave behind the mark of my hand. I used red Aurifil 30 weight thread to stitch a simple running stitch to form an X next to the skinny lined X that I created in red fabric on the black fabric. I used the same thread and stitch to accent the tiny lime blocks in the quilt. 

Quilting detail hand stitches middle right
To view the quilting, you will have to be up close and personal.  Yesterday, I washed it to remove dog hair and the starch. Our dog is a sweetie. She is a shedder, even though I brush her every day!!! To ensure it would be dry today, I tossed it in the dryer for ten minutes. After ten minutes it was damp dry in most places. 

Detail of hand stitching around ghost block
Then, I blocked it which it needed. Before quilting it was 26 1/2 inches by 52 inches. It now measures 24 1/4 inches by 50 inches. Today, my goal is to trim the edges, machine stitch the facing to the quilt, make the label and the label. I'll be hand stitching the facing, label and sleeve into place during the week.

View after quilting
Perhaps, next Sunday, I will have a finish to post. I am pleased with both the progress and how the project look. It's been a super fun project to stitch. I definitely will be employing Irene Roderick's techniques in other projects!

View after blocking. The dark areas
indicate areas with more wetness. 
 I'm linking to Oh Scrap/Quilting Is More Fun Than Housework, Do pour yourself a cuppa and enjoy all the inspirational projects people share that they are stitching.


Wednesday, March 13, 2024

Visiting the Vancouver Community Library

Crossroads
Goal number ten on my March list was to see the exhibition of the Portland Modern Quilt Guild quilts that library staff hung throughout the Vancouver Community Library. As I've written, driving more than about 20 minutes causes tremendous pain in my right knee. So, I've not been driving more than to work and to medical appointments that are within that range.

Circling the Sun
My friend, Theresa offered to drive me to the library last Sunday. We went. This library is open seven days a week. There are five floors with books available on floors one, three, four and five. It is a beautiful building with lots of spaces for reading. There are even a couple terraces! 

Fly Home
We browsed the floors and found all the quilts and 3-D items on display. I had provided a fourth quilt; but, the staff didn't hang it. Likely, they ran out of hanging space! All my entries were inspired by books. It was cool to see them hanging in the library! 

Crossroads hung on the first floor. The other two quilts hung on the fourth floor on either side of member, Linda P. As we were admiring her quilt, we saw her! It was great to see her in person! We met her husband and a friend who had come to see the display.

Theresa's hummus
On our way home, we stopped at the grocery store so I could purchase some spinach and crackers for our late lunch. Theresa wanted to know how I made hummus so we made a batch together. When I make hummus, most of the time I give half of it away because one can of chickpeas makes more hummus than I can comfortably eat before it spoils. 

Sweet potato, spinach and chicken soup
As we prepared the hummus, I washed the spinach and added it to my soup. It simmered while we finished the hummus. The soup contained grated fresh ginger, coriander, cumin, turmeric, salt, pepper, poblano pepper, onion, lentils sweet potato, spinach, chicken and chicken broth. It was delicious. The hummus was delicious. Theresa took hummus and soup home with her!

Mending the jeans
After lunch, she showed me a pair of jeans that she had purchased and worn one time. At the pockets and belt loops, the denim had split. Upon inspecting the rent, it looked like the fabric had been cut underneath those areas. No wonder there were holes! They were Wrangler jeans which usually are well made. I used a product called Bo-Nash to mend the rips. I sprinkled a little Bo-Nash powder on the rip; placed a denim scrap over the powder and heated the fabrics until the powder melted. 

The birthday girl
It takes some time to get the denim hot enough for the powder to melt. Theresa is planning to add hand embroidery stitches around all those areas. Her pants will be one of a kind and those ripped areas will be thoroughly reinforced. I hope she shares her pants after she finishes the embellishments! We both laughed at how that was popular when we were teens! 

Trying a new swimsuit on for size
Monday was Miss A's second birthday. My husband flew last week to be with Miss A and family for her special day. I made her a swimsuit a couple sizes too big so she had a suit to grow into. After she opened her package, she immediately wore it. First, it was upside down. Second, it was backwards. Third, she had her two legs through one leg opening. She asked her papa to help. 

On the move and pool ready 
He managed to stretch the suit on over her clothes. It was good that the suit was too big. Otherwise, the suit wouldn't have fit over all that clothing. She proceeded to wear it while she opened her other gifts. I was tickled she liked it so much!

I also have news--I have a date for my knee joint replacement surgery: April first . . .no fooling!! I'm looking forward to being a little more mobile, although I will need my other knee joint replaced before I will feel like I could travel again without causing myself major pain. 

Sunday, March 10, 2024

Farm Quilt Quilting Progress--Post 5

Block #2 farm chickens
Goal number two on my March list was to make progress on the quilting on the Farm quilt. Last month, I managed to determine the quilting in the blocks. I quilted three and a half blocks. As February ended, I thought if I quilted four blocks each month, in five months, I would have all the blocks quilted. 

Block #3 Pig
During the first few days of March, I decided I would quilt a few blocks. If I made progress at the beginning of the month, I'd meet my March goal. If I had time at the end of the month to quilt more, ir would be a bonus as I'd be closer on track of finishing the block quilting in five months. I'm two and a half blocks away from that finishing goal. 
Block #4 turkey
Gertie offered helpful suggestions. She whispered in my ear to spend an hour quilting the project before working on Lime Sprinkle. I tried her suggestion the first day. I found it was too cumbersome to switch gears. I quilted a couple blocks and I now have six and a half blocks quilted. There are 20 blocks in the project. Any progress I make will get me closer to the finish line.
Block #5 lamb

Wednesday, March 6, 2024

2024 Temperature Quilt Block--Flying Geese--post 1


Fabrics for January first and second
Goal number eight on my March list was to piece some blocks for the 2024 Temperature quilt. This year to record the temperatures, I'm making flying geese blocks that will finish at two inches by four inches. I'm using the same fabrics in four degree increments that I've used for the last two tops that I've made.

I cut the block pieces from two and half inch strips. I used the Essential Triangle Tool from Bonnie Hunter to cut the wing part of the block and Wrights Companion Angle tool to cut the goose part of the block. There is less waste with this method and it doesn't take much to square the blocks as I finish.

Block in process--a sunny day
To denote a rainy, snowy or sunny day, I'm using the same fabrics as I did last year. I'll attach a strip that finishes to one half inch to the right of the block to denote the kind of day it was. In this session, I completed two blocks. I've a third block in process. The block stitches much faster than piecing the English Paper Piecing blocks that I did for the last two years. Perhaps by the end of May, I'll be making the blocks in real time.

Between the first two days in January, the high on the first day was the low of the second day! 

The goose is the high; the wings are the low
I plan to attach the blocks vertically with each row containing a month. At the end of the year, the project will be a lap sized. I hope it doesn't take me months to quilt it!!!