 |
| Layered, basted and ready to quilt |
Next I pieced a back. I had a leftover piece of chicken print fabric. It wasn't quite wide enough so I added a bit of the facing fabric. I knew the piecing wouldn't show. I even considered leaving that part without batting. However, batting is a bit sticky and having it as the bottom layer on the project would have made quilting more challenging because the fabric wouldn't slide. In the end, I was glad I had pieced the back!
I layered the backing with a piece of wool batting and placed the top on the batting. This time when I pin basted, I laid out rulers to be sure that I kept the borders straight. I chose not to pin in the organza as I was concerned that the pins might leave too large a hole.
 |
| Quilting the dark lines |
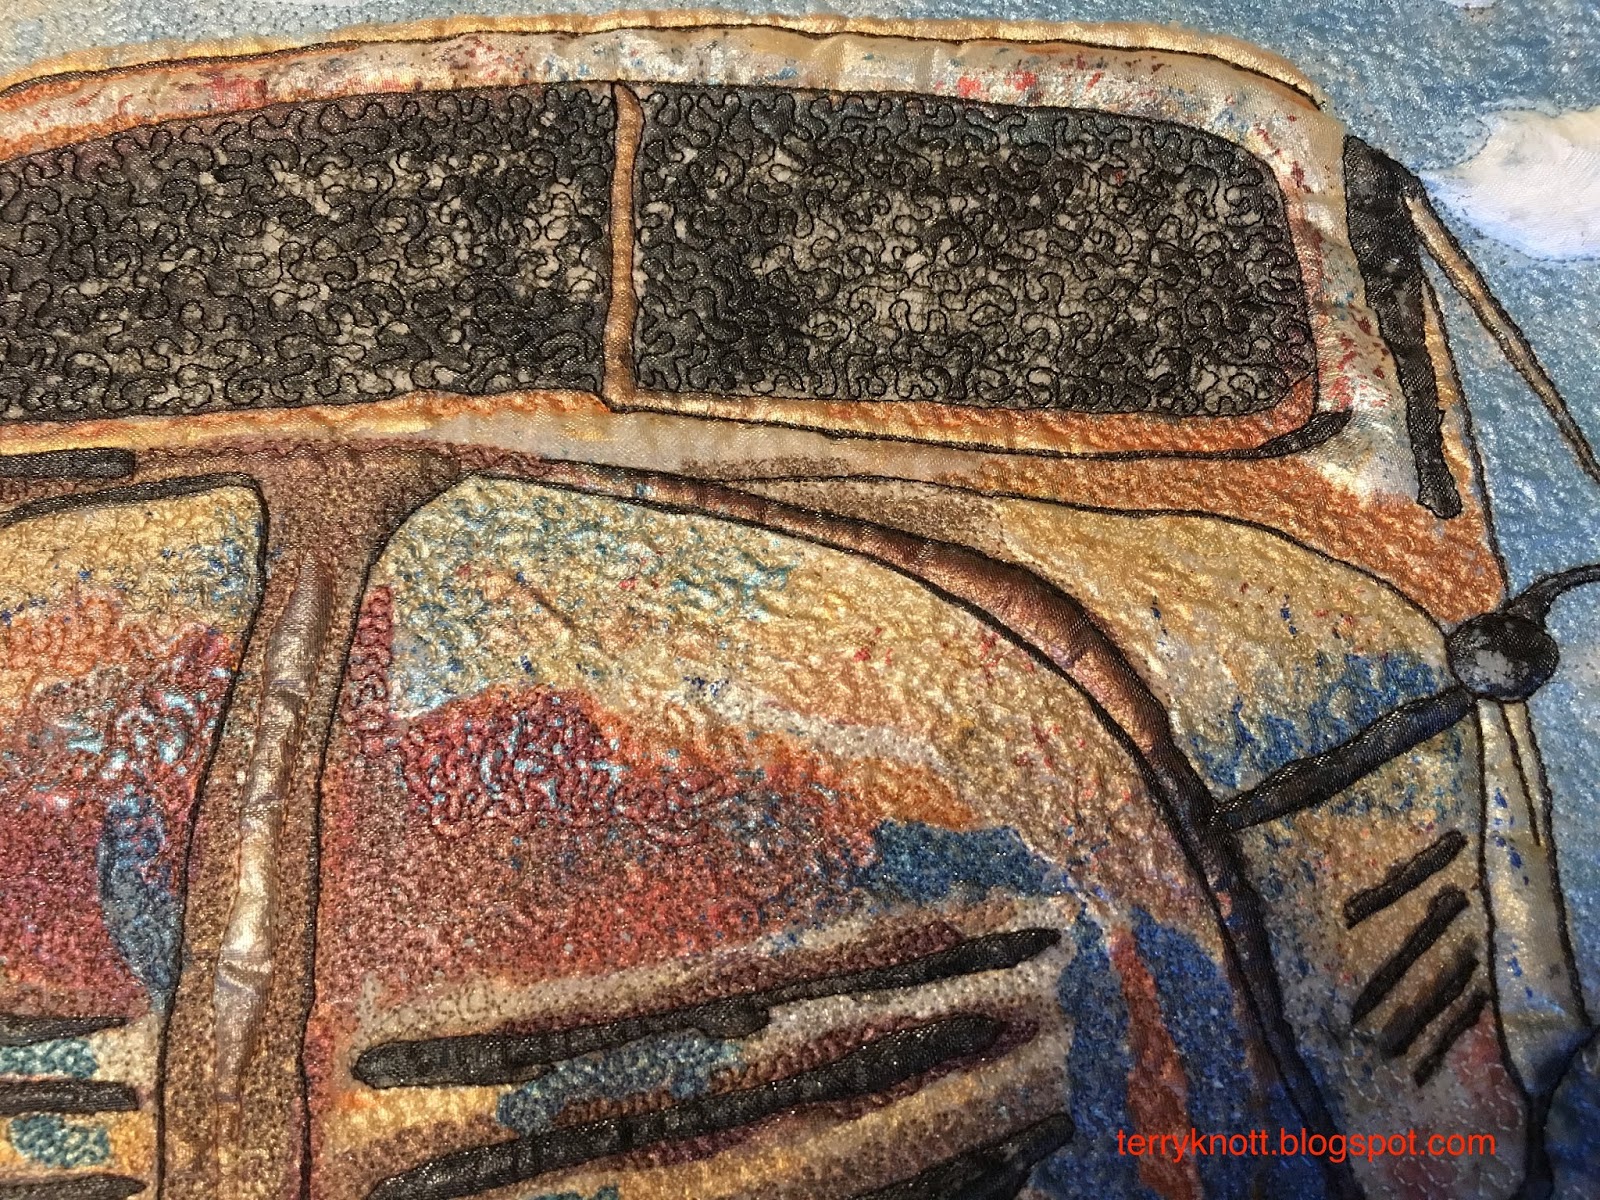
I decided to use 50 wt. 2 ply cotton thread to quilt the organza. I wanted the matte of the cotton thread to balance the sheen of the organza. I used a 70 microtex needle. I decided to outline the black lines of the truck first. Sometimes, I used a black thread and sometimes, I used a dark brown thread. I probably could have also used a dark navy thread.
 |
| View of the quilting |
Because I painted the truck, I thought a densely quilted stipple background stitch would replicate the feeling of paint. I've looked at many paintings and would note the lines/cracks left behind in the layers of the paint.
I did leave a few areas of the truck as well as the clouds unquilted to give the piece a little dimension. I used a cotton thread that matched the value of the background as closely as what was available in my stash. I used four blues, two oranges, four browns, two grays, three golds. This time, I used the same thread in the bobbin.
 |
| View of the various quilting textures |
I did make tension adjustments. The thread I used was all from the same company and the same weight. You might not think that adjustments would need to be made! Sometimes, I unstitched a few stitches because the value of the thread I had chosen had too much contrast or the tension was not okay. I didn't want the thread to sing a solo in this piece!
 |
| 'Ole Truck label |
In each border, I matched silk thread to the value of the fabric. My goal again was that the thread would provide texture and compliment the truck! It took about 24 hours to quilt the piece to the last border. All that stippling, because I used it all over the quilt, kept the density of the quilting consistent throughout the piece. Maintaining that consistency through the borders was important too!
It took about 18 hours to quilt all those pebbles in the facing which looks like the outer border! I wanted them because if someone looks at the back of my quilt, I want them to wonder how I managed to have a different quilting pattern along the edge on the front than I do on the back!
 |
| Finished back |
My goal was that the quilting enhances the piece. I believe what I chose to quilt enhances the painted truck.
The piece did get a bit wonky. I was concerned about pressing on that organza as well as getting it wet an losing all that paint. I e-mailed Esterita Austin as she was the teacher who taught this method. She replied to use parchment paper front and back and that steam was okay. I appreciated that she returned my e-mail so quickly--it was the same day! I did follow her instructions and the quilt blocked beautifully.
I used the same technique for the facing as I did with my "Circling the Sun" piece. This time, I added the edge finish before I turned and stitched the corners. This change sure made it easier to apply! I'm glad that I documented the process as I needed to review it! The second time actually went well and I'm happy with the results.
This project was expensive to make. The cost of the class was the majority of the class. I spent $260 to make the project. I'm so glad that it is finished and can be enjoyed now!!! I LOVE this piece. I am already enjoying it hanging in my home.
Did you recognize the fabric on the back? I thought it fit the feel of the truck. I had almost enough of the chicken fabric that I used on the back of my chicken wall hanging for the back and the sleeve of this project. (I pieced the sleeve with some of the facing fabric.) I picked up the label from the guild's free table. I ink/create a label for each of my quilts. The label is so important because it provides information about it straight from the maker! All quilts should have a label with the maker's name, date and why the quilt was made.
 |
| Finished front of "Ole Truck" |
I started this piece in a class with Esterita Austin last September at the NW Quilt Expo show. It was accepted to hang in the NW Quilt Expo show which will be held September 25-27, 2018. The other posts about this piece are listed below:
Painting the Truck--post 1
Adding the Borders--post 2
2 comments:
What character that piece has. If only that truck could talk . . . . Gail G
Indeed! I'd love to hear the stories, Gail!
Post a Comment