 |
| Painting an old truck |
Near where I live, this old truck has been parked in a field promoting a plant nursery for years. Each year, it has become a little more rusted which has added to its character. Last year, the property was sold for development. The time it will be spent parked alongside a busy road, must be short. Of the photos, I submitted, this was the one that Estertia picked. I'm so glad she did!
This was the second class I took with her as an instructor. I have no artistic background. I grew up in a small farming community. There were less than 80 students in my high school. When I was in elementary school, art projects were basic. I can remember using chalk on black construction paper thinking what a cool process that was. I only remember using water color paints once. In high school, the closest program to art was either home economics or shop classes!
 |
| Esterita explaining the process of fusing |
The process was to come to class with a full size photo. I took an 11x16 inch size; but, next time I will make it larger like at least 16x20 inches. We made a line drawing of the photo on a piece of medium weight vinyl with a black sharpie pen. From there, we used the line drawing underneath a piece of parchment paper. We painted in the details with metallic paints. I was shocked that I actually finished the painting before class had ended! With help from Esterita, I was surprised that I could actually blend paint colors to come up with rustic colors that fit my project!
 |
| Possible border fabrics |
Once the painting was finished, the parchment paper was layered with misty fuse and transparent organza. Using a warm iron and taking care to keep the iron moving, she fused the misty fuse to the organza and the design transferred to the organza. The metallic paints worked so well! Unfortunately, I was so into the process and experimenting that I forgot to take photos while I was working on my truck. I do look forward to playing with her technique again.
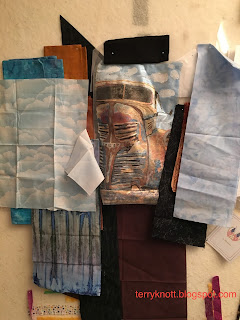
Esterita layered and quilted her projects at this point. I wanted to add borders so that my piece resembled a framed painting. Last October, I purchased a piece of gold/rust Grunge fabric by Moda that I just knew would be right for one of the three borders that I had planned. As I auditioned the pieces for the borders, I found that maybe that piece was too strong. I pulled other fabrics from my stash. In the photo you can see the variety of possibilities.
In the last photo, you can see my edited fabrics. Although it took me along time to pull the fabrics and to audition them, I was able to narrow my choices. Even better, I like the choices that remained! I'm planning to make three borders--a narrow black, followed by a wider orange, followed by a blue. I haven't gone further with this project because I have an idea of how I want to finish the edge. It is a variation of a facing, but since the idea is in my head, I haven't tried it. I will test my idea on another project before I add the borders to this project.
 |
| Edited border fabrics |
6 comments:
Do you remember the brand of the metallic paints you used? Were they designed specifically for fabric, or simply acrylic? I love that truck. I’ve taken a picture of a very old tow truck, and I think it would be great fun to try this technique with Mater's photo.
That's going to be really cool when it's finished! Thanks for sharing the process!
OMG! The very first post I ever wrote for my blog was in October of 2010. The subject was my experience attending Esterita’s “Quilting under the Tuscan Sun” workshop. She is a fabulous teacher, and the workshop was amazing.
Luann, Esterita said metallic paints like Decor or Folk Art worked great. . .these are acrylic. She said these worked better than the fabric ones. You will want an opaque white for places that you don't want to be transparent. . .like my clouds for instance. I painted the whole sky white and then added the metallic paints on top. You will have to share your fun when you work on your tow truck!
Thanks, Nancy. It is cool now. . .I hope the framing will enhance the project. Time will tell. . . .:)!!!!
Janice, I know. . .Esterita is absolutely AMAZING!!! If I would have had her influence in middle school, it would have changed my life's path. I would love to go to her Tuscan Sun "retreat." How fun that would be!!!
Post a Comment