Wednesday, March 29, 2023

A Baby Quilt

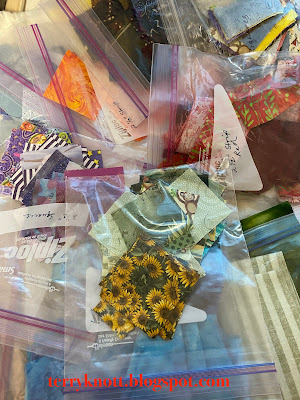
Laying out the scraps
As a treat, I enjoy a Starbucks iced Carmel Macchiato with almond milk. I limit myself to one or two each month. It is disappointing when I order one and it doesn't taste just right. Sometimes, there is a grainy feel to the drink or it doesn't taste like there is any coffee in it. I've sampled that same order from a variety of Starbucks shops in my area.

Two prints that I purchased
The Starbucks located on Civic Drive in Gresham, Oregon provides the most consistent order. This is the location that my husband frequents after a workout at a gym located a few blocks away. Since I've gushed over drinks made there, my husband let me know that Kaylee was the barista who often made my drink. I learned that she recently married. A little later, I learned she was pregnant! Kaylee had a boy in February.

I decided that I would make her a baby quilt out of Martha's flannel scraps to gift her by the end of November. That was at the end of August. In September, I was sidelined after being rear ended in a car accident. In October, my friend Pat, shared a lap size quilt she had made using the pattern "The Tessa Quilt" by Erica Jackman of Kitchen Table Quilting. I could envision Martha's flannel scraps in that pattern for a baby sized quilt. Pat leant me the pattern.

Sashing attached; rows assembled
For at least another three weeks, I only looked at the flannel scraps. Then one afternoon, I decided that I would try working on the project. (This project took me on a trip to the fabric store for two flannel prints that read "boy" and more yardage for the sashing. I'm sure I would have made progress faster had I used yardage.)

Top assembled; ready to trim and baste
I pulled the larger chunks of the scraps and cut the largest size I could. I'm trying to use up the flannel; not bring more into the stash! NOTE: After my purchase,  Martha's flannel scrap box is fuller than it was when I started the project! I see another flannel scrap project at some point!

Some of the textures quilted in the spaces
It took me four afternoons to cut all the pieces. After the car accident, cutting is challenging. Pushing on the rotary cutter is hard. My arm tires and I have tremors so I have to take many breaks. I made a cutting error but didn't realize it
until I was sewing rows together. It was a case of cutting the pieces too wide which was not a hard error to remedy.

I enjoyed stitching again. I found that I could stitch a seam and stand up and press it. I could stitch about four to six seams and then I needed to take a long break.

Thread and rulers used in the quilting
Once I had the top finished, I had to trim the sides. I was apprehensive about cutting; but, that process went okay. Then I layered and pin basted the project which took me an afternoon. I'd pin a little, walk a little, rest a little and repeat. I used the dots on the yellow background for the backing.

Label
Then the project sat for another week. I decided that I would quilt in the ditch with my walking foot to see how that process affected my back. I quilted with a monofilament thread. It took me four sessions to quilt in the ditch. My body managed better than I thought that it would.

The day after I had finished the ditch quilting, I decided to start adding texture to the rectangles in the project. I opened an audiobook and started stitching. Every time that I switched thread, I would get up and walk around for a few minutes. I'd also do a few stretches. An hour passed, then another. I lasted three hours before the pain in my neck and back forced me to stop. I also was having tremors in my arms and hands. I was ecstatic because I hadn't been able to stitch this long since the accident.

Finished quilt
I didn't stitch again for about a week. I had over done it and I had several days of work ahead of me. When I returned, I continued to add more texture to the rectangles. Most of the time, I chose cotton thread in the same color of the rectangle. I quilted swirls, stars, circles, straight lines and a stipple in the rectangles. I chose to quilt straight lines in the white sashing. To quilt the circles and the straight lines, I used a ruler.

I had a t-shirt label so I added it when I stitched the binding to the quilt. I left a space for the mama to add her son's name and birthdate to the quilt. I even contributed the pigma pen to do the writing. The quilt measured 39 inches wide by 45 inches long.

Ready for gifting

I wrote a note about the quilt and the reason behind making it. I rolled it up with the label visible. I tied the roll with a piece of a selvage. My husband delivered it at the end of November. 

She was so surprised to be gifted a quilt and she loved it!

Recipient and the delivery man
Before the accident, I would have been able to finish the quilt in a week. I worked on it over a five week period. I used 6.5 yards of fabric; but, I also purchased fabric so in the end, I used as much as I purchased! I do need to begin piecing the leftover strings together to make a bigger dent in the scrap box. If my friend Martha could see this quilt, she would approve of how I used her scraps. She loved making baby quilts! 

This was goal number ten on my March list.


Sunday, March 26, 2023

A Birthday Skirt

Fabric and possible patterns


Goal number six on my March list was to make a birthday present for our granddaughter who turned one year old this month. (I can't believe it's been a year since I visited.) When she was visiting this summer, she seemed drawn to the color orange. 

I had a yard of an orange thin wale corduroy fabric that I thought I could make a dress or a jumper for Miss A. This fabric came to my stash when a husband was clearing out his wife's fabrics after she died. The fabric has been in my stash for more than 30 years. It was time to use it!

Back in progress
I chose a couple patterns. Unfortunately, when I went to cut out the jumper, I didn't have enough fabric. This fabric was 38 inches wide and not 40 or 42. So I needed to come up with a different plan. I decided that I would make a skirt instead.

This is a Stretch and Sew pattern that I made when our daughters were the size of our granddaughter! I used it again when the older granddaughters were the same size. I'd say this was one pattern that I've gotten a good return on my three dollar investment!

Fortunately, I had thread that was a close match to the fabric. I had interfacing on hand and even a zipper. The zipper came from my grandmother's stash. I'll wonder what she was going to make with a five inch reddish orange zipper! Likely, it was a good buy so she purchased it for "someday."

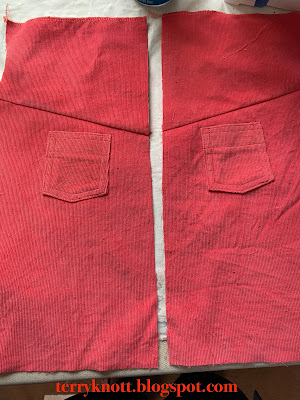
In a few hours, I had attached the pockets and yoke to the 
Finished view
back of the skirt. I also had stitched the zipper and attached 
the waistband to the front of the skirt.

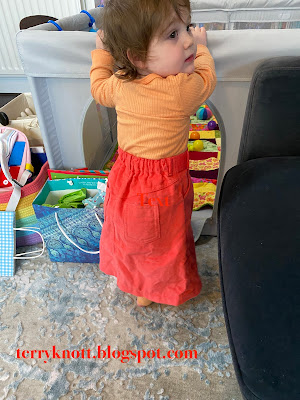
Not long after that, I stitched the back sections together, made a casing for the elastic. I added the elastic and then sewed the side seams. I used the serger to finish the seams and bottom of the skirt. I topstitched the hem and added the closure. I had a finish!

The birthday girl modeling the skirt
I used a yard of fabric which brings the total of fabric I've used from stash to negative one yard! I'll be doing a little shopping to find a few items to accessorize the skirt. I hope my granddaughter will have fun wearing it.

Since the fabric for this project was a large scrap, I'm linking to Cynthia at Oh Scrap/Quilting Is More Fun Than Housework.


Wednesday, March 22, 2023

aMAZEd--post 1

Bingo block
Our book club read the book "River of the Gods--Genius, Courage and Betrayal--in the Search for the Source of the Nile" by Candice Millard. This is the story of two British explorers in the 19th century who endured so many hardships searching for the source of the Nile. 

The plan
The author shares the difficulty in sponsorship for the trek to Northern Africa as well as the illness' the two had during the trip. Procuring supplies and labor was an intensive process in itself. 

"Precuts"pulled for the project
The explorers never had enough of anything. At times, they came close to losing everything including their lives. Yet, they continued on their quest. 

I listened to it as an audio book. I recommend the book. As I've written in a previous post about book club projects this year, I'm trying to use scraps and stash to build the project. As I listened, I thought about quilt possibilities. 

As I listened, I stitched a couple BINGO blocks for a virtual retreat that I attended. I'll post more about that experience in a future post.

A block layout
I have a lot of two and a half inch strips and squares. I've been challenged with using some of the prints in projects. The explorers were challenged every step of the way.

Every part of the exploration process was so difficult. It was as if they were navigating a huge maze and encountering many dead ends along the route.

I was amazed that both explorers lived to tell the tale even though the tale didn't turn out for either as one would have thought. Between my amazement and the maze idea, I had found my inspiration.

Beginning to web a block

I could stitch a maze. Blue fabric would represent the river. I even had a name: aMAZEd spelled that way because I wanted to draw attention to the concepts of maze. I also wanted to play on the word amazed.

A visit to Pinterest provided me some examples. I decided that I could map out my own maze using graph paper. So I decided I would make a 64x96 inch project using two and a half squares.

Next, I drew a design on a piece of graph paper. I refined the first drawing because I had too many entrances and exits in and out of the maze. I also decided that I would stitch a total of 24 blocks with each block containing 64 squares. 

Two blocks complete--the pattern begins to emerge
I determined a layout of four blocks wide by six blocks high would use a lot of squares. It would be a good size quilt for an adolescent. 
Five blocks complete

From the leftover backing of my Chilhowie quilt, I had about a yard of fabric that could represent water. I also had another piece of fabric leftover from a previous project that while it had more purple than the first fabric, I planned to make it work. 

I think I'll need about six and three quarters yard of fabric for the top. I pulled my pre-cuts stash of two and a half inch squares and strips. I cut the two blue fabrics into squares. 

In an attempt to distribute fabrics evenly, I grouped 24 sets of 16 squares. I planned that after adding the blue fabric, I'd fill in the block with other squares from thestash. I decided that I would not use white or cream fabrics because they were too light.

I laid out block number one using my graph paper as my guide. I didn't pay attention to color except for the blue water squares. I tried to keep the value more in the medium range. 

Once I felt the prints/values were evenly distributed, I webbed the squares together and stitched them into the block. I pressed the rows up in block one. I moved on to stitching block two using the same process except I pressed block two rows down so that when it is time to stitch the two blocks together, the rows would nest.

One lesson learned was that I need to pay attention to the previous block as I lay out the next block so I don't end up with two of the same fabrics together. My fingers are crossed that this is going to work!

This was goal number five in March list.

Sunday, March 19, 2023

Heart X0XO ---A Challenge

Scraps collected
Last August, the Clark County Quilters guild newsletter shared the challenge rules for "Put A Heart On It." In a nutshell, we were to make a quilt that was about 20 inches on each side. The quilt had to contain a heart. I'd wanted to make another heart quilt so I looked through my pattern collection and decided on a project that used 2 1/2 inch squares. XOXO is a free pattern by Robin Pickens

I had some black squares that I've petted for a long time. It was time to stitch them into a project. Next, I checked my red strips for "possible candidates." Finally, I picked a few pink scraps for the project.

The top before embellishment
I realized that I could make the whole project entirely from scraps. I even pieced the back from my scraps! One of the fabrics had been in my stash for years. I loved the print, I just hadn't found a project in which to use it. In my description for the project, I wrote that no yardage was harmed in making the project! 

After I had cut the fabrics, I began laying out the squares following the pattern design. The background was flat.  My middle granddaughter was over for a visit so I asked for her help. Miss J immediately showed me a solution. . .she flipped one particular fabric to the wrong side. 

Thread, rulers and quilting design
While she did it, she reminded me that I had purchased both sides so I could choose which side I wanted to show. (I had to chuckle hearing her share my words back to me!) She was right. The smoky, bluish grey fabrics are the wrong side of the fabric. The change improved the project.

Pieced back
Once I had the fabrics on the design wall, I began stitching the design. Miss J questioned why I was following the pattern. She asked me why I didn't offset the heart. I told her that was a good question. 

We arranged the squares to represent that layout to see what we thought. She was right. Although, because I planned a dark binding, I added one row of blocks so that the binding didn't encroach on the pink X.

Label
We talked about quilting designs. Miss J suggested circles that blended into the background. I used a couple quilting templates to stitch circles. Of course, I stitched in the ditch first!

Then Miss J thought I needed to add a word in the background space. She couldn't put her finger on the reason; but, I could. Adding an element would make the project have three elements. Odd numbers are more pleasing to the eye.

She suggested adding a word. I wrote "Love" in several fonts.  She liked the word and picked one of the fonts. 

Miss J commented that the word would pop if I wrote with "string." I had some red perle cotton that I purchased to tie quilts close to forty years ago. She liked the weight of the thread. 

After I had auditioned the word, Miss J let me know
I needed to add a heart with thread. I added a heart. Miss J had the best ideas!

I couched the string into position. Couching was a little tricky but it wasn't impossible. I machine stitched a scrap of black binding in place. It was in my friend Martha's string scraps. 

To finish the project, I added the label and the sleeve. The quilt hung at the guild quilt show at the end of October. I'll enjoy it for a time before I gift it. Since Miss J provided so much input on this project, the wall hanging will be hers. . .if she wants it! 

Finished front

I used 2 yards from my stash. With this finish, I used 63 and 3/4 yards of stash for 2022. I would have published this post in 2022; but for a time I wasn't able to spend much time on electronic devices. 

It is truly a scrap quilt so I'm linking to Cynthia at Oh Scrap/Quilting Is More Fun Than Housework.

Publishing this post was goal number nine on my March list.

Wednesday, March 15, 2023

Origami Shirt--A Saturday Workshop Experience

Origami shirts completed in the workshop
Last Saturday, one our Clark County Quilters guild members, Su S, taught us via Zoom how to fold origami shirts. I'll admit, I wasn't confident that I'd be able to grasp the technique within the three hour class.

Fortunately, I was WRONG! Su had prepared a great handout. We started folding dollar bills to practice the folding techniques. I think these will be fun to tuck into my granddaughters' Easter cards. Su talked about folding one and leaving it as an extra special tip when you've had a great server.

Next, we began folding a piece of paper. I drew lines on my piece of paper so that I could remember which was the right side of the paper! Sue said the paper example could be attached to a gift bag or used as a gift tag. 

The folding technique for the gift tag varied a bit from the dollar bill folding technique. I had a tough time figuring out the sleeve part of the fold; but, with Su re-demonstrating the fold, I got it. The last folding exercise she led was making a shirt using fabric. She suggested that we make three at a time so the fabric had time to cool. 

Because you press the fold into the fabric and need the the fold to stay, the fabric needs to cool.These shirts are made with a 10 inch by seven inch scrap of fabric. It was supposed to be 11 inches; but, I miss measured. I had three in process and was surprised to have finished them with 20 minutes to spare in the class!

Su also covered what fabrics would work better for the technique and which fabrics to avoid. She shared a few examples of what she did with the fabric shirts. She even talked about how to attach the buttons and where to apply the hand tack stitches. I will look through my button options and add some. Although, I may wait until after I decide what they are going to be because quilting a project with buttons might not be a smart move! 

It was a fun couple of hours. I'll need to fold a few more to be ensure that I don't forget how to make the shirts! 


Sunday, March 12, 2023

Hexagon Round Pincushion--post 3

Fabrics and templates ready to glue baste


After making the hexagon pincushion, I happened upon a hexagon ball photo on Pinterest. When I clicked the link to investigate further, I found a tutorial AND a link to a template pattern! I had to try it! 

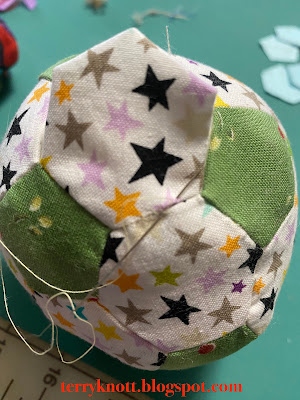
View of the half stitched ball
This time, I printed the shapes on cardstock and  cut out the shapes. I made an effort to cut carefully on the lines. As with hand work, there was less accuracy than with using the laser cut papers I purchased from Paper Pieces

Ready to stuff
I had considered choosing a fabric that I could fussy cut. Since I couldn't see through the paper templates, I decided to use two fabrics. I cut 2 1/4 inch squares for the hexagons and 2 1/8 inch squares for the pentagons.  Cutting squares was faster than drawing around the templates. When I was ready to begin the basting process, I centered the cardstock on the fabric and trimmed about 3/8 inch away from the edge of the shape. 
Sewing the last hexagon in place

As I glue basted the shapes to the cardstock, I was mindful to glue a bit away from the outer edge of the paper. Gluing away from the edge of the paper made sliding the needle under the fabric easier. The fabric stayed in place during the whole sewing process. It wasn't too challenging to remove the card stock.

For stitching, I used a lingerie thread made by Coats and Clark in a neutral shade. It buried well into the fabrics. 

Finished ball
The whip stitch that I used to stitch the pieces together is hardly visible on some of the shapes. I was able to angle the whip stitches and ease a longer edge next to a shorter edge as I do when I use the ladder stitch to stitch pieces together. I didn't like how that seam looked so I turned the ball inside out and stitched the remaining shapes to the ball with right sides together.

The last four sides of the shape is stitched after the papers are removed and after the ball is stuffed. I chose to stuff the
ball partially. I used leftover bits of batting for stuffing. I had leftover wool and 80/20 batting. I removed the papers at the last moment to try to avoid stretching the edges.

The stitches are going to show so I chose to join all the pieces in this project with the whip stitch. I wanted to make it challenging to determine which were the last three shapes I stitched together!

I thought stitching the shapes would be more challenging than it was. I found stuffing the ball firmly allowed me to press into the center as I stitched the edges of the last shape to close the ball. It was a firm surface and it wasn't long until I had a finish!

Aside from the prep work, the fiddly business of stuffing it, trying not to stretch the ball and stitching the last four sides to finish the ball, it wasn't a difficult project. It did take time! It is about four inches in diameter. Perhaps, I will use it as a pincushion.

This was goal number three on my March list.  Since I stitched with small scraps, I'm linking to Oh Scrap/Quilting Is More Fun Than Housework.

On the health front, I had a re-evaluation on my head, neck, back, shoulder last week. I'm making progress. I have more range of motion, fewer tremors in my hand, less numbness and a little more tolerance of PT exercises for my neck. I'm making progress although it is slow!

A few weeks ago while walking across a parking lot, I felt a twinge in my knee. Oh the sharp pain I felt at that moment! Unfortunately, I still have pain and walking has become difficult. Tomorrow, I have an appointment for an MRI. 

I have had meniscus tears in the past. It feels like I have done it again and while doing the same activity. . .walking!

Wednesday, March 8, 2023

Embroidery Software and Chilhowie is in the Hands of the Quilter!

Christie checking out my Chilhowie
The first Monday of the month, our small group, Mystery Mavens meet. Seventeen of us made it to the March in person sew day. There are 30 of us in the group. Life happens and not all the members can come to the sew day. We sew from 10am to 5pm. People come and go as their schedules allow. One of these days, I'll be physically able to stay the day too. 

Christie attended and she is "my" quilter. It was exciting to hand off my Chilhowie to her for her magic touch to quilt it. I look forward to seeing what loopy type pattern she will choose to quilt it. Getting the quilt to the quilter was goal number two on my March list

I look forward to these sew days as there is lots of sharing and plenty of laughter too!

I'm making progress on V-9 which is the Bernina Embroidery software. I've played with the software every day this month. I've watched a few tutorials and I was inspired by a photo in one of the tutorials to design a little project.

Software exercise
Goal number eight on my March list was to play with the software each week. Since we are eight days into the month, I've more than met the goal of touching the software four times. I'll keep playing for the next couple of weeks. Perhaps, I'll even have a stitch out to show at some point!

The design I created is all done with stitches. There probably is a tutorial around somewhere for it; but, I wasn't able to find it. This design contains a lot of stitches because the plaid in the word home is created with thread. 

It isn't the sort of design that would work on a tea towel. It is the sort of design that would look great as framed art. I'm considering using batting as one of the stabilizers.

As I was pursuing tutorials, I came across one that demonstrated stitching a basil plant motif on a tea towel. I'm considering purchasing the collection of embroidered herbs that the basil is featured. The collection contains ten herbs. Each herb would look good on a tea towel, on a bag for a collection of dried herbs, on a napkin and/or in a block for a wall hanging. In short, I could get a return on my investment, make some gifts and practice embroidering! 

Sunday, March 5, 2023

Flannel Strings Finished--post 2 of 2

Quilting, thread and label
My quilting plan for this project was to use the walking foot. I wanted the thread to provide texture and to blend in with the fabric. I used a 40 weight polyester thread made by Superior for quilting in the yellow strips. I used a 100 weight polyester thread made by Wonderfil to quilt in the ditch and in the bobbin.

I set the alarm on my phone. Every 30 to 45 minutes I stopped quilting and took a stretch break. Most breaks ranged in time from five to 15 minutes. 

I did take a couple hour breaks throughout the day. I walked around. I completed neck and back stretches. I continued until I not only had finished quilting the project; but, I bound it as well! When finished, it measured 35 inches wide by 39 inches long.

Finished front
The following day, I was tired and a little stiff. I was not in pain. Wahoo! I am healing and I am progressing toward quilting at least as much as I did before being rear ended in that car accident!

I did choose a blank label. When this project is in line to be gifted, it won't take long to write the information on the
label and stitch it to the back of the quilt.

I used about two and a half yards of stash in this project. I have now used negative two yards from my stash. This is finish number two for the year. It was goal number four on my March list

Flannel leftover containers
I was able to reduce the string bits in the two gallon plastic bag by at least half. This is the seventh flannel quilt that I've made from Martha's flannel bits! 

Gone are the fabrics in a banker's box and two sheet set zipper bags. All the small flannel scraps are in a small acrylic project box. All the bigger flannel scraps are in the larger acrylic tub. I anticipate making a number of baby quilts out of these fabrics over time. 

I had planned that the next time I worked with the flannel scraps,  I would work on the "boy" strings. Instead, I'll make some blocks using the larger chunks. The leftover bits will provide more variety to the remaining strings. 

I'm linking to Cynthia at Oh Scrap/Quilting Is More Fun Than Housework. Pour a cuppa and enjoy what others are making with scraps!

Wednesday, March 1, 2023

February Recap and March Goals

Lone star quilting progress
My February goals were:

✔1. Keep up with the temperature quilt.

✒2. Take Chilhowie to the quilter. We've made arrangements to make the exchange March 6.

✔3. Make a sample for my "Beyond the Flower Garden" class which is scheduled for May.

✔4. String piece some of Martha's flannel scraps.

✔5. Make some Valentine postcards.

✔6. Try machine quilting on Lone Star project. Hooray, I've worked a few hours free motion quilting using rulers. I tire quickly; but, I haven't had an increase in numbness, tremors or pain. Maybe I'm really on the mend!

EPP project materials
✔7. Write a Wednesday post in addition to my Sunday post for this blog. I've written four posts this month and feel like I'm almost back in the groove for writing.

✔8. Work on the project for the book, "Where the Forest
Meets the Stars" by Glendy Vanderah.

It was a productive month. I even had a FINISH!

For March, my goals are:

1. Keep up making EPP blocks and adding them to the temperature quilt.

2. Take Chilhowie to the quilter.

3. Make a sample for my EPP "Beyond the Flower Garden" class.

Possible materials for a birthday gift
4. Quilt the baby quilt that I started last month using Martha's flannel leftovers.

5. Design the project for the book, "River of the Gods--Genius, Courage and Betrayal--In Locating the Source of the Nile" by Candice Millard

6. Make a birthday present for the youngest granddaughter.

7. Continue making progress with the free motion quilting of the Lone Star. I'm currently waiting for inspiration to strike.

8. Spend time learning my embroidery software each week.

9. Write a post about the challenge quilt that was in the October guild show. 

10. Write a post about a baby quilt I gifted last November.

I thought about making a list of quarterly goals; but, I decided that for at least the next quarter, I'll stick with monthly goals. I'm still working toward healing from being rear ended last September. It is a long, hard and painful process.

Let's see what happens!