 |
| Auditioning the words and squares |
It has been almost a year since I last posted about this project. Our doodle reminded me of flying and seeing the landscape below. I asked Miss J what direction should be the top of of the piece. (It didn't seem to matter to my eye.) Miss J, however, looked at me somewhat incredulously.Then she said, "Silly, Gran! That's a dog!"
I turned the doodle a half turn to view it as she viewed it. Then I saw what she saw. I was amazed!! At this time, our book club was reading, "The Art Forger," by B.A. Shapiro. It was a good read. My inspiration came not from remaking a piece of a master's art into a quilt; but, to make a piece of art in the spirit of a master.
The art reminded me of Pablo Picasso. The dog missing an ear or out of site ear, reminded me of Vincent Van Gogh. (I am a fan of Vincent Van Gogh art.) My plan was to embroider "Vincent Van Gogh's" for the top border, "Dog" for the bottom border and "by Josette" on the art. Van Gogh often signed his art in the art which was new information to me.
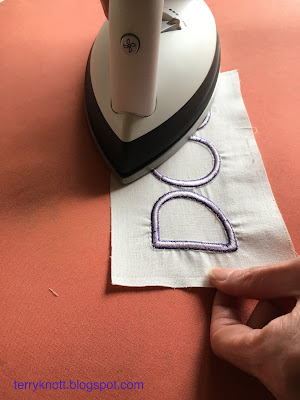 |
| Steaming the embroidery |
Originally, my plan was to embroider each section in a different color. Seeing the variety of thread colors next to the art, made me realize using one color--purple--would make the piece feel more calm.
I also auditioned a variety of colors for an inner border because having an all neutral background would make the piece too light. Even though purple was my first choice. I auditioned lots of other colors of fabric. In the end I chose a scrap of purple that had some curved lines that reminded me of the lines in Miss J's original drawing. I thought that this inner border would finish to 1/2 inch. I cut it at 1 1/2 inches though so I could trim it if I needed that purple border larger to fit the embroider pieces. I was glad I made this choice because I trimmed a quarter of an inch and not the half inch!
As I looked at the embroidery samples, I started asking various "What if??" questions. What if I embroidered the word dog in a couple sizes? What if I embroidered the letters of the word so I could piece fabric in-between the letters? I had little background fabric remaining. With careful planning, I embroidered the three sets of the word "DOG." I was able to place the embroider exactly where I wanted it.
 |
| Two of the outer borders pieced into position |
I printed the print preview of the embroidery with the grid lines present. I cut out the embroidery, found the center of the design and using the reference lines on my fabric, I placed the paper template. Once I had the template to my liking, I moved the embroidery design in my machine to the place where I wanted it to stitch. This process for placement worked well for me.
I placed my stabilizer and embroidered the letters. The embroidery stitched well; but, in spite of the stabilizer, the fabric still drew up which made me sad. I found that using a little glue stick on the pieces helped hold the pieces in place better.
I was sharing my project with JoJo and she suggested I use her steamer to steam the embroidery to flatten it. It took some finagling; but, the steamer worked well to remove many of the bubbles. I have no doubt that the remaining fullness will quilt out.
JoJo also explained to me about some different stabilizer options. She gave me a couple samples which I will try the next time I embroider because that was one of the reasons I had so much puckering. I also had too many stitches for the design so another time, I would reduce the number of stitches. I know I need to keep practicing and using the knowledge that I'm learning.
 |
| Using the trimmings from another project |
It looks like I worked hard to piece those tiny parts together; but, you know the back story!!! I also wanted to use a little green since there was a little dark green in the dog. I like the balance it created to add those pops of color to separate the letters in "DOG."
Moving to work on the left side of the border, I was ready to work with those squares. The squares represent the paint pots in a watercolor kit. JoJo suggested that since the dog was asymmetrical, that I should skew the squares too. Miss J picked the squares and the strip fabrics after we had finished coloring the dog. I liked her color choices and she finished her fabric selection in about 10 minutes. She is definitely someone who knows what she likes!
Using Sharyn Craig's technique to twist and turn the blocks, I made over sized log cabin blocks which I trimmed at an angle to three inches. I wanted some blocks to tilt right and some to tilt left so I needed to pay attention to how I trimmed the blocks! I like the movement this approach brought to the top.
I've selected a couple fat quarters to make the back and once Miss J has signed her name, I'll layer and baste this project. I plan to use some of the leftover squares to embellish the top; but, that will wait until after I've quilted it! I've spent about 15 hours getting the project to this stage.
 |
| Finished top sans signature |
6 comments:
I really like how this one's coming together! Your embroidered letters look perfect!
Nancy, working with a friend on a project is fun. This project has become so much more than I would have created on my own!
What a delightful project! Your embroidery looks great. I would love to know what JoJo uses for her stabilizers. I use Madeira Stable Cotton for a lot of mine, but it does not wash out..it is a tear away. Your letter embroidery is lovely. Once you quilt around the letters it will be perfect. Cheers.
BJ, the stabilizer that she uses comes on a roll and while papery is quite flexible. She didn't remember what it was called. There other stabilizer she uses for cotton shirts. . .I look forward to giving each a try as I think that my stabilizer choice was a lot of the reason why I wasn't happy with the final stitching. I'll have to check out the Maderia stable cotton. Neither of JoJo's are wash away. Thanks so much for stopping by!
A marvelous way to document your little grand's artistic adventure.
Thanks, Luann! She likes ready about herself in the blog too!
Post a Comment