 |
| Granddaughters on their first day of school |
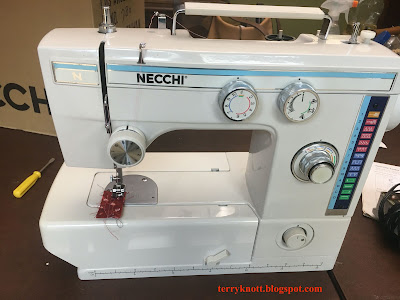
With the help of my husband to unload the shelves, I sorted through the stuff. This time, I reduced what was there by about half. One of the items in the closet was a Necchi sewing machine. If it stitched, I decided that it was going to a place that it would be used.
My husband's dad purchased this machine for our daughters when they were about eight and 10 years old. They didn't sew on it much because they preferred to sew on my machine which had more features! I did remember that it had a nice stitch. I searched on line and found that this particular model (537-FA) was built in Taiwan between 1988 and 1996. My father-in-law purchased it as part of an overflow order for a school. In other words, school personnel decided that they didn't want all the the models they purchased. I estimated he made his purchase around 1992.
 |
| Parts and beginning of tune-up |
It has lived in the box that it arrived in for most of its life! It hadn't stitched for at least 25 years. I decided to give it a tune up and test drive. If it sewed well, I planned to gift it to the granddaughters. They are a little younger than when my daughters received the machine; but, this machine could be a great match for them to start sewing on their own. I shared a first day of school photo of them.
I lifted the out of its box and reviewed the manual. While I could turn the balance wheel, I was unable to move the feed dogs. Machines need to be used. When they sit for years, as this one has, the lubricants become gummy causing the moving parts to become stuck in place.
I removed the bobbin case. I cleaned and oiled the hook before replacing it. Then, it was time to removed the covers. I was able to remove the top cover; but, the screw drivers in my tool kit did not fit the screw heads in the bottom of the machine. I oiled and greased the areas I could in the top of the machine. I still could not move the feed dogs. The machine was lint free.
 |
| Muscle power to remove screws |
Bob and I let the sprayed part sit to loosen the gum that had frozen them. While it sat, I readied a few fabrics for stitching. If the machine had a good stitch, I wanted to sew until I needed to fill a bobbin to find out how the bobbin winder worked.
 |
| Stitch tension test |
As I've written before, my husband is all about forging ahead when there is a project in front of him. I'm cutting fabrics for a quilt back when I hear him exclaim, "I got it to move!" According to my watch, there were still 10 minutes remaining on the time we had agreed would be adequate to let the degreaser work.
He was right. The balance wheel turned easily and the feed dogs also moved freely. I don't know who was the most excited, him or me! I finished oiling the machine. Together we replaced the covers. I tried a test stitch. It sewed well the first time!
 |
| Ready to stitch |
I sewed four quilt backs and finished three scrap tops with this machine. It sewed well. However, I was unable to satisfactorily wind a bobbin. I couldn't figure out how to change the position of the rubber wheel that turns the spindle the bobbin sits on. The spindle turns intermittently instead of continuously.
 |
| First sewing-- a pieced back |
It will make a wonderful learning machine for the grand daughters. I have posted a photo of the first quilt back that I stitched. This quilt back is for the last quilt top that my friend Martha finished before she died. After I stitched the back, I cut a piece of batting, layered the three pieces and pin basted it together. I'm ready to quilt that project. I will save the other stitching this machine did for a future post!
2 comments:
Yea for giving an old machine the TLC it needs to come back to life. I hope your granddaughters enjoy using it.
Thank you, Bonnie! I do quite a bit of piecing on a 1947 featherweight so "vintage" works for me. Earlier models had a lot going going for them as maintenance was something the owner could do a lot of it themselves. I hope that it will be used by this generation of daughters!
Post a Comment