 |
| Quilting in the center block |
I used my Bohin chalk pencil to mark lines to divide the block in half vertically, horizontally as well as diagonally. I placed my template on top of the square. I stitched, I rotated the template and stitched again until I completed the circle. I did use a pin to anchor the template. The design stitched well for being in the center of the quilt! Later, I added some shadow to the block. Photos are toward the end of the post!
 |
| Quilting design in corners of the center |
I had planned to quilt the larger arms of the star next; but, because I had the pinkish thread in the needle, I decided to quilt the other four squares that were also in the center of the quilt. This time, I used a different shaped ruler template. I also held the template as I stitched it. I quilted these shapes as part of my Skittles and Sherbet quilt. It was fun to practice quilting them again!
 |
| Curved cross hatching |
 |
| The lines that didn't work & the lines in the star legs |
 |
| Tear drop filler stitch |
I looked through my rulers and my thread. I decided to use a variegated thread with orange, purple and green to quilt a curved cross hatch design in the arms. I was dubious about having orange in the quilt with the pink thread used in the center as I thought that the orange might stand out too much.
 |
| A few pebbles and a border added to the quilt center |
The fabric colors were too strong to achieve the star leg look. Perhaps, if I quilted the cream background to emphasize the star legs, could get closer to achieving that goal. I decided the best way to accomplish that decision was to quilt straight lines that looked like they were behind the star. I first used a 50 weight cream thread; but, it wasn't heavy enough to accomplish the look.
Another challenge was continuing the line and keeping the line straight when I stitched in the section with the pink square. I decided I didn't have enough strength to hold the ruler and manipulate the fabric to make the line design work the way that I had envisioned. Instead, I stitched a tear drop filler stitch in the background.
 |
| Pebbles and stippling added to center block |
The plan was to stitch a larger version of this filler in the outer star points. As I stitched a quarter inch around the outer star legs, my eye rested on the green triangles. The more that I looked at the triangle opposite the green triangle in the background, the more I thought about repeating the design. So I did. It would have been much easier to have continued that design in the beginning; but, all in all I was happy with how close I was able to match the design.
 |
| Evidence that there was just enough thread |
 |
| Green triangle squares completed |
When it was time to quilt the pink squares surrounded by the background, the quilt said to stitch some straight lines in the background that were similar to the ones in the star legs of the center block. I thought that the addition of the straight lines worked well and it broke up the amount of tear drops.
 |
| Finished center |
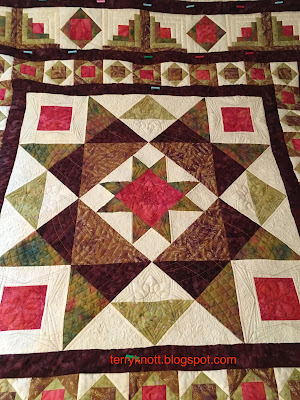
The light green squares needed to have a few lines quilted in the background of the flower design, the center star needed pebbles and a filler stitch in the center block along with a few pebbles in the star legs.
What I thought would take me ten to fifteen days to quilt actually took me 24 days. Rather than bemoan the extra time, or bemoan my slowness, or bemoan my indecisiveness, I am celebrating the progress I've made. I'm excited to have this much of the project quilted. I like how the quilting is more modern. I like that I practiced my ruler skills too. This portion of the quilt is about 30 inches by 30 inches. The quilt is about 86 inches by 86 inches. I'm not at the half-way point yet!
Next to quilt is the square in a square border and at least the brown borders that frame it. I'm waiting for the quilt to tell me what it feels it needs in those areas!
4 comments:
Your attention to the details in the quilting is why you've won so many awards for best machine workmanship!
Joanne, you are much to kind and I appreciate every word!
Thanks again for linking up. Enjoying your posts!
Karin, I so appreciate your link up. I look forward to my next project when I play again with my rulers and templates! Thanks for stopping by!
Post a Comment