 |
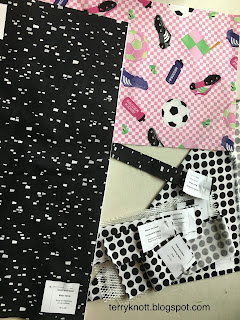
| Fabrics selected for two bags |
Here it is the end of June and I've made just two bags! (If you missed those posts, click the links so you can read about the daffodil bag and the selvage bag.) It was past time to make some progress!!
I used two fat quarters for the lining and the outer part of the bag. The black and white dot fabric is for the edge finish and embellishments. It was supposed to be half a yard; but, this piece of black dots leftover was just shy of that so I crossed my fingers and hoped there would be enough! There was! WHEW!!!!
 |
| Fabrics cut and labeled |
When I purchased the heavy duty zippers and bonsal stabilizer recommended for the project, I laughed at myself. These fat quarter projects were costing much more than the fat quarter fabric that I was moving out of my stash! The pattern is Stash and Dash by Annie Unrein. I labeled the pieces as I cut them out. Her pattern contains a sheet of tags for the pieces that you can copy and then cut to place on your cut pieces. I often label pieces in the project because once the pieces are cut, I want to stitch it. I don't want to try to figure out what piece is what!!!
 |
| Zippers on mesh |
I reviewed the instructions. I started stitching. I reviewed the instructions and got stuck. First, I got stuck because the zipper tape and zipper pulls that I purchased? Well, I was unable to slide the zipper pulls on the tape. I googled Annie and zipper pulls. Fortunately, for me, Annie had a video tutorial. Turns out, I was trying to slide the pull the wrong way. All I had to do was turn it around! It really was easy to slide the pulls on to the tape!!
 |
| Quilting, closure and vinyl pocket close up |
Slowly the piece began to emerge. I used a white 40 wt. polyester thread made by Floriani and the walking foot to quilt straight lines on the bag body. Originally, the pink fabric was going to be the outer part of the bag; but, I decided that since this bag could "grow" with the grand, she might enjoy the pink surprise more on the inside so that is how the pink fabric became the lining. Also, if she turns this into a make up bag, it would be easier to find items on a pink rather than a black background.
 |
| Finished inside of tote |
I followed the directions for adding the strap and vinyl pocket to the main body. So far, I'm liking my fabric choices. Then, it came time to add the mesh pockets to the lining. I reread the directions. I looked at the diagram provided. I couldn't see how the pieces that I cut would fit and not interfere with the vinyl pocket!
Perhaps, other people traveled the same path as me because Annie provide a link in the directions to a post in her blog where she provided a tutorial for this very project! Seeing the detailed photos helped a lot!
 |
| Finished bag ready for action |
It did take me most of one day to sew the bag. I'm planning to fill it with pencils, paper, card games, snacks so it will start its life as a busy bag for a six year old grand. There are many uses for this bag. Annie posted here about some of the uses.
I used one yard of fabric from my stash. I now have sewn 14 1/2 yards from my stash and I have 35 1/2 yards to go to achieve my goal of a net loss of 50 yards from my stash this year.
This was goal number six on my 2nd Quarter Finish A Long list. It is my eighth finish for the quarter!
4 comments:
Love the bag! I've made several of Annie's patterns and I really like them.
Thanks, Nancy. It was a fun project. I don't know why it took me so long to take the leap!!!
What a neat bag, and I love how you are thinking toward the future. On behalf of the FAL crew, congrats on your finish and thanks for participating!
Thanks, Lynne! I look forward to gifting it to her at Christmas time! Thank you for stopping by!
Post a Comment