 |
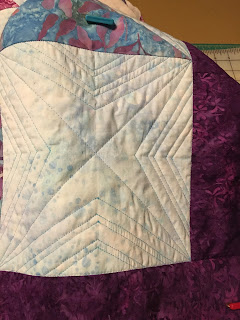
| Corner Setting Block |
These were the challenges:
*The design required the use of a longer ruler. The longer ruler was difficult to use because the slide on tray of my machine has a bit of a curve. I wasn't able to keep the ruler flat and lined up on my markings as I needed.
*The stitching line in some cases was less than a quarter of an inch away from the next stitching line. I found that I didn't have "reference points" to be able to use the ruler. Had I marked some reference points, I decided that I would have confused the reference points with the stitching points!
*My view of the stitching line was difficult to see moving backward. I have my puddle of fabric so that I have "room" to stitch. But, this puddle then makes it challenging to use the ruler.
 |
| Triangle Setting Block |
*I'm continually challenged to keep the ruler lined up, the fabric flat and then stitch smoothly all at the same time!
My solution was to use a blue ink pen and draw the lines. The lines will disappear when wet with cool water. I didn't want to "mark" the quilt; but, in the end, it was the best option this time!
 |
| A sign of having just enough thread! |
Check out how much thread I had left after stitching the main design lines. . .not much! It was a good estimate on my part! This spool was part of a retreat gift a number of years ago. It feels great to use it up!
Getting back to the ruler subject, I could quit. I have given rulers a good try; however, I want to work with rulers. I just need to keep practicing until I figure out what is going to work for me with the set up I have. With this in mind, I drew a more simplified shape to quilt in the four inch border. Using what I learned from stitching the previous section, I think, although I'm not confident, that I can use the ruler for this stitching!
 |
| Side Setting Block |
You will have to check in with me on Wednesday to see if I was successful!
Note: If I had unlimited resources, I would have purchased a longarm years ago. The longarm would be the "cheap" part of the purchase because a serious remodel would have to happen to fit that piece of equipment in the studio! Actually, the only room it could fit in now, is the living room.
4 comments:
I have a lot of the same problems using rulers as you do. I've also found that I need to work on how much pressure to use on the ruler, on the quilt sandwich and on the presser foot against the ruler. I'm a lot better at following marked lines. But, like you, I'll persevere and I'm sure I'll figure out at some point what works for me. Your quilting is looking great!
I feel your pain. My sit down long arm was just the right solution for me and I love doing ruler work. I no longer grit my teeth and wrestle the quilt.
Nancy, Yes, I too have found it challenging to gauge the press on the ruler to the quilt sandwich and to the presser foot. Gosh, those u-tube videos make it look so simple!--Terry
Joanne, I'm so happy you found a solution that works for you. Wrestling all that quilt body is not fun!--Terry
Post a Comment