 |
| Using the seam ripper as a guide |
Based on my granddaughters' likes for prints and colors, I purchased two size medium men's shirts at Goodwill. I purchased one because it was blue and had an animal printed on it. I purchased the second shirt because it was a dark grey with pink stripes. The two shirts cost $12. I did not pay attention to fiber content although both shirts are mostly cotton. I would have preferred to have purchased a shirt with a breast pocket; but, I chose the print/color over the pocket!
 |
| Collar detail |
I have lots of bias tape from my grandmother's stash. In the stash were several packages that paired well with the shirts. Our instructor, Bev, demonstrated how to use our seam rippers as a guide to sew the double fold bias tape. This
 |
| Auditioning the outer pocket |
I slipped the raw edge of the top front back into the collar seam and I restitched the edge of the collar. When I stopped to take a photo of the stitching, I realized this shirt had a pointed collar which was a great design feature.
Then I followed Bev's next direction to stitch on close to the edge on each side of the placket. To ensure that the plackets lined up on top of each other, we pinned the layers together between the buttons. We placed the pins vertically in the placket. Starting at one end of the planet, I stitched to about one and half inches from the bottom of the second button. From that point, I stitched straight across the placket. Then I stitched down the other side.
 |
| Closed outer pocket/recycled cuff |
I interfaced the main pocket because I planned to place an outer pocket on it. I also found that the shirt was made using the wrong side of the fabric. To have more contrast, I constructed the pockets with the right side of the fabric out. Before I stitched the pocket and pocket lining pieces together, I constructed the pocket and placed it on the main pocket.
 |
| A second option to open the pocket . . . unsnap it. . . |
I added bias tape to the top edge of the outer pocket as an accent. I repurposed the flat felled seam of the sleeve. I turned it into loops to hold a tasting spoon or just to be decorative.
I stitched close to the edge of the pocket and then a quarter of an inch away from the first stitching. Along the top edge of the pocket, I stitched next to the inner edge of the bias tape.
 |
| Collar detail |
I used the second cuff as a breast pocket. I didn't realize that the cuffs had these decorative snaps. I thought it would be fun if the snaps were usable so I made the pocket accessible by the snaps!
Regarding the ties. Using the shirt back, I cut a strip that was folded the bias that was about 2 inches wide. This gave me two ties. I pressed the fabric in half, then pressed the edges to the center fold. Next I folded the edges inside and pressed the strips in half. I stitched next to the outer edges of the tie. I tied a knot into one end of each tie.
 |
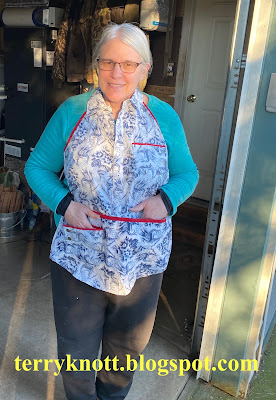
| Finished apron |
I inserted the other end into the seam finish and stitched the seam finish in place. This is a great way to finish the ends of the ties.
Although, I didn't use any of my fabric stash in this project, I did use my grandmother's bias tape. She would have said it was a good use of the tape. She would also have been tickled with me making an apron. She wore an apron in her house. That apron was a dust cloth, a carrier for garden produce, a place to put some of the mail in addition to keeping her clothes clean.
I think I'll wait for Christmas to gift the apron to my middle granddaughter. Next Christmas she will be nine years old. She might enjoy getting a cookbook to go along with it. She cooks with her mom and dad. When she visits us, she cooks here too. She likes stirring and enjoys making soups among other dishes. I like her delicious cobbler fillings best.
I'm linking to Cynthia at Oh Scrap/Quilting Is More Fun Than Housework. This was goal number three on my April goal list.
No comments:
Post a Comment