 |
| The project |
I spent time auditioning green fabrics for the lining; but, none of those choices were ones I would look forward to sewing. I pulled an Asian fabric which seemed to be "right." I cut out the lining pieces, the pocket linings and then chose a fabric that coordinated for the pockets. I did have enough of the red fabric for the binding.
 |
| Selection of selvages |
Unfortunately, the leftover pieces weren't large enough for the inner pockets. Last time, I stitched the selvages to a muslin base. This time, I glued the selvages together and then stitched/quilted the layers together.
As I cut fabrics, I save the selvages. I cut a minimum of a quarter inch into the fabric print. Sometimes, I cut up to an inch extra of the fabric. I think the variety is nice. I admit, I used to throw these away or sometimes, I used them to tie fabric bundles together! Some people only save the light colored edge with the dots; but, I save both edges. I sort the fabrics into three categories: small--under 18 inches; medium--18 to 36 inches and large--over 36 inches.
 |
| About a quarter of the strata created for one panel |
Since the two finished sections measurements were 21 inches by 26 inches, I pulled selvages from the large bag. I chose selvages that were long enough to work for each section. I found it was easier to make the sections the same.
This time, I tried running the selvages lengthwise of the bag, instead of crosswise. After I placed the front pocket, I decided that the selvages showed better if they ran crosswise. I used glue to adhere the edges together instead of stitching the pieces to a foundation. The idea of gluing came from Riel Nason's book, "Modern Selvage Quilting." If you are considering a selvage project, allow a lot of time. It takes longer than one would think to create enough "fabric" for the project.
Once I had created my strata and following the pattern instructions, I pressed a piece of stabilizer to the back of the strata. I layered the stabilized strata to batting and a piece of batting. Then it was ready to quilt.
I liked gluing the strips together step because it saved the time of sewing the pieces together. I used an even feed foot to quilt the layers. I stitched close to the edge of each selvage and then added more lines as I felt it needed. Previously, I used a walking foot and the walking foot was the better choice! (It is good to try options so that you know which works the best for you!)
 |
| Inside front of tote |
After I finished this step, I attached the pockets to
the front that were left from my project last year. Then I made the pockets for the lining and fused the stabilizer to the back of the lining fabric. At this point, I followed the steps and finished the tote!
The inch webbing straps were easier to apply. I still had some wonkiness; but, I'm able to use the inside pockets okay. Another time, I think I would just divide the lining in half and center the pockets over that line. I like the sizes of the pockets because other sized rulers can slide into these pockets. Quilting tools/supplies can fit easily into the pockets too!
The lining of the back of the tote has three pockets. I like a bag with lots of pockets because it is easier to keep supplies organized. This bag has a variety of sizes of pockets which helps to remember which pocket the supplies are in! It is designed to safely carry large rulers like you might want to take on a retreat or to a class.
The bag is still fairly heavy. If I left out the stabilizer, the the bag should feel lighter. I used 80/20 Pellon batting pieces left over from past quilting projects. After I finish a project, I piece the batting into as large a chunk as possible. I use these leftovers for bags, placemats and even small quilts.
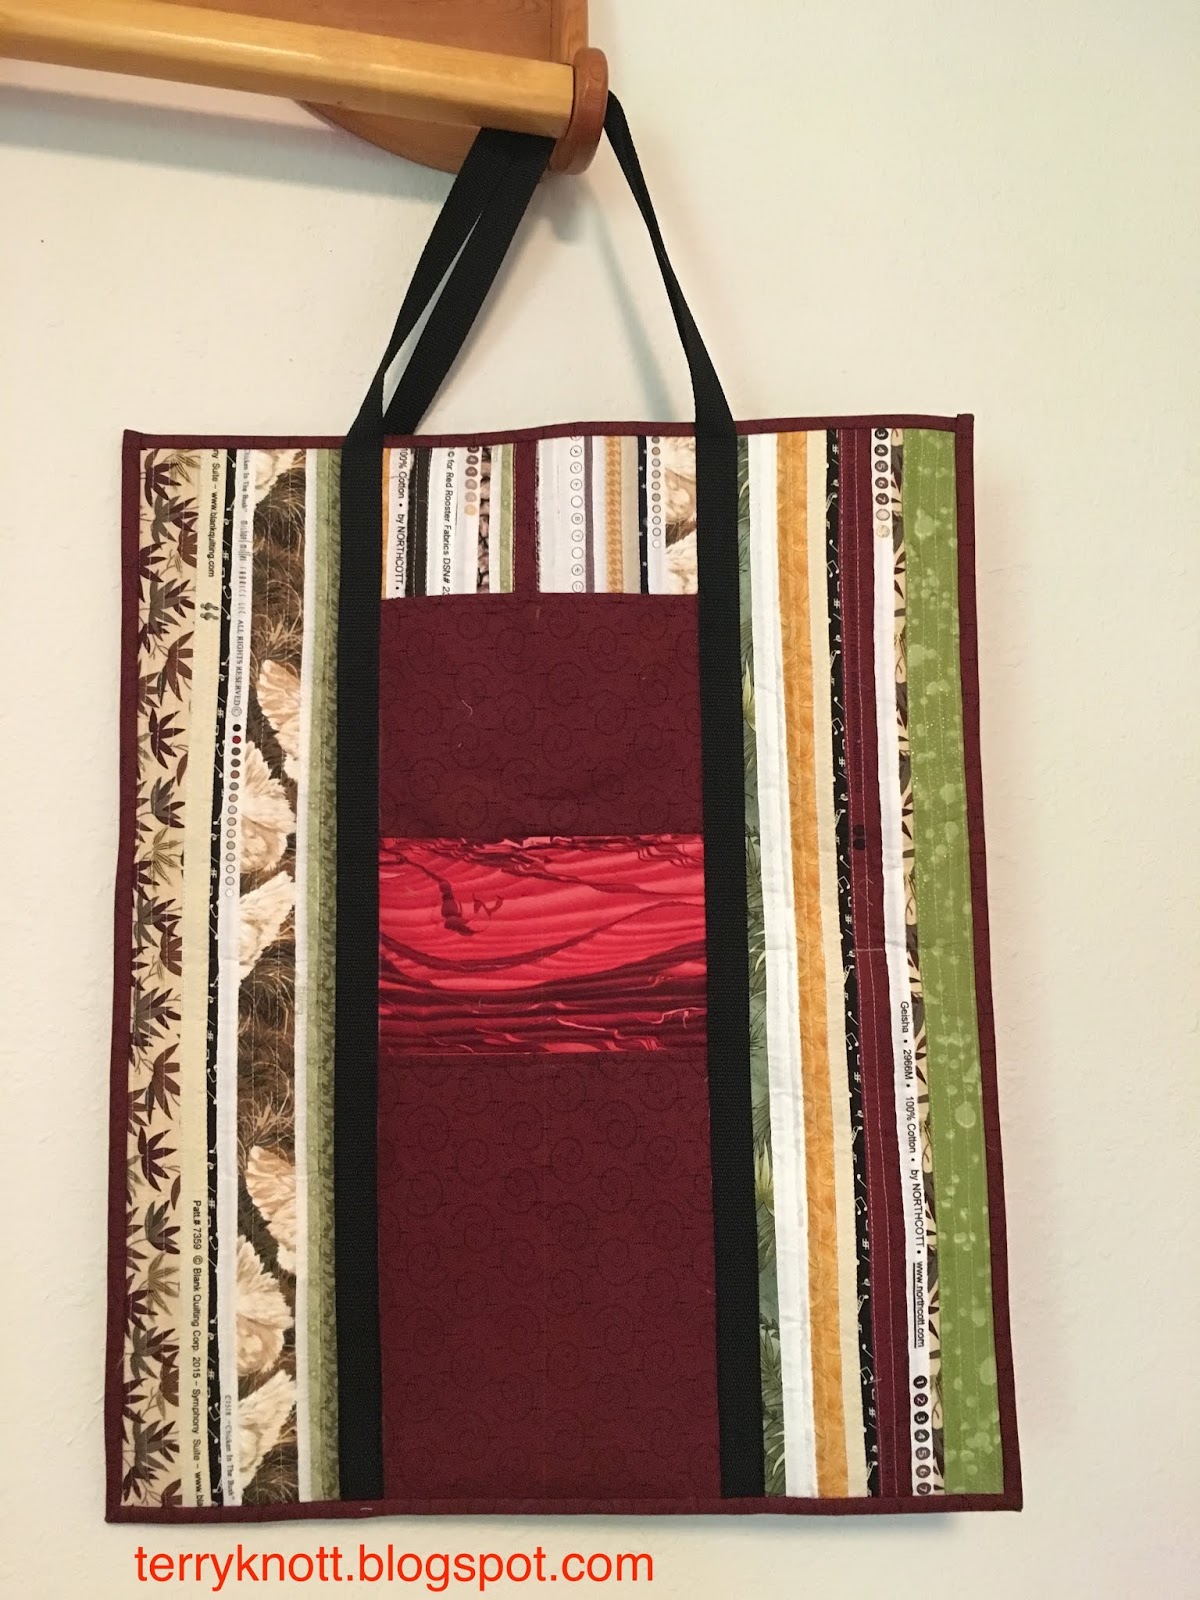 |
| Finished tote |
I used 3 1/4 yards of fabric from my stash. I used enough selvage strips to equal about 3/4 of a yard of fabric. Interesting, my large selvage bag doesn't look much different from when I started!!! I've now sewn 53 1/4 yards out of my goal of using 57 1/2 yards from my stash this year. I've 4 1/4 yards left to stitch!! This is finish number six for the 2nd quarter of the FAL 2019. It was goal number five on my FAL list.
2 comments:
I’ve saved and given away my selvedges a few times! I always have the intent to make something, but when someone asks if I have any extras,,, out they go! Recently I’ve started to collect some ideas for their use. Something that I’d actually want to make and a few I’d like to keep, lol. Did you ever see the picture of the lady in a circle skirt made with them? It's pretty unique, but circle skirts and my shape aren’t friends anymore. LOL. I did use some recently when I was making a 12&1/2” block. It came out 12&1/8” so I knew I wouldn’t want to fudge that amount between the two sides,,, I added sashing to that block with selvedges from some of the fabric used in the block, I was lucky that there weren’t any star points etc to deal with. Have a great weekend.
Luann, I did see the picture of the lady wearing the selvage dress that had a beautiful full circle skirt. It was a gorgeous dress! The secret to the edge is to leave one edge with a chunk of fabric that doesn't have a selvage. . . .the edge allows for "ish" so the block comes out the right size. It also is regular fabric so it doesn't make the seam thicker when you join the blocks together! I'm glad that you are playing with your selvages!!!
Post a Comment