Wednesday, May 31, 2017

A Little More Quilting On The Chicken

Pebbles in the background
Well, last time I posted that I didn't have to decide about all pebbles in the background. I was quilting away in my "zone." Because I was watching the space and not thinking about "where" I was stitching, I stitched outside the boundaries. I plan to keep stitching; I've lots of background to cover and still have lots of ditch quilting to do on the appliqués.

Do you suppose that I can still quilt other textures, or, did I commit myself to pebbles everywhere? Okay, I agree. I am certifiable nuts to have even completed this many pebbles already!

Back of "Flight Path"
Speaking of pebbles, I've quilted many over the years. I'll share my butterfly quilt which was inspired by the children's book, "Velma Gratch and the Way Cool Butterfly." 


Front of "Flight Path"
I wanted to stitch a two sided quilt that was all thread. As I neared the finish, I decided that I wanted the size to be bigger. I added the outer border via the quilt as you go method. Meaning, I quilted the border and then added it to the quilt!

It was a bold move and it worked! It is easier to see the segments that I added when you view the back.


Finished Front of "Flight Path"
I enjoy hanging it sometimes with the back showing and sometimes with the front showing!

Unfortunately, I don't have a photo of the back now. I removed the partial sleeve (the piece hung in an art gallery system so I needed access to the center of the project) and replaced it with a sleeve that had Flight Path embroidered on it.

JoJo at "Through My Hands" digitized the words for me. I so love this font!
Back of "Flight Path"

Monday, May 29, 2017

Quilting the Background on the Chicken

Superior Threads order
Until today, I haven't been stitching since my buddy's hip surgery. I've swept floors, cooked meals, mowed the lawn and even provided transportation to the grocery store! (I haven't mowed the lawn in about 20 years!) My body is rebelling with the added chores. . .especially, the lawn mowing!

The patient, now 11 days post op, is doing amazing! Although his incision is larger than the seven inches the surgeon had said. The incision must be in the 12 to 14 inch range. It was surprising to see how large it was when the home health nurse removed the bandage. She removed his 22 staples and the wound looked like it was healing perfectly! No wonder he felt like he was getting pinched! When I shared the photo I took of the wound, my sweetie said one could fit a Thanksgiving turkey in that space! It is  wonderful to see him moving around pain free and even better to watch him planning more activities! We think he will receive the go ahead for driving next Thursday.

The above photo shows the silk threads that I ordered from Superior Threads. I like the way the silk embeds into the quilting and provides texture. I can buy a few YLI spools at a fabric store; but, since I use quite a bit, I'd rather purchase the product in a larger quantity. Plus, Superior has a lot more variety!
After two hours of stitching pebbles!
Today, I stitched a few more pebbles. After two hours, this is as far as I am! I still have more ditch quilting to do on the individual blocks; but, I'm taking a break from that process. Probably, I should quilt the entire background in pebbles. BUT, I would be bored doing endless pebbles so who knows how long it would take me to stay on track! However, the quilting would be evenly distributed! :) For now, I don't have to make that decision.

Wednesday, May 24, 2017

Surprise!!!

Miss K in her hostess role
Last week, I had a birthday. . .I turned 60. Because I don't make plans for my birthday, I had agreed to teach a number of classes that week. I taught CPR Tuesday and Thursday. Friday, T and I updated seven Red Cross lifeguard instructors in a skills review course.  Saturday and Sunday, I trained twelve 11-13 year olds in the Red Cross Babysitter's Training program. We had the grands on Monday. Wednesday, my husband had a full hip replacement surgery. Little did I know, daughters A and N had a plan for me on Saturday night; but, they weren't sharing it with me!

Miss J in her hostess role
A couple of my quilting buddies with their husbands
Crazy, week? It was! My husband has had hip issues his whole life because of a birth defect of how his left hip formed. In the last three months, his pain level went from about a seven to off the scale. Aleve had no effect. He had to stop walking the dog and some other daily activities. He found it more comfortable to sleep in his chair rather than the bed! He even ate my cooking full time and said he enjoyed it!

From the time he had his first appointment with the orthopedic surgeon to the surgery, it was two weeks. Today, he is a week post op. He feels great. He is carrying a cane for just in case situations and he is waiting for the healing to happen which it is. He is following the rules to a "T!" He looks forward to riding his bicycle in August.
Me, A and N who plotted the logistics!
The night of his surgery, our youngest daughter, N, who lives in London, arrived for a surprise visit. She scared the crap out of me which is just the effect she wanted. I was in bed when I heard footsteps coming down the hall. After pulling my heart out of my mouth, I was glad to see her!

The following day, we brought the surgical patient home. Friday, the oldest daughter, A, and family came for dinner. The patient supervised cooking the chicken on the Traeger smoker/barbecue. I thought that this was my birthday celebration dinner. Son-in-law, J, even brought my favorite pie--Strawberry/rhubarb. Saturday, we were all supposed to go to the oldest daughter's home for dinner. I said to make it easy and let's call this evening what we would do tomorrow.

The patient and I enjoying a bit of Dalwhinnie
The patient wouldn't hear of it. N said that A had the food already in process and it would ruin her day if I didn't go. I said okay and not with a smile on my face either!

I was tired after teaching the babysitting training skills! When I arrived, K, our oldest grand, handed me a paper she had written, "Welcome to Gran's Party." Her dad, J, had made a pitcher of a special beverage he named, "Stitch in the Ditch." It was delicious although, all I couldn't tell you all the ingredients!

A and N had a surprise birthday party planned. How fun! I saw people from when I worked at the Red Cross and members of my water
Water aerobics class members sampling the hors d'oeuvres
aerobic class came as well as a couple quilting friends and their husbands. It was great to catch up as I haven't seen some of those people in many years! A and N kept the table stocked with dairy and soy free alternatives. What delicious choices there were!

During one conversation, I said that I was  thinking about making a quilt using 60 degree angles in honor of my year.  P, one of my quilting buddies, said she was planning to make a project like that and I could join her. Ahhh an enabler. Life is good! Daughter, N, rolled her eyes and said she was so cold!!!!!
A and J made Kalua pork sliders. YUM!


The patient stayed home and rested. Although once home, I did share a bit of Dahlwinnie scotch I received for my birthday. The patient hadn't had any pain medications so a little imbibing wasn't unhealthy for him.

So there was no progress made on the chicken project last week. I'm okay with that. I'd rather hang with the daughters over quilting any day! They did tell me their original plans were to meet at 2:30 (2x30=60) at a tea house for the party; but, because I was working, I nixed their plans! Sorry, ladies! I guess we will have to "party" there the next time N comes for a visit!

Thanks everybody for coming! It was the best party I have ever had! (Thanks A and N for planning and hosting it!)
The attendees, hostesses and me! (N is taking the photo.)

Wednesday, May 17, 2017

A Little More--A Chicken Update

Beginning the cross hatching
Quilting this chicken wall hanging is a lot like a sponge soaking in water. . .the more thread I put in to this project, the more it seems to absorb without much change in the look! On the other hand, all the thread in the wall hanging has to "fill" sometime. . . right??!!!!

I placed an order with Superior Threads for a few more cones of Kimono Silk thread. They were having a 25% off sale. Now, I should be able to finish quilting the entire wall hanging with silk thread.

When quilting the leaves, sometimes I chalked the lines. One reason to chalk was to see if I liked the spacing or the direction of the veins. Another reason to chalk the line was that once I've drawn it, I've the muscle memory to stitch it. It seems strange but, drawing the design really does work. What is crazy is that often my stitching is better than my drawing!


Chalked lines
Most of the leaves are quilted. I've used a variety of threads and a variety of designs to create the leaf veins.  I like the various thread choices for the leaf veins.

The leaf veins provide the repetitious quilting; but, since they are a little different--it provides variety at the same time. The grands have had fun finding similar veins, similar leaves and then ones that are different. They like playing that game!


Leaf detail and wood detail
I like the cross hatching at the base of the central rooster. Quilting the "wood grain" printed lines was a good decision. With the center panel almost complete, I still was stuck on what to do with the backgrounds and outer border. I'm getting closer to working on those areas! I have almost quilted the center panel.

When I was at a guild meeting last week, I took this project with me because I was still stuck with how to quilt the outer pieced border as well as how to quilt the backgrounds. Pat had some awesome suggestions. She took my idea of a curve in the outer border and suggested that I incorporate three blocks instead of one or two. Brilliant! She talked about quilting a cloud around the words.

JoJo suggested that I use a fill stitch like a brick wall behind the letters leaving parts of the wall out around the letters. It is great to have friends to provide input!

I am going to try the brick filler. JoJo's thought takes Pat's suggestion to a different level and will still allow me to stitch different fill stitches in the blocks. If I "get" to stitch the same filler stitch over the entire quilt, I'd be bored and it might take another six months to get to the facing and sleeve stage! Below is showing the center panel almost quilted. Perhaps, the sponge really is approaching the saturation point!
Center panel nearing completion

Sunday, May 14, 2017

Happy Mother's Day--"The Artist's Hand"

Mother's Day bouquet
Happy Mother's Day to all the Moms and Moms to be out there. The days of toast and juice served by my daughters with help from my husband to me in bed are behind me; but, those are wonderful memories.

I use to plant and deliver hanging fuchsia baskets for my mom and mother-in-law. Over the years, that planting changed to a gift certificate for potting plants. Now that my mother-in-law lives in a retirement center, she receives a photo of a plant. My mom still delights in the gift certificate. For several months after Mother's Day, she will share what is on her list, what she actually bought and what she planted in her patio pots. As the plants grow and bloom, she shares that too.

Until 2009, I enjoyed spending as much time in the garden as I did quilting. Then, I was rear ended in a car accident which damaged my neck and back. I had surgery which helped me gain many activities of daily living, but, alack, gardening has not been one of those activities! I still like looking at plants though! My oldest daughter often gives me a plant or two for Mother's Day so that I have something to watch grow and bloom during the year.

My "quilted" bouquet
The grands like flowers. They like picking bouquets.  In retrospect, I should have taken photos of the two of them gathering their bouquet. One carefully selects a stem of this and a stem of that. The other has a "the more the merrier" sort of approach. Either method works.  The bouquet that J created made it to the house; but, the stems were too mangled from all her "adjusting" to make it to the glass. Her bouquet was full of forget me knots which doesn't surprise me since blue is her favorite color.  I love J's exuberance for creating. Her bouquet was beautiful and created with so much love. She would often ask if I liked this flower better than that flower as she made her selections! I carry her bouquet in my heart.

Close up of the daffodil quilting
The bouquet K created is the photo today. K must have walked a mile creating her bouquet. She started with the forget me knots, then would hold the forget me knots next to the next candidate and hold her head to the side looking at the color or the texture and then say. . .maybe tomorrow and walk on or she might say yes and make her collections. Sometimes she would return to a tomorrow candidate and change her mind! K likes pink; but, the bouquet wasn't finished until she found some red flowers (a few coral bells) to add to the mix because red is my favorite color. Then she proudly presented it to me. Their mama and daddy sure are raising sweet and thoughtful ladies to be!

I've had Mother's Day wishes from my youngest daughter who is living in London, England. Actually, I was also honored when Mum's Day was in England earlier this year. Hey, you can't beat two Mother's Days in one year! :)

Close up of the hand quilting
I'm sharing a project I made after reading "Clara and Mr. Tiffany." The daffodils were a photo of the ones that bloom in our yard and the hand is my own with some embellishment! The title of my work is "The Artist's Hand."

Our hands create so much for those that we love as well as bring to fruition that which has come from our hearts and souls.


Thursday, May 11, 2017

Quilting the Center Panel of the Chicken

This is what a section resembles before I tie
and bury the threads.  .  .MESSY!!
This chicken project continues to be work in progress. I've been stitching-- a little most days and I've been burying threads in the evenings. I started quilting this chicken project the first part of April. I thought that by the end of this month, I would have finished the quilt. However, I still have a long way to go!

Generally, I've been threading the machine with a color of thread and then stitching until I need to switch to a different color. This means, I'm stitching in various spots on the quilt. This stitching here and there format coupled with hours of knotting and burying threads has contributed to me feeling like I'm just not getting anything done!

I tried knotting and burying as I went; but, I felt like I made even less progress so I decided to tie and bury a bunch of threads instead of one at a time! Although, I've found that the repetitive motion of tying and burying threads hurts my shoulder so I am pacing myself and taking many breaks.
For the quilting,  I've stitched around the print in the fabric and added texture. The
body of this bird is mostly quilted, although you don't see it because the thread 
blends. 


Using the print in the fabric as the quilting motif means I don't have to 'think' of what motif would fit that section. The downside to this approach is that the quilting blends into the piece. My husband thinks it is crazy to stitch for hours and then not be able to see the quilting stitches.

I'm using 100 weight silk thread as I quilt. I may need to use some cotton thread because I might not have silk in the color that I need; but, I am trying to stay with the light thread weight. The reason I'm using a light weight thread in a color that blends with the fabric is so that the quilting will provided texture and so that the appliqué is the focus of the piece. Can you see where I've stitched around the various prints to give my bird the illusion of 'feathers?' Perhaps, I've stretched that term--feathers-- a bit far; but, I do hope that you can see it!

The rooster body is now quilted. It took a long time to determine thread color and
what stitch to use!


The photo above is another example of how I quilted the body of one of the chickens. This is the rooster which is in the center of the wall hanging. There are just a few threads there to knot and bury. At times, I've had so many threads that I quilted another section of the quilt because I didn't want to stitch over one or more of these thread ends!

I want to share with you a tip about using threads when you don't have THE color that works the best with fabric. Choose the thread that matches closest in value. In the photo above, the thread in the 'orange' section is actually a burgundy. The blue thread in the tail is actually a grey navy. It works well even on the brighter turquoise shapes because there is some grey already in the fabric. Isn't this an interesting find?
Center panel of wall hanging. I've about 50 leaves to quilt along with the arches and  
some backgrounds to finish the center panel.  


I've spent so much time with my nose inches away from the surface of this project that I lost sight of how much I have finished! In the above photo, I can see how far I have come. I need to remember to take a photo and to look at the WHOLE quilt at the end of the day instead of concentrating on the fine detail work. That stepping back view will help me maintain the perspective of the project. I also need to keep in mind that it took me ten years to get to this point so taking another 30 days or so to quilt this piece is but a small increment of time in comparison to how long this project has been a WIP! (Work in Progress)

When I'm quilting, my goal is that my quilting enhances the project. My other goal is that the design of the project will bring you to view the quilt and that my quilting will encourage you to stay awhile and 'browse!' I still haven't decided how I'll be quilting the background of the other chicken blocks; but, I trust that when it is time to put the needle in that area and begin, the design will come to me or at least to my fingers! Enough sharing for now. I had better get back to tying and burying thread tales so that I will have a 'clean' workspace when I want to quilt tomorrow!


Monday, May 8, 2017

Month 4 of 8--QAYG (Quilt As You Go)

Most of the templates used
This month, we received the videos for the class late which didn't allow me time to doodle and to practice. Okay. . .I could have doodled and practiced; but, had I done so, my blocks wouldn't be finished in time for the class on Saturday! The saying, "Better finished than perfect," was going through my head. I sure don't want to get behind on this project.

This post, I'm including a photo of most of the templates that I used to quilt the blocks.


Simple motif
The directions were to use a circle template, create this motif and then add more motifs to the block. The finished block will be 6 inches x 24 inches.

It would have been helpful had the video included information about how the block was marked. It took me some time to figure out that the lines on either side of the center line were the width of the template!

This was an important line because I used it as a reference line while using the circle template! My first motif went well. The second one was a little wonky. I added some gripping tape to the back of the template and that helped me hold the template better in place.

Once I finished quilting the motifs, I added some lines. I was challenged to back track. The design of the foot makes it tough to see where I'm stitching in some directions.

Finished first block of four

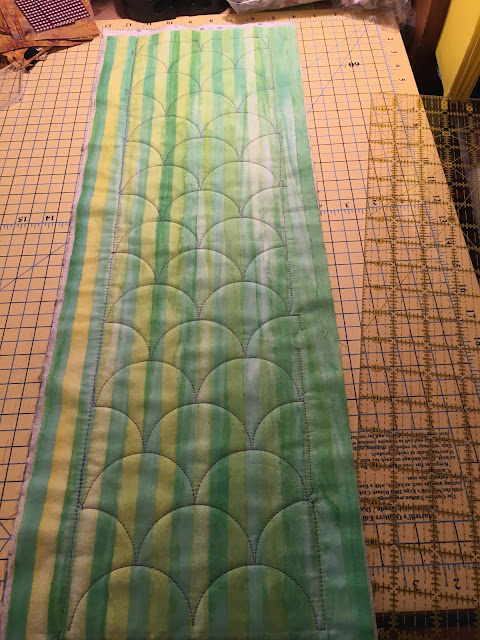
Finished second block of four--clamshell design


The second block used the clamshell template. In spite of my clumsy use of the template--I kept turning it incorrectly--the block is easily recognizable as clam shells. I never did figure out how to start the design on the left side of the block; but, my "squiggles" "should" end up in the seam allowance. Again, it took some thought to figure out where to draw the registration lines; but, like with the first block, the template held the answer. The registration lines corresponded to lines on the template. I "got" to practice realigning the template with each "arc." I was surprised at how much realigning there was!

Adding veins to the arc.
The third block utilized the clamshell template in a little different manner. I had a challenge with the foot fitting into the template when using the template from the side of the foot. I wonder if my template has an incorrect bevel or perhaps my foot just isn't the right shape for the template. I'll ask if others had issues. To make the design "work," I dropped the template about a quarter to half an inch. That space allowed the foot to move around the template.


Finished third block of four--adding veins to the clamshell 


In the end, my veins are different sizes; but, I'm okay with that. It is a little tricky to hold the template in the same spot each time. The more I stitched, the easier it became.

The circle template in action
For the last block, it was back to the circle template. I learned how to use the curved template to make a gentle S curve and then, I learned how to use the circle template to stitch a curve of circles!

I learned how to use the clamshell template to add a couple lines of ripples and then I added more ripples until the space was quilted!


Finished fourth block of four--circles


I enjoyed making this block the most. Next month we stitch another four blocks; but, this are a bit smaller. It is back to working on the chicken!


Wednesday, May 3, 2017

Challenge Quilts

Just a little eye candy for the post today. I wanted to share all the entries into the guild challenge. The rules this year was to make a small quilt--no larger than a perimeter of 84 inches using your favorite quote as inspiration. The contest was called, "Quilt the quote." The creativity is amazing! Below are the entries.
This was my entry.


This one won third place


This one placed second in the challenge competition.


This one placed first in the competition!