Wednesday, October 31, 2018

Four Mini Stockings--Second Finish for 4th Quarter Finish A-Long

Here it is the end of October. I had planned to accomplish so much more than I did this month; but I still made progress on my list which is TERRIFIC! I did complete two finishes. I also met my goal of quilting the center of the BOM mystery quilt. As for the other three listed projects, I worked a bit on each one. A finish for those will also happen. . .just when is yet to be determined!
The mini stockings
I was going through a scrap bag of my friend, Martha, and discovered a plastic bag with four mini stockings cut out along with a paper pattern. She often made little items like these for gift giving. It looked like from the paper pattern that there was a contrasting cuff, heel and toe. I rummaged through my small scraps and found a piece of red fabric for the contrasting items and a little piece of Silk Radiance for the lining. I even had some ribbon in my stash for the hangers. Robert Kaufman stopped producing Silk Radiance. I only purchased it twice; but, I loved using it. I wish I had purchased more; but, that is a story for another time.

There were no directions about how to proceed. I sketched a pattern for the contrasting cuff, toe and heel and cut out enough pieces for four stockings. I cut out the lining pieces.

Then it was time to start stitching! I topstitched the contrasting pieces to the stocking first. I figured out where I wanted the hanger and stitched it into the cuff. I stitched the lining to the top of the stocking and under stitched it. When I completed that step, I moved on to stitching the lining to the stocking. I left a small section unstitched and used that hole to turn the stocking right side out. It didn't take long to hand stitch that two inch section closed. I stuffed the lining into the sock. I pressed the stockings and they were finished! Hooray!!!
Parts in progress

These could be tree ornaments filled with a little treasure for a special somebody. They could be part of a holiday place setting or perhaps, they could end up decorating a special package.

Each stocking is about three inches wide and about six inches high. I figure that I might have used about a fat eighth of fabric; but, the amount is so small that I'll roll the amount into a finish using more fabric. This is my second finish and goal number 22 on my Fourth Quarter goal list.

Stockings ready for duty
This month, I trained 26 in Basic Life Support (268 YTD); 47 in swimming lessons ( 81 YTD), 19 in CPR for the Lay Responder (26 YTD). This is a total of 92 for October. (489 YTD). I worked as a sub on a Saturday morning and in three hours 47 was the number of participants that came to the six classes I taught. If I were to count the parent that came with the child to the parent/child lessons, I would have taught 62 people! My new black suit swam just fine!


Sunday, October 28, 2018

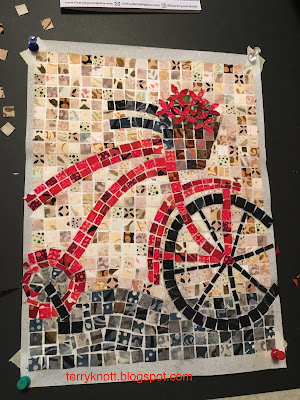
Red Bicycle (Gladys) post 2--First Finish for 4th Quarter Finish-A-Long 2018

White tulle
Red tulle
The first trip that I made to Joann Fabric store didn't net me one piece of tulle. I returned a couple weeks later and the selection was much better. I purchased a half-yard piece each of red, black and purple tulle and a black organza. I did take the top with me. I also looked at some Halloween fabrics that might have worked; but, the print was too big. For the next step, I placed the tulle on the top and took a photo of it. Trying to do this in a crowded aisle wasn't the ticket. Also, the store lighting was awful!
Purple tulle
Black organza
Black tulle
At home, I photographed my choices. The reason that I went to purchase tulle was because the white that came with the kit dulled the piece too much. While I liked the red tulle, it seemed to distort the background color to a pinkish tone which wasn't my favorite. The purple was a little too dark and the black organza was way too dark. The black with the few sparkles intensified the colors the best so that was the tulle that I chose. It was interesting to see how the tulle changed the feeling of the piece!

Borders attached; quilting started
The directions in the materials was to trim the top within a quarter of an inch and to layer the piece with the tulle on top. I had some scraps of red fabric that I pieced to make the back and I also saved some fabric for the sleeve. I also pieced the sleeve.

The next step was to add the borders by stitching through all of the layers. I wasn't keen to do this step because I was concerned about keeping the border from distorting using that method. I wasn't going to do it and then I thought I would try it. The border did stretch a bit; but, in the end, the results were good. Would I use this method again? Probably not.
The label for Gladys

I started quilting the red areas of the quilt using a silk thread. Then I moved to the basket using a brown silk thread. I used red in the bobbin which matched the backing fabric. I stitched along the outer edge of the pieces. Stitching through the tulle, the stabilizer and the layers wasn't difficult; but, the needle moving through all that sounded terrible! I used a fine gray polyester thread to quilt the street. I decreased the top tension to one and still the thread shredded. I had a bit of an issue with thread shredding using a neutral silk as I stitched the background. I decided what was making the thread shred was going through that heavy stabilizer. I used the same neutral thread to quilt spirals in the border and had no issues. It took me about three hours to quilt this project.

Finish #1 and goal #11
I trimmed the project and added a binding that was of the same fabric as the outer border. I machine stitched it to the project and then top stitched it in place. I used the number 71 foot for my Bernina to stitch it initially. This is a flat felled
foot. I like using it because I have better control of stitching straight. I pressed the binding; then used a little Elmer's glue and a hot iron to "baste" the edge in place. Then I used the #10 foot to top stitch it in place. I like the #10 because it has a blade that I can run next to the edge of the fabric and it helps me sew straighter.

Time to make this project was about 16 hours. Cost of the materials was $45. I might make another mosaic type quilt. I would try to use a lighter stabilizer or employe a different method of anchoring the pieces to the background. I'm still thinking about the tulle. It wasn't that difficult to work with; however, I'm not too excited about the end look of the project after using it.

This is finish #1 for the 4th Quarter Finish-A-Long and goal number 11 on my 4th Quarter Finish-A-Long list. I used 1/2 a yard of fabric from my stash bringing the total to 38 yards used from my stash. I have 12 yards to go to meet my goal of using 50 yards from my stash by the end of the year.

If you missed the first post about this project, you can read it here.


Wednesday, October 24, 2018

Passion Unfolded--Joanne Adams Roth Quilts

One quilt in her power line series
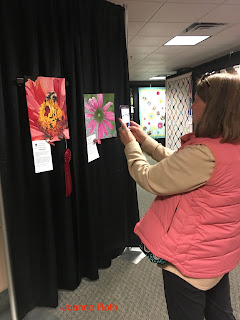
On Sunday, a friend and I went to the Clark County Quilters Featured artist's show. The title of the show was "Passion Unfolded: The Quilts of Joanne Adams Roth." This was the first year that I didn't volunteer to help with some part of the show. I was scheduled to work; but, one of the days was canceled so that was why I got to see the show.

Examples of her early work
"Daffodil Dreams"
What an amazing show it was. Joanne shared quilts that were hand pieced, hand quilted and hand beaded. Yes, she had machine quilted some quilts and had some quilts quilted by check book! She shared quilts that contained examples of techniques that she not only learned herself but taught others as well. I've known Joanne for a number of years. We were in the same small group for awhile so I saw many of the quilts in process that were in the show! I had many favorites and it was so fun to see them again!
I snapped a photo of one of her quilts in her power line series because I liked how she had shaded the fabrics that she had pieced. It was so striking. . . probably because she used red! Red is my favorite color with turquoise and purple not far behind so I wanted to share that piece in this post!

Capturing the art for a "rainy day!"
Of course, there were examples of her more traditional quilts. Although, even in the traditional quilts, Joanne used a different setting or an unexpected color to make the quilt her own creation. I appreciated leafing through her project notebooks. She had saved patterns/in process photos or her quilts. She even had her projects numbered!!!!

I am SO not that organized! She also had her blog posts printed in a book for that year. She does a great job of documenting her work!

On many of the quilt stories was written "In the collection of" and the person's name. Joanne has stitched many graduation quilts, gifted
many quilts and even sold some quilts.

My friend and I oohed over the "Daffodil Dreams" quilt. Joanne had designed the 58 center feather wreaths which enclosed a daffodil. Joanne machine quilted the piece and dabbled with trapunto. The variety of fabrics used is large with few repeats.
A modern take on a pickle dish pattern--"Chic Kisses"

"Moon Gazing"
It was fun to see "Moon Gazing" again. This was her entry in the guild's theme category at the show last spring. That bit of blue is tiny lights and I love that a mouse was gazing too!

Of course, one of the nicest compliments a quilter can receive is for someone to want to photograph their work. Or, perhaps, a quilt calls the viewer from across the room and soon, the viewer is nose close to the quilt seeing a different view all together from that angle! It is also wonderful to watch the viewer grab a friend and share their excitement of their "view!" Sometimes, the viewer snaps a photo. At this show, it is okay to take photos!!!

I saw people reading the story of each quilt, I heard the questions--"how did she do that?"  and "check out the fabric on the back!" I also heard a lot of "WOW" comments as quilts were viewed. People marveled at how Joanne accomplished each finish. I heard comments like, "this makes me want to go home and sew" and "well, I'm inspired!"

She also shared a number of her nest quilts and her latest series on shadow selfies. It was a terrific show of 114 pieces of her work!


Sunday, October 21, 2018

Red Bicycle (Gladys)--post 1

Supplies used to start the project
Cheryl Lynch was a presenter on "The Quilt Show" showing her projects made with her mini mosaics technique  and her curvalicious ruler. She made the process look like fun! In a rare move for me, I ordered a kit, the 3/8" cutting ruler and the curvalicious ruler.

About the time I ordered her kit and tools, our book club was reading "The Sweetness at the Bottom of the Pie" by Alan Bradley. The book is written for young readers and is a murder mystery. Eleven year old Flavia, the main character, finds a man taking his last breath in the family's cucumber patch. Her dad is arrested for the crime and Flavia sets out using her bicycle named Gladys to solve the murder. The author brings other sub plots into the story. You will have to read it to find out what happens.

Progress at the end of the first session
I decided the bicycle was the inspiration for a quilt. At first, I envisioned Dresden blocks as the wheels for the bicycle. I looked at various bicycle photos and drawings on line as I thought I could machine embroider a bicycle as part of my design. I also thought about appliquéing a bicycle. Then I saw Cheryl demonstrate her technique.  When I investigated her website, I saw she had a red bicycle pattern and also a pattern/kit of the bicycle for sale.  I decided it was serendipity so I ordered the kit and the ruler to try making a mini mosaic!

The kit contained the "grout" (fabric behind the pieces),  more than enough two inch squares for the design, the sticky stabilizer, the pattern, a piece of white tulle and a detailed instruction booklet. I cut a piece of foam core board and taped it together as she suggested. I cut the 3/8 inch squares by color as per the directions.  I used her ruler that she suggested. It worked like a charm. I'm glad that I purchased the ruler as cutting squares that small would have been a challenge! I put the little bits into muffin cups.
Ready to heat the fusible to all the pieces

I taped the pattern to the foam core board in the four corners. Then I removed the release paper from one side of the stabilizer and used the push pins to anchor it sticky side up on top of the pattern.

Then, it was time to play! At the end of a couple hours of play time, I had about one fourth of the design placed. I had planned to work on the project at a sew day at a friend's house; but, then I decided the foam core board would take up too much space. It was better for me to continue filling in the design. After about seven hours, I had finished the design. I had left the basket empty; but, then decided I could put the flowers in it after all. I free hand cut the petals and used glue to adhere the petals to the background. I also reworked the basket--removing the squares that had a little orange in them and replacing them with a brown square instead.

There was plenty of fabric in the kit for this project. I had squares left over. There are probably enough for a good start on a second bicycle! I laid the tulle over the top of the project and was disappointed at how dull the project became. I might try a different color tulle or I might leave it off all together. I plan to think about it for a few days!

It took me about eight hours to finish this part of the top. I have selected a small inner border fabric and a larger outer border fabric. I am pleased with my progress.

Wednesday, October 17, 2018

Alphabet Reference Sheets--Samples Stitched!

Monogram w/o stabilizer
The other day I had sewing time with Julie, Pat, Laura and Carol. I got to see Laura's new home and I received a personal tour of her studio--wow! What a large and organized space she has for creating.

I enjoyed seeing what everyone was stitching. I am inspired by both the projects and the processes used. Mainly, the positive energy was extremely helpful as I brought an embroidery project that I wasn't enthused about doing.

I brought my laptop with the Bernina V-8 software on it. I wrote the reference sheets for the alphabets to the machine to a USB stick. I selected a couple fonts that I thought might work for the project that Miss J and I started together. I created a few words using those fonts. My plan was to stitch the reference sheets on felt so that when I want to embroider words or letters, I have a sample I can review. I chose felt because everything is suppose to look good on it and I had a supply of it on hand.
Font samples in software

The following day, I began the stitching. In stitching the reference sheets, I was able to use bobbins of my embroidery thread. Sometimes, I have bits of bobbins that won't be enough for a design; but, there is too much thread to pull off to waste. This is the perfect place to use them. Besides, I needed the practice to build my confidence with embroidery. Being able to have empty bobbins for the next quilting or stitching related project is a total win!

The first sample I stitched was a cross stitch alphabet. I think that this is a cool idea and could see it on a baby quilt, on an apron or on a pillow. Unfortunately, there is a lot of tweaking needed for this alphabet as it stitched poorly on the felt. Why one letter would actually look like cross stitch and the others not so much is beyond my skill level right now.

The second sample I stitched was a flower alphabet. I could see this used on a towel and again, I saw similar challenges with the second sample as I saw with the first.
More font samples

The third sample was a monogram. I could see this on a shirt pocket or a cuff. It might work into a towel design or a napkin. For some reason, in one area of the design, the machine continually created a thread nest. I rethreaded the machine, I used a different thread color, I inserted a different needle. Finally, I advanced the stitching three stitches and it stitched. What was consistent with each sample was each looked awful!

For the fourth sample, I stitched the name of the font as the sample. I liked the idea of stitching the name of the font as the sample. This time, I also hooped a piece of cutaway stabilizer with the felt. The results were much better. I was told that felt doesn't need stabilizer. With this test, I learned that most fabrics need stabilizer. I will start with a piece and add more if needed!

Next week, I will print a portion of the reference guide for the software. Next month, I will print another portion. I figure in about three months, I will have printed the entire reference manual. (We opted to buy our ink through a company that monitors the number of pages we print and we purchased printing 100 pages a month. The reference manual is about 440 pages in length hence the number of months it will take to print it without having to pay an additional fee for the ink!)

I used 1 1/2 yards of felt. This year, I have used 37 1/2 yards of fabric from my stash and have 12 1/2 yards to go to meet my goal of using 50 yards of fabrics from my stash!

The next task with the embroidery, is to work out the words to use to use in the project that Josette and I started together. In between, I'll continue working on several projects. I'm making progress; but, no where close to a finish yet!!!

Sunday, October 14, 2018

Licensed to Cut Loose--post 2

Progress at the end of day 
The second day of class, my focus was on the butterfly body as there was just one of those so my scraps would work well. I also planned to map out another two sections of the wings with fabrics to show better contrast. Having a plan, made me feel like I could tackle the project again.

Susan's second critique was that she liked the smaller pieces of the wing that I had done first. I showed her some small scrap triangles that I had saved from a project and she gave me an idea of how to incorporate them into my piece which I loved! I was working on adding a wing section that was darker and she felt I was on the right track. My second day was so much better than my first!!! I am a beginner at this cutting loose stuff!!

I found Susan's lectures about how she adds tulle and netting as trims, how she finishes her quilts and how she edits her quilts to be full of valuable information. I have so much more to consider now! I look forward to finishing this project. I think it would be a fun activity for Miss J and for Miss K too. I will try to have a palette ready for them to play with me. Let's see what happens!

This was the third class Susan had taught since leaving her home state of Maine two weeks earlier. On the first day of class, she was coming down with a bad cold. I was impressed with her professionalism. She soldiered on in spite of how she felt. Many of the participants were oblivious to her predicament. I've taught when I didn't feel great and know what a challenge that is! Susan wrote a post about her classes in Sisters. You can read it here. The slideshows are GREAT!
Buck deer in the hotel parking lot
Unfortunately, a student in the class wore perfume that made me ill so it was really difficult to work. I didn't get to have a second critique from Susan as I just couldn't take the perfume smell!!! The class list was specific that no perfume or scented body lotion be worn during the class. My friend, JoJo, listened to Susan's lectures but, didn't participate in the class because the scent affected her breathing to the point of her maximizing the use of her quick acting inhaler. We spent a lot of money for the class and I was surprised that the issue, when brought to the attention of an employee, wasn't followed up on.

Does having breakfast in the hotel's grass
I appreciated that lunch was part of the class fee. We had a plethora of choices from The Depot which was almost across the street from the classroom.  I liked walking to lunch and having a change of scenery for an hour. The classroom had good lighting.  I liked that the parking was close to the outer door or the classroom.

I liked the Ponderosa Lodge (Best Western Hotel) where we stayed. The staff was super friendly and helpful. The breakfast that was part of our room was extra nice. We learned the eggs, sausage and potatoes were catered from The Sisters Saloon! We sampled the hotel amenities and had a personal view of the local wildlife.

On our first morning in Sisters, JoJo opened the curtains and saw a couple deer munching on the hotel grass.  Later, they moved just outside our patio door. As we were leaving for class, we saw two bucks that were munching the shrubbery outside the Hotel office!

I enjoyed a couple of dinners from Sno Cap during our stay too. If you are in Sisters, visiting Sno Cap, a little burger joint, is a must for the milkshakes alone! When I was a kid, it was the biggest deal to stop for a milkshake there. Had my family had more funds, I imagine that we would have been treated to burgers and fries too. The food is made to order and I chuckled at the signage that read "This is not fast food!"

All in all, it was all a terrific experience. I grew up in Central Oregon, actually about forty miles north of where Sisters is located. It was nice to reacquaint myself with frosty mornings and 70 degree afternoons! It was extra special to share the experience with JoJo. As for the "rest" of the story with the butterfly, I have many more hours ahead. As I play with the pieces and get more of the sections filled, I'll post my progress.

Next up is stitching the font samples of alphabets in my embroidery software.


Wednesday, October 10, 2018

Licensed to Cut Loose--post 1

Susan giving the intro to her technique
At the end of September, my friend JoJo and I took a class in Sisters, Oregon from Susan Carlson. Ever since I saw Susan on an episode of "The Quilt Show," I have wanted to take a class from her. Susan lives in Maine so opportunities to learn from her when I live in Oregon were limited! JoJo noticed from one of her blog posts that she was going to be in Oregon teaching two classes at the Stitchin' Post.

Immediately, we signed up for the only open class which was a two day class to learn Susan's technique. I signed up March of 2017 for the September 2018 class!

Fabrics ready for play time
You had the choice of collaging a fish, a bug or a butterfly. I chose a butterfly. I was excited because I have been saving scraps for years. I reviewed the supply list. Batiks seemed to be the favored fabrics. I had a bunch of batiks that had a design in the fabric. I didn't have many of large motif prints; but, I took what I had.

I sorted my scraps into colors. I took a tub of batik scraps from Martha's sewing room. I reviewed the blog posts recommended to read. I reviewed Susan's book. I purchased the swallowtail butterfly pattern, enlarged it and transferred it to a piece of muslin. I was ready for class.

Learning to cut interesting lines
In the first hour of the class, Susan talked about fabric selection and she brought out samples. She told us to cut some shapes about the size of our palm with gentle curves. Oh-oh. . . .I was in trouble as my scraps were mostly small. I tried to so as she suggested. I did understand the importance of having a selection of scraps that were more like chunks instead of strips and squares!

Susan giving a "smoosh" lesson

After my first critique with Susan, she suggested that I build one side of the butterfly which was a great thought. As I pulled my scraps, I put aside similar scraps for the other side. She said the first step of the process was like a rough draft or the messy stage. The second step was the second draft and a refining of the shape stage. I learned to cut the shapes following the lines on the design. If there weren't lines on the design, I learned different ways of cutting the edge so that there would be an interesting line shape.

At the end of the first day, I learned that I would have been much further along had I a collection of Kaffe type prints. Susan suggested that I not trim the scraps and to use the shapes that I had as they were.
Rough draft or the messy stage


Then, she demonstrated what she meant. In about ten minutes, she moved some shapes around in her method of working with fabrics. I can tell that the smooshing and placement of fabrics is a Zenlike process for her. Her parting words of wisdom to me was to "cut loose!"

I took the project and my scraps back to the hotel and spent another four hours trying to make some progress.  It was tough. I liked the smaller shapes; but, it is a class. I paid a huge fee so it was to my betterment to follow through with her advice in doing the homework. (At least, this was some of the self-talk I engaged in as I worked.)
Progress at the end of day one

At the end of the day, I had two parts of the butterfly wing completed. I liked the side I had done in class with the smaller pieces much better than the side I did as homework with the larger pieces. I was glad that I had done both versions because now I knew which I liked better.

I was disappointed with how the wings looked as there just wasn't enough contrast. I was disappointed that I hadn't done more than those two sections!!! Also, my body was in rebellious mode as my back, neck and shoulders hurt from bending over my work all those hours!

JoJo provided lots of positive feedback and offered constructive comments as well as asked some great questions during the evening. After a good dinner, a soak in the hot tub and a fair amount of shut eye, I decided that I would continue with the process to learn all that I could. I was determined to at least fill all the spaces and then decide if I was finished or if I wanted to re-evaluate and quilt/embellish the piece.

I was thankful for JoJo's encouragement. Good friends are so dear!

Sunday, October 7, 2018

Goals for October


Marci Girl DesignsThis month is the beginning of the fourth quarter Finish-A-Long. It is a great on line group with few rules. Since joining in on the fun, I've finished projects that have languished about in the studio for years AND I've been inspired by so many others. Yes, I've spent way too much time reviewing their posts; but, it was worth the internet time! Soon it will be time to post intentions for this quarter. if you are interested, check the link above. You can join any quarter.

I appreciate the moderators and I've even won a cool prize a couple of times. Finishing projects, being inspired and being a winner. . .well, one can't go wrong!

Quilt the center of this project
I've many projects on my fourth quarter list to finish. To maximize the number of finishes for the quarter, I decided I would set myself some goals for the month. I've found a list is a good start and having a written plan to refer to helps me stay on track!

In no particular order I've outlined my goals. I want to quilt the center of the mystery BOM. I'm thinking about curves; I'm thinking about using rulers. I've drawn some shapes. I've selected some threads. . . well, let's see what happens! I'm actually getting excited about returning to this project!

Makings for four stockings
The holiday season is approaching. There were four pairs of mini stockings cut out in a bag of scraps of Martha's treasures. These might make cute package tags or ornaments for gifts. I'll try to stitch them.

Earlier this week, I started working on the Cheryl Lynch kit of the bicycle. I would like to finish that project this month. I did enjoy the process. I have to say that there were plenty of fabrics in the kit as I had enough fabrics left for a good start on a second wall hanging!!

Finish the Cheryl Lynch Bicycle
I chose the fabric for the inner and outer border. The directions say to start the quilt sandwich. Place some tulle over the top and stitch the border to the quilt in the sandwich stage. I'm not sure how that will work; but, I'm game to try. Also, I want to audition different tulle over the flowers; but, will need to purchase some.
#5. Stitch this hot pad
Get this project to the layered stage
I plan to print a portion of my machine reference guide from my embroidery software. I plan to stitch the reference files for the alphabets. I so want to learn the ins and outs of lettering. If I had a better handle on how to stitch lettering and was confident with the outcome, I would use this feature more often in my quilts. At this point, I'm disappointed in my results; but, I'm too much of a novice to understand where to make changes so I am happy with the results!

I know machine embroidery takes practice to make improvements. Getting my machine set up for embroidery takes some doing. Consequently, I don't do it often enough to get comfortable with the basics of machine embroidery. Moving forward, my goal is to stitch something weekly. . .even if it is a sample of a motif available in the software.

Part box for baby sandals 
I also plan to get the Karen Kay Buckley project to the layered stage. I learned so many hints from her class. I had purchased her templates; but, wasn't so enamored with the results of my circles. Turns out I didn't use heavy enough thread!

Martha had made the cutest fabric sandals for a baby. She had a box of "parts." I plan to make four pair this month. There is plenty of fabric in the box for many more pairs, but, this is going to be the start for now. She also had a few pairs in process. These pairs I will use as samples as I work through the steps. At some point, I will stitch the box into useable little shoes which will be gifted to an organization. . .although I will probably keep a pair or two for future baby gifts!

Finally, I've had a hot pad on my list for a couple of years. It is time to actually make it! It is a doable outline. Nothing is hard and fast so if I find myself playing in another project, that is okay too. Quilting is supposed to be fun!


Wednesday, October 3, 2018

Projects--4th Quarter Finish-A-Long 2018

#1. Add the fun quilting to this mystery BOM
I made terrific progress last quarter as I finished 12 of the 24 projects on my list! This quarter, I'm carrying over the other 12 projects and I'm adding more! My goal at the end of this quarter is to start with a dozen of "new" finishes for the new year!

It seems to be a good balance for me to intersperse big projects with smaller ones. I also seem to make better progress when I make weekly or monthly goals on projects that have been in the queue for a long time.

#1. Finish the quilting of this mystery BOM that I started in 2015. Last quarter, I completed the ditch quilting. I pulled some variegated threads from my stash and am doodling some motifs that I might want to use. Sometimes, inspiration is a long time in coming to me!!

#2. Complete trio of sisters
#2. Finish the trio of sisters that I started last quarter. This is a book club quilt. It is the first time that I've drawn a figure and then painted the details on cloth. I had great help from my almost five year old grand to draw the faces.

#3. Finish the machine applique of a piece began in a Karen Kay Buckley class last May.
#3. Finish the machine applique for this piece first
#4. Stitch a skirt with this fabric

#4. Stitch this gingham fabric into a skirt for one of the grands. It's been on the list for over a year.
#5. Stitch this hot pad
#6. Get this project out of the fabric phase

#5. Get this project from the fabric stage to the finished stage. It's been on the list for over two years.

#6. Make some progress on this project. It's been in the fabric stage for over two years. 
#7. A potential hat or purse?

#7. I made a skirt out of this fabric for one grand. Last quarter, I made a vest. I still have leftovers. So. . .it may become a hat or a purse for the youngest grand.

#8. Make two kitchen towels
#9. Stitch a second selvage tote
#10. Chicken placemat kit
#8.  Stitch the leftover bits from a previous kitchen towel goal into two more towels.

#9. In the first quarter, I made a tote with these fabrics and selvages. I had planned to add a pocket to the back of the tote; but, didn't because I would have sewn over my inside pockets. I'd like to make another tote and put that pocket to good use! I'm not sure that I have enough of the rust. . . .but, I guess that is part of the journey to choose a fabric that will mix or another one all together!! Perhaps, I can use the lining fabric from the last tote to make the pockets. I will need to select a coordinating fabric for the lining.

#10. For Christmas, I received this placemat kit. The chicken pattern is cute. It is time to stitch it up!!
#11. Play with this mosaic design

#11.  Play with a mosaic design that Cheryl Lynch shared on an episode of The Quilt Show. (Note: You do have to be a member of the online group to access her episode. So far, I have found the annual fee worth paying. I've been a member since the show began.)

#12. Add some embroidery to the color block squiggle and get that piece finished!
#12. Add some embroidery to this project

#13. Appliqué, quilt and bead
#13. Finish the appliqué, quilt and bead this piece. It was on the list last quarter.

#14. Stitch another Stash and Go bag
#15. Paper pieced greeting card
#14. Make another stash and go bag. I'm determined to develop better skills with the binding! The fabric was leftover from cutting out a halter dress last quarter.
#16. Raw edge applique

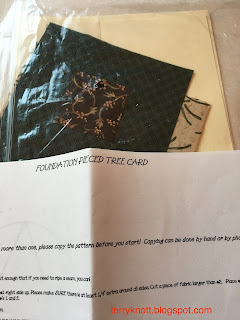
#15. Make a paper pieced tree that becomes a greeting card. This was in a box of supplies of my friend Martha. She will be smiling when I work on it!

#16. Continue progress on the piece began in September in a Susan Carlson class.

#17. Work with Miss J to finish embroidering her artwork. Miss J will determine what it will be. . .!!

#18. Stitch four pairs of sandals from Martha's supplies.

#19. Stitch a bag with the black mesh and webbing that I bought last fall at a quilt/craft show.

#17. Miss J's embroidery project
#18. Sandals waiting to be stitched
#19. Grocery tote bag
#20. Skirt for Miss K to sew
#21. Make a pop up
#20. Stitch a skirt with Miss K. This looks like a fun project and the supplies were given to me.

#21. Make a pop up container. I bought several of these at a show some time ago. It would make a nice gift.

#22. Make these four stockings. They were in a bag of scraps from Martha's treasurers.

#23. Make a quilt for the book, "The Snow Child." I'm part way through the book so I'm just forming an idea. Maybe I'll do some more drawing and painting. I'm thinking red mittens and a blue coat.  Perhaps, Miss J will help me refine my drawing!

#24. Make four potholders from this pattern. It was a Martha project.
#22. Stockings--4 pair

#23. Make a quilt with this
book as the inspiration
#24. Potholders--4
It's a big list. . .again! I believe that there is a enough variety to keep me busy if I'm stumped on another project. I do plan to make some monthly goals because taking a big list and subdividing it into smaller sections will help me progress.